nateman_doo
Omnipotent Enthusiast

- Total Posts : 8452
- Reward points : 0
- Joined: 2008/01/16 16:16:54
- Location: NOT the Jersey shore
- Status: offline
- Ribbons : 56

Re:SR2 build Project Super Deco
2011/06/14 03:35:04
(permalink)
|
Gratuitous
FTW Member

- Total Posts : 1109
- Reward points : 0
- Joined: 2011/03/16 04:30:23
- Location: California
- Status: offline
- Ribbons : 4


Re:SR2 build Project Super Deco
2011/06/14 08:32:18
(permalink)
Yes you have linked the correct base. I believe the standard spacing to be 80mm and I think that it would look best with only that set of holes. when I made the sample I included the spacing for the 775, and 1156 sockets. I printed your pdf and will check it later today. I also want to actually mount my sample so I can see if the slight modification to the flow I have made will work, and to benchmark the temp. I have been thinking of adding some blind 16th" holes in the underside of the top inside where the o-ring sits to increase surface area of water contact. what do you think?
“I built a castle in the swamp and it sunk. I built a second castle and it sunk too. I built a third castle and it burned down and then sunk. But the fourth castle, Ahhhh! That one stood.” —Monty Python and the Holy Grail
|
nateman_doo
Omnipotent Enthusiast

- Total Posts : 8452
- Reward points : 0
- Joined: 2008/01/16 16:16:54
- Location: NOT the Jersey shore
- Status: offline
- Ribbons : 56

Re:SR2 build Project Super Deco
2011/06/14 09:46:20
(permalink)
Right, 80mm. I was thinking 90 for some reason.
I was also thinking blind & tapped hole for the block to mount it to the motherboard, but might be a pain in the rear to take apart, but may look better. So long as you can get to the underside of the block-it shouldn't be a problem.
When you say adding blind holes inside for surface area of water contact, you don't mean to bolt down right? I was going to ask if you wanted to have some extrusions or anything done to the inside of it. Could probably chew some material out with an 0.125 end mill or something.
One thing about my pdf, it was different from your original. I just mated the radius of the 2.75" arc, tangent to the .2" radius of each end. I think you had a .375" radius on each side prior to the .2" radius ends.
|
nateman_doo
Omnipotent Enthusiast

- Total Posts : 8452
- Reward points : 0
- Joined: 2008/01/16 16:16:54
- Location: NOT the Jersey shore
- Status: offline
- Ribbons : 56

Re:SR2 build Project Super Deco
2011/06/14 11:17:34
(permalink)
This is what I mean:  Your block has these extra 2 radius on each side of the armature. Mine just mates the 2 end circles, with the larger 2.75 arc. Not sure how much of a difference it would make. I am sure I could figure out the placement of those circles and just use what you have. probably would be safer then me redesigning the wheel.
Attached Image(s)
|
nateman_doo
Omnipotent Enthusiast

- Total Posts : 8452
- Reward points : 0
- Joined: 2008/01/16 16:16:54
- Location: NOT the Jersey shore
- Status: offline
- Ribbons : 56

Re:SR2 build Project Super Deco
2011/06/14 11:36:43
(permalink)
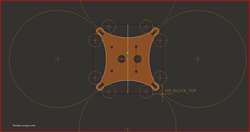
You know, I just realized that I am an idiot. I was trying to get the dimensions when it hit me, I don't need them. You did it already. I need the tool path, which I just figured out:  The tool path is the yellow line, and those small radius (plural-radii?) are highlighted in red. Mission planning is complete.
Attached Image(s)
|
Gratuitous
FTW Member

- Total Posts : 1109
- Reward points : 0
- Joined: 2011/03/16 04:30:23
- Location: California
- Status: offline
- Ribbons : 4


Re:SR2 build Project Super Deco
2011/06/14 14:16:24
(permalink)
yes! i love the idea of blind block to top mounting, also looks like you nailed the radiuses with that last post. one thing I noticed from your pdf though is that the 4 block mounting holes should not be the same spacing. 2 of them on the right are diferent than the two on left. I will mark it and dimention it for you when I get back to the right office. but it should be good to go on the solid modle (2nd one) I sent. Yes, I am thinking a little extrusion and/or some small depth holes to add surface area and volume to the water chamber. I will have to lay out where dd has placed their o-ring for you.
“I built a castle in the swamp and it sunk. I built a second castle and it sunk too. I built a third castle and it burned down and then sunk. But the fourth castle, Ahhhh! That one stood.” —Monty Python and the Holy Grail
|
nateman_doo
Omnipotent Enthusiast

- Total Posts : 8452
- Reward points : 0
- Joined: 2008/01/16 16:16:54
- Location: NOT the Jersey shore
- Status: offline
- Ribbons : 56

Re:SR2 build Project Super Deco
2011/06/14 17:55:07
(permalink)
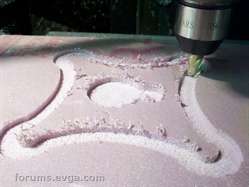
The hard part is the outside. As long as I get the coordinate system of the holes, thats all that matters. The bottom left corner should be X0 Y0
You get me the hole coordinates, and I will get the outer shell. outline with 3/8" end mill. (unless you wanna give your cam program a crack at that)
|
Gratuitous
FTW Member

- Total Posts : 1109
- Reward points : 0
- Joined: 2011/03/16 04:30:23
- Location: California
- Status: offline
- Ribbons : 4


Re:SR2 build Project Super Deco
2011/06/14 20:01:47
(permalink)
sure, I will plug it into cam later tonight. should be only a few lines of code compared to the last stuff I sent you, lol
so how do you want your holes? pecked? spiral ramped? or just located centers for transfer to drill press?
“I built a castle in the swamp and it sunk. I built a second castle and it sunk too. I built a third castle and it burned down and then sunk. But the fourth castle, Ahhhh! That one stood.” —Monty Python and the Holy Grail
|
nateman_doo
Omnipotent Enthusiast

- Total Posts : 8452
- Reward points : 0
- Joined: 2008/01/16 16:16:54
- Location: NOT the Jersey shore
- Status: offline
- Ribbons : 56

Re:SR2 build Project Super Deco
2011/06/14 20:18:48
(permalink)
just the coordinates for the centers. I'll write the code for that (easy as anything) I will have to change drill bits so that will be about the extent of that operation. Then bolt it through the existing bolt holes I just drilled, then cut out the shell.
|
nateman_doo
Omnipotent Enthusiast

- Total Posts : 8452
- Reward points : 0
- Joined: 2008/01/16 16:16:54
- Location: NOT the Jersey shore
- Status: offline
- Ribbons : 56

Re:SR2 build Project Super Deco
2011/06/15 05:41:23
(permalink)
Its ok, you can sleep in. I just finished plotting all of the coordinates. 10 hole centers, 16 points, and 3 radii.
You made a perfect mirror part. All X's & Y's are a perfect mirror. Glad I used your drawing instead of trying to re-invent the wheel.
|
Gratuitous
FTW Member

- Total Posts : 1109
- Reward points : 0
- Joined: 2011/03/16 04:30:23
- Location: California
- Status: offline
- Ribbons : 4


Re:SR2 build Project Super Deco
2011/06/15 10:22:45
(permalink)
“I built a castle in the swamp and it sunk. I built a second castle and it sunk too. I built a third castle and it burned down and then sunk. But the fourth castle, Ahhhh! That one stood.” —Monty Python and the Holy Grail
|
nateman_doo
Omnipotent Enthusiast

- Total Posts : 8452
- Reward points : 0
- Joined: 2008/01/16 16:16:54
- Location: NOT the Jersey shore
- Status: offline
- Ribbons : 56

Re:SR2 build Project Super Deco
2011/06/15 10:24:05
(permalink)
can't see pic at work :(
stuck here a few more hours. Can you attach directly?
I am writing up the G-code for the outer shell as we speak.
|
Gratuitous
FTW Member

- Total Posts : 1109
- Reward points : 0
- Joined: 2011/03/16 04:30:23
- Location: California
- Status: offline
- Ribbons : 4


Re:SR2 build Project Super Deco
2011/06/15 10:26:28
(permalink)
give me a min and I will e-mail them to you
“I built a castle in the swamp and it sunk. I built a second castle and it sunk too. I built a third castle and it burned down and then sunk. But the fourth castle, Ahhhh! That one stood.” —Monty Python and the Holy Grail
|
Gratuitous
FTW Member

- Total Posts : 1109
- Reward points : 0
- Joined: 2011/03/16 04:30:23
- Location: California
- Status: offline
- Ribbons : 4


Re:SR2 build Project Super Deco
2011/06/15 17:50:08
(permalink)
“I built a castle in the swamp and it sunk. I built a second castle and it sunk too. I built a third castle and it burned down and then sunk. But the fourth castle, Ahhhh! That one stood.” —Monty Python and the Holy Grail
|
ajohnes2
iCX Member

- Total Posts : 282
- Reward points : 0
- Joined: 2008/01/23 18:46:32
- Status: offline
- Ribbons : 0


Re:SR2 build Project Super Deco
2011/06/15 18:01:44
(permalink)
Looks very good and I can only imagine how nice it will look in the sandblasted copper.
|
nateman_doo
Omnipotent Enthusiast

- Total Posts : 8452
- Reward points : 0
- Joined: 2008/01/16 16:16:54
- Location: NOT the Jersey shore
- Status: offline
- Ribbons : 56

Re:SR2 build Project Super Deco
2011/06/15 18:43:42
(permalink)
ajohnes2
Looks very good and I can only imagine how nice it will look in the sandblasted copper.
rumor has it, your looking for some of these copper tops too ;)
|
ajohnes2
iCX Member

- Total Posts : 282
- Reward points : 0
- Joined: 2008/01/23 18:46:32
- Status: offline
- Ribbons : 0


Re:SR2 build Project Super Deco
2011/06/15 19:32:12
(permalink)
Indeed I just do not have the bottoms to get only the tops made. These tops would look great with the motherboard block, but I would need to figure out the bottom design.
|
nateman_doo
Omnipotent Enthusiast

- Total Posts : 8452
- Reward points : 0
- Joined: 2008/01/16 16:16:54
- Location: NOT the Jersey shore
- Status: offline
- Ribbons : 56

Re:SR2 build Project Super Deco
2011/06/15 19:41:21
(permalink)
It would look pretty sweet matching the CPU blocks to the SR2 blocks. All sandblasted copper.
|
Gratuitous
FTW Member

- Total Posts : 1109
- Reward points : 0
- Joined: 2011/03/16 04:30:23
- Location: California
- Status: offline
- Ribbons : 4


Re:SR2 build Project Super Deco
2011/06/15 19:57:48
(permalink)
so a solution to the bottom part would be for us to put together a bulk buy from dd. If you are interested in this aproach then I can contact them and see if they will sell us just the bases. I would be willing to bet that even with the purchase nate could get the total block out the door for a very reasonable price for a custom block.
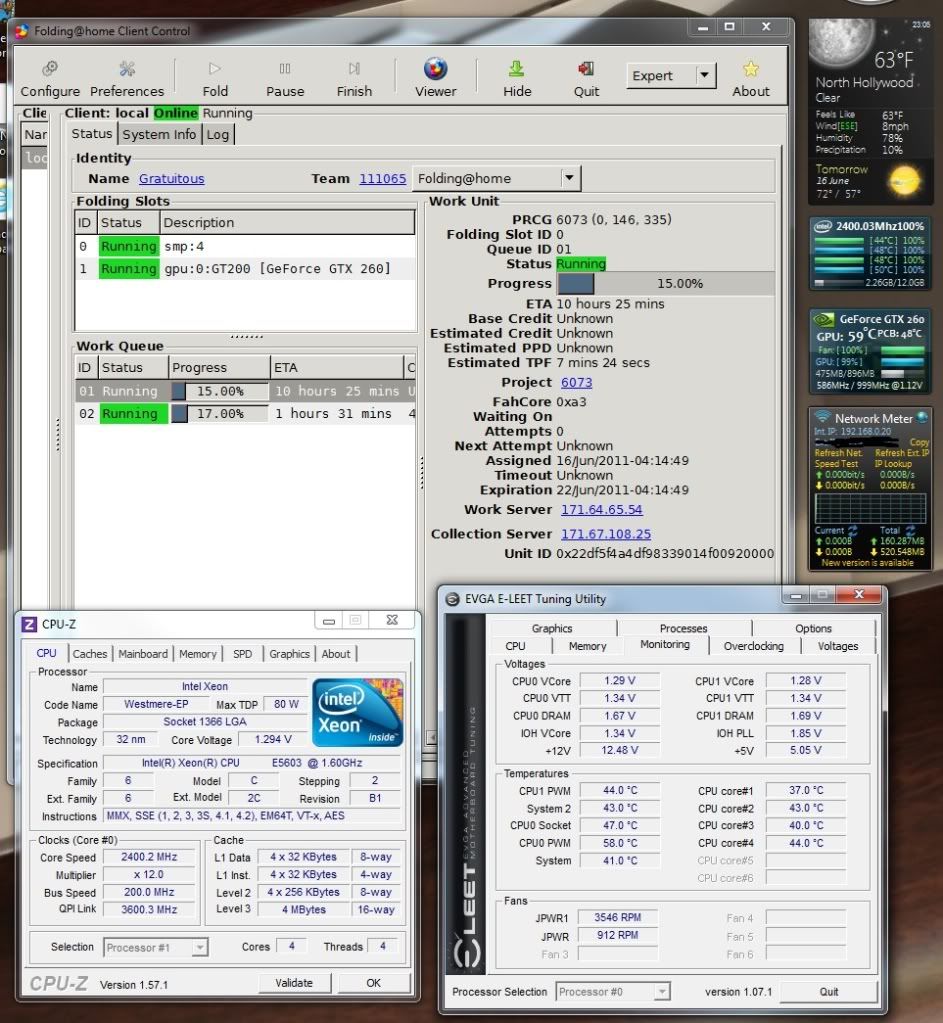
now on the temps with this design. I am noticing a consistant 7-15 degree lower temp than with air. I am waiting for the room ambient to reach similar to last night when i benched with air. and this is with the acrylic test piece mounted quickly on a used base that has some scratches on it, and crappy cheep paste. I would be willing to bet that with a new lapped bottom and good tm seat job, that the temps will stay consistantly comparable to whatever block you want to pit it against.
I will post my benchmarks for this test setup on a single 5603 overclocked to 12x200 in the morning.
“I built a castle in the swamp and it sunk. I built a second castle and it sunk too. I built a third castle and it burned down and then sunk. But the fourth castle, Ahhhh! That one stood.” —Monty Python and the Holy Grail
|
Gratuitous
FTW Member

- Total Posts : 1109
- Reward points : 0
- Joined: 2011/03/16 04:30:23
- Location: California
- Status: offline
- Ribbons : 4


Re:SR2 build Project Super Deco
2011/06/15 22:39:16
(permalink)
  so the top is air with a generic coolermaster aftermarket cpu cooler with 2 120mm fans mounted to it. bottom is the new block. room temp was 25 degrees c in both tests and the only diferance is the work unit is diferant so may be slightly higher or lower load(don't know if this maters) 100% cpu for at least 4 hours before each test. obviously I don't have my nateman chipset cooler on yet so that is why the chipset and vreg temps are high.
post edited by Gratuitous - 2011/06/15 23:20:30
“I built a castle in the swamp and it sunk. I built a second castle and it sunk too. I built a third castle and it burned down and then sunk. But the fourth castle, Ahhhh! That one stood.” —Monty Python and the Holy Grail
|
uliena
New Member

- Total Posts : 23
- Reward points : 0
- Joined: 2009/04/04 10:56:05
- Status: offline
- Ribbons : 0

Re:SR2 build Project Super Deco
2011/06/15 22:46:56
(permalink)
That sure is a very nice design.
|
Gratuitous
FTW Member

- Total Posts : 1109
- Reward points : 0
- Joined: 2011/03/16 04:30:23
- Location: California
- Status: offline
- Ribbons : 4


Re:SR2 build Project Super Deco
2011/06/28 15:22:51
(permalink)
“I built a castle in the swamp and it sunk. I built a second castle and it sunk too. I built a third castle and it burned down and then sunk. But the fourth castle, Ahhhh! That one stood.” —Monty Python and the Holy Grail
|
ajohnes2
iCX Member

- Total Posts : 282
- Reward points : 0
- Joined: 2008/01/23 18:46:32
- Status: offline
- Ribbons : 0


Re:SR2 build Project Super Deco
2011/06/28 15:33:57
(permalink)
I am so excited to get mine Gratuitous. Cannot wait to put them on the SR-2 and get it under water. I just need to order the Danger Den blocks to get them here and ready to go.
|
derrickjfile
New Member

- Total Posts : 62
- Reward points : 0
- Joined: 2010/07/21 07:19:54
- Location: Omaha, NE
- Status: offline
- Ribbons : 0

Re:SR2 build Project Super Deco
2011/06/30 15:37:53
(permalink)
Excellent work, keep it up!
|
nateman_doo
Omnipotent Enthusiast

- Total Posts : 8452
- Reward points : 0
- Joined: 2008/01/16 16:16:54
- Location: NOT the Jersey shore
- Status: offline
- Ribbons : 56

Re:SR2 build Project Super Deco
2011/06/30 16:26:22
(permalink)

Attached Image(s)
|
Gratuitous
FTW Member

- Total Posts : 1109
- Reward points : 0
- Joined: 2011/03/16 04:30:23
- Location: California
- Status: offline
- Ribbons : 4


Re:SR2 build Project Super Deco
2011/06/30 16:44:42
(permalink)
“I built a castle in the swamp and it sunk. I built a second castle and it sunk too. I built a third castle and it burned down and then sunk. But the fourth castle, Ahhhh! That one stood.” —Monty Python and the Holy Grail
|
ajohnes2
iCX Member

- Total Posts : 282
- Reward points : 0
- Joined: 2008/01/23 18:46:32
- Status: offline
- Ribbons : 0


Re:SR2 build Project Super Deco
2011/06/30 16:55:18
(permalink)
I am waiting to get the tops and some foam blocks like with the EVGA foam. 
|
nateman_doo
Omnipotent Enthusiast

- Total Posts : 8452
- Reward points : 0
- Joined: 2008/01/16 16:16:54
- Location: NOT the Jersey shore
- Status: offline
- Ribbons : 56

Re:SR2 build Project Super Deco
2011/06/30 18:21:48
(permalink)
|
nateman_doo
Omnipotent Enthusiast

- Total Posts : 8452
- Reward points : 0
- Joined: 2008/01/16 16:16:54
- Location: NOT the Jersey shore
- Status: offline
- Ribbons : 56
|
Gratuitous
FTW Member

- Total Posts : 1109
- Reward points : 0
- Joined: 2011/03/16 04:30:23
- Location: California
- Status: offline
- Ribbons : 4


Re:SR2 build Project Super Deco
2011/07/02 23:08:30
(permalink)
now thats what I'm talking about. I love it when a plan comes together 
“I built a castle in the swamp and it sunk. I built a second castle and it sunk too. I built a third castle and it burned down and then sunk. But the fourth castle, Ahhhh! That one stood.” —Monty Python and the Holy Grail
|