mallorian
New Member

- Total Posts : 9
- Reward points : 0
- Joined: 2021/07/24 13:42:29
- Status: offline
- Ribbons : 0

Probably overthinking it but I feel the manual could have used at least a word or two besides the basic photo, I have a WD black 1tb sn850 and just want to make sure I optimize the thermal pads with it. Orange circle 1, pro tip use 5mm socket to remove because the teeth will pop off just breaking the factory torque when loosened. Probably didn't need to remove but was just following directions in order. Orange circle 2 **** My problem mostly stemmed from not realizing the included screws separated into a riser and a screw and was attempting to use as a screw only **** Square 3, assumedly I put a thermal pad here? seems strange to sit over a chip in first 2 boxes and flush in last one, im so hesitant to place something over multiple solderings out of fear lol. The thinner pad if double sided nvme and thicker if single sided. Both sizes provided. I dont quite see how this helps transfer heat if anyone can explain be greatly appreciated. also can I use a another piece to extend (fill in) until the mounting screw? any benefit of this? does it transfer heat on that side to motherboard or is it more for stability? 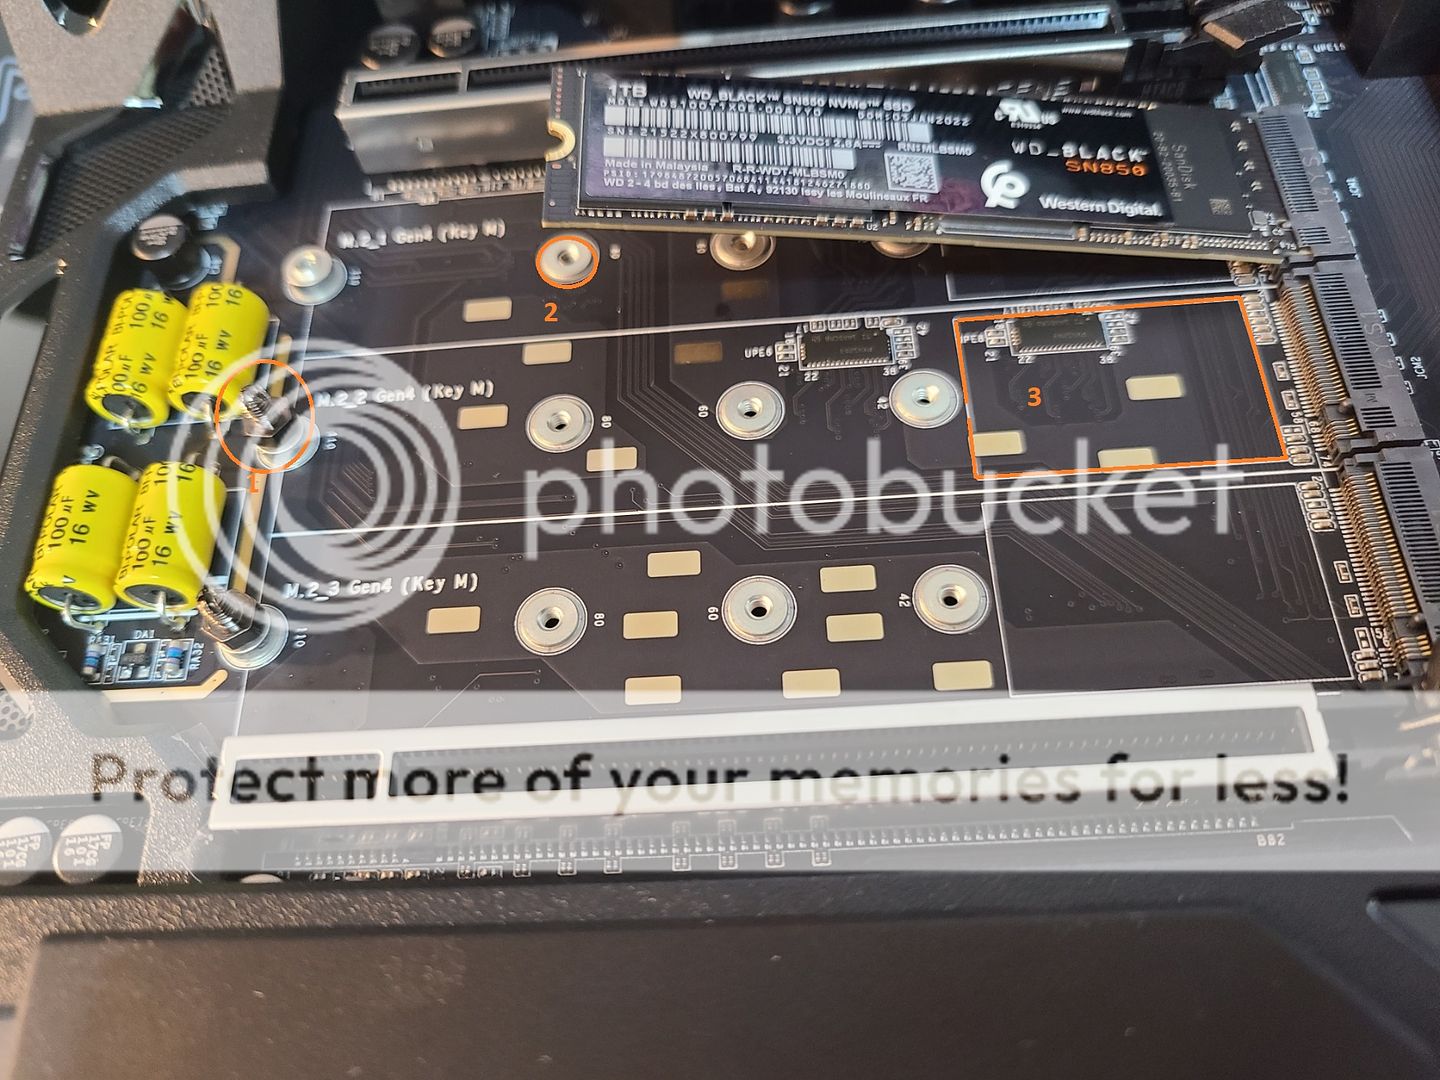 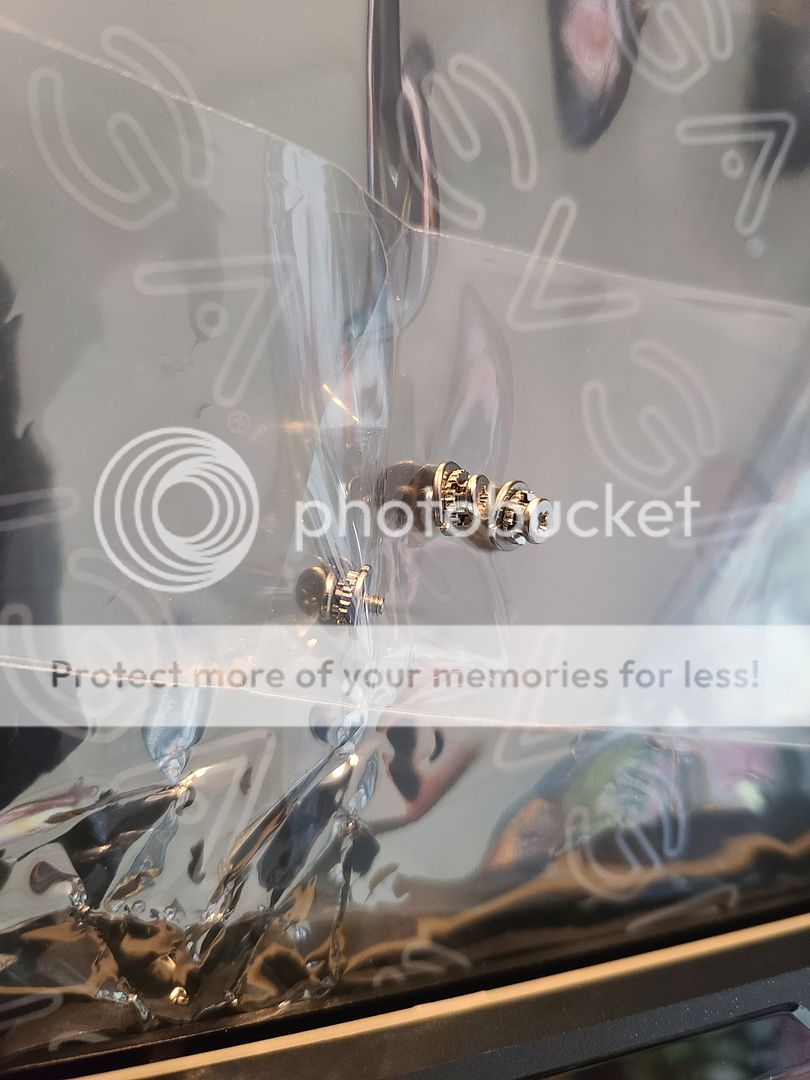 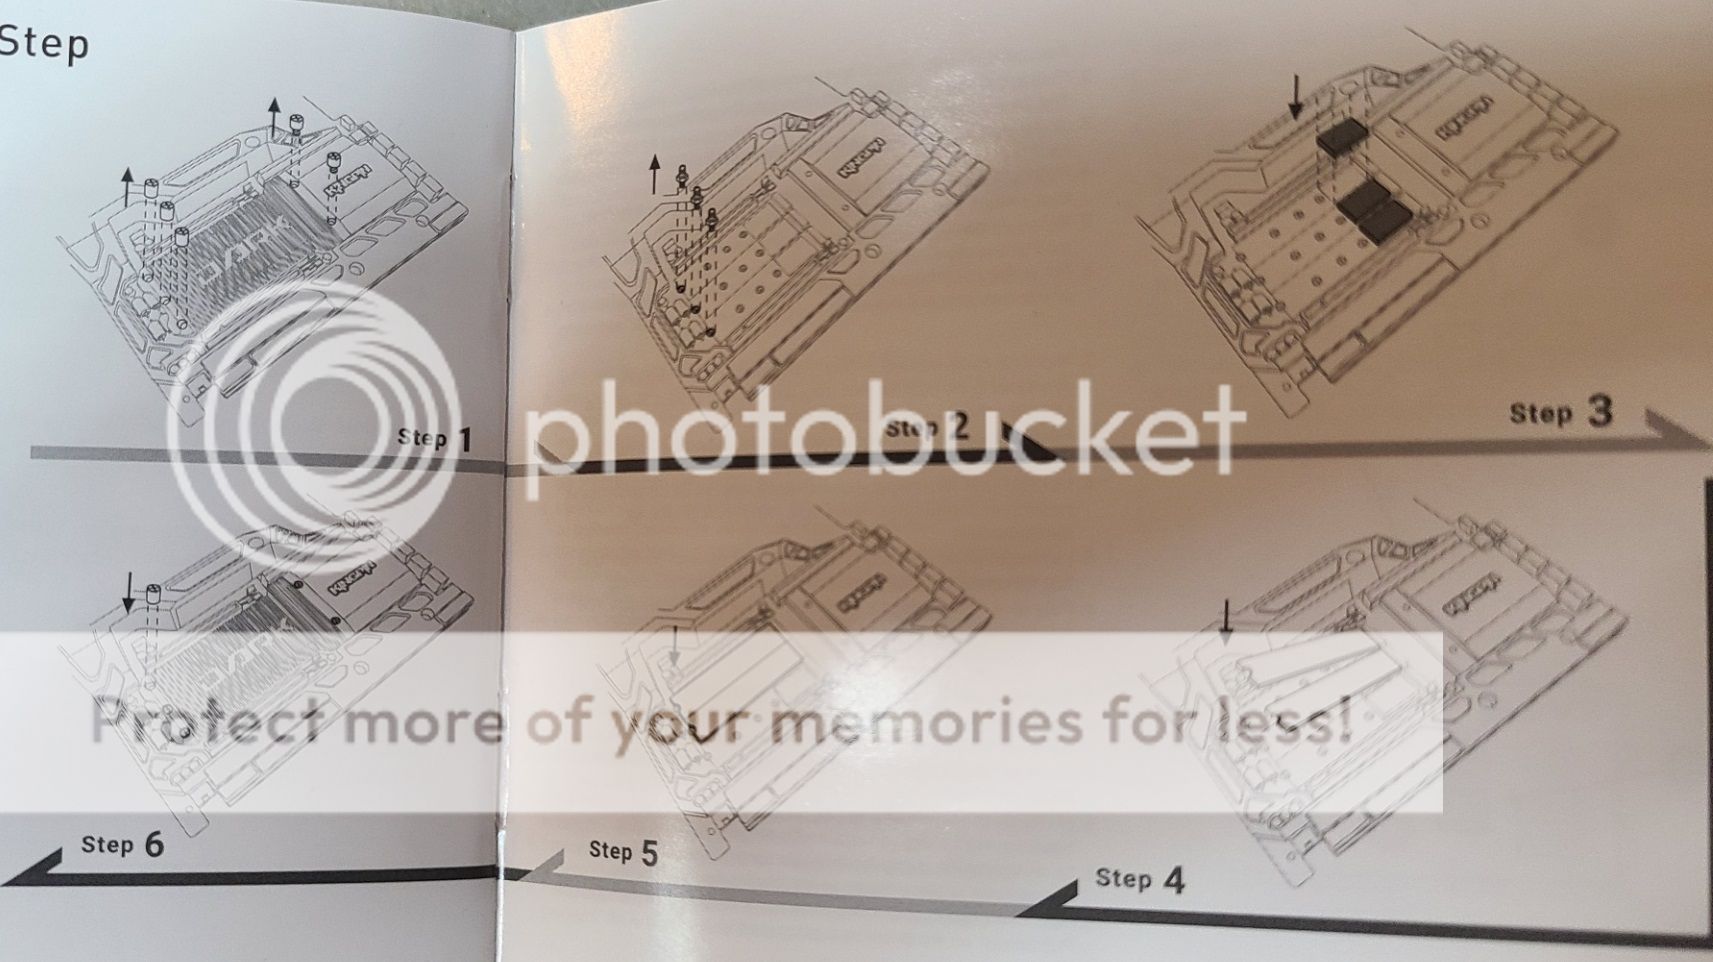 This is the manual, step one remove cover and screws, check step two remove the screws that mounted the heatsink (not required for shorter cards remember 5mm not screw driver) step 3 grey square assumedly thermal pad? peel both sides? (probably unfounded fear of conductivity) step 4 lay in and press down the nvme (assume find extra screws and separate into a riser and install prior to nvme) step 5 im guessing the arrow means use screw step 6 replace heatsink, assuming remove the backing off of it first I have done plain installs of NVME before and seemed more straight forward, being a performance build and pricey i am being extra careful but i cannot be the only one struggling here? any help appreciated, I will update thread as I figure it out or answers are provided. Thank you
post edited by mallorian - 2022/04/11 21:18:26
|
ideasash
New Member
- Total Posts : 40
- Reward points : 0
- Joined: 2021/11/04 09:23:54
- Status: offline
- Ribbons : 1

Re: Installing NVME Z690 Kingpin Dark
2022/04/11 22:06:02
(permalink)
☄ Helpfulby mallorian 2022/04/12 13:38:41
I just used the one pad in the outlined area, and used the provided tiny screw for the NVME, I mounted (2) drives, used (2) pads. As for transferring heat its probably very low thermal transfer pad in terms of W/M-K.
 GEARS = EVGA Z390 DARK / INTEL i9 9900KF / G.SKILL SNIPER X 2x16GB / NVIDIA RTX 3090 FE / SAMSUNG EVO PLUS 2TB / EVGA SuperNOVA 1000 P6 / PHANTEKS Evolv X / LG C1 48" / LG CX 48" / EVGA X20 Mouse / DECK HASSIUM PRO KB / VINTAGE EVGA X58 CLASSIFIED SR-2 / GEARS = EVGA Z390 DARK / INTEL i9 9900KF / G.SKILL SNIPER X 2x16GB / NVIDIA RTX 3090 FE / SAMSUNG EVO PLUS 2TB / EVGA SuperNOVA 1000 P6 / PHANTEKS Evolv X / LG C1 48" / LG CX 48" / EVGA X20 Mouse / DECK HASSIUM PRO KB / VINTAGE EVGA X58 CLASSIFIED SR-2 /
|
zippytek
FTW Member

- Total Posts : 1185
- Reward points : 0
- Joined: 2020/10/06 17:25:35
- Status: offline
- Ribbons : 9
Re: Installing NVME Z690 Kingpin Dark
2022/04/12 12:04:55
(permalink)
☄ Helpfulby mallorian 2022/04/12 13:38:34
any time you install a thermal pad on anything, you always need to peel off the plastic. the pad can't do its job with a layer of plastic in the mix. looks like you figured it out tho, good work
|
mallorian
New Member
- Total Posts : 9
- Reward points : 0
- Joined: 2021/07/24 13:42:29
- Status: offline
- Ribbons : 0
Re: Installing NVME Z690 Kingpin Dark
2022/04/12 13:26:24
(permalink)
Definitely got it in once I figured out the screw situation (took me a bit longer than I care to admit haha) I just wasnt sure what the bottom pads real job was, definitely not my most intuitive moments here but I still dont understand what the bottom pad is doing for heat dissipation
post edited by mallorian - 2022/04/12 13:36:14
|
Cool GTX
EVGA Forum Moderator

- Total Posts : 31005
- Reward points : 0
- Joined: 2010/12/12 14:22:25
- Location: Folding for the Greater Good
- Status: offline
- Ribbons : 122
Re: Installing NVME Z690 Kingpin Dark
2022/04/12 13:31:02
(permalink)
☄ Helpfulby mallorian 2022/04/12 13:38:21
mallorian
I just wasnt sure what the bottom pads real job was, definitely not my most intuitive moments here but I still dont understand what the bottom pad is doing
Your trying to dissipate the Heat ... very passive cooling as those drives do not need to be "cold" & they should Not be over cooled Looks like you figured-out the "stepped screw" capture feature that is the same M.2 drive I bought for my X570 build, they are fast 
|
mallorian
New Member
- Total Posts : 9
- Reward points : 0
- Joined: 2021/07/24 13:42:29
- Status: offline
- Ribbons : 0
Re: Installing NVME Z690 Kingpin Dark
2022/04/12 13:37:43
(permalink)
the top heat sink is traditional and make sense all day to me, the bottom one covering the chip below and dissipating into the solid motherboard is the one I struggle with
|
zippytek
FTW Member
- Total Posts : 1185
- Reward points : 0
- Joined: 2020/10/06 17:25:35
- Status: offline
- Ribbons : 9
Re: Installing NVME Z690 Kingpin Dark
2022/04/12 13:49:24
(permalink)
☄ Helpfulby mallorian 2022/04/12 14:22:04
can't say 100% but if i have to guess the bottom pad is less for heat transfer and more for a "shim" to reduce stress on the drives in the event that you might run the board on a bench where excessive weight on this area of the board is possible (that m2 armor plate sits right below where you'd mount a liquid nitrogen container for a GPU)
|
Jomama22
iCX Member

- Total Posts : 257
- Reward points : 0
- Joined: 2020/09/23 08:06:30
- Status: offline
- Ribbons : 19
Re: Installing NVME Z690 Kingpin Dark
2022/04/13 11:35:11
(permalink)
Pad on bottom serves 2 purposes.
1: to have a stable base for the drive when the top heatsink is installed, else it would cause bending to the drive as there would be no support from the bottom
2: high capacity drives have flash on both sides. Granted the temp of the flash isn't actually of any concern, it's the the controller that needs to be kept cool. Also, it will allow heat from the controller to be dissipated from underneath as well (Mobo can absorb a lot of heat, given the amount of copper layers).
Bonus: some drives may have the controller on the bottom.
|
rjbarker
CLASSIFIED Member
- Total Posts : 3214
- Reward points : 0
- Joined: 2008/03/20 10:07:05
- Location: Vancouver Isle - Westcoast Canada
- Status: offline
- Ribbons : 21
Re: Installing NVME Z690 Kingpin Dark
2022/04/13 19:00:40
(permalink)
Good job.....!!
Now we will move on to installing a WB on a GPU ;)
Enjoy your new mobo and ssd!!
I9 12900K EK Velocity2 / ROG Z690 Apex/ 32G Dominator DDR5 6000/ Evga RTX 3080Ti FTW3 EK Vector / 980 Pro 512G / 980 Pro 1TB/ Samsung 860 Pro 500G/ WD 4TB Red / AX 1600i / Corsair 900D & XSPC 480 * 360 * 240 Rads XSPC Photon 170 Rez-Vario Pump Combo - Alienware 3440*1440p 120Hz/ W11
|
joneffingvo
New Member
- Total Posts : 50
- Reward points : 0
- Joined: 2020/09/23 23:19:30
- Status: offline
- Ribbons : 1
Re: Installing NVME Z690 Kingpin Dark
2022/05/09 11:15:33
(permalink)
"Orange circle 2 **** My problem mostly stemmed from not realizing the included screws separated into a riser and a screw and was attempting to use as a screw only ****" I still never figured out this part...
|
zippytek
FTW Member
- Total Posts : 1185
- Reward points : 0
- Joined: 2020/10/06 17:25:35
- Status: offline
- Ribbons : 9
Re: Installing NVME Z690 Kingpin Dark
2022/05/09 12:06:04
(permalink)
joneffingvo
"Orange circle 2 **** My problem mostly stemmed from not realizing the included screws separated into a riser and a screw and was attempting to use as a screw only ****" I still never figured out this part...
there should be m2 screws in the accessory kit box to hold down the m2 disks. use one of the supplied screws in there for that
|
joneffingvo
New Member
- Total Posts : 50
- Reward points : 0
- Joined: 2020/09/23 23:19:30
- Status: offline
- Ribbons : 1
Re: Installing NVME Z690 Kingpin Dark
2022/05/09 12:07:45
(permalink)
zippytek
joneffingvo
"Orange circle 2 **** My problem mostly stemmed from not realizing the included screws separated into a riser and a screw and was attempting to use as a screw only ****" I still never figured out this part...
there should be m2 screws in the accessory kit box to hold down the m2 disks. use one of the supplied screws in there for that
correct there were 3 of them I believe in the clear bag. However with the SSD inserted in the screw wouldn't grab. If i take out the SSD then it screws in perfectly fine.
post edited by joneffingvo - 2022/05/09 12:09:07
|
zippytek
FTW Member
- Total Posts : 1185
- Reward points : 0
- Joined: 2020/10/06 17:25:35
- Status: offline
- Ribbons : 9
Re: Installing NVME Z690 Kingpin Dark
2022/05/09 12:10:58
(permalink)
it's a standoff and retaining screw. so the top part disconnects from the standoff in your photo, and then you screw that standoff piece in to board, lay m2 on top and use the screw part to hold it together
|
joneffingvo
New Member
- Total Posts : 50
- Reward points : 0
- Joined: 2020/09/23 23:19:30
- Status: offline
- Ribbons : 1
Re: Installing NVME Z690 Kingpin Dark
2022/05/09 12:14:59
(permalink)
zippytek
it's a standoff and retaining screw. so the top part disconnects from the standoff in your photo, and then you screw that standoff piece in to board, lay m2 on top and use the screw part to hold it together
I had an inclination that was the case, but how did you gets separate the top part? I tried screwing it into the board and then trying to pry the top off but no luck? I also tried prying it off with the screw in my hand(s) but as you can tell because its so little its hard to get any grip.
post edited by joneffingvo - 2022/05/09 12:27:57
|
Mienko
Superclocked Member

- Total Posts : 170
- Reward points : 0
- Joined: 2007/11/28 19:45:09
- Status: offline
- Ribbons : 3
Re: Installing NVME Z690 Kingpin Dark
2022/05/09 14:48:23
(permalink)
joneffingvo
zippytek
it's a standoff and retaining screw. so the top part disconnects from the standoff in your photo, and then you screw that standoff piece in to board, lay m2 on top and use the screw part to hold it together
I had an inclination that was the case, but how did you gets separate the top part? I tried screwing it into the board and then trying to pry the top off but no luck? I also tried prying it off with the screw in my hand(s) but as you can tell because its so little its hard to get any grip.
For mine, I just held the threads lightly with pliers (with a paper towel protecting the threads) and unscrewed the screw with a screwdriver. I didn't want to install the standoff and inadvertently overtighten the screw I was trying to remove.
|
slapshotkc
New Member
- Total Posts : 2
- Reward points : 0
- Joined: 2013/08/20 20:06:27
- Status: offline
- Ribbons : 0
Re: Installing NVME Z690 Kingpin Dark
2022/09/06 12:56:52
(permalink)
Those M.2 standoff/screws for mounting the SSD's really needed some better instructions from EVGA. They don't match what the manual describes that they come pre-installed ON the mobo, which they don't, and you cannot get the screw out of the standoff with taking a pair of needle nose pliers, grab the serrated edge of the stand off, and unscrew the small screw. Took me about as long to figure these suckers out as it did to remove all the damn plastic covering everything on the board.
|
jessquirl
New Member
- Total Posts : 3
- Reward points : 0
- Joined: 2023/03/25 17:38:06
- Status: offline
- Ribbons : 0
Re: Installing NVME Z690 Kingpin Dark
2023/04/15 23:08:33
(permalink)
YA shame on EVGA for not explaining these screws better.
|
Detleg
Superclocked Member
- Total Posts : 113
- Reward points : 0
- Joined: 2013/03/02 00:13:51
- Location: Columbia, South Carolina
- Status: offline
- Ribbons : 2
Re: Installing NVME Z690 Kingpin Dark
2023/04/16 11:13:33
(permalink)
I was doing the same...looking for standoffs not screws lol
|
jessquirl
New Member
- Total Posts : 3
- Reward points : 0
- Joined: 2023/03/25 17:38:06
- Status: offline
- Ribbons : 0
Re: Installing NVME Z690 Kingpin Dark
2023/04/17 21:24:51
(permalink)
<p>YA shame on EVGA for not explaining these screws better. </p>
|
suzyytom
New Member
- Total Posts : 1
- Reward points : 0
- Joined: 2023/04/20 02:25:47
- Status: offline
- Ribbons : 0
Re: Installing NVME Z690 Kingpin Dark
2023/04/20 02:26:59
(permalink)
I just wasnt sure what the bottom pads real job was, definitely not my most intuitive moments here but I still dont understand what the bottom pad is doing for heat dissipation
post edited by suzyytom - 2023/04/22 03:28:24
|