Krzysztof47
iCX Member

- Total Posts : 430
- Reward points : 0
- Joined: 2015/12/15 11:51:36
- Location: USA
- Status: offline
- Ribbons : 15


Hello, After months of acquiring parts and fixing issues, I am almost done with a mega machine I have been putting together for a while now. Its a fully water cooled system with one unified loop, using components from various companies. I have posted a parts list down below (Will be finalized once the system is complete). Wanted to post some pictures here and get some feedback on anything I can improve or adjust in the system, or what people think. The system as of now, is almost done............. The color theme of this build was mainly Black and Silver. I made this system FULLY MODULAR with the use of QDC's. No more ball valves! All the radiators, Pump assembly, Motherboard, and 3x GPU's can be removed from the system without the need to drain the system. The system on 2x DDC (100%) pumps gets a flow rate of around 175 l/h and with the radiator setup that can dissipate around (1200w~)+ of heat! Here is the Finished System!!!!!!Primo II with 6x QDC's, and 2x Temp Sensor's, more updates/upgrades to come soon.      
post edited by Krzysztof47 - 2018/01/24 12:45:29
|
Cool GTX
EVGA Forum Moderator

- Total Posts : 31032
- Reward points : 0
- Joined: 2010/12/12 14:22:25
- Location: Folding for the Greater Good
- Status: offline
- Ribbons : 123
MB and those GPUs the 980s that are on your Mods Rigs page ?
|
Krzysztof47
iCX Member
- Total Posts : 430
- Reward points : 0
- Joined: 2015/12/15 11:51:36
- Location: USA
- Status: offline
- Ribbons : 15
Yeah the motherboard and 980Ti's are the same on my mods rig page, sorry I have not updated the photos on there, wanted to finish this build first and then update the page.
|
Krzysztof47
iCX Member
- Total Posts : 430
- Reward points : 0
- Joined: 2015/12/15 11:51:36
- Location: USA
- Status: offline
- Ribbons : 15
PA3's (Updated) now running on USB cables, not aqua bus cables.  
post edited by Krzysztof47 - 2018/01/02 17:23:18
Attached Image(s) 
|
Krzysztof47
iCX Member
- Total Posts : 430
- Reward points : 0
- Joined: 2015/12/15 11:51:36
- Location: USA
- Status: offline
- Ribbons : 15
Mission control  Using the Aquaero 6 Pro with multiple Upgrades in tandem with PA'3. All USB devices where hooked up to an Aquacomputer Hubby 7.   
post edited by Krzysztof47 - 2018/01/02 17:56:34
|
Krzysztof47
iCX Member
- Total Posts : 430
- Reward points : 0
- Joined: 2015/12/15 11:51:36
- Location: USA
- Status: offline
- Ribbons : 15
|
Krzysztof47
iCX Member
- Total Posts : 430
- Reward points : 0
- Joined: 2015/12/15 11:51:36
- Location: USA
- Status: offline
- Ribbons : 15
3x Bitspower BP-WBVGNGTXTITANXNPACBK, with a 3-Way SLI Terminal, tried to use the Pro V.2 SLI bridge, but the terminal is way to big and got in the way unfortunately. Managed to acquire an original Pro 3-Way Bridge which should work. Old GPU connection system 
post edited by Krzysztof47 - 2018/01/02 17:31:47
Attached Image(s)
|
Krzysztof47
iCX Member
- Total Posts : 430
- Reward points : 0
- Joined: 2015/12/15 11:51:36
- Location: USA
- Status: offline
- Ribbons : 15
Also a warning, I originally tried to use the Bitspower lateral dual connection plates with the Magic Cubes, but there is a design flaw with the O-ring not being tall enough (did not create a seal), and it leaked everywhere, that's why I am using a 6mm extender fitting instead of the lateral plates. Switched to EK Dual DDC XTOP System
post edited by Krzysztof47 - 2018/01/02 16:52:16
|
Krzysztof47
iCX Member
- Total Posts : 430
- Reward points : 0
- Joined: 2015/12/15 11:51:36
- Location: USA
- Status: offline
- Ribbons : 15
The Complete Parts list: Waterblocks/Pumps: Bitspower (BP-VGAB3AC-CL) 3-Way SLI Terminal Acrylic (Clear), Parallel3x Bitspower (BP-WBVGNGTXTITANXNPACBK) Titan X/980 Ti Water Blocks, Nickel, Black AcrylicBitspower (BP-WBTHOREIX99FCBNPAC-CL) THOR EIX99 Nickel Plated Full-Covered-Block (Clear) Monoblock2x Bitspower (BP-RAMS44PS-CLBK) 8x DIMM's, 2x Blocks, Nickel, Acrylic (Clear) Bitspower Summit EF Brass CPU Block, Nickel Plated (Replaced the Acrylic one in the Monoblock kit) EK-XTOP Dual DDC 3.2 PWM AcetalEK XTOP XRES Upgrade Link AcetalEK Anti Cyclone Insert ShortEK RES X3 Top Multi Port Black AcetalEK RES Tube 150ml2x EK DDC 3.2 PWM Sleeved2x EK DDC Heatsink Black Hardware: EVGA X99 FTW Ki7-6800K LGA 2011-V33x GTX 980 Ti (Originally Hybrids) 1342 MHz Boost, ASIC Quality (71% ~)EVGA Pro (Original) 3-Way SLI Bridge2x Crucial DDR4 2133 MHz 32GB (CR328X41700) (8GBx4) (64GB Total/ No XMP, Bare Sticks)EVGA 1200 P23x Aqua Computer Power Adjust 3's Standard Versions (With Black Heatsinks)Aqua Computer Aquaero 6 Pro, with: (Black Heatsink, Time Clock, Black Aluminum Panel, Acrylic Shield, and Aquaero Remote)Aqua Computer Power Adjust 2/3 Mounting Panel Black Aluminum Storage: 4x Corsair XT 480GB SSD2x Corsair XTi 240GB SSDKingston Hyper X Predator 480GB M.2 SSD Cooling: Aquacomputer KryoM.2 EVO PCIe Heatsink Fujipoly Thermal Pads 0.5mm, 1.0mm, 1.5mm 11.0 W/mKNoctua NT-H1 Thermal CompoundEK 480mm PE Radiator (40mm) P/PEK 240mm PE Radiator (40mm) P/PEK 240mm XE Radiator (60mm) P/P16x EK Vardar F4 2200 RPM (Running at 1950 RPM~)3x 10ft box of EK ZMT Tubing (3/8-5/8) made multiple length revisionsAqua Computer DP Ultra Coolant Clear 5L Canister Cables: EVGA Black Individually Sleeved KitsVarious Cable Combs, BlackEK Extension Fan Cables 4pin4x Modtek 4-Way PWM SpiltterCustom Cables made and Sleeved, Black Case/Accessories: Phanteks Primo Case BlackMNPC-TECH Full Acrylic Window Version 2 for PrimoVarious Stainless Steel, Aluminum, Steel Screws and WashersColdZero Enthoo Primo Backplate Black Fittings: Bitspower G1/4 Silver Shining AIR-Exhaust - Nickel (BP-ETAIR)2x Bitspower G1/4 Temperature Sensor Silver Shining - Nickel (BP-WTP-CT) 12x Bitspower (BP-SLTC6AL-BK) Black Hose Clamp OD 5/815x EK-ACF Fitting 10/16mm - Nickel8x EK-AF Angled 90° G1/4 - Nickel2x EK-AF Extender 8mm M-F G1/4 - NickelEK-AF Extender 8mm M-M G1/4 - Nickel9x EK-PLUG G1/4 - NickelEK-AF T-Splitter 3F G1/4 - NickelEK AF Extender 20mm M-F G1/4 - Nickel8x EK-Extender G1/4 Socket - Nickel6x EK CPC QDC 10mm External: UPS: Cyber Power PR1500LCD 1050wKeyboard: CHERRY MX Board 6.0, Red SwitchesMouse: ROG Spatha RGBMonitor: Acer XB270H 27in 1920x1080p G-Sync 144Hz 1msHeadset: Steel Series Arctis 5 RGB BlackAqua Computer Aquaero RemoteLUXA 2 Headset Stand Black Info: 960mm of Radiator SpaceFlow Rate: 150 L/h~Pump PWM: 60%System Idle Power: 210w~ Finalized/Updated: 1/2/18
post edited by Krzysztof47 - 2018/01/02 17:59:41
|
Krzysztof47
iCX Member
- Total Posts : 430
- Reward points : 0
- Joined: 2015/12/15 11:51:36
- Location: USA
- Status: offline
- Ribbons : 15
Had to scratch the second M.2 because I wouldn't be able to use the first one on PCIe lane 6.
post edited by Krzysztof47 - 2017/06/29 01:26:45
|
Krzysztof47
iCX Member
- Total Posts : 430
- Reward points : 0
- Joined: 2015/12/15 11:51:36
- Location: USA
- Status: offline
- Ribbons : 15
Got the coolant and MN PC Tech Acrylic display, just waiting on the EK SBAY res and a few fittings and should be good to go. SBAY was removed in the final design.
post edited by Krzysztof47 - 2017/06/29 01:27:19
|
Krzysztof47
iCX Member
- Total Posts : 430
- Reward points : 0
- Joined: 2015/12/15 11:51:36
- Location: USA
- Status: offline
- Ribbons : 15
This is the MN PC Tech Primo V.2 Acrylic panel. 
post edited by Krzysztof47 - 2018/01/02 17:13:52
Attached Image(s)
|
Krzysztof47
iCX Member
- Total Posts : 430
- Reward points : 0
- Joined: 2015/12/15 11:51:36
- Location: USA
- Status: offline
- Ribbons : 15
DP it up , can never have too much coolant! DP is the best coolant I have used yet, at least the clear version. 
post edited by Krzysztof47 - 2018/02/13 14:53:21
Attached Image(s)
|
rjohnson11
EVGA Forum Moderator
- Total Posts : 102418
- Reward points : 0
- Joined: 2004/10/05 12:44:35
- Location: Netherlands
- Status: offline
- Ribbons : 85
Looking forward to the final pics
|
notfordman
Omnipotent Enthusiast

- Total Posts : 10346
- Reward points : 0
- Joined: 2007/08/09 23:52:23
- Location: In a van, down by the
- Status: offline
- Ribbons : 28
That's really nice, I like the gpu sandwich you have. Too bad about the seal, I bet that was a mess. Very nicely done!! +1 I was going to comment and +1 your Mods rig page , but can't comment there for some reason. Boo! Quite a change from your MR pics. 
|
Krzysztof47
iCX Member
- Total Posts : 430
- Reward points : 0
- Joined: 2015/12/15 11:51:36
- Location: USA
- Status: offline
- Ribbons : 15
Thanks for the feedback, I greatly appericate it. Strange, I thought I had my mod rigs page set to public, I'll check it out. Yeah the two magic cubes with the lateral plates did not have close contact with the seal, its a design flaw, the O ring is simply not tall enough, good thing it was with distilled water and no power :)
|
Krzysztof47
iCX Member
- Total Posts : 430
- Reward points : 0
- Joined: 2015/12/15 11:51:36
- Location: USA
- Status: offline
- Ribbons : 15
Yeah I am myself, hope this works out in the end.
|
Krzysztof47
iCX Member
- Total Posts : 430
- Reward points : 0
- Joined: 2015/12/15 11:51:36
- Location: USA
- Status: offline
- Ribbons : 15
I n an effort to avoid any issues, I purchased a pressure valve and a small bicycle pump, going to use the method I found from a post on Overkclockers UK, would of never thought of this for testing if a loop is water tight, simply genius, all credit too "B N3GATIVE" for this solution. Here's the link: https://forums.overclockers.co.uk/threads/the-correct-method-to-leak-test-a-loop.18647388/ Using the Aqua Computer Dr. Drop Kit, much easier then making your own pressure tester.
post edited by Krzysztof47 - 2017/06/29 01:28:54
|
Krzysztof47
iCX Member
- Total Posts : 430
- Reward points : 0
- Joined: 2015/12/15 11:51:36
- Location: USA
- Status: offline
- Ribbons : 15
The Original Pro SLI bridge 
post edited by Krzysztof47 - 2018/02/13 14:57:15
Attached Image(s)
|
Krzysztof47
iCX Member
- Total Posts : 430
- Reward points : 0
- Joined: 2015/12/15 11:51:36
- Location: USA
- Status: offline
- Ribbons : 15
I finally finished the two loops, ended up buying the Aqua Computer Dr. Drop Pressure tester since it was actually cheaper then making my own, and the gauge does not exceed 8.7 Psi. I am going to post some photos of the system.
|
Krzysztof47
iCX Member
- Total Posts : 430
- Reward points : 0
- Joined: 2015/12/15 11:51:36
- Location: USA
- Status: offline
- Ribbons : 15
Here is the SBAY Res, I installed a Laing DDC 3.25 and an EK Black DDC Heatsink on top. There is also a Bitspower Air Exhaust fitting, Alphacool Temp Sensor and an EK Ball Valve in the back, for draining. Removed from final loop design
post edited by Krzysztof47 - 2017/06/29 01:31:04
|
Krzysztof47
iCX Member
- Total Posts : 430
- Reward points : 0
- Joined: 2015/12/15 11:51:36
- Location: USA
- Status: offline
- Ribbons : 15
Here is the jungle of cables in the 5.25 Bays.... It was just a pain getting the molex cables and fan headers plugged in since they where in the most cramped spots. None the less, its set up and I did make an effort to tame the cables to the best of my ability :) Single loop now, no bay res anymore
post edited by Krzysztof47 - 2017/06/29 01:31:22
|
Krzysztof47
iCX Member
- Total Posts : 430
- Reward points : 0
- Joined: 2015/12/15 11:51:36
- Location: USA
- Status: offline
- Ribbons : 15
I put two EK 8mm extender fittings on the upper acrylic mono block to give the height of the ram blocks, so one block was not taller than the other. (Updated) The order of the loop was changed, shown in later photos and on front page.
post edited by Krzysztof47 - 2018/01/02 17:41:54
|
Krzysztof47
iCX Member
- Total Posts : 430
- Reward points : 0
- Joined: 2015/12/15 11:51:36
- Location: USA
- Status: offline
- Ribbons : 15
Here is the finalized series DDC setup with the res for the bottom loop, its features another Air Exhaust fitting, and Alphacool pressure fitting. The 90 degree fitting was taken out on the res since it did not work at all for connecting the res to the front radiator. I am thinking of taking out the pressure fitting since the Bitspower one does the same job, only you have to manually press down on it when the loop is not running, any suggestions would be appreciated. Problem Solved
post edited by Krzysztof47 - 2017/06/29 01:32:31
|
Krzysztof47
iCX Member
- Total Posts : 430
- Reward points : 0
- Joined: 2015/12/15 11:51:36
- Location: USA
- Status: offline
- Ribbons : 15
Here is the res installed in the lower loop. Updated 
post edited by Krzysztof47 - 2017/06/29 01:34:54
Attached Image(s)
|
Krzysztof47
iCX Member
- Total Posts : 430
- Reward points : 0
- Joined: 2015/12/15 11:51:36
- Location: USA
- Status: offline
- Ribbons : 15
Here is the entire back of the system, just waiting on the other two SSD's and it will be done. Updated 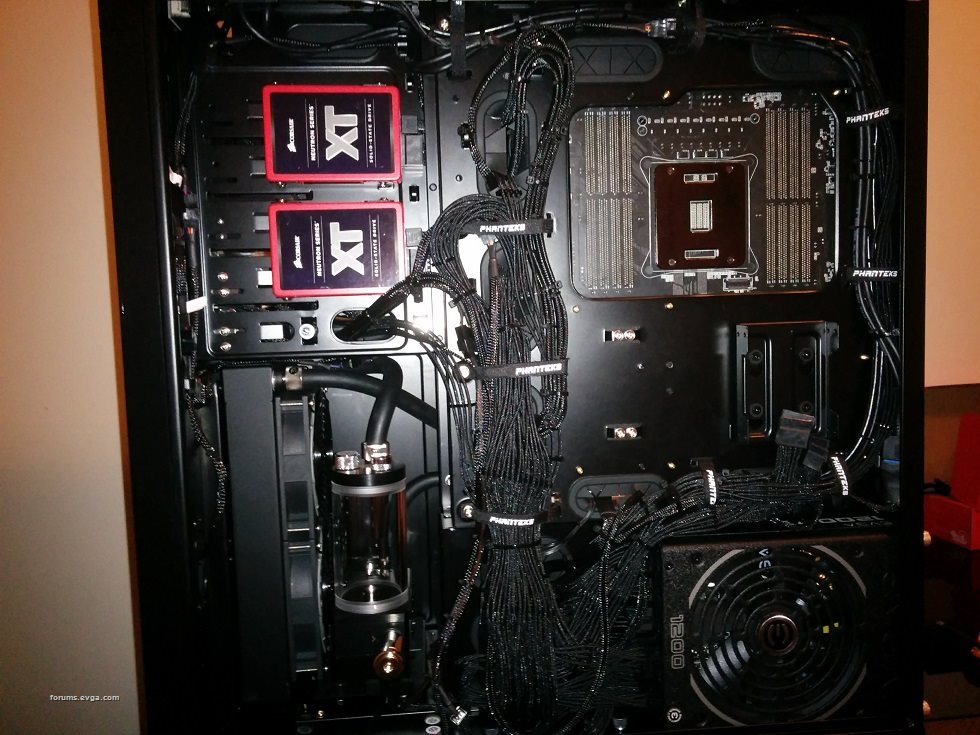
post edited by Krzysztof47 - 2017/06/29 01:34:32
Attached Image(s)
|
Krzysztof47
iCX Member
- Total Posts : 430
- Reward points : 0
- Joined: 2015/12/15 11:51:36
- Location: USA
- Status: offline
- Ribbons : 15
Going to use this 550 G3 to power the pumps externally while filling the loop while the rest of the system is off, once the pressure test checks out good. Did this for the first filling, worked great from filling the loop from the bottom.
post edited by Krzysztof47 - 2017/06/29 01:35:52
|
Cool GTX
EVGA Forum Moderator
- Total Posts : 31032
- Reward points : 0
- Joined: 2010/12/12 14:22:25
- Location: Folding for the Greater Good
- Status: offline
- Ribbons : 123
Looks almost done
|
Krzysztof47
iCX Member
- Total Posts : 430
- Reward points : 0
- Joined: 2015/12/15 11:51:36
- Location: USA
- Status: offline
- Ribbons : 15
Yeah looking forward too it, hope everything checks out good.
|
Krzysztof47
iCX Member
- Total Posts : 430
- Reward points : 0
- Joined: 2015/12/15 11:51:36
- Location: USA
- Status: offline
- Ribbons : 15
I am pretty happy I bought the Dr. Drop, I already caught a leak I would of probably never noticed until it was too late. I have been leak testing all the components individual and got to the SBAY. I would pump it to 0.4 Bar and the pressure would drop within 30s. I tightened all the screws and still kept dropping. I then opened the unit and replaced the O Ring on the pump and it's fixed!!!! Just wanna say that anyone that does water cooling should get one of these because they can save you a lot of trouble in the end. Also if you do get this item make sure your read the manual :)
post edited by Krzysztof47 - 2017/06/29 01:36:21
|