Tyver
Superclocked Member

- Total Posts : 176
- Reward points : 0
- Joined: 2018/11/28 17:25:55
- Location: Illinios
- Status: offline
- Ribbons : 1


I have been asking all kinds of questions for the last couple weeks, in preparation of installing a liquid system. The day has finally arrived and the parts are here. Im prepping today and plan to start building tomorrow. Thanks for all the help everyone, I plan to update along the way. Here is what the system looks like now. Excuse the mess, I built this not too long ago knowing I was going to be making a custom loop. I reused some old parts and ran as minimal as possible until now. 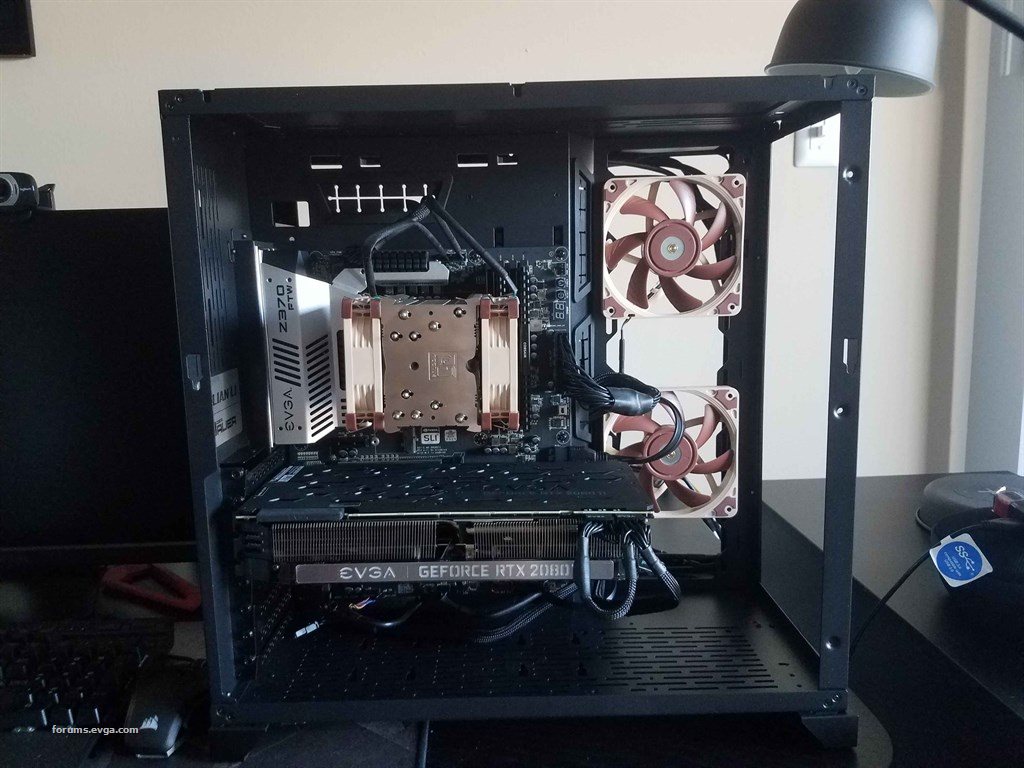 So here is what I have and plan to put in. Install Related:Case: Lian Li O11 Dynamic, black Pump/Res: EK XRES Revo 140 D5 RGB PWM, swapping res tube to 250 Fittings: bitspower Tubing: EK 10mmID/12mm, PrimoChill 10mmIDx16mmOD LRT Softtubing GPU: 2080 TI FTW3, Vertically mounted GPU Block: HydroCopper Fans: x6 ML 120mm White Pro LED, x3 ML 120mm White Pro LED, x3 ML 120mm Processor: Intel 8700K (delidded) CPU Block: EK Velocity RGB, EK Supremacy EVO, Nickel Plexi Coolant: EK CryoFuel, Solid Azure Blue Rad: x2 Ek CoolStream PE 360, x2 EK CoolStream SE 360 Other info:Mother Board: EVGA Z370 FTW PSU: EVGA 1000 G3, EVGA 1200 P2 Ram: Corsair Vengence LPX x2 8GB Storage: Samsung Pro 960 M.2 NVMe 512GB, Samsung EVO 860 (I believe) Sata SSD 512 GB, WD 5400RPM HDD 4TB Please feel free to make any comments and if you see a potiental issue PLEASE point it out. This is my first time doing a liquid cooling system and I like to challenge myself so that is why Im doing hard tubing. Also, I know this is overkill but after doing SFF for the last year, its hard for me to not use open space. So I filled it in with more parts for better deltas, hopefully better deltas.
post edited by Tyver - 2018/12/20 11:02:32
Attached Image(s)
Just a novice following the dream to be a master 
|
Delirious
EVGA Forum Moderator

- Total Posts : 17474
- Reward points : 0
- Joined: 2007/11/15 13:34:04
- Location: at my computer
- Status: offline
- Ribbons : 61
Re: Liquid Build
2018/12/15 15:44:37
(permalink)
 can't wait to see the finished product.
"Be quick to listen, slow to speak and slow to anger" Affiliate Code XZUMV9TJW5 Associate Code: 7PM43CU71IB2IAP education may be expensive but wait until you get the bill for ignorance A wise man once said that we can't make anyone feel or do anything. We can throw things into the wind, but it's up to each person to decide how they want to react, where they want to stand when things fall.
|
GGTV-Jon
FTW Member

- Total Posts : 1813
- Reward points : 0
- Joined: 2017/11/25 14:11:43
- Location: WA, USA
- Status: offline
- Ribbons : 19
Re: Liquid Build
2018/12/15 18:44:49
(permalink)
|
Cool GTX
EVGA Forum Moderator
- Total Posts : 31005
- Reward points : 0
- Joined: 2010/12/12 14:22:25
- Location: Folding for the Greater Good
- Status: offline
- Ribbons : 122
Re: Liquid Build
2018/12/15 20:06:16
(permalink)
Moving to Mods Rigs section of Forums Looking forward to your updates
|
EVGATech_DanielM
EVGA Tech Support
- Total Posts : 1132
- Reward points : 0
- Joined: 2017/07/07 19:01:01
- Status: offline
- Ribbons : 2
Re: Liquid Build
2018/12/15 20:58:56
(permalink)
Looking forward to this build. Keep us updated, chief!
|
Vlada011
Omnipotent Enthusiast

- Total Posts : 10257
- Reward points : 0
- Joined: 2012/03/25 00:14:05
- Location: Belgrade-Serbia
- Status: offline
- Ribbons : 11
Re: Liquid Build
2018/12/15 23:44:11
(permalink)
That small Noctua cooler I recommend to everyone who not overclock system or use mid OC. It's small, nice, and cool. How much you paid Bitspower fittings, I mean everything? I wait Performance PC to get GTS360 radiators to order second radiator and Koolance fittings. They told me second week December, and still are Out of Stock. I could build with single radiator for CPU and GPU and add later one more radiator. And my loop is 100% EKWB now, but I will add radiators HW Labs. In future when I change platform I will easy replace with Watercool Heatkiller series. I can't say it's much nicer than EK but it's far better quality. Lian Li PC-O11 is nicest case last years for gamers. Only because I'm mid 30s PC-O11 WXC was more classic for me. I like him so much. But I can't install vertical GPU bracket because I have dedicate sound card. Extra sound quality is very important to me.
post edited by Vlada011 - 2018/12/15 23:51:08
|
rjohnson11
EVGA Forum Moderator
- Total Posts : 102323
- Reward points : 0
- Joined: 2004/10/05 12:44:35
- Location: Netherlands
- Status: offline
- Ribbons : 84
Re: Liquid Build
2018/12/16 04:57:06
(permalink)
This will be an interesting build. Looking forward to the updates.
|
Tyver
Superclocked Member
- Total Posts : 176
- Reward points : 0
- Joined: 2018/11/28 17:25:55
- Location: Illinios
- Status: offline
- Ribbons : 1
Re: Liquid Build
2018/12/16 07:14:15
(permalink)
Vlada011
That small Noctua cooler I recommend to everyone who not overclock system or use mid OC.
It's small, nice, and cool.
I like it, I did SFF building before hand and that cooler was a staple Vlada011
How much you paid Bitspower fittings, I mean everything?
I wait Performance PC to get GTS360 radiators to order second radiator and Koolance fittings. They told me second week December, and still are Out of Stock. I could build with single radiator for CPU and GPU and add later one more radiator.
I odnt know the exact price. I also bought a ton of spares in case I decided to change the route. So it was a ton of spares. I live right down the road from a Micro Center and will just return what I dont use. I know it was in the realm of $100-200 buck but if the route goes teh way I think, it should be under $100 after its all installed and spares returned Vlada011
Lian Li PC-O11 is nicest case last years for gamers.
Only because I'm mid 30s PC-O11 WXC was more classic for me. I like him so much.
But I can't install vertical GPU bracket because I have dedicate sound card. Extra sound quality is very important to me.
The previous case I had was the M1 Ncase and I thought nothing could beat that case in just how well it was thought out. Imn going to have to say its probably the M1 Ncase is still probably my favorite but the Lian Li O11 Dynamic is jsut as well, if not better, laid out. Well I got my prep started yesterday but BF5 called and I had to answer. I will finish prep this morning and begin installing today. I have identified one potiental issue, I am installing the pump verticalling in the front, with the vertical mount. The top and bottom rads were to be the PE 360s, so with the 250 tube on the pump, it may be too tall. If so, I may turn the one of the res into a 240 or put the smaller res tube back on the pump.
Just a novice following the dream to be a master
|
Tyver
Superclocked Member
- Total Posts : 176
- Reward points : 0
- Joined: 2018/11/28 17:25:55
- Location: Illinios
- Status: offline
- Ribbons : 1
Re: Liquid Build
2018/12/16 10:56:27
(permalink)
☄ Helpfulby Cool GTX 2019/01/26 14:22:22
Taking a lunch break. Ive got my rads cleaned, processor block and GPU block in. So I have 2 issues pop up so far. One is personal preference and the other is a major issue.
First issue is just how terrible the EKWB Velocity back plate is. You have to fold the back plate on the back then try to thread the mounting screws through on the front. If that wasnt bad enough, where you thread them by hand is round and in hard to reach places due to the EVGA board. I could barely get them started, let alone run them to the end of the thread. They say dont use pliers to turn them....I did. However due to the stupid things being completely round, I couldn't get much farther with pliers. So I went back to my Noctua back plate....but I was worried it wouldnt keep the gasket tight so I scrapped that idea. Finally I had an idea that worked. I still used the EKWB back plate, but after starting the thread of the mounting screws, I out the Noctua screw caps on them. Noctua was smart enough to put a Phillips hole on top of the caps so you can screw them down. Someone was clearly thinking over there. So I ran the Noctua caps all the way down on the EKWB mounting screws and continued turning until the EKWB mounting screws were threaded to to back board all the way, per instructions. This should have taken a few minutes to install but too me nearly a hour. I get EKWB was trying to make a plate that worked for 15xx and the LGA chipsets but this was ridiculous. If it was going to be done this was, EKWB could at least made it to where you could use a hex wrench or a screwdriver or anything. I would have NEVER got in on if I didnt have parts for other companies.
The second problem is with the HydroCopper block. Unfortunately it sticks out just a few mm past my side panel. So it's not completely compatible with this set up. However, since it is so little, I am able to install the glass panel still but it bows the glass panel just a bit. It is definitely not ideal but I really like this case. I'm just going to deal with it. The issue arises from the added width of the 2080 TI FTW3 card, it was at least an in wider than my first 2080 Ti. Thus adding the HydroCopper block makes iteven wider.
If anyone attempts to use the HydroCopper on the 2080 Ti FTW3 in a Lian Li PC-O11 Dynamic, it will be a few mm too wide for the case panel. The case panel can be bowed and still work. I can live with it but that is up to them.
I only have the one computer and obviously it's down right now. Resizing pictures is a pain on my phone. I will upload pictures to the correct posts later, to help provide more details and the steps I took. I have pictures of both of these issues.
Just a novice following the dream to be a master
|
Cool GTX
EVGA Forum Moderator
- Total Posts : 31005
- Reward points : 0
- Joined: 2010/12/12 14:22:25
- Location: Folding for the Greater Good
- Status: offline
- Ribbons : 122
Re: Liquid Build
2018/12/16 12:03:36
(permalink)
RE: Lian Li PC-O11 Dynamic Time to make a spacer to move that side panel - necessity is the mother of invention 
|
repo1979
FTW Member
- Total Posts : 1116
- Reward points : 0
- Joined: 2017/02/21 20:37:56
- Location: UTAH
- Status: offline
- Ribbons : 4
Re: Liquid Build
2018/12/16 14:06:14
(permalink)
That case was my choice till I found out it was not gonna house my kingpin with a block on it
|
Tyver
Superclocked Member
- Total Posts : 176
- Reward points : 0
- Joined: 2018/11/28 17:25:55
- Location: Illinios
- Status: offline
- Ribbons : 1
Re: Liquid Build
2018/12/16 18:23:04
(permalink)
So I've hit a road block. Here is what I've done since lunch.
I decided to go another route. I changed the top and side rads to 360 SEs. I then mounted the pump in the front bottom. The bottom rad is gone completely. I did this because the pump wouldnt sit in there with the previous configuration. I ran to MicroCenter and got some barbs and tubing. I ran soft tubing to everything. I had planned to run like this for a week. After that week I was going to drain and mount the GPU vertically. I was to use the week as a clean out and wait for the vertical mount to arrive. This would look better in my opinion and let everything fit better.
However after filling the system, that is when I ran into the road block. I was able to run the pump with everything unplugged but the 12v error light comes on when ever I plug the motherboard in. I swapped the cable and that didnt help. I think the MB is dead. I think it arose from the EKWB back plates poor design. It looks like the screws may not have been straight and the board is bowed slightly. Soooooo .... yeah.........
I have another board on my shelf, going to verify the MB is dead. I've removed all parts and still the MB shows the 12v error light when all parts are removed, also when the 24 pin cable is the only one installed. I've got the remaining parts out but troubleshooting is tomorrows issue. I'm tired of messing with it for the day.
Just a novice following the dream to be a master
|
Tyver
Superclocked Member
- Total Posts : 176
- Reward points : 0
- Joined: 2018/11/28 17:25:55
- Location: Illinios
- Status: offline
- Ribbons : 1
Re: Liquid Build
2018/12/18 08:41:09
(permalink)
So I'm back on track. The board was dead. 3 factors contributed to it. First I was the EKWB backplate in to where wrong face was against the board. Second, when I ran into issues, I used the method mentioned in a previous post to tighten the screws down. I over tightened. Third, one of the holes on the back plate was angled, I didnt catch it. So all three issues combined lead me to warp my board slightly and I believe that killed the board.
This was entirely my fault and I should have caught these things. I was in a rush, trying to get everything built that day. I do blame EKWBs backplate slightly due to what I consider poor design and the angled screw hole. However I should have caught that issue. This is the first time I have broken hardware in the years of building I've done. It was to a stupid rookie error too, I feel kinda stupid but I'm moving on with the build.
So here is where I stand. I returned to Micro center. I traded out the EK-Velocity for a EK-Supremacy EVO. I had hoped it would use a different backplate, it did not. However this new one had all the holes lined up correctly. I triple checked. I also bought a new board to replace the one I broke. I could have used my spare I mentioned but I really wanted the Z370 FTW board in this build.
I have mounted the Ek-Supremacy EVO, it went much smoother this time due to correct alignment of the holes and orientated with the correct face of the back plate to the board. I hope to have the system up and running today as I still have most of the loop in the case installed.
Just a novice following the dream to be a master
|
Tyver
Superclocked Member
- Total Posts : 176
- Reward points : 0
- Joined: 2018/11/28 17:25:55
- Location: Illinios
- Status: offline
- Ribbons : 1
Re: Liquid Build
2018/12/18 17:56:52
(permalink)
So it turns out my PSU was bad. It was probably the cause of many issues I was seeeing in my MB and GPU. Dont exactly know what was wrong with it, sometimes things would work and other times it didint. Everything is running now so thats all that matters.
So I was able to complete the system. YAY!!! I will be uploading pictures and details tomorrow. Its not what I intended but Im content for the most part seeing that its my first time building a custom loop. Still have some work to do but Im up and running.
I have been running PRime95 for 15 minutes and at full synthetic load @ stock temps, the RIG is running around 36 C.
Just a novice following the dream to be a master
|
Tyver
Superclocked Member
- Total Posts : 176
- Reward points : 0
- Joined: 2018/11/28 17:25:55
- Location: Illinios
- Status: offline
- Ribbons : 1
Re: Liquid Build
2018/12/20 11:00:51
(permalink)
So I took the time to resize the images to 500 KB one by one and the server didnt like them still so here is a link to the pictures of the completed system. https://1drv.ms/f/s!AhpMuwhZ9f34-DQo2rRuqBPRlhLC  Install Related: Install Related:Case: Lian Li O11 Dynamic, black Pump/Res: EK XRES Revo 140 D5 RGB PWM, swapping res tube to 250 Fittings: bitspower Tubing: EK 10mmID/12mm, PrimoChill 10mmIDx16mmOD LRT Softtubing GPU: 2080 TI FTW3, Vertically mounted GPU Block: HydroCopper Fans: x6 ML 120mm White Pro LED, x3 ML 120mm White Pro LED, x3 ML 120mm Processor: Intel 8700K (delidded) CPU Block: EK Velocity RGB, EK Supremacy EVO, Nickel Plexi Coolant: EK CryoFuel, Solid Azure Blue Rad: x2 Ek CoolStream PE 360, x2 EK CoolStream SE 360 Other info:Mother Board: EVGA Z370 FTW PSU: EVGA 1000 G3, EVGA 1200 P2 Ram: Corsair Vengence LPX x2 8GB Storage: Samsung Pro 960 M.2 NVMe 512GB, Samsung EVO 860 (I believe) Sata SSD 512 GB, WD 5400RPM HDD 4TB  So after building this I know one thing, I will never do hard tubing. Not because it is hard to do but due to the restrictions it would cause. I can still move parts around and make minor adjustments in this system. After having to make said minor adjustments, I realized that as often as I change my system, it would be counter productive to put in hard tubing. One issue I did have was vertically mounting the card. With the 3 slot mounting bracket, the PCIe riser was pushing on the GPU so much it was twisting and could barely go in the PCIe slot. So I used a band saw and cut the mounting bracket. I now have a 2 slot 2080 Ti GPU. This gave me the room I needed. I could use a little more but I cant moved the card anymore out so itll have to do. Playing BF5 is when Ive seen the temperature the highest, so far I have seen it up to 46 C. That includes a Prime 95 runs for a hour. Speeds turbo boosted to 4.3 Ghz, otherwise, everything has been at stock for now. Pump at 50% and fans running on default curve. Only thing that is actually making noise is the PSU fan. Otherwise its silent as can be, highest default fan curves speed Ive seen appear is ~980 RPM on all 6 fans, which are running in a negative pressure scenario. edit by Cool GTX - placed one photo in post
post edited by Tyver - 2018/12/31 11:41:54
Just a novice following the dream to be a master
|
Cool GTX
EVGA Forum Moderator
- Total Posts : 31005
- Reward points : 0
- Joined: 2010/12/12 14:22:25
- Location: Folding for the Greater Good
- Status: offline
- Ribbons : 122
Re: Liquid Build
2018/12/20 13:07:13
(permalink)
nice looking Rig
|
Gone Cruising
FTW Member
- Total Posts : 1711
- Reward points : 0
- Joined: 2008/02/17 23:10:31
- Location: Clearlake Oaks, CA
- Status: offline
- Ribbons : 45
Re: Liquid Build
2018/12/20 22:13:07
(permalink)
I like it !!!! Nice and clean!
Gigabyte Z390 Aorus Ultra Intel Core I9-9900K Corsair 32gb DDR4 EVGA RTX 2070 Super EVGA 850W Gold 2 x 1TB Samsung SSD 2 x 3TB HD's in Raid 1 Kustom Case https://www.heatware.com/u/67033/to 
|
rmorse27
FTW Member
- Total Posts : 1671
- Reward points : 0
- Joined: 2008/04/25 18:47:29
- Location: Plaistow N.H.
- Status: offline
- Ribbons : 19
Re: Liquid Build
2018/12/21 08:31:27
(permalink)
Intel i9 14900kf-Asus Z790 Rog Strix-E Wifi-Corsair 64GB @6400 DDR5-EVGA 3080TI FTW HC-EVGA G6 1000 PWS-Samsung Pro 2TB 4.0-Thermaletake Case-Corsair Pump/Res Combo http://www.heatware.com/eval.php?id=66896
|
seth89
CLASSIFIED ULTRA Member

- Total Posts : 5290
- Reward points : 0
- Joined: 2007/11/13 11:26:18
- Status: offline
- Ribbons : 14
Re: Liquid Build
2018/12/21 16:37:56
(permalink)
That is one nice GPU water block!
|
Tyver
Superclocked Member
- Total Posts : 176
- Reward points : 0
- Joined: 2018/11/28 17:25:55
- Location: Illinios
- Status: offline
- Ribbons : 1
Re: Liquid Build
2018/12/29 13:20:05
(permalink)
Thanks guys I try to make things clean as possible, I'm great at math but my artistic skills just aren't there. PC building is as close to art making as I'll get.
I'd show the back but.......its a cable management nightmare. I just got back from a Christmas visit home. If I get the parts in time before I leave for the field for testing mid January, I plan to make cables. I ran out of pins from the last rig I built. I have also yet to over clock it so that is next up on the list as well.
This is the first build in a while I'm actually quite pleased with. Not that I didn't like my other builds, but as soon as they were done I was already thinking about another build. It gave me all kinds of headaches but I hope to keep learning. I doubt I'll tear this one down any time soon and may run it longer than I usually would. I'll keep everyone updated on changes as they occur.
Thanks for all the help and support from everyone here. I did the work but the knowledge given by members played huge parts as well. I hope we can continue to learn together.
Just a novice following the dream to be a master
|
bcavnaugh
The Crunchinator

- Total Posts : 38977
- Reward points : 0
- Joined: 2012/09/18 17:31:18
- Location: USA Affiliate E5L3CTGE12 Associate 9E88QK5L7811G3H
- Status: offline
- Ribbons : 282
Re: Liquid Build
2018/12/29 14:21:25
(permalink)
Nice Rig, Time to Create a MODS RIGS.  I am liking this new Color as well.
post edited by bcavnaugh - 2018/12/29 14:25:04
|
Tyver
Superclocked Member
- Total Posts : 176
- Reward points : 0
- Joined: 2018/11/28 17:25:55
- Location: Illinios
- Status: offline
- Ribbons : 1
Re: Liquid Build
2018/12/29 16:32:46
(permalink)
bcavnaugh
Nice Rig, Time to Create a MODS RIGS.
yeah I need to do that. Ive just been too lazy to do it in the time Ive been home. I want to do it after I at least OC it a little bit to have better scores, even if its mostly auto settings or somethings. BF5 has been a time vampire with what time Ive been home. haha bcavnaugh
I am liking this new Color as well.
Thanks, I was actaully very skeptical of the color choices I made. I made a rig a year ago that basically looked like a rainbow unicorm threw up all over it. I loved to look at it....for about a week. it was just too much, especially in non-FPS games. So the next few builds I did had no RGB at all. I liked it but they were SFF builds (Dan Case and M1 NCase), whta could be seen was so compact it didnt amount to much. THis build however, I decided to go with multiple glass panels so I felt it needed something more since it was also more open. I didnt want a rainbow but did want some light. At the time of planning, I was looking to EVGA parts and was watching some of their videos. The particular guy I was watching had a all white PC and I like that look. It was simple yet lit. Starting this build, there was more RGB as you could see. I eventually dropped the pump and CPU block simply becauase of the extra wire. That extra wire just made it look less clean, I also didnt want to add another device in the back and another software program just to control white lights. So I dropped those pieces and settles on just the ML fans and the HydroCopper lighting. I actually liked this design better because it draws the viewers atttention to what is really the centerpiece of the build, the cooling system. When I vertically mounted the card, it just made it that much better. So the last thing was the coolant. Originally I was going to do all white, so I was going to use cloud white coolant. It was out of stock so I was going to have to order it. I put off the order because of all the issues going on. During that time I decided, I like the white lights but would like some color. While looking threw the colors I decided I liked the blue the most. I liked the orange but it looked too Harley Davidson to me when paired with the black case. Nothing against the company, I just dont like the color skeme for a PC. I also considered scarlett but it just didnt look right to me. Thus Azure blue was what I chose. Upon first putting it in I knew it was the right choice for this build. It helps draw attention to the cooling system but isnt over powering like the scarlett many of the other colors in the EK Cloud Coolant line. I put probably way too much thought into it....but this is as close to art as I will probably ever make. Plus I have to look at it every day. I do plan to swap the RAM to some Corsair Dominator RAM. I think it will blend in better and wont be an eye sore. The RAM in there now is good but being all black just doesnt fit the scheme of the whole case. The one thing I wish I could change, but to my knowledge I cant, is the red color of the temperature readings on the board. I think it would stick out much less if white...but I cant change that.
Just a novice following the dream to be a master
|
Krzysztof47
iCX Member

- Total Posts : 430
- Reward points : 0
- Joined: 2015/12/15 11:51:36
- Location: USA
- Status: offline
- Ribbons : 15
Re: Liquid Build
2018/12/29 21:50:29
(permalink)
|
repo1979
FTW Member
- Total Posts : 1116
- Reward points : 0
- Joined: 2017/02/21 20:37:56
- Location: UTAH
- Status: offline
- Ribbons : 4
Re: Liquid Build
2018/12/29 21:55:26
(permalink)
Oh snap you from the ppcs discord.
|
Krzysztof47
iCX Member
- Total Posts : 430
- Reward points : 0
- Joined: 2015/12/15 11:51:36
- Location: USA
- Status: offline
- Ribbons : 15
Re: Liquid Build
2018/12/29 21:56:49
(permalink)
repo1979
Oh snap you from the ppcs discord.
Haha small world ain't it? Nice to run into you again.
|
repo1979
FTW Member
- Total Posts : 1116
- Reward points : 0
- Joined: 2017/02/21 20:37:56
- Location: UTAH
- Status: offline
- Ribbons : 4
Re: Liquid Build
2018/12/29 21:57:27
(permalink)
|
GTXJackBauer
Omnipotent Enthusiast
- Total Posts : 10323
- Reward points : 0
- Joined: 2010/04/19 22:23:25
- Location: (EVGA Discount) Associate Code : LMD3DNZM9LGK8GJ
- Status: offline
- Ribbons : 48
Re: Liquid Build
2018/12/31 05:37:59
(permalink)
Use this Associate Code at your checkouts or follow these instructions for Up to 10% OFF on all your EVGA purchases: LMD3DNZM9LGK8GJ
|
rjohnson11
EVGA Forum Moderator
- Total Posts : 102323
- Reward points : 0
- Joined: 2004/10/05 12:44:35
- Location: Netherlands
- Status: offline
- Ribbons : 84
Re: Liquid Build
2019/01/01 05:46:19
(permalink)
A superior build. Well done.
|
Tyver
Superclocked Member
- Total Posts : 176
- Reward points : 0
- Joined: 2018/11/28 17:25:55
- Location: Illinios
- Status: offline
- Ribbons : 1
Re: Liquid Build
2019/01/03 14:54:01
(permalink)
Ran some bench marks finally. Fire Strike https://www.3dmark.com/3dm/32005920Time Spy https://www.3dmark.com/3dm/32007077 Heres some back ground info: Highest temp seen was on time spy CPU test, 58 C. Default fan curve Default GPU settings Default RAM settings OC on CPU, all settings on auto except clock ratio was set to 47 HT on Default Nvidia control panel settings G-Sync turned off Havent got around to tweaking things too much yet but that is my base line.
Just a novice following the dream to be a master
|
bcavnaugh
The Crunchinator
- Total Posts : 38977
- Reward points : 0
- Joined: 2012/09/18 17:31:18
- Location: USA Affiliate E5L3CTGE12 Associate 9E88QK5L7811G3H
- Status: offline
- Ribbons : 282
Re: Liquid Build
2019/01/03 15:24:21
(permalink)
|