Delirious
EVGA Forum Moderator

- Total Posts : 11199
- Reward points : 0
- Joined: 11/15/2007
- Location: at my computer
- Status: offline
- Ribbons : 61


Have you ever wanted to sleeve your own cables and not know where to begin. Well, I was in the same boat. I practiced on a pair of old cables and I suggest if you have an old PCIe cable around, try practicing on that first before you disassemble your good PCIe cables. I wanted to do this the most econimical way I could. I made my own pin extracter tool - for pennies. I had read that if you purchased one of these, they are often flimsy and do sometimes break. You can purchase these from Frozen CPU and they will cost you about $24. I have seen them go as low as 13 bucks on ebay.    But, If you would like to make your own, for pennies, take a large paperclip and uncoil it. Then you have two ends. Take a hammer and hit the paper clip on the end a few times to flatten it like a screwdriver. It may take a few hits and you want to make sure you hit it against something solid like a metal vise or anvil or any piece of scrap metal that can allow the hammerhead to flatten the metal. ....and this is what you get   I used a bench grinder to shape the metal so that it was flat on each side and thin enough to go between the PCIe plastic housing and the metal connector. You can flatten it more with the hammer but it's hard to get it accurate. It may take a few times but its a free solution (well pennies) and you can always make another if it breaks. Mine never did. You only have to take one of the sides of the paperclip and insert it down the side of the PCIe housing. There, you will bend the retaining pin back into position.   Once you have driven the pin extracter down each side, the cable should come right out of the housing. If it doesn't, try it again on each side of the metal pin. This is what you should get and the second picture is what you are trying to bend down.   Once the pin is extracted, put tape on to the end of the pin to allow it to pass easily throgh the sleeving material. It can be anything you choose. Nice thing about using blue painters tape is that you can use it over and over and it keeps sticking and is easy to peel off. One little scrap can pass many a wire.   Make sure you pre trim the sleeving material to go the full length from the tip of the metal pin on one end of the wire to the full length the opposite end. The sleeving material is like a chinese finger trap and can be adjusted along the wire for final fit. Once you get it sleeved, there's a couple of options here. Either you can use black shrink tubing or you can heat the end of the sleeving material and compress it over the pin for a cleaner look. Position the sleeving material past the first metal knob holding the wire in place.  Past the knob  Now heat the sleeving and taper the molten material with your fingers towards the end of the pin.   Now that you have the sleeving tapered at both ends of the wire, take your fingernail or a small screwdriver and bend the tabs on the pin outwards. They will be pushed in from removing the pin from the PCIe plastic housing.  Now insert the pin back in to the PCIe housing   Make sure the pin clicks back in place. It helps to remember the orientation the pin came out for easy insertion. When you are finished, all the metal pins should look like this. As you can see, there are grooves on each side of the metal pin for insertion of the homemade pin extractor.  That's it, your done with the first one. Just repeat for the other wires until you are finished. Pay attention to the location the wires should go so that you don't confuse where to plug it back in. I would do one at a time although if you want to take all the wires out at the same time, there are wiring diagrams on the net. Just do a search for PCIe wiring diagram. I would personally do one wire at a time. You can purchase sleeving at any local Fry's or electronic store and you can get paracord off of ebay for around 5.95 for 50 feet or 9.99 for 100 feet----free shipping. My paracord arrived in 3 days from purchase.  Cut the paracord to length. I used a wire cutter because it crimped the end of the paracord and didn't fray it. I then lightly used a lighter and burnt the tip of the paracord to prevent fraying while sleeving. Make sure you use the wire cutters to grab ahold of the white innards on the paracord to remove it. You will be left with a hollow tube. I spent a total of around 20 dollars and I have enough paracord to plenty of sleeving.  My finished product   For 24 pin PSU cables, it is the same procedure. The pins are slighly different but they have the two wings on each side of the pins that needs to be depressed. You don't need to compress both at the same time as the tool from frozen CPU shows. I think that's why these tools are so flimsy and break.....they have to be thin enough to insert on each side simultaneously. This isn't necessary, especially if you slighly bend the last 2-3 mm of the tip of the homemade extraction tool downwards and direct it towards the locking tabs. Standard 4 pin molex are also very easy and you can look right down molex connector and see the pins. Great fun! Good luck and have fun. I spent 20 bucks to do those cables above along with another 8 pin motherboard cable and a 6 pin PCIe cable and still had all those bundles left over for more sleeving.
"Be quick to listen, slow to speak and slow to anger" Affiliate Code XZUMV9TJW5 Associate Code: 7PM43CU71IB2IAP education may be expensive but wait until you get the bill for ignorance A wise man once said that we can't make anyone feel or do anything. We can throw things into the wind, but it's up to each person to decide how they want to react, where they want to stand when things fall.
|
neal0790
FTW Member

- Total Posts : 1446
- Reward points : 0
- Joined: 2/3/2012
- Location: Boston, MA
- Status: offline
- Ribbons : 4

Re:Sleeving Tutorial
Monday, June 04, 2012 6:08 AM
(permalink)
Nice guide, i need to get around to trying this one day. Always wanted white and blue cables.
Case: CM Storm Stryker CPU: i7 3820 Mobo: Asus Rampage Extreme IV x79 Ram: 16GB Kingston HyperX GPU: 3x670 SC 4GB PSU: Corsair AX1200 SSD/HDD: 128GB Crucial M4/2TB+1TB Seagate Barricuda Monitors: Asus VG278HE 27" 144hz 3D 1080p/ Acer H5630 3D projector 85" G700/Razer Black Widow Ultimate/G27 Racing Wheel/Razer Nostromos Mod Rigs Give Me A +1 If You Like It
|
z3r0t0l0rence
Omnipotent Enthusiast

- Total Posts : 8422
- Reward points : 0
- Joined: 10/8/2009
- Location: Arizona
- Status: offline
- Ribbons : 20
Re:Sleeving Tutorial
Monday, June 04, 2012 6:19 PM
(permalink)
Thanks for the guide. I'm going to do my 6pin connecting to try out first then my main 24pin will be up next.
i7 930 OC 4.21 EVGA E758 GSkill 12GB Evga GTX 780 SC 2x Kingston 240 Raid 0 2x Seagate 4TB
|
Halo_003
Omnipotent Enthusiast
- Total Posts : 10297
- Reward points : 0
- Joined: 3/21/2009
- Status: offline
- Ribbons : 51
Re:Sleeving Tutorial
Monday, June 04, 2012 6:23 PM
(permalink)
Nice! I'm going to do my 24 Pin and my other lines. I'll have to make some extension for my PCIe though.
i7 7700K - ASUS Maximus IX Apex - 16GB G.Skill TridentZ RGB 3466MHz C16 - 5700 XT 50th Anniversary
|
Delirious
EVGA Forum Moderator
- Total Posts : 11199
- Reward points : 0
- Joined: 11/15/2007
- Location: at my computer
- Status: offline
- Ribbons : 61
Re:Sleeving Tutorial
Monday, June 04, 2012 6:32 PM
(permalink)
I found it relaxing. ...and you have a little self gratification. Cheap to do as well
"Be quick to listen, slow to speak and slow to anger" Affiliate Code XZUMV9TJW5 Associate Code: 7PM43CU71IB2IAP education may be expensive but wait until you get the bill for ignorance A wise man once said that we can't make anyone feel or do anything. We can throw things into the wind, but it's up to each person to decide how they want to react, where they want to stand when things fall.
|
flasher4q
FTW Member
- Total Posts : 1323
- Reward points : 0
- Joined: 4/16/2006
- Location: So. Cal. L.B.
- Status: offline
- Ribbons : 0
Re:Sleeving Tutorial
Monday, June 04, 2012 8:15 PM
(permalink)
Outstanding post it will help a lot of people....again well done
Asus ROG Strix B550-F gaming Ryzen7 5800x Corsair Dominator Platinum 32 Gig 3600 Samsung 1T 980 PRO PCIe 4.0 Samsung 500Gig 970 Evo PCIe 3.0 MSI GTX 1080Ti Thermaltake Pump/Res combo Primochill 2 120x2 Radiators Bitspower G1/4" Premium master fittings Corsair RM 850x CoolerMaster H500P Case EK-Quantum Velocity D CPU cooler Bose Companion2 Speakers
|
BigH3017
FTW Member
- Total Posts : 1037
- Reward points : 0
- Joined: 6/23/2011
- Status: offline
- Ribbons : 3
Re:Sleeving Tutorial
Wednesday, June 06, 2012 10:54 AM
(permalink)
Nice, are your cables nice and snug without the heat shrink?
|
drake187
iCX Member

- Total Posts : 372
- Reward points : 0
- Joined: 9/25/2009
- Location: durty jerz
- Status: offline
- Ribbons : 4
Re:Sleeving Tutorial
Wednesday, June 06, 2012 11:18 AM
(permalink)
sweet thank you for this post, i had horrible exp[erience sleeving needless to say those tools are sharp haha.
|
notfordman
Omnipotent Enthusiast
- Total Posts : 8772
- Reward points : 0
- Joined: 8/10/2007
- Location: In a van, down by the
- Status: offline
- Ribbons : 28
Re:Sleeving Tutorial
Wednesday, June 06, 2012 2:31 PM
(permalink)
Thats a nice guide Delirious, thanks. I do have a question on one thing. " Make sure you use the wire cutters to grab ahold of the white innards on the paracord to remove it. You will be left with a hollow tube. " Is this telling us that there is a nylon (or something) material inside that needs to be removed to provide the actual sleeve? I do agree this can bring a great feeling of self satisfation doing this yourself. 
post edited by notfordman - Wednesday, June 06, 2012 2:36 PM
|
CAxVIPER
CLASSIFIED Member
- Total Posts : 2710
- Reward points : 0
- Joined: 8/24/2011
- Location: South FL
- Status: offline
- Ribbons : 5
Re:Sleeving Tutorial
Thursday, June 07, 2012 3:25 AM
(permalink)
Sleeving can piss you off to no end if the terminals aren't crimped good and you pull the wire out. But nice tutorial, I highly Suggest mdpc-x. Good quality at a good price if it is offered in the 100eter dumping pack. It is $62 for 330 feet of it.
|
Delirious
EVGA Forum Moderator
- Total Posts : 11199
- Reward points : 0
- Joined: 11/15/2007
- Location: at my computer
- Status: offline
- Ribbons : 61
Re:Sleeving Tutorial
Thursday, June 07, 2012 5:13 PM
(permalink)
notfordman
Thats a nice guide Delirious, thanks. I do have a question on one thing. " Make sure you use the wire cutters to grab ahold of the white innards on the paracord to remove it. You will be left with a hollow tube. "
Is this telling us that there is a nylon (or something) material inside that needs to be removed to provide the actual sleeve?
I do agree this can bring a great feeling of self satisfation doing this yourself.
Yes, Paracord is a woven material on the outside but on the inside is nylon cord that is white. You want to remove all those strings. I slightly melt the tip of the paracord. Just hit it gently with the lighter. It prevents the paracord from fraying. The white portion goes molten and sticks together. You then grab that part with the wire cutters and it brings all that nylon cordage out. "I do agree this can bring a great feeling of self satisfation doing this yourself." Yeah, and sipping on a cold beer while doing it is even more relaxing. Just make sure you don't forget where the wires go back.  I did that and had to look it up. Basically, 12 volts leads go on the bottom.....but consult a wiring diagram. After I finished, I put a volt meter on all my cables to make sure the 12 volt and grounds were all placed where they should be. BigH3017
Nice, are your cables nice and snug without the heat shrink?
Yes, they are. Make sure you test them before you insert them. That's why I post the red arrows as to where you burn the paracord. I show a different sleeving in my pictures but the paracord will melt into a ball at the end and you taper that over that silver knob so that it doesn't/ can't slip back. The other key here is to make sure that you cut enough paracord. I go 4-5 mm past where the silver starts and I make sure I don't stretch the paracord along the wire to measure it. It will contract back after you sleeve it if it's too short. If you cut it longer, it will not pull away from the pin. I started with the heat shrink, and I didn't like it afterwards. It looks professional and clean with no heat shrink....to me.
post edited by Delirious - Thursday, June 07, 2012 5:19 PM
"Be quick to listen, slow to speak and slow to anger" Affiliate Code XZUMV9TJW5 Associate Code: 7PM43CU71IB2IAP education may be expensive but wait until you get the bill for ignorance A wise man once said that we can't make anyone feel or do anything. We can throw things into the wind, but it's up to each person to decide how they want to react, where they want to stand when things fall.
|
Delirious
EVGA Forum Moderator
- Total Posts : 11199
- Reward points : 0
- Joined: 11/15/2007
- Location: at my computer
- Status: offline
- Ribbons : 61
Re:Sleeving Tutorial
Thursday, June 07, 2012 5:16 PM
(permalink)
CAxVIPER
Sleeving can piss you off to no end if the terminals aren't crimped good and you pull the wire out. But nice tutorial, I highly Suggest mdpc-x. Good quality at a good price if it is offered in the 100eter dumping pack. It is $62 for 330 feet of it.
This will never happen if you have those tabs bent in like they should be. If you have to force it, then there's a problem. These pins should pull out cleanly. mdpc-x is good stuff. Either will work. I don't know the cost but the paracord was dirt cheap for 50 feet. $5.95 shipped off of ebay and I'm an outdoorsman...I love to carry paracord with me...It's useful for lots of stuff.
"Be quick to listen, slow to speak and slow to anger" Affiliate Code XZUMV9TJW5 Associate Code: 7PM43CU71IB2IAP education may be expensive but wait until you get the bill for ignorance A wise man once said that we can't make anyone feel or do anything. We can throw things into the wind, but it's up to each person to decide how they want to react, where they want to stand when things fall.
|
CAxVIPER
CLASSIFIED Member
- Total Posts : 2710
- Reward points : 0
- Joined: 8/24/2011
- Location: South FL
- Status: offline
- Ribbons : 5
Re:Sleeving Tutorial
Thursday, June 07, 2012 5:22 PM
(permalink)
Delirious
CAxVIPER
Sleeving can piss you off to no end if the terminals aren't crimped good and you pull the wire out. But nice tutorial, I highly Suggest mdpc-x. Good quality at a good price if it is offered in the 100eter dumping pack. It is $62 for 330 feet of it.
This will never happen if you have those tabs bent in like they should be. If you have to force it, then there's a problem. These pins should pull out cleanly. mdpc-x is good stuff. Either will work. I don't know the cost but the paracord was dirt cheap for 50 feet. $5.95 shipped off of ebay and I'm an outdoorsman...I love to carry paracord with me...It's useful for lots of stuff.
There is always a few I have trouble removing. But yes paracord is much cheaper. For other sleeve you can pay up toward .50 a foot. I think mdpc is like .24 if they don't have the 100 meter packs. Excuse my grammar or spelling errors, I'm stuck on. An iPhone because msi sucks for RMA
|
neal0790
FTW Member
- Total Posts : 1446
- Reward points : 0
- Joined: 2/3/2012
- Location: Boston, MA
- Status: offline
- Ribbons : 4
Re:Sleeving Tutorial
Friday, June 08, 2012 8:09 PM
(permalink)
Do you have a link to where you bought that sleeving in the picture, thanks.
Case: CM Storm Stryker CPU: i7 3820 Mobo: Asus Rampage Extreme IV x79 Ram: 16GB Kingston HyperX GPU: 3x670 SC 4GB PSU: Corsair AX1200 SSD/HDD: 128GB Crucial M4/2TB+1TB Seagate Barricuda Monitors: Asus VG278HE 27" 144hz 3D 1080p/ Acer H5630 3D projector 85" G700/Razer Black Widow Ultimate/G27 Racing Wheel/Razer Nostromos Mod Rigs Give Me A +1 If You Like It
|
Delirious
EVGA Forum Moderator
- Total Posts : 11199
- Reward points : 0
- Joined: 11/15/2007
- Location: at my computer
- Status: offline
- Ribbons : 61
Re:Sleeving Tutorial
Friday, June 08, 2012 9:32 PM
(permalink)
I can't post eBay links but do a search for paracord 550
"Be quick to listen, slow to speak and slow to anger" Affiliate Code XZUMV9TJW5 Associate Code: 7PM43CU71IB2IAP education may be expensive but wait until you get the bill for ignorance A wise man once said that we can't make anyone feel or do anything. We can throw things into the wind, but it's up to each person to decide how they want to react, where they want to stand when things fall.
|
sh1ft
Superclocked Member

- Total Posts : 242
- Reward points : 0
- Joined: 6/24/2008
- Location: East Lansing, MI
- Status: offline
- Ribbons : 3
Re:Sleeving Tutorial
Friday, June 08, 2012 9:57 PM
(permalink)
Also try your local surplus store. They have stockpiles of it. We use it regularly.
|
Vlada011
Omnipotent Enthusiast
- Total Posts : 10126
- Reward points : 0
- Joined: 3/25/2012
- Location: Belgrade-Serbia
- Status: offline
- Ribbons : 11
Re:Sleeving Tutorial
Sunday, June 10, 2012 12:07 AM
(permalink)
I buy about 30m MDPC-X small black and 5m SATA sleeve and heatsrink for both. I will go with full black I think. But maybe I need more.
post edited by Vlada011 - Sunday, June 10, 2012 12:10 AM
|
icostin
New Member

- Total Posts : 17
- Reward points : 0
- Joined: 10/2/2011
- Status: offline
- Ribbons : 0
Re:Sleeving Tutorial
Saturday, June 23, 2012 7:04 PM
(permalink)
Waiting for my parts to arrive but working on sleeving : I have started sleeving my 2 Corsair's Psu. Sleeving : 550 Paracord ( gunandsurplus seller on ebay ) good quality fast shipping. Tools : Lamptron mod kit, works very good just like staples but better. Tried different techniques with it and it works great on push-pull (push the tool into the atx connector and pull gently on the cable) no effort. Took me like 5 hours to get to the bottom of 7 cables (1* 24 pin cable; 2* 8 pin to 8 pin CPU; 4 Pcie 8 pin to 8 pin cables) and trust me corsair cables are hard to do, they're twisted and jammed especially the 24 pin that has 2 cables on the same pin. Paracord is the best, last build i did some Mdpc sleeving looks good but i just don't like heat-shrink. I use it only if I really don't have a choice and even then I try to hide it behind something in the build. Here 's a picture of today's work : 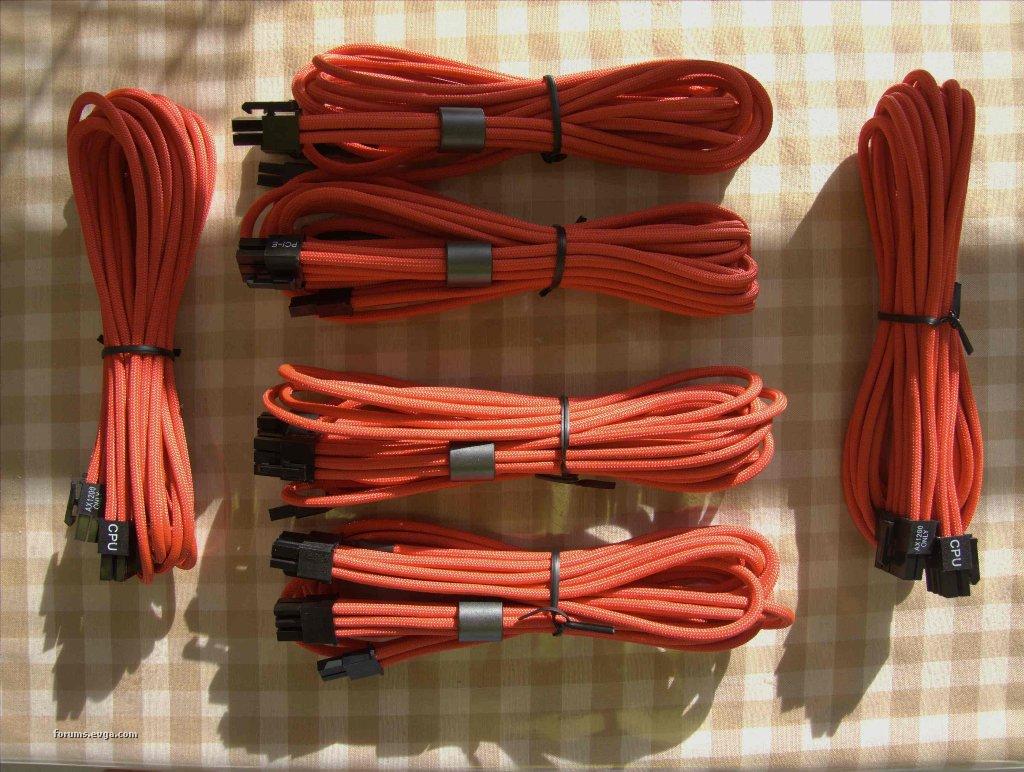
post edited by icostin - Saturday, June 23, 2012 7:19 PM
Attached Image(s)
MM Extended UFO / EVGA SR-2 / 2*Intel Xeon 5680 / 48Go Kingston HyperX T1 Black ______________________________________________________ It is difficult to master your passions and impossible to satisfy them.
|
icostin
New Member
- Total Posts : 17
- Reward points : 0
- Joined: 10/2/2011
- Status: offline
- Ribbons : 0
Re:Sleeving Tutorial
Saturday, June 23, 2012 7:31 PM
(permalink)
and Lamptron mod toolkit : 
Attached Image(s)
MM Extended UFO / EVGA SR-2 / 2*Intel Xeon 5680 / 48Go Kingston HyperX T1 Black ______________________________________________________ It is difficult to master your passions and impossible to satisfy them.
|
Delirious
EVGA Forum Moderator
- Total Posts : 11199
- Reward points : 0
- Joined: 11/15/2007
- Location: at my computer
- Status: offline
- Ribbons : 61
Re:Sleeving Tutorial
Saturday, June 23, 2012 8:43 PM
(permalink)
excellent work. Looks like you kept the magnets. I didn't on mine. On corsair, at least for the AX1200, you have to be careful how you do those. There's a specific wiring sequence for their PSUs. Make sure the pins are back like you found them. How much did that Lamptron kit set you back?
"Be quick to listen, slow to speak and slow to anger" Affiliate Code XZUMV9TJW5 Associate Code: 7PM43CU71IB2IAP education may be expensive but wait until you get the bill for ignorance A wise man once said that we can't make anyone feel or do anything. We can throw things into the wind, but it's up to each person to decide how they want to react, where they want to stand when things fall.
|
icostin
New Member
- Total Posts : 17
- Reward points : 0
- Joined: 10/2/2011
- Status: offline
- Ribbons : 0
Re:Sleeving Tutorial
Sunday, June 24, 2012 4:34 AM
(permalink)
Thanks. I kept the magnets for keeping the sleeving together (only got 6 wires inside) and as any core filter to keep interferences away. I plan to paint them in red like the sleeving. It wasn't easy to keep the wiring sequence in mind not even with a picture (all wires are black  ) but because I have 2 corsair AX1200 on the workbench, i did myself a tester with an led and some old 12v adapter and wired the pins like the original cable one by one by testing the connection onto the 2 cable. It was annoying and lost some time to finish it because on top of this on the 24pin there are 3 types of wires : AWG 18, AWG 20 and AWG 22 plus a pin with 2 wires on it that i had to double sleeve. For the lamptron kit I payed like 14 euro in France but worth every penny because it saved me allot of time without cutting my fingers as I did with staples  , but as I said in my previous post it's working in a "push pull mode" at least this is the way I did. For only one 24 pin cable, 4 pciE cables and 2 cpu 8 pins cables I used 100 ft of sleeve, and I'm just half through the first psu.
MM Extended UFO / EVGA SR-2 / 2*Intel Xeon 5680 / 48Go Kingston HyperX T1 Black ______________________________________________________ It is difficult to master your passions and impossible to satisfy them.
|
icostin
New Member
- Total Posts : 17
- Reward points : 0
- Joined: 10/2/2011
- Status: offline
- Ribbons : 0
Re:Sleeving Tutorial
Sunday, June 24, 2012 5:35 AM
(permalink)
For the AX 1200 wiring diagram I found this just in case things screw up : 
Attached Image(s)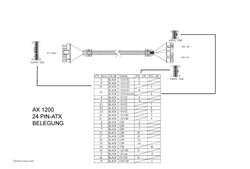
MM Extended UFO / EVGA SR-2 / 2*Intel Xeon 5680 / 48Go Kingston HyperX T1 Black ______________________________________________________ It is difficult to master your passions and impossible to satisfy them.
|
feniks
CLASSIFIED Member
- Total Posts : 3994
- Reward points : 0
- Joined: 8/3/2008
- Location: NYC
- Status: offline
- Ribbons : 38
Re:Sleeving Tutorial
Monday, July 16, 2012 4:13 PM
(permalink)
good pics, thank you! will be doing this very soon on the MB 24-pin extension  nice write up Delirious! 
|
omning
New Member
- Total Posts : 95
- Reward points : 0
- Joined: 6/20/2012
- Location: Orlando, Fl
- Status: offline
- Ribbons : 1
Re:Sleeving Tutorial
Thursday, July 19, 2012 8:43 PM
(permalink)
Man it's a shame I'm so ridiculously lazy when it comes to this :)
|
adamf4i
iCX Member
- Total Posts : 341
- Reward points : 0
- Joined: 7/21/2012
- Location: Lee's Summit MO
- Status: offline
- Ribbons : 0
Re:Sleeving Tutorial
Monday, July 23, 2012 2:40 PM
(permalink)
Nice tutorial I will give this a try
|
adamf4i
iCX Member
- Total Posts : 341
- Reward points : 0
- Joined: 7/21/2012
- Location: Lee's Summit MO
- Status: offline
- Ribbons : 0
Re:Sleeving Tutorial
Wednesday, July 25, 2012 6:06 AM
(permalink)
Once u open up the power supply is there other end a connector so it's the same to do on other end ?
|
tiagoarkangel
New Member
- Total Posts : 43
- Reward points : 0
- Joined: 5/29/2011
- Status: offline
- Ribbons : 2
Re:Sleeving Tutorial
Wednesday, July 25, 2012 6:10 PM
(permalink)
Simple and great tutorial..
 Sponsored by: Zowie, Adata, Seasonic, EK waterblocks, OCZ, Patriot, Alphacool, Bitspower, Phobya, Jingway, Aquatuning, Coldzero, Djungelapa, PcCool waiting for EVGA coming in :D Sponsored by: Zowie, Adata, Seasonic, EK waterblocks, OCZ, Patriot, Alphacool, Bitspower, Phobya, Jingway, Aquatuning, Coldzero, Djungelapa, PcCool waiting for EVGA coming in :D
|
CAxVIPER
CLASSIFIED Member
- Total Posts : 2710
- Reward points : 0
- Joined: 8/24/2011
- Location: South FL
- Status: offline
- Ribbons : 5
Re:Sleeving Tutorial
Monday, August 06, 2012 6:20 PM
(permalink)
So I started doing something that I found works better for paracord. Instead of heating it using a lighter I use 6/0 thread. I use to tie flies for fishing and my dad gave me the idea of doing it. You can pull it down tighter then you can if you heat it and it makes it fit easier.  Then I use a bobbin  end result 
|
neal0790
FTW Member
- Total Posts : 1446
- Reward points : 0
- Joined: 2/3/2012
- Location: Boston, MA
- Status: offline
- Ribbons : 4
Re:Sleeving Tutorial
Monday, August 06, 2012 6:58 PM
(permalink)
This was a great tutorial for when i did mine. I just have to say after doing my 4 six pin PCI connectors and my 24pin ATX i got some respect for people that did it themselves. It takes a good amount of time and isnt the easiest thing to do. But one you get in the rythem of things its moves right along. I wanted to give up like 4 times when i did mine but after seeing it all done it was worth the time and cuts all over my fingers. lol
Case: CM Storm Stryker CPU: i7 3820 Mobo: Asus Rampage Extreme IV x79 Ram: 16GB Kingston HyperX GPU: 3x670 SC 4GB PSU: Corsair AX1200 SSD/HDD: 128GB Crucial M4/2TB+1TB Seagate Barricuda Monitors: Asus VG278HE 27" 144hz 3D 1080p/ Acer H5630 3D projector 85" G700/Razer Black Widow Ultimate/G27 Racing Wheel/Razer Nostromos Mod Rigs Give Me A +1 If You Like It
|
CAxVIPER
CLASSIFIED Member
- Total Posts : 2710
- Reward points : 0
- Joined: 8/24/2011
- Location: South FL
- Status: offline
- Ribbons : 5
Re:Sleeving Tutorial
Monday, August 06, 2012 7:09 PM
(permalink)
Anyone have a solution besides heat shrink for these? 
|