Graphite8five
SSC Member

- Total Posts : 660
- Reward points : 0
- Joined: 2016/08/04 22:27:09
- Status: offline
- Ribbons : 3

Today I disassembled my 1080 Ti FTW but reached a point of frustrating confusion. All of the FTW3 teardown/waterblock installation videos I watched failed to mention the removal of the four silver spring screws that appear to be what essentially hold the heatsink/cooler to the baseplate-PCB. I realise some people are removing the PCB only and leaving the baseplate attached to the heatsink (more likely the waterblock installations) But I was trying to remove the heatsink from the baseplate only as does this guy here: https://www.youtube.com/watch?v=lrMzB_K8mNU&t=330s Starts at 5:23 He chooses not to video all of the disassembly steps but you can see how he a has already unscrewed those 4 spring screws... The fan shroud almost completely covers over all 4 screws making access with a screwdriver very difficult. I had to unscrew them on quite an angle. You would think taking the shroud off would make things easier but there are screws on the shroud that can only be accessed once the heatsink is separated from the baseplate! Wow what a nightmare! On re-assembly I was able to partially remove the shroud to make access easier but still very difficult. So have I gone about disassembly the wrong way? Has anyone else faced this? Is there another trick? This could be very helpful for people wanting to attempt this. The guy in the above video seems to have done it but with how much difficulty I don't know. I think he really should have filmed those steps as it makes it look far far to simple...  https://s1.postimg.org/2g.ng88f3/Spring_Screws.jpg https://s1.postimg.org/2g.ng88f3/Spring_Screws.jpg
post edited by Graphite8five - 2017/10/21 00:18:16
 Maximus XI Hero, 8700K 5Ghz delid, EKWB Custom loop ,Dominator RGB 3400Mhz 16GB, EVGA 2080 Ti FTW3 EK Vector, Seasonic Prime Platinum 1300W, Asus PG349Q 34" 120hz G-Sync, Phanteks Eclipse P600S.
|
PietroBR
FTW Member

- Total Posts : 1202
- Reward points : 0
- Joined: 2013/09/14 06:40:52
- Location: Brazil
- Status: offline
- Ribbons : 7

Re: FTW3 disassembly confusion.
2017/10/21 05:01:49
(permalink)
I would risk using a precision screwdriver on those, since the precision ones are thinners and easier to angle fit the screws (I would be afraid to damage the screw depending on the angle as well). A kit like this I'm talking about (the tools on the right side)  And removing the shroud first wouldn't been easier to get those screws? Other than that, I don't think your disassembly is wrong. Might just be tricky to take those out (or not take it out at all).
|
Graphite8five
SSC Member
- Total Posts : 660
- Reward points : 0
- Joined: 2016/08/04 22:27:09
- Status: offline
- Ribbons : 3
Re: FTW3 disassembly confusion.
2017/10/21 05:31:39
(permalink)
I did use a precision screwdriver toolkit. I had an angled screw driver as well but it was far to big in this case (not part of the precision toolkit)
My initial reaction was that the shroud would have to come off too like you suggest, but can you believe it part of the shroud is screwed to the heatsink which can only be accessed once the heatsink is separated from the baseplate/PCB! So no the shroud does not come off easily... I managed to unscrew them but with quite an angle on the screwdriver, which should I say didn't feel quite right... On re-assembly though I was able to loosen the shroud slightly to get a straighter angle on the screwdriver. I suppose it wasn't too bad but I am curious to know how this would have been achieved in the manufacturing assembly process and if there is another way. As far as I could tell these had to be unscrewed for to the heatsink to detach from the card...
Maximus XI Hero, 8700K 5Ghz delid, EKWB Custom loop ,Dominator RGB 3400Mhz 16GB, EVGA 2080 Ti FTW3 EK Vector, Seasonic Prime Platinum 1300W, Asus PG349Q 34" 120hz G-Sync, Phanteks Eclipse P600S.
|
PietroBR
FTW Member
- Total Posts : 1202
- Reward points : 0
- Joined: 2013/09/14 06:40:52
- Location: Brazil
- Status: offline
- Ribbons : 7
Re: FTW3 disassembly confusion.
2017/10/21 05:44:05
(permalink)
Oh boy.
Didn't know about that.
Now you got me curious well.
When I saw the pic. you posted, I was thinking that only unscrewing the ones on the shroud would come out easily.
|
Graphite8five
SSC Member
- Total Posts : 660
- Reward points : 0
- Joined: 2016/08/04 22:27:09
- Status: offline
- Ribbons : 3
Re: FTW3 disassembly confusion.
2017/10/21 16:18:48
(permalink)
No, there a couple of screws on the rgb badge side that fix the shroud to the heatsink. Impossible to get to without separating the heatsink from the card... See pic below. Edit: A precision angle screwdriver may work for these but would still be very difficult...  https://s1.postimg.org/6a..._fan_shroud_screws.jpg https://s1.postimg.org/6a..._fan_shroud_screws.jpg
post edited by Graphite8five - 2017/10/21 16:22:43
Maximus XI Hero, 8700K 5Ghz delid, EKWB Custom loop ,Dominator RGB 3400Mhz 16GB, EVGA 2080 Ti FTW3 EK Vector, Seasonic Prime Platinum 1300W, Asus PG349Q 34" 120hz G-Sync, Phanteks Eclipse P600S.
|
PietroBR
FTW Member
- Total Posts : 1202
- Reward points : 0
- Joined: 2013/09/14 06:40:52
- Location: Brazil
- Status: offline
- Ribbons : 7
Re: FTW3 disassembly confusion.
2017/10/23 03:13:23
(permalink)
I think nobody (at least until this moment) have disassembly the Heatsink from the 1080Ti's.
With the photos you provided, I have no idea how this marked scews were put in place.
|
Graphite8five
SSC Member
- Total Posts : 660
- Reward points : 0
- Joined: 2016/08/04 22:27:09
- Status: offline
- Ribbons : 3
Re: FTW3 disassembly confusion.
2017/10/23 03:58:23
(permalink)
The marked screws in the first pics have been unscrewed by others. Steve from gamer's nexus has them unscrewed in his teardown but the video doesn't show it and he doesn't seem to mention them either. https://www.youtube.com/w...uBjTi0uj64E&t=409s The screws in the second pic (the other shroud screws) can be accessed only once the heatsink has been separated from the board. I'm gonna have to have another close look at some of FTW3 disassembly videos again but yes for waterblock installations your mostly interested in separating the PCB and the videos I've seen tend to leave the baseplate intact with the heatsink...
Maximus XI Hero, 8700K 5Ghz delid, EKWB Custom loop ,Dominator RGB 3400Mhz 16GB, EVGA 2080 Ti FTW3 EK Vector, Seasonic Prime Platinum 1300W, Asus PG349Q 34" 120hz G-Sync, Phanteks Eclipse P600S.
|
rludwic
iCX Member

- Total Posts : 316
- Reward points : 0
- Joined: 2009/01/11 16:27:52
- Location: Las Vegas via Detroit, MI
- Status: offline
- Ribbons : 2
Re: FTW3 disassembly confusion.
2017/10/25 14:10:37
(permalink)
I've been changing blocks onto GPU's for a while now and I would personally make it a habit to do the minimal disassembly as possible. In the end I am strictly interested in the board and attached components. I don't want a baggy fully of tiny screws I won't remember where they came from should the next owner want the card back to air cooling a year or so later.
Rig#1 Fractal Define S 5960x @4.4 Custom Water Cooling Loop Asus Deluxe 2 x99 m/b 32 gigs GSkill 2666 1 EVGA 1080Ti Hydro Copper 1 Intel 750- 400Gig NVMe SSD 1 Samsung 950 Pro (500 gig) 1 Sammy 850-1TB SSD ( My Files and downloaded (SW library) 1Sammy 850-500Gig (Extra Games) 1 WD Black SATA 3 2 TB backup HDD EVGA 1050 watt SuperNova G Acer XB270HU monitor Firestrike Extreme score 16847 http://www.3dmark.com/fs/6075261https://www.heatware.com/eval.php?id=71122 Rig #2 HAF 932 EVGA X58 Classified 980x @4.5 Ghz 12 gigs Patriot Viper Sector 7's 2
|
Cool GTX
EVGA Forum Moderator

- Total Posts : 31014
- Reward points : 0
- Joined: 2010/12/12 14:22:25
- Location: Folding for the Greater Good
- Status: offline
- Ribbons : 122
Re: FTW3 disassembly confusion.
2017/10/25 14:46:20
(permalink)
|
EVGA_Lee
Moderator
- Total Posts : 4247
- Reward points : 0
- Joined: 2016/11/04 14:43:35
- Location: Brea, CA
- Status: offline
- Ribbons : 14
Re: FTW3 disassembly confusion.
2017/10/25 15:31:09
(permalink)
Generally, I wouldn't try to remove the heatsink from the baseplate. You can do it, of course, but it's much easier to just remove the heatsink and baseplate together, although it requires removing more screws. On the positive side, you won't have to remove the backplate either, since the backplate is held on pretty well by the thermal pads. Take a look at the FTW3 HYBRID guide, which walks you through how to do this: https://www.evga.com/support/manuals/files/GTX_1080Ti_FTW3_Hybrid_manual.pdf A Phillips #1 should be sufficient for all the screws. Please note that some screwdriver kits may vary slightly between a Phillips #0 to a Phillips #2.
|
Graphite8five
SSC Member
- Total Posts : 660
- Reward points : 0
- Joined: 2016/08/04 22:27:09
- Status: offline
- Ribbons : 3
Re: FTW3 disassembly confusion.
2017/10/27 23:58:39
(permalink)
Hey Guys, I disassembled my card again today to re-paste the GPU but unfortunately on reassembly I struck a problem. One of the wires for the RGB badge has broken out of the plug.  I know that when plugs like this break they are most times impossible to fix and I tried with no luck. The wire is part of the RBG lighting and now the RGB logo does not follow the badge colour and sometimes the badge does the breathing effect instead of the colour shift effect. I know that EVGA do condone disassembly under warranty and if this did happen to be a poor connection from the factory could this be covered under warranty?
Maximus XI Hero, 8700K 5Ghz delid, EKWB Custom loop ,Dominator RGB 3400Mhz 16GB, EVGA 2080 Ti FTW3 EK Vector, Seasonic Prime Platinum 1300W, Asus PG349Q 34" 120hz G-Sync, Phanteks Eclipse P600S.
|
PietroBR
FTW Member
- Total Posts : 1202
- Reward points : 0
- Joined: 2013/09/14 06:40:52
- Location: Brazil
- Status: offline
- Ribbons : 7
Re: FTW3 disassembly confusion.
2017/10/28 03:23:57
(permalink)
Graphite8five
Hey Guys,
I disassembled my card again today to re-paste the GPU but unfortunately on reassembly I struck a problem. One of the wires for the RGB badge has broken out of the plug. I know that when plugs like this break they are most times impossible to fix and I tried with no luck. The wire is part of the RBG lighting and now the RGB logo does not follow the badge colour and sometimes the badge does the breathing effect instead of the colour shift effect. I know that EVGA do condone disassembly under warranty and if this did happen to be a poor connection from the factory could this be covered under warranty?
Damn. That Sucks. But I doubt the warranty is going to cover it.
This Limited Warranty is conditioned upon proper use of the Product by the Purchaser. This Limited Warranty does not cover:- Graphics Cards that are modified by customer outside of factory specifications and/or not in factory condition.
- Graphics Cards with modification to the serial number and/or factory identification labels whether removed, relocated, falsified, defaced, damaged, altered or made illegible.
- Damages to PCB (Printed Circuit Board) whether cut, scratched, warped, cracked, dented or broken.
- Any damages to the components, hardware and/or assembly of the graphics card including neglect, or unusual physical, electrical or electromechanical stress.
- Any missing hardware, components and/or assemblies of the graphics card.
https://www.evga.com/support/warranty/graphics-cards/ But, I do remember, somewhere I read, that they MIGHT repair (some fee included) a determined broken component. Would need to contact the support to confirm this.
|
Graphite8five
SSC Member
- Total Posts : 660
- Reward points : 0
- Joined: 2016/08/04 22:27:09
- Status: offline
- Ribbons : 3
Re: FTW3 disassembly confusion.
2017/10/28 04:58:46
(permalink)
I did take a lot of care in unplugging the plugs so I think it's possible the particular wire had a weak connection to begin with causing it to break so easily. I have contacted customer support anyway and will hope for the best.
On a side note the 4 difficult to access screws I mentioned earlier are a lot easier to access if you loosen the shroud as much as possible.
Maximus XI Hero, 8700K 5Ghz delid, EKWB Custom loop ,Dominator RGB 3400Mhz 16GB, EVGA 2080 Ti FTW3 EK Vector, Seasonic Prime Platinum 1300W, Asus PG349Q 34" 120hz G-Sync, Phanteks Eclipse P600S.
|
PietroBR
FTW Member
- Total Posts : 1202
- Reward points : 0
- Joined: 2013/09/14 06:40:52
- Location: Brazil
- Status: offline
- Ribbons : 7
Re: FTW3 disassembly confusion.
2017/10/28 05:04:56
(permalink)
Graphite8five
I did take a lot of care in unplugging the plugs so I think it's possible the particular wire had a weak connection to begin with causing it to break so easily. I have contacted customer support anyway and will hope for the best.
On a side note the 4 difficult to access screws I mentioned earlier are a lot easier to access if you loosen the shroud as much as possible.
Hoping for the best as well man. Damn. After all, you still did a nice job in the disassembly there. I risk saying you didn't record the steps?
|
Graphite8five
SSC Member
- Total Posts : 660
- Reward points : 0
- Joined: 2016/08/04 22:27:09
- Status: offline
- Ribbons : 3
Re: FTW3 disassembly confusion.
2017/10/28 05:19:36
(permalink)
It's really very easy, you just have to disconnect the 5 plugs (includes my broken one  ), loosen the shroud a bit and then unscrew the 4 screws that hold the heatsink to the board and it just comes apart. I could easily put a guide together with pics... Most of the disconnecting is seen in the first pic I posted...
Maximus XI Hero, 8700K 5Ghz delid, EKWB Custom loop ,Dominator RGB 3400Mhz 16GB, EVGA 2080 Ti FTW3 EK Vector, Seasonic Prime Platinum 1300W, Asus PG349Q 34" 120hz G-Sync, Phanteks Eclipse P600S.
|
Cool GTX
EVGA Forum Moderator
- Total Posts : 31014
- Reward points : 0
- Joined: 2010/12/12 14:22:25
- Location: Folding for the Greater Good
- Status: offline
- Ribbons : 122
Re: FTW3 disassembly confusion.
2017/10/28 13:01:35
(permalink)
Contact support about your options 
|
Graphite8five
SSC Member
- Total Posts : 660
- Reward points : 0
- Joined: 2016/08/04 22:27:09
- Status: offline
- Ribbons : 3
Re: FTW3 disassembly confusion.
2017/10/28 16:02:04
(permalink)
Cool GTX
Contact support about your options
Thanks. I have lodged a support request with EVGA. Obviously I'm quite upset about it and I believe that I did take a lot of care in removing the plugs. Hopefully we can come to some understanding. 
Maximus XI Hero, 8700K 5Ghz delid, EKWB Custom loop ,Dominator RGB 3400Mhz 16GB, EVGA 2080 Ti FTW3 EK Vector, Seasonic Prime Platinum 1300W, Asus PG349Q 34" 120hz G-Sync, Phanteks Eclipse P600S.
|
Graphite8five
SSC Member
- Total Posts : 660
- Reward points : 0
- Joined: 2016/08/04 22:27:09
- Status: offline
- Ribbons : 3
Re: FTW3 disassembly confusion.
2017/11/05 23:49:48
(permalink)
I was looking over some of my camera photos and noticed from a pic of my FTW3 the RGB plug that has broken appears that I'd plugged it in back to front. I switched it around today and now the RGB badge is doing the full set of RGB colours again. However the brown wire is still broken but I'm unsure what the brown wire does exactly. Does anyone know? Is it a wire that controls the RGB effects rather than the actual colours? I've noticed one or two colours are transitioning to the next colour much faster than the others.
Maximus XI Hero, 8700K 5Ghz delid, EKWB Custom loop ,Dominator RGB 3400Mhz 16GB, EVGA 2080 Ti FTW3 EK Vector, Seasonic Prime Platinum 1300W, Asus PG349Q 34" 120hz G-Sync, Phanteks Eclipse P600S.
|
ty_ger07
Insert Custom Title Here

- Total Posts : 21174
- Reward points : 0
- Joined: 2008/04/10 23:48:15
- Location: traveler
- Status: online
- Ribbons : 270
Re: FTW3 disassembly confusion.
2017/11/06 01:03:50
(permalink)
It doesn't look like the LEDs are multiplexed. So, that wire must be for one individual color (red, green, or blue) shared among the three. This is the Kingpin 1080 Ti RGB LED pinout. I assume that the FTW3 is the same or similar. 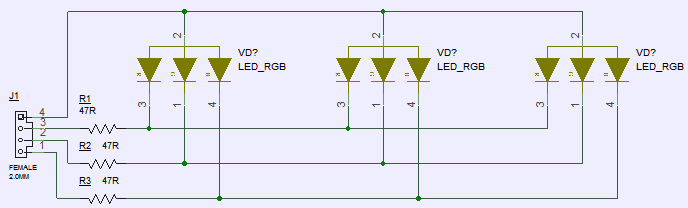
ASRock Z77 • Intel Core i7 3770K • EVGA GTX 1080 • Samsung 850 Pro • Seasonic PRIME 600W Titanium
My EVGA Score: 1546 • Zero Associates Points • I don't shill
|
Graphite8five
SSC Member
- Total Posts : 660
- Reward points : 0
- Joined: 2016/08/04 22:27:09
- Status: offline
- Ribbons : 3
Re: FTW3 disassembly confusion.
2017/11/06 23:43:03
(permalink)
ty_ger07
It doesn't look like the LEDs are multiplexed. So, that wire must be for one individual color (red, green, or blue) shared among the three.
This is the Kingpin 1080 Ti RGB LED pinout. I assume that the FTW3 is the same or similar.
Hmm I'm not the greatest with wiring diagrams... I am quite sure I am getting all of the colours again though. I am getting Green, Light blue, Dark Blue, Purple, Red, Orange and Yellow. The only issue I can see is that the orange is only lasting a mere second before transitioning to yellow vs the normal 5 second or so transition time. If it's not an individual colour wire do you have any other idea? On a side note to anyone else who followed this thread I am pleased to announce that EVGA have approved RMA for my card. Thanks EVGA!
post edited by Graphite8five - 2017/11/07 02:15:01
Maximus XI Hero, 8700K 5Ghz delid, EKWB Custom loop ,Dominator RGB 3400Mhz 16GB, EVGA 2080 Ti FTW3 EK Vector, Seasonic Prime Platinum 1300W, Asus PG349Q 34" 120hz G-Sync, Phanteks Eclipse P600S.
|
PietroBR
FTW Member
- Total Posts : 1202
- Reward points : 0
- Joined: 2013/09/14 06:40:52
- Location: Brazil
- Status: offline
- Ribbons : 7
Re: FTW3 disassembly confusion.
2017/11/07 02:36:23
(permalink)
Graphite8five
ty_ger07
It doesn't look like the LEDs are multiplexed. So, that wire must be for one individual color (red, green, or blue) shared among the three.
This is the Kingpin 1080 Ti RGB LED pinout. I assume that the FTW3 is the same or similar.
Hmm I'm not the greatest with wiring diagrams... I am quite sure I am getting all of the colours again though. I am getting Green, Light blue, Dark Blue, Purple, Red, Orange and Yellow. The only issue I can see is that the orange is only lasting a mere second before transitioning to yellow vs the normal 5 second or so transition time. If it's not an individual colour wire do you have any other idea?
On a side note to anyone else who followed this thread I am pleased to announce that EVGA have approved RMA for my card. Thanks EVGA!
Well. That's nice to hear. Good thing they accepted the RMA. Now they might repair the broken cable / replace your card.
|