staypuft
CLASSIFIED Member

- Total Posts : 3764
- Reward points : 0
- Joined: 3/11/2006
- Location: USA
- Status: offline
- Ribbons : 31


Saturday, October 02, 2021 3:41 AM
(permalink)
Here we go with a quick summary of my teardown of the EVGA RTX 3070 Ti XC3 Ultra. I could not find a single photo of the PCB online and figured it would be good to get some pics, in addition to looking into the thermal pad setup and areas for potential improvement. There isn't a single online review of this card either... but I'm not going to get into any benches in this thread. OK, on with the project...  Step 1 Step 1: I reached out to EVGA to get my hands on factory spec thermal pads. Ordered three sets just in case things went south and I needed to redo the pads. The supplied pads are all ~ 2.25mm thick. UPDATE: I followed up with EVGA to ask about the backplate pads and they told me that these are not included with the kits, that they should not need to be removed/replaced.  Step 2 Step 2: Remove the 8 screws holding the backplate to the PCB, 6 of these (locations marked in yellow) pass through to the heatsink, and 2 of them (marked in pink) pass through to nuts on the front side of the PCB. Hold the nut with your finger as you loosen the screw, should turn easily. Gently pull the backplate away from the PCB at a slight angle. Be patient, it takes a bit for the thermal pads to release.  Here is a close-up of the backplate pads. These WERE NOT included in the kit I purchased from EVGA. Going to reuse them as is. NOTE: The small square and strip are both ~3mm thick. The large center square is only about 1.5mm thick and does not contact the PCB itself, but rather just touches the 2nd shortest components. Looking at the compression marks, anything thicker will likely put undue pressure on those 4 caps and cause the backplate to bulge. Pads aren't meant to compress that much, you would need paste, or pad+paste to make good PCB contact.  Step 3 Step 3: Remove the 4 GPU core screws (marked in blue). Unplug the 3 colored fan connectors. Gently pull the heatsink away from the PCB at an angle (open on the colored fan connector side). Be careful because there is another connector on the other side. When you split the two, open them like a book and place them on the table as shown. At this point you can disconnect the LED plug.  This pad does not cover the Memory VRM MOSFETs 100%  This pad is slightly off center for the GPU VRM MOSFETs  Step 4 Step 4: Remove the old pads and clean the chips with rubbing alcohol, clean all used paste from the core and heatsink. The memory chips did not clean up completely and there is some residual staining from the pads. The core paste was hardened and stuck, took a long time to remove. NOTE: I reused the GPU VRM choke (inductor) paste by scooping up with a plastic tool and smoothing it back over. It stays flexible and has the consistency of cake frosting. It presses out easily when the heatsink is replaced. The gap is around 0.5mm.   Step 5 Step 5: Install the new pads, sticky side down. Peel off the protective film that has writing on it. Center them up, set down, and voila. Beautiful. I left the blue protective wafer on each pad until the pasting was complete. I applied MX-5 to the core using a spread method, just enough that you can't see the metal, but not too much that you keep the core from making good metal contact. Don't forget to remove the wafers before reassembly!  Improvement option: I added a small thermal pad (6.5x6.5mm) to the 9th GPU VRM MOSFET at the top of this photo. The pad will contact the copper plate and hang over about 25% when assembled. Should be good for additional cooling of that lonely FET. This small pad was cut from the materials supplied with my second pad kit.  Step 6 Step 6: Place the heatsink next to the PCB and connect the LED plug. Turn the heatsink over so that the fan side is down. Bring the PCB over the heatsink and align the holes then gently let the PCB down on top of the heatsink. The two rear holes have bosses that fit into the PCB, so I tilted it a bit towards the back and made sure these were inserted first, then set the rest down. Install the 4 GPU core screws and tighten in crossover pattern while applying firm (firm but gentle) pressure to the back of the PCB directly over the core with your other hand. Make sure that you check alignment of all holes before the final tightening. Then install backplate and tighten the 2 screws/nuts and 6 screws. PLUG THE FANS BACK IN. Double-check everything and make sure it looks seated and pads are bulging out (compressed).  Step 7 Step 7: Test. I did some quick runs of my favorite heat-generating apps to make sure it is all good. My before and after temps are the same... so new TIM had no effect, but at least now I have some photos of the inside. COMMENTS on the EVGA 3070Ti XC3 design - Thermal pad assembly issues for the VRM MOSFETs.  - The PCB does not have cutouts for air flow on the inner section, like the 3070 XC3. - The backplate is exactly the same as a 3070 XC3, including large air holes lined up with the missing inner section cutouts.(image courtesy of google)  - The heatsink used on this card is looks the same as that used on a 3080 XC3, except for a few changes. It is completely different than the one used on the 3070 XC3 / 3060Ti FTW3. Makes sense considering the 290W power consumption rating of this card. - The 3070Ti XC3 VRM components appear to be the same as used on a 3080 (low profile chokes), but only total up to 9/2 (GPU/Memory) VRM phases, same count as a 3070 XC3 (the 3060Ti FTW3 has 8/2). (image courtesy of google)  That's all I have for now. Will probably look into adding / replacing backplate pads in the future.
post edited by staypuft - Thursday, January 20, 2022 8:09 PM
Interested in a discount on EVGA products? Click here for details and enter this Associates code at checkout >> 2ILPLQQ8IWY8DPN 2021 Build: Gigabyte Z590 Ultra | Core i7-10700K | be quiet! Dark Rock Pro 4 | 32GB G.Skill Trident Z DDR4-3200 EVGA RTX 3080 FTW3 Ultra | Samsung 970 EVO 500GB | Seasonic Focus GX-850 | Fractal Design Meshify C | Asus TUF VG27AQL1A
|
Lordred
SSC Member

- Total Posts : 674
- Reward points : 0
- Joined: 3/22/2010
- Status: offline
- Ribbons : 5
Re: EVGA RTX 3070Ti XC3 Ultra 3785 Teardown Disassembly - PCB Photos
Saturday, October 02, 2021 3:48 AM
(permalink)
Great breakdown and inspection, I can tell from the marking on the heatsink that the lower vram chips were covered by the thermal pads correctly before, I'm guessing it took some shifting to get the heatsink assembly off?
The only thing I would be intrested in seeing is if some gentle laping of the heatplate could improve the gpu-die temps at all, but it's great to hear your before and after temps were the same. I remember back in the G80 days having a substantial improvement over the TIM evga was using back then!
|
staypuft
CLASSIFIED Member
- Total Posts : 3764
- Reward points : 0
- Joined: 3/11/2006
- Location: USA
- Status: offline
- Ribbons : 31
Re: EVGA RTX 3070Ti XC3 Ultra 3785 Teardown Disassembly - PCB Photos
Saturday, October 02, 2021 3:53 AM
(permalink)
Separating the PCB and Heatsink was an exercise in patience. The pads try to stick to both, so that bottom one ended up pulled aside. Markings show that everything was fine when originally assembled.
Interested in a discount on EVGA products? Click here for details and enter this Associates code at checkout >> 2ILPLQQ8IWY8DPN 2021 Build: Gigabyte Z590 Ultra | Core i7-10700K | be quiet! Dark Rock Pro 4 | 32GB G.Skill Trident Z DDR4-3200 EVGA RTX 3080 FTW3 Ultra | Samsung 970 EVO 500GB | Seasonic Focus GX-850 | Fractal Design Meshify C | Asus TUF VG27AQL1A
|
staypuft
CLASSIFIED Member
- Total Posts : 3764
- Reward points : 0
- Joined: 3/11/2006
- Location: USA
- Status: offline
- Ribbons : 31
Re: EVGA RTX 3070Ti XC3 Ultra 3785 Teardown Disassembly - PCB Photos
Saturday, October 02, 2021 1:33 PM
(permalink)
Updated post to contain embedded images. Added content at the end.
Interested in a discount on EVGA products? Click here for details and enter this Associates code at checkout >> 2ILPLQQ8IWY8DPN 2021 Build: Gigabyte Z590 Ultra | Core i7-10700K | be quiet! Dark Rock Pro 4 | 32GB G.Skill Trident Z DDR4-3200 EVGA RTX 3080 FTW3 Ultra | Samsung 970 EVO 500GB | Seasonic Focus GX-850 | Fractal Design Meshify C | Asus TUF VG27AQL1A
|
staypuft
CLASSIFIED Member
- Total Posts : 3764
- Reward points : 0
- Joined: 3/11/2006
- Location: USA
- Status: offline
- Ribbons : 31
Re: EVGA RTX 3070Ti XC3 Ultra 3785 Teardown Disassembly - PCB Photos
Friday, October 15, 2021 3:20 AM
(permalink)
UPDATE: I ran Precision X1 for the first time this week. Was looking to change the LED to a fixed color. The software compelled me to update the 3070Ti XC3 Ultra’s BIOS firmware, so I went ahead with it. Ran a stress test immediately before and after the update. With GPU fans on Auto for both tests, my GPU core temps dropped about 2C avg/max because the fans run just a bit faster now (slightly more aggressive curve).
Interesting and welcomed change. Thanks EVGA
Interested in a discount on EVGA products? Click here for details and enter this Associates code at checkout >> 2ILPLQQ8IWY8DPN 2021 Build: Gigabyte Z590 Ultra | Core i7-10700K | be quiet! Dark Rock Pro 4 | 32GB G.Skill Trident Z DDR4-3200 EVGA RTX 3080 FTW3 Ultra | Samsung 970 EVO 500GB | Seasonic Focus GX-850 | Fractal Design Meshify C | Asus TUF VG27AQL1A
|
staypuft
CLASSIFIED Member
- Total Posts : 3764
- Reward points : 0
- Joined: 3/11/2006
- Location: USA
- Status: offline
- Ribbons : 31
Re: EVGA RTX 3070Ti XC3 Ultra 3785 Teardown Disassembly - PCB Photos
Monday, October 18, 2021 3:52 PM
(permalink)
Here are some dimensions of the EVGA thermal pad kit. According to their CS, this kit is for both the 3070 XC3 and 3070Ti XC3. Thickness is 2.25mm 
Interested in a discount on EVGA products? Click here for details and enter this Associates code at checkout >> 2ILPLQQ8IWY8DPN 2021 Build: Gigabyte Z590 Ultra | Core i7-10700K | be quiet! Dark Rock Pro 4 | 32GB G.Skill Trident Z DDR4-3200 EVGA RTX 3080 FTW3 Ultra | Samsung 970 EVO 500GB | Seasonic Focus GX-850 | Fractal Design Meshify C | Asus TUF VG27AQL1A
|
staypuft
CLASSIFIED Member
- Total Posts : 3764
- Reward points : 0
- Joined: 3/11/2006
- Location: USA
- Status: offline
- Ribbons : 31
Re: EVGA RTX 3070Ti XC3 Ultra 3785 Teardown Disassembly - PCB Photos
Tuesday, October 26, 2021 6:42 PM
(permalink)
Photo of this GPU installed in the PC. You can see that there is no bulging or warping due to the pads. Also, anti-sag support is now installed. Card is running great. 
Interested in a discount on EVGA products? Click here for details and enter this Associates code at checkout >> 2ILPLQQ8IWY8DPN 2021 Build: Gigabyte Z590 Ultra | Core i7-10700K | be quiet! Dark Rock Pro 4 | 32GB G.Skill Trident Z DDR4-3200 EVGA RTX 3080 FTW3 Ultra | Samsung 970 EVO 500GB | Seasonic Focus GX-850 | Fractal Design Meshify C | Asus TUF VG27AQL1A
|
nomoss
FTW Member
- Total Posts : 1559
- Reward points : 0
- Joined: 4/5/2009
- Status: offline
- Ribbons : 7
Re: EVGA RTX 3070Ti XC3 Ultra 3785 Teardown Disassembly - PCB Photos
Tuesday, October 26, 2021 6:55 PM
(permalink)
Very nice! Good job, pufty!
|
aka_STEVE_b
EGC Admin

- Total Posts : 13835
- Reward points : 0
- Joined: 2/26/2006
- Location: OH
- Status: offline
- Ribbons : 69
Re: EVGA RTX 3070Ti XC3 Ultra 3785 Teardown Disassembly - PCB Photos
Tuesday, October 26, 2021 7:22 PM
(permalink)
great job ... 
AMD RYZEN 9 5900X 12-core cpu~ ASUS ROG Crosshair VIII Dark Hero ~ EVGA RTX 3080 Ti FTW3~ G.SKILL Trident Z NEO 32GB DDR4-3600 ~ Phanteks Eclipse P400s red case ~ EVGA SuperNOVA 1000 G+ PSU ~ Intel 660p M.2 drive~ Crucial MX300 275 GB SSD ~WD 2TB SSD ~CORSAIR H115i RGB Pro XT 280mm cooler ~ CORSAIR Dark Core RGB Pro mouse ~ CORSAIR K68 Mech keyboard ~ HGST 4TB Hd.~ AOC AGON 32" monitor 1440p @ 144Hz ~ Win 10 x64
|
staypuft
CLASSIFIED Member
- Total Posts : 3764
- Reward points : 0
- Joined: 3/11/2006
- Location: USA
- Status: offline
- Ribbons : 31
Re: EVGA RTX 3070Ti XC3 Ultra 3785 Teardown Disassembly - PCB Photos
Wednesday, November 10, 2021 1:58 AM
(permalink)
nomoss
Very nice! Good job, pufty!
aka_STEVE_b
great job ...
Thanks!
Interested in a discount on EVGA products? Click here for details and enter this Associates code at checkout >> 2ILPLQQ8IWY8DPN 2021 Build: Gigabyte Z590 Ultra | Core i7-10700K | be quiet! Dark Rock Pro 4 | 32GB G.Skill Trident Z DDR4-3200 EVGA RTX 3080 FTW3 Ultra | Samsung 970 EVO 500GB | Seasonic Focus GX-850 | Fractal Design Meshify C | Asus TUF VG27AQL1A
|
Hulky87
Superclocked Member

- Total Posts : 220
- Reward points : 0
- Joined: 9/13/2020
- Status: offline
- Ribbons : 0
Re: EVGA RTX 3070Ti XC3 Ultra 3785 Teardown Disassembly - PCB Photos
Wednesday, November 10, 2021 2:22 AM
(permalink)
Amazing Job, I hope your thermals are going down now.
08G-P5-3667-KL 12/28/2020 9:40:57 PM PTN No
|
rjohnson11
EVGA Forum Moderator

- Total Posts : 85038
- Reward points : 0
- Joined: 10/5/2004
- Location: Netherlands
- Status: offline
- Ribbons : 86
Re: EVGA RTX 3070Ti XC3 Ultra 3785 Teardown Disassembly - PCB Photos
Wednesday, November 10, 2021 7:33 AM
(permalink)
Outstanding work and tutorial.
|
notfordman
Omnipotent Enthusiast
- Total Posts : 8772
- Reward points : 0
- Joined: 8/10/2007
- Location: In a van, down by the
- Status: offline
- Ribbons : 28
Re: EVGA RTX 3070Ti XC3 Ultra 3785 Teardown Disassembly - PCB Photos
Wednesday, November 10, 2021 7:41 AM
(permalink)
Nicely done, staypuft! Good information, thanks! 
|
snowleo
New Member

- Total Posts : 9
- Reward points : 0
- Joined: 2/1/2022
- Status: offline
- Ribbons : 0
Re: EVGA RTX 3070Ti XC3 Ultra 3785 Teardown Disassembly - PCB Photos
Tuesday, February 01, 2022 9:50 PM
(permalink)
what screws are on the Fan Shroud ?
|
Gamerdude87
New Member
- Total Posts : 1
- Reward points : 0
- Joined: 2/1/2022
- Status: offline
- Ribbons : 0
Re: EVGA RTX 3070 Ti XC3 Ultra 3785 Teardown Disassembly - PCB Photos
Tuesday, February 01, 2022 11:45 PM
(permalink)
I just got a RTX 3070 ti FTW3 Ultra. Super excited to see the power in action!
I'm sure the universe is full of intelligent life. It's just been too intelligent to come here.
|
staypuft
CLASSIFIED Member
- Total Posts : 3764
- Reward points : 0
- Joined: 3/11/2006
- Location: USA
- Status: offline
- Ribbons : 31
Re: EVGA RTX 3070Ti XC3 Ultra 3785 Teardown Disassembly - PCB Photos
Wednesday, February 02, 2022 4:54 PM
(permalink)
Interested in a discount on EVGA products? Click here for details and enter this Associates code at checkout >> 2ILPLQQ8IWY8DPN 2021 Build: Gigabyte Z590 Ultra | Core i7-10700K | be quiet! Dark Rock Pro 4 | 32GB G.Skill Trident Z DDR4-3200 EVGA RTX 3080 FTW3 Ultra | Samsung 970 EVO 500GB | Seasonic Focus GX-850 | Fractal Design Meshify C | Asus TUF VG27AQL1A
|
snowleo
New Member
- Total Posts : 9
- Reward points : 0
- Joined: 2/1/2022
- Status: offline
- Ribbons : 0
Re: EVGA RTX 3070Ti XC3 Ultra 3785 Teardown Disassembly - PCB Photos
Wednesday, February 02, 2022 5:15 PM
(permalink)
|
snowleo
New Member
- Total Posts : 9
- Reward points : 0
- Joined: 2/1/2022
- Status: offline
- Ribbons : 0
Re: EVGA RTX 3070Ti XC3 Ultra 3785 Teardown Disassembly - PCB Photos
Saturday, February 19, 2022 5:57 PM
(permalink)
What is the Stuff I Marked in this Picture and could you replace it with a Thermalpad ?   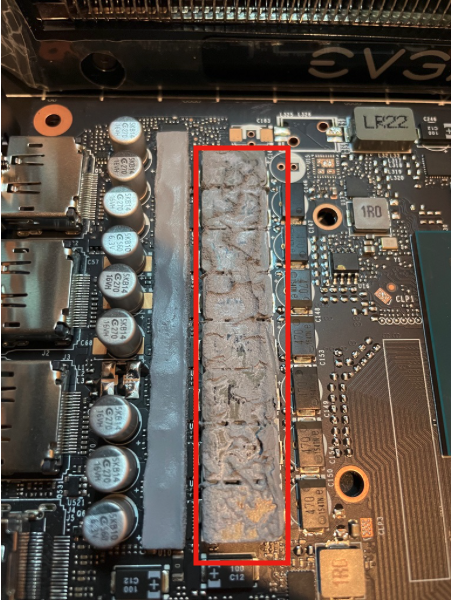
post edited by snowleo - Saturday, February 19, 2022 6:02 PM
|
staypuft
CLASSIFIED Member
- Total Posts : 3764
- Reward points : 0
- Joined: 3/11/2006
- Location: USA
- Status: offline
- Ribbons : 31
Re: EVGA RTX 3070Ti XC3 Ultra 3785 Teardown Disassembly - PCB Photos
Sunday, February 20, 2022 2:02 AM
(permalink)
Interested in a discount on EVGA products? Click here for details and enter this Associates code at checkout >> 2ILPLQQ8IWY8DPN 2021 Build: Gigabyte Z590 Ultra | Core i7-10700K | be quiet! Dark Rock Pro 4 | 32GB G.Skill Trident Z DDR4-3200 EVGA RTX 3080 FTW3 Ultra | Samsung 970 EVO 500GB | Seasonic Focus GX-850 | Fractal Design Meshify C | Asus TUF VG27AQL1A
|
snowleo
New Member
- Total Posts : 9
- Reward points : 0
- Joined: 2/1/2022
- Status: offline
- Ribbons : 0
Re: EVGA RTX 3070Ti XC3 Ultra 3785 Teardown Disassembly - PCB Photos
Friday, March 04, 2022 9:10 AM
(permalink)
I just talked to EVGA on the phone and they are fine with it if you replace the Putty with a Thermal Pad.
|
staypuft
CLASSIFIED Member
- Total Posts : 3764
- Reward points : 0
- Joined: 3/11/2006
- Location: USA
- Status: offline
- Ribbons : 31
Re: EVGA RTX 3070Ti XC3 Ultra 3785 Teardown Disassembly - PCB Photos
Friday, March 04, 2022 1:24 PM
(permalink)
snowleo
I just talked to EVGA on the phone and they are fine with it if you replace the Putty with a Thermal Pad.
Did they happen to tell you exactly which pads would fit? They did not offer these when I bought the pad replacement kit.
Interested in a discount on EVGA products? Click here for details and enter this Associates code at checkout >> 2ILPLQQ8IWY8DPN 2021 Build: Gigabyte Z590 Ultra | Core i7-10700K | be quiet! Dark Rock Pro 4 | 32GB G.Skill Trident Z DDR4-3200 EVGA RTX 3080 FTW3 Ultra | Samsung 970 EVO 500GB | Seasonic Focus GX-850 | Fractal Design Meshify C | Asus TUF VG27AQL1A
|
snowleo
New Member
- Total Posts : 9
- Reward points : 0
- Joined: 2/1/2022
- Status: offline
- Ribbons : 0
Re: EVGA RTX 3070Ti XC3 Ultra 3785 Teardown Disassembly - PCB Photos
Friday, March 04, 2022 1:40 PM
(permalink)
no but I saw a video of a thermal pad being used on the 3080 and a a 1mm Pad does fit so I will go with that one. I cant find 2.25 mm pads for the other stuff only 2mm or 2.5mm do you think 2.5 will be fine or should I use 2mm ?
post edited by snowleo - Friday, March 04, 2022 9:54 PM
|
Biffa773
New Member
- Total Posts : 17
- Reward points : 0
- Joined: 6/7/2021
- Status: offline
- Ribbons : 0
Re: EVGA RTX 3070Ti XC3 Ultra 3785 Teardown Disassembly - PCB Photos
Saturday, March 05, 2022 7:06 PM
(permalink)
Do you have a link to the kit you bought?
|
Cool GTX
EVGA Forum Moderator
- Total Posts : 31353
- Reward points : 0
- Joined: 12/12/2010
- Location: Folding for the Greater Good
- Status: offline
- Ribbons : 123
Re: EVGA RTX 3070Ti XC3 Ultra 3785 Teardown Disassembly - PCB Photos
Saturday, March 05, 2022 8:17 PM
(permalink)
Learn your way around the EVGA Forums, Rules & limits on new accounts Ultimate Self-Starter Thread For New Members
I am a Volunteer Moderator - not an EVGA employee
Older RIG projects RTX Project Nibbler

When someone does not use reason to reach their conclusion in the first place; you can't use reason to convince them otherwise!
|
staypuft
CLASSIFIED Member
- Total Posts : 3764
- Reward points : 0
- Joined: 3/11/2006
- Location: USA
- Status: offline
- Ribbons : 31
Re: EVGA RTX 3070Ti XC3 Ultra 3785 Teardown Disassembly - PCB Photos
Saturday, March 05, 2022 9:45 PM
(permalink)
Interested in a discount on EVGA products? Click here for details and enter this Associates code at checkout >> 2ILPLQQ8IWY8DPN 2021 Build: Gigabyte Z590 Ultra | Core i7-10700K | be quiet! Dark Rock Pro 4 | 32GB G.Skill Trident Z DDR4-3200 EVGA RTX 3080 FTW3 Ultra | Samsung 970 EVO 500GB | Seasonic Focus GX-850 | Fractal Design Meshify C | Asus TUF VG27AQL1A
|
jeffsteeves1
New Member
- Total Posts : 7
- Reward points : 0
- Joined: 7/19/2012
- Status: offline
- Ribbons : 0
Re: EVGA RTX 3070Ti XC3 Ultra 3785 Teardown Disassembly - PCB Photos
Sunday, April 24, 2022 3:12 PM
(permalink)
I already have issues with mounting pressure with my 3070 ti ftw3. i dont think lapping is a good idea unless you also shorten the heat sink standoffs. which seems like a lot of work. my hotspot temp is 74c under load(~20c room temp)pulling 300w. I wish they would use older style heat sinks with 4 mounting holes instead of making the whole heat sink mount to the pcb.. mounting pressure is useless on the rest of the card. if you want more performance out of the 3070ti it either needs de-shroud and good fans or heat sink replacement/water cooling. the heat sink is good just de-shroud will drop temps 10c easy. i need to machine a mount for accelero4. still unless you go water cooling you wont see much improvement beyond de shroud.
|
pegasus12-123
New Member
- Total Posts : 1
- Reward points : 0
- Joined: 3/21/2022
- Status: offline
- Ribbons : 0
Re: EVGA RTX 3070Ti XC3 Ultra 3785 Teardown Disassembly - PCB Photos
Monday, April 25, 2022 2:44 PM
(permalink)
Just a quick update about thermal pads. A company called Kritical Thermal Pads makes a 100x100x2.25 thermal pad that has a Shore C12/Shore A35, Density of 3.4 g/cm and a thermal conductivity of 20 w/mK. The price as of this post is $38.00 plus $4.95 shipping, bringing a total of $42.95 shipped. That is enough material to cover this procedure 3 times over. Below a link to their website.
Cheers....
Kevin
|
BiggyNewton
Superclocked Member
- Total Posts : 145
- Reward points : 0
- Joined: 4/15/2021
- Status: offline
- Ribbons : 2
Re: EVGA RTX 3070Ti XC3 Ultra 3785 Teardown Disassembly - PCB Photos
Monday, April 25, 2022 3:15 PM
(permalink)
 Associate code: EKA5I8R4C7M401LThanks to anyone using my code! Associate code: EKA5I8R4C7M401LThanks to anyone using my code!
|
snowleo
New Member
- Total Posts : 9
- Reward points : 0
- Joined: 2/1/2022
- Status: offline
- Ribbons : 0
Re: EVGA RTX 3070Ti XC3 Ultra 3785 Teardown Disassembly - PCB Photos
Monday, April 25, 2022 5:06 PM
(permalink)
I hope the rtx 40xx cards won't have that putty stuff at all
|
jeffsteeves1
New Member
- Total Posts : 7
- Reward points : 0
- Joined: 7/19/2012
- Status: offline
- Ribbons : 0
Re: EVGA RTX 3070Ti XC3 Ultra 3785 Teardown Disassembly - PCB Photos
Monday, April 25, 2022 5:38 PM
(permalink)
not only is thermal putty horrible to clean, i cant find it in canada. is it possibly called something else? thermal pads seem the way to go just cause of availability This is thermal putty of unknown (to me, at least) specification. Even though I reused it, you can probably use a very soft thermal pad in its place. I hate the thermal putty. Cleaning it takes the longest on most cards. Always replace with pads if you can guys.
|