OZA2014
New Member

- Total Posts : 47
- Reward points : 0
- Joined: 2014/02/18 12:16:39
- Location: UK
- Status: offline
- Ribbons : 0
Finally got this thing to my doorstep from halfway around the world lol. I have the 2080 TI disassembled and the thermal grease cleaned off the GPU. The instructions at this stage say to stick any thermal strips which remained on the PCB back on the removed air cooler. Before I do that I’m just curious: the thermal strips pre-installed on the water block seem to have different coverage to the ones that I’m about to peel off and stick on the air cooler. What I really mean here is that the block strips seem to “miss out” where the original strips cover. Maybe it’s late and I’m missing something or maybe this is intentional? Thought I’d just reach out before I take the plung in case anyone can give me a steer. I can post pics if it makes if it helps clarify what I’m talking about.
post edited by OZA2014 - 2019/01/23 15:44:12
|
bcavnaugh
The Crunchinator

- Total Posts : 38516
- Reward points : 0
- Joined: 2012/09/18 17:31:18
- Location: USA Affiliate E5L3CTGE12 Associate 9E88QK5L7811G3H
- Status: offline
- Ribbons : 282


Re: 2080 TI Hydrocopper block installation
2019/01/23 15:39:29
(permalink)
What GPU is this XC or FTW3?
|
OZA2014
New Member
- Total Posts : 47
- Reward points : 0
- Joined: 2014/02/18 12:16:39
- Location: UK
- Status: offline
- Ribbons : 0
Re: 2080 TI Hydrocopper block installation
2019/01/23 15:43:42
(permalink)
FTW3 - edited my post title to clarify.
|
bcavnaugh
The Crunchinator
- Total Posts : 38516
- Reward points : 0
- Joined: 2012/09/18 17:31:18
- Location: USA Affiliate E5L3CTGE12 Associate 9E88QK5L7811G3H
- Status: offline
- Ribbons : 282
Re: 2080 TI Hydrocopper block installation
2019/01/23 19:04:35
(permalink)
|
OZA2014
New Member
- Total Posts : 47
- Reward points : 0
- Joined: 2014/02/18 12:16:39
- Location: UK
- Status: offline
- Ribbons : 0
Re: 2080 TI Hydrocopper block installation
2019/01/24 01:58:47
(permalink)
Interesting reading for sure but does not address my question.
|
OZA2014
New Member
- Total Posts : 47
- Reward points : 0
- Joined: 2014/02/18 12:16:39
- Location: UK
- Status: offline
- Ribbons : 0
Re: 2080 TI Hydrocopper block installation
2019/01/24 05:14:52
(permalink)
Basically, should those two TIM strips definitely be removed and NOT used when the block is put on?
post edited by OZA2014 - 2019/01/24 05:17:07
Attached Image(s)
|
OZA2014
New Member
- Total Posts : 47
- Reward points : 0
- Joined: 2014/02/18 12:16:39
- Location: UK
- Status: offline
- Ribbons : 0
Re: 2080 TI Hydrocopper block installation
2019/01/24 09:41:04
(permalink)
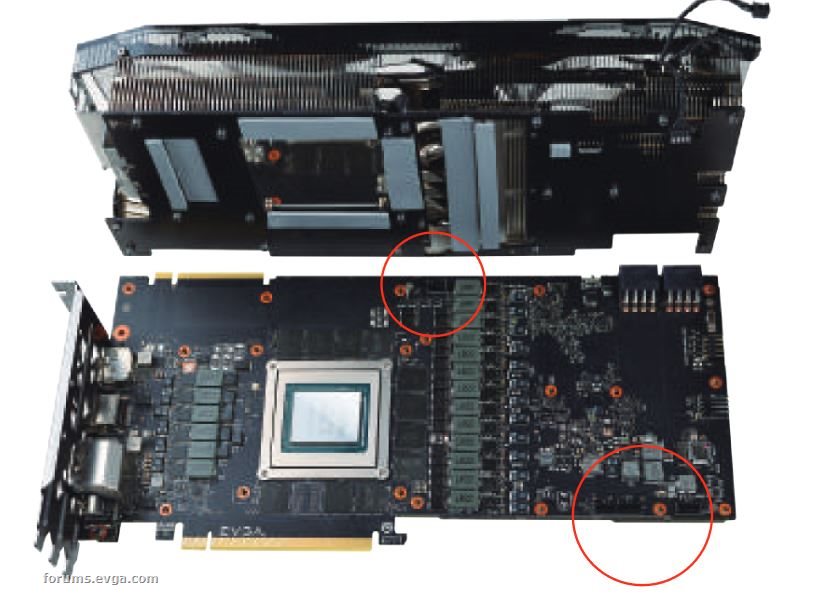
The TIM strips I’m referring to are those circled in yellow in this pic.
Attached Image(s)
|
GGTV-Jon
FTW Member

- Total Posts : 1813
- Reward points : 0
- Joined: 2017/11/25 14:11:43
- Location: WA, USA
- Status: offline
- Ribbons : 19
Re: 2080 TI Hydrocopper block installation
2019/01/24 09:50:31
(permalink)
Don't you need to take that plate off?
|
OZA2014
New Member
- Total Posts : 47
- Reward points : 0
- Joined: 2014/02/18 12:16:39
- Location: UK
- Status: offline
- Ribbons : 0
Re: 2080 TI Hydrocopper block installation
2019/01/24 09:57:40
(permalink)
Hmmm - you may just have pointed out the obvious thing I had overlooked!! Thanks - I feel stupid but happy 😉
|
Cool GTX
EVGA Forum Moderator

- Total Posts : 31353
- Reward points : 0
- Joined: 2010/12/12 14:22:25
- Location: Folding for the Greater Good
- Status: offline
- Ribbons : 123
Re: 2080 TI Hydrocopper block installation
2019/01/24 10:23:19
(permalink)
Learn your way around the EVGA Forums, Rules & limits on new accounts Ultimate Self-Starter Thread For New Members
I am a Volunteer Moderator - not an EVGA employee
Older RIG projects RTX Project Nibbler

When someone does not use reason to reach their conclusion in the first place; you can't use reason to convince them otherwise!
|
bcavnaugh
The Crunchinator
- Total Posts : 38516
- Reward points : 0
- Joined: 2012/09/18 17:31:18
- Location: USA Affiliate E5L3CTGE12 Associate 9E88QK5L7811G3H
- Status: offline
- Ribbons : 282
Re: 2080 TI Hydrocopper block installation
2019/01/24 10:56:22
(permalink)
OZA2014
Hmmm - you may just have pointed out the obvious thing I had overlooked!! Thanks - I feel stupid but happy 😉
That was why I posted the Threads above 
|
bcavnaugh
The Crunchinator
- Total Posts : 38516
- Reward points : 0
- Joined: 2012/09/18 17:31:18
- Location: USA Affiliate E5L3CTGE12 Associate 9E88QK5L7811G3H
- Status: offline
- Ribbons : 282
Re: 2080 TI Hydrocopper block installation
2019/01/24 10:57:02
(permalink)
Cool GTX
EVGA GeForce RTX 2080 Ti FTW3 HYDRO COPPER Kit Installation Guide
Step #3 - plate is still attached to ACX cooler
It did take Months for EVGA to Post this Manual. But The Links are still broken There has been an error while requesting your page, and our team has been notified. The request from 67.40.48.134 at 2019-01-24 19:00:24 GMT for the URL /products/pdf/ cannot be served due to error 17 on the host www.evga.com.
post edited by bcavnaugh - 2019/01/24 11:04:08
|
OZA2014
New Member
- Total Posts : 47
- Reward points : 0
- Joined: 2014/02/18 12:16:39
- Location: UK
- Status: offline
- Ribbons : 0
Re: 2080 TI Hydrocopper block installation
2019/01/24 11:02:54
(permalink)
Somehow my plate stuck to the pcb not the cooler. Probably those TIM strips won the tug of war.
Cleaning the TIM off the memory chips as a real pain as it’s seeped down between the gaps 😞
|
OZA2014
New Member
- Total Posts : 47
- Reward points : 0
- Joined: 2014/02/18 12:16:39
- Location: UK
- Status: offline
- Ribbons : 0
Re: 2080 TI Hydrocopper block installation
2019/01/24 11:51:05
(permalink)
Blimey, these instructions are not too clear.
When installing the bracket:
1. Do I peel off the old washers and replace with new (I presume yes)?
2. Are the #4 screws the spring screws I removed from GPU area when dismantling the card? I certainly don’t have a pack of 4 screws in the water block box.
3. Does the spring part of the #4 screws sit next to the washers mentioned in point 1. i.e. the screws get inserted from behind the GPU?
|
Cool GTX
EVGA Forum Moderator
- Total Posts : 31353
- Reward points : 0
- Joined: 2010/12/12 14:22:25
- Location: Folding for the Greater Good
- Status: offline
- Ribbons : 123
Re: 2080 TI Hydrocopper block installation
2019/01/24 11:53:58
(permalink)
check the links in post #4 from bcavnaugh 
Learn your way around the EVGA Forums, Rules & limits on new accounts Ultimate Self-Starter Thread For New Members
I am a Volunteer Moderator - not an EVGA employee
Older RIG projects RTX Project Nibbler
When someone does not use reason to reach their conclusion in the first place; you can't use reason to convince them otherwise!
|
OZA2014
New Member
- Total Posts : 47
- Reward points : 0
- Joined: 2014/02/18 12:16:39
- Location: UK
- Status: offline
- Ribbons : 0
Re: 2080 TI Hydrocopper block installation
2019/01/24 12:03:30
(permalink)
Cool GTX
check the links in post #4 from bcavnaugh
I have - twice. The first post is about XT cards/blocks. The second is about bracket up vs bracket down?
|
Cool GTX
EVGA Forum Moderator
- Total Posts : 31353
- Reward points : 0
- Joined: 2010/12/12 14:22:25
- Location: Folding for the Greater Good
- Status: offline
- Ribbons : 123
|
OZA2014
New Member
- Total Posts : 47
- Reward points : 0
- Joined: 2014/02/18 12:16:39
- Location: UK
- Status: offline
- Ribbons : 0
Re: 2080 TI Hydrocopper block installation
2019/01/24 12:51:17
(permalink)
Thanks mate, that’s very helpful. Should be OK from here on.
|
OZA2014
New Member
- Total Posts : 47
- Reward points : 0
- Joined: 2014/02/18 12:16:39
- Location: UK
- Status: offline
- Ribbons : 0
Re: 2080 TI Hydrocopper block installation
2019/01/24 14:10:31
(permalink)
Well, it’s on at last 🤪. Did anyone else feel their RGB header connection left a bit to be desired? I noted (by squinting very hard under bright light) that it was keyed - but still didn’t get that satisfaction that it was truly seated all the way - I pushed as hard as I dared 😳 And I assume everyone had that corner of TIM chop itself off the LR chip nearest the RGB header ... the block doesn’t seem to properly cover that chip?
post edited by OZA2014 - 2019/01/24 14:16:51
|
Cool GTX
EVGA Forum Moderator
- Total Posts : 31353
- Reward points : 0
- Joined: 2010/12/12 14:22:25
- Location: Folding for the Greater Good
- Status: offline
- Ribbons : 123
Re: 2080 TI Hydrocopper block installation
2019/01/24 17:13:25
(permalink)
 glad you got it finished
Learn your way around the EVGA Forums, Rules & limits on new accounts Ultimate Self-Starter Thread For New Members
I am a Volunteer Moderator - not an EVGA employee
Older RIG projects RTX Project Nibbler
When someone does not use reason to reach their conclusion in the first place; you can't use reason to convince them otherwise!
|
GGTV-Jon
FTW Member
- Total Posts : 1813
- Reward points : 0
- Joined: 2017/11/25 14:11:43
- Location: WA, USA
- Status: offline
- Ribbons : 19
Re: 2080 TI Hydrocopper block installation
2019/01/24 21:25:32
(permalink)
OZA2014
Hmmm - you may just have pointed out the obvious thing I had overlooked!! Thanks - I feel stupid but happy 😉
Glad to see you were pointed in the right direction and on your way to having that thing up and running
|
ehabash1
iCX Member

- Total Posts : 463
- Reward points : 0
- Joined: 2019/01/03 12:02:48
- Status: offline
- Ribbons : 0
Re: 2080 TI Hydrocopper block installation
2019/01/25 09:54:36
(permalink)
i see so many ppl doing this. The hydro-copper is $1600 while the ftw3 is $1500
so why not just buy the hydro from the beginning. change of heart? There are no cost savings in buying a separate block and installing
|
OZA2014
New Member
- Total Posts : 47
- Reward points : 0
- Joined: 2014/02/18 12:16:39
- Location: UK
- Status: offline
- Ribbons : 0
Re: 2080 TI Hydrocopper block installation
2019/01/25 10:12:12
(permalink)
ehabash1
i see so many ppl doing this. The hydro-copper is $1600 while the ftw3 is $1500
so why not just buy the hydro from the beginning. change of heart? There are no cost savings in buying a separate block and installing
https://forums.evga.com/m.m.aspx?m=2898822&p=2
|
Graphite8five
SSC Member

- Total Posts : 660
- Reward points : 0
- Joined: 2016/08/04 22:27:09
- Status: offline
- Ribbons : 3
Re: 2080 TI Hydrocopper block installation
2019/01/26 01:03:01
(permalink)
Is the Hydro Copper the only water block currently available for the 2080 Ti FTW3? Can't see any pictures of what the Hydro Copper looks like powered on, does it have RGB lighting? It seems like not many Hydro Copper have been sold yet...
 Maximus XI Hero, 8700K 5Ghz delid, EKWB Custom loop ,Dominator RGB 3400Mhz 16GB, EVGA 2080 Ti FTW3 EK Vector, Seasonic Prime Platinum 1300W, Asus PG349Q 34" 120hz G-Sync, Phanteks Eclipse P600S.
|
bcavnaugh
The Crunchinator
- Total Posts : 38516
- Reward points : 0
- Joined: 2012/09/18 17:31:18
- Location: USA Affiliate E5L3CTGE12 Associate 9E88QK5L7811G3H
- Status: offline
- Ribbons : 282
Re: 2080 TI Hydrocopper block installation
2019/01/26 11:35:05
(permalink)
|
Graphite8five
SSC Member
- Total Posts : 660
- Reward points : 0
- Joined: 2016/08/04 22:27:09
- Status: offline
- Ribbons : 3
Re: 2080 TI Hydrocopper block installation
2019/01/26 19:30:44
(permalink)
They look nice, and bright. Is that a whole bunch of led's placed around the block? Sadly if these are mounted in the normal GPU PCIe position all of that lighting is going to be on the underneath and not seen  . Any idea what the back plate looks like? Is there any lighting on the top of the card?
Maximus XI Hero, 8700K 5Ghz delid, EKWB Custom loop ,Dominator RGB 3400Mhz 16GB, EVGA 2080 Ti FTW3 EK Vector, Seasonic Prime Platinum 1300W, Asus PG349Q 34" 120hz G-Sync, Phanteks Eclipse P600S.
|
bcavnaugh
The Crunchinator
- Total Posts : 38516
- Reward points : 0
- Joined: 2012/09/18 17:31:18
- Location: USA Affiliate E5L3CTGE12 Associate 9E88QK5L7811G3H
- Status: offline
- Ribbons : 282
Re: 2080 TI Hydrocopper block installation
2019/01/26 19:46:37
(permalink)
Graphite8five
They look nice, and bright. Is that a whole bunch of led's placed around the block? Sadly if these are mounted in the normal GPU PCIe position all of that lighting is going to be on the underneath and not seen . Any idea what the back plate looks like? Is there any lighting on the top of the card?
The LED's are in the upper part of the Block, I do not have any around the Block. No LED's on the Back Plate. 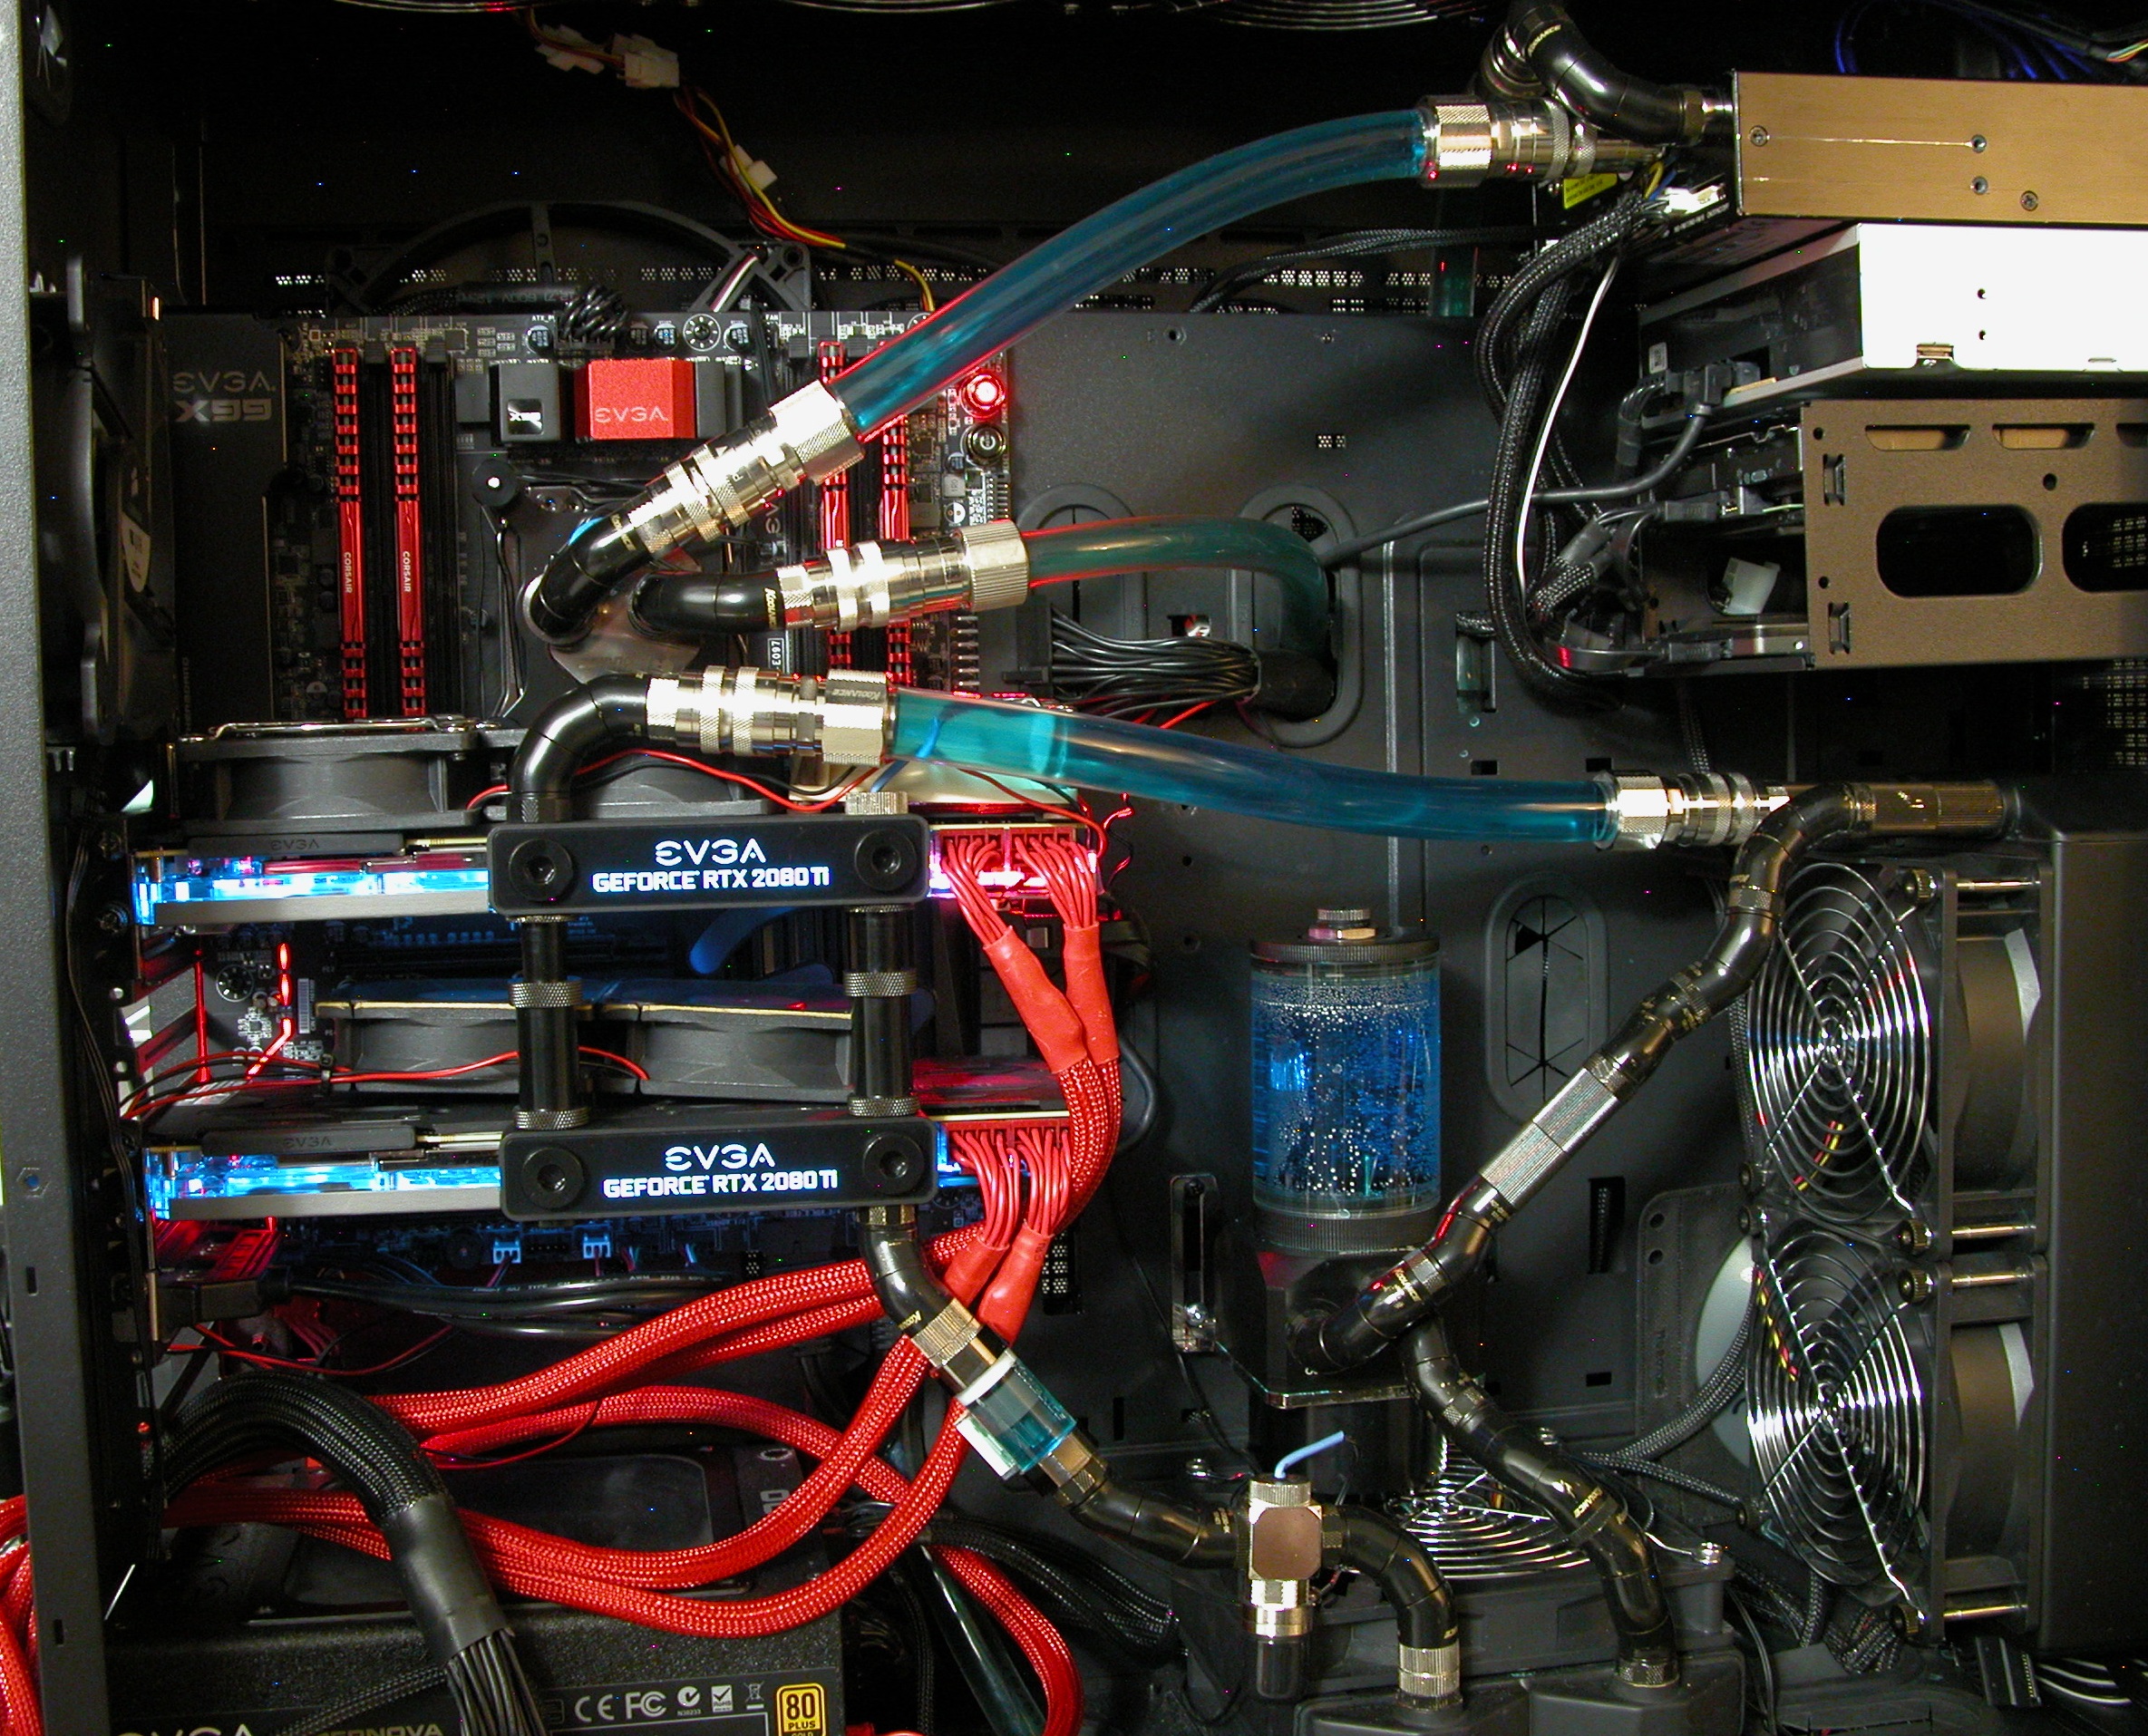
|
Graphite8five
SSC Member
- Total Posts : 660
- Reward points : 0
- Joined: 2016/08/04 22:27:09
- Status: offline
- Ribbons : 3
Re: 2080 TI Hydrocopper block installation
2019/01/26 20:12:54
(permalink)
@bcavnaugh
You have two of these Hydro Coppers already? I take it stock is coming through now and then? How come you don't have an SLI bridge on them? The blue watery block looks neat and I suppose that can be changed to any RGB color?
Maximus XI Hero, 8700K 5Ghz delid, EKWB Custom loop ,Dominator RGB 3400Mhz 16GB, EVGA 2080 Ti FTW3 EK Vector, Seasonic Prime Platinum 1300W, Asus PG349Q 34" 120hz G-Sync, Phanteks Eclipse P600S.
|
bcavnaugh
The Crunchinator
- Total Posts : 38516
- Reward points : 0
- Joined: 2012/09/18 17:31:18
- Location: USA Affiliate E5L3CTGE12 Associate 9E88QK5L7811G3H
- Status: offline
- Ribbons : 282
Re: 2080 TI Hydrocopper block installation
2019/01/26 20:20:41
(permalink)
Graphite8five
@bcavnaugh
You have two of these Hydro Coppers already? I take it stock is coming through now and then? How come you don't have an SLI bridge on them? The blue watery block looks neat and I suppose that can be changed to any RGB color?
Yes and the NVLink is on the other rig. But I do now have one on each rig one from NVIDIA and one from EVGA. I am going with a Dark Cyan for the color ATM on the HC Water Blocks. The Coolant is only one Color Blue. I have two FTW3 (Top Image Pre-Installed) and a Pair of XC + XC ULTRA (Bottom Image I installed the HC Water Blocks)
post edited by bcavnaugh - 2019/01/26 20:59:43
|
bcavnaugh
The Crunchinator
- Total Posts : 38516
- Reward points : 0
- Joined: 2012/09/18 17:31:18
- Location: USA Affiliate E5L3CTGE12 Associate 9E88QK5L7811G3H
- Status: offline
- Ribbons : 282
Re: 2080 TI Hydrocopper block installation
2019/01/26 20:57:18
(permalink)
|