jamesfuston
New Member

- Total Posts : 22
- Reward points : 0
- Joined: 2009/05/30 12:17:59
- Status: offline
- Ribbons : 1

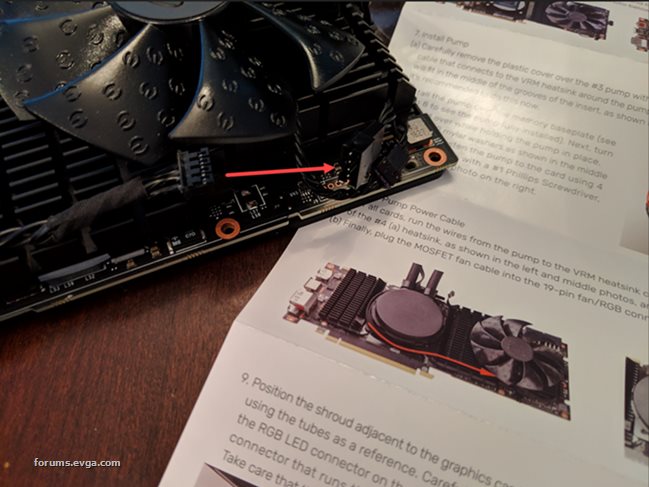
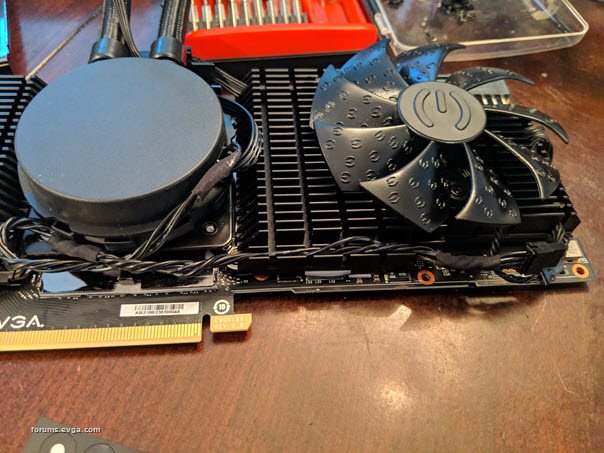
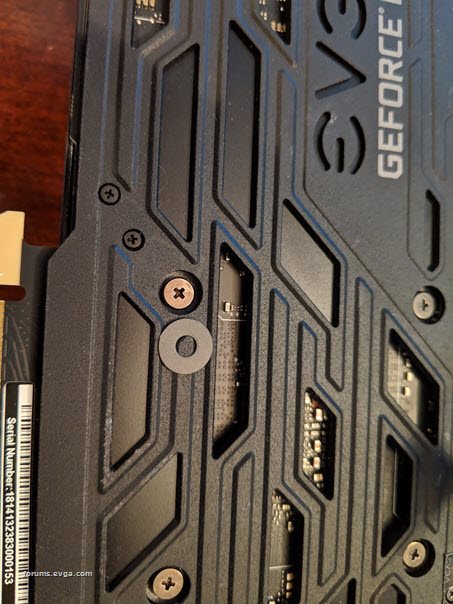
Hey all! I just got my 2080 ti XC Ultra up and running with a newly install hybrid kit and I had a couple thoughts I wanted to point out. 1) The instructions say that you won't need to remove the rear bracket on the card, but the pictures immediately following show a card with no bracket attached. I ended up removing it as it made removing the baseplate much easier. 2) The instructions also didn't mention the baseplate and the pictures made it seem like it would detach as part of the heatsink/fan structure but that was not my experience at all. 3) One of the 20 screws on the backplate was covered by a small black sticker (presumably for tamper detection). It was highlighted on the diagram but I initially missed it due to the sticker not being obvious. 4) Step 7a says you need to wrap the pump cable counterclockwise around the pump on "all cards", but doing so led to the cable being about an inch short when it was time to connect in step 8. I ended up rerouting the cable's slack in a different manner. Curiously, what I did seems similar to the third picture for this step and seems to directly contradict the previous instruction to wrap the cable. 5) Pushing the pump cable into the VRM heatsink channel was a VERY snug fit. I basically had to twist the cable so I could straighten out the individual wires and make them lay flat. The way the wires were braided in the initial cable was simply too wide to fit into the channel. 6) The included mylar washers are bigger than the holes in the backplate, making it impossible to install them as instructed without removing the backplate. 7) Reinstalling the 3 slot bracket on a now-2-slot card seems a bit silly. I would gladly pay for a 2 slot bracket if one can't be included in the cost! Overall it was a smooth installation process, though the cable wrapping bit did leave me scratching my head for a second. Beyond that, I'm unable to get the "auto" fan curve to do anything in X1 or MSI Afterburner. The card and radiator fan stay at 0 even when the core has hit 70C+. This isn't a big deal as I can build a custom curve, but I don't recall having this issue with the 1080 ti hybrid kit. Cable length disparity:  Rerouted cable:  Mylar washer vs. hole size: 
post edited by jamesfuston - 2018/12/11 15:52:32
|
Sajin
EVGA Forum Moderator

- Total Posts : 49227
- Reward points : 0
- Joined: 2010/06/07 21:11:51
- Location: Texas, USA.
- Status: offline
- Ribbons : 199


Re: Thoughts after installing the HYBRID kit on a 2080 ti XC Ultra
2018/12/11 15:58:02
(permalink)
Sounds like something is wrong 70c+ on a hybrid kit isn't right at all.
|
jamesfuston
New Member

- Total Posts : 22
- Reward points : 0
- Joined: 2009/05/30 12:17:59
- Status: offline
- Ribbons : 1

Re: Thoughts after installing the HYBRID kit on a 2080 ti XC Ultra
2018/12/11 15:59:50
(permalink)
|
Sajin
EVGA Forum Moderator

- Total Posts : 49227
- Reward points : 0
- Joined: 2010/06/07 21:11:51
- Location: Texas, USA.
- Status: offline
- Ribbons : 199


Re: Thoughts after installing the HYBRID kit on a 2080 ti XC Ultra
2018/12/11 17:14:49
(permalink)
|
Spyle
New Member

- Total Posts : 43
- Reward points : 0
- Joined: 2010/10/01 05:02:56
- Status: offline
- Ribbons : 1

Re: Thoughts after installing the HYBRID kit on a 2080 ti XC Ultra
2018/12/17 07:36:02
(permalink)
jamesfuston
1) The instructions say that you won't need to remove the rear bracket on the card, but the pictures immediately following show a card with no bracket attached. I ended up removing it as it made removing the baseplate much easier.
You actually have no choice but to remove at the very least 3 of the screws on the bracket. They are holding part of the original heatsink in place. Even though the manual says you can just loosen them =/ jamesfuston
2) The instructions also didn't mention the baseplate and the pictures made it seem like it would detach as part of the heatsink/fan structure but that was not my experience at all.
Yeah mine came apart in 2 separate pieces also, I thought something had broken at first. jamesfuston
3) One of the 20 screws on the backplate was covered by a small black sticker (presumably for tamper detection). It was highlighted on the diagram but I initially missed it due to the sticker not being obvious. Also didn't notice it as the manual made it seem they were all exposed. jamesfuston
4) Step 7a says you need to wrap the pump cable counterclockwise around the pump on "all cards", but doing so led to the cable being about an inch short when it was time to connect in step 8. I ended up rerouting the cable's slack in a different manner. Curiously, what I did seems similar to the third picture for this step and seems to directly contradict the previous instruction to wrap the cable.
Again, very same issue. Cable is just not long enough to go around the pump like they tell you to. jamesfuston
5) Pushing the pump cable into the VRM heatsink channel was a VERY snug fit. I basically had to twist the cable so I could straighten out the individual wires and make them lay flat. The way the wires were braided in the initial cable was simply too wide to fit into the channel.
From your pictures it looks like the acetate wasn't installed in the right spot either. It says "Make sure the wiring covered with acetate tape is seated within the groove" but that is impossible! Did your kit come with any extra tape for it? I'm just realizing now that may have been what the black square was in one of the little bags, I'll need to check later. It also come with a few small square rubber things that aren't mentioned anywhere... jamesfuston
6) The included mylar washers are bigger than the holes in the backplate, making it impossible to install them as instructed without removing the backplate. Yet again I also had this same issue. I didn't even use them seeing as the original screws had none. shrug Did your pump mount have any protective tape on the thermal pads? Mine did not, but the 2 heatsinks did. Additionally my shroud came with a broken wire for the led. For now I just installed without connecting it.
|
bcavnaugh
The Crunchinator

- Total Posts : 38516
- Reward points : 0
- Joined: 2012/09/18 17:31:18
- Location: USA Affiliate E5L3CTGE12 Associate 9E88QK5L7811G3H
- Status: offline
- Ribbons : 282


Re: Thoughts after installing the HYBRID kit on a 2080 ti XC Ultra
2018/12/17 12:10:29
(permalink)
You had to Cut the Wires? 
|
vxpulse
New Member

- Total Posts : 51
- Reward points : 0
- Joined: 2007/10/17 16:21:31
- Status: offline
- Ribbons : 0

Re: Thoughts after installing the HYBRID kit on a 2080 ti XC Ultra
2019/01/09 16:23:10
(permalink)
Are these ever coming back in stock?
|
CyberbrainPC
Superclocked Member

- Total Posts : 151
- Reward points : 0
- Joined: 2011/03/21 16:57:50
- Status: offline
- Ribbons : 0

Re: Thoughts after installing the HYBRID kit on a 2080 ti XC Ultra
2019/01/10 09:28:57
(permalink)
Nice info, thank you for taking the time to share!

My Affiliate Code: GTQRMTK9I1
|
ClimbsRocks
New Member

- Total Posts : 1
- Reward points : 0
- Joined: 2018/12/22 06:15:08
- Status: offline
- Ribbons : 0

Re: Thoughts after installing the HYBRID kit on a 2080 ti XC Ultra
2019/02/13 10:15:40
(permalink)
Some thoughts after my install:
- Agreed on 2, 3, 4, & 6 (layer between gpu board and fan module coming off separately and with some effort, screw covered with tape, cable length, and mylar washers, which I also skipped).
- I've only got a 2 slot card, and I was able to keep the bracket on the whole time. I did the installation both with and without the bracket on, and it seemed like the same level of difficulty either way. I agree with #7- having a 3 slot bracket with a 2 slot shroud would be pretty silly.
- It seems like they might have fixed #5!
Other things I encountered:
- Their instructions say several times to use a #8 screw which should be 2mmx4mm, but the closest I could find in the box was 2mmx5mm. This meant that the 4b heatsink (the smaller one) was a bit loose, since it had an extra 1mm of wiggle room that wasn't accounted for in the design. Oddly, the other place they tell you to use this screw (the initial screw for holding the shroud in place) actually needs a longer screw, so I just used one of the same 2mm7xmm screws used to hold the shroud and backplate in place.
- Speaking of the 4b heatsink, I'd recommend fully securing it (screwing in the second screw, through the backplate) before putting on the shroud. I found it really tough on one of my installs to get all the holes to align and to find enough pressure to get the screw in once the shroud was preventing me from holding the heatsink. As far as I can tell, there's no downside to doing this (aside from spending an extra few seconds locating which hole this is on the backplate).
- In general, the screwdriver sizes given were inaccurate. I'd recommend having a #1 Phillips head screwdriver, and some smaller ones as well (I used a #00, but a #0 might work). This was kind of annoying, because at least on my unit, the screws were tight enough that it was hard to unscrew them without stripping them, and having the right size screwdriver was pretty essential.
- If you still have it, I'd recommend using the PCI-E connector cover while you're working.
- There's a decent amount of pump whine when mounting with the radiator above the card (radiator mounted horizontally on the top of the case, the closest I could come to their recommendations). That's annoying because I bought this in part to reduce noise. Any tips on how to reduce pump whine are very welcome! It did seem to get better (though not go away) after running for a while, so maybe it just needs some breaking in.
- The LEDs aren't coordinated with the rest of the board. They're both bright green, while the board is a solid blue. I don't use LEDs much, but still kind of annoying just to see that the product is broken and doesn't coordinate LED colors with the board. The fan cover that came with the GPU coordinated correctly, so it's pretty clearly the hybrid kit that's misbehaving (and again, it's both of my hybrid kits that do this, and they're both green).
Overall, way better cooling. Able to run both units at once without any thermal limiting. Should be able to overclock next. I'd definitely recommend the hybrid kit, just keep in mind the things noted above.
|
JDauwalter
Superclocked Member

- Total Posts : 181
- Reward points : 0
- Joined: 2005/03/12 02:26:47
- Status: offline
- Ribbons : 0

Re: Thoughts after installing the HYBRID kit on a 2080 ti XC Ultra
2019/02/15 10:24:28
(permalink)
ClimbsRocks
Some thoughts after my install:
- Agreed on 2, 3, 4, & 6 (layer between gpu board and fan module coming off separately and with some effort, screw covered with tape, cable length, and mylar washers, which I also skipped).
- I've only got a 2 slot card, and I was able to keep the bracket on the whole time. I did the installation both with and without the bracket on, and it seemed like the same level of difficulty either way. I agree with #7- having a 3 slot bracket with a 2 slot shroud would be pretty silly.
- It seems like they might have fixed #5!
Other things I encountered:
- Their instructions say several times to use a #8 screw which should be 2mmx4mm, but the closest I could find in the box was 2mmx5mm. This meant that the 4b heatsink (the smaller one) was a bit loose, since it had an extra 1mm of wiggle room that wasn't accounted for in the design. Oddly, the other place they tell you to use this screw (the initial screw for holding the shroud in place) actually needs a longer screw, so I just used one of the same 2mm7xmm screws used to hold the shroud and backplate in place.
- Speaking of the 4b heatsink, I'd recommend fully securing it (screwing in the second screw, through the backplate) before putting on the shroud. I found it really tough on one of my installs to get all the holes to align and to find enough pressure to get the screw in once the shroud was preventing me from holding the heatsink. As far as I can tell, there's no downside to doing this (aside from spending an extra few seconds locating which hole this is on the backplate).
- In general, the screwdriver sizes given were inaccurate. I'd recommend having a #1 Phillips head screwdriver, and some smaller ones as well (I used a #00, but a #0 might work). This was kind of annoying, because at least on my unit, the screws were tight enough that it was hard to unscrew them without stripping them, and having the right size screwdriver was pretty essential.
- If you still have it, I'd recommend using the PCI-E connector cover while you're working.
- There's a decent amount of pump whine when mounting with the radiator above the card (radiator mounted horizontally on the top of the case, the closest I could come to their recommendations). That's annoying because I bought this in part to reduce noise. Any tips on how to reduce pump whine are very welcome! It did seem to get better (though not go away) after running for a while, so maybe it just needs some breaking in.
- The LEDs aren't coordinated with the rest of the board. They're both bright green, while the board is a solid blue. I don't use LEDs much, but still kind of annoying just to see that the product is broken and doesn't coordinate LED colors with the board. The fan cover that came with the GPU coordinated correctly, so it's pretty clearly the hybrid kit that's misbehaving (and again, it's both of my hybrid kits that do this, and they're both green).
Overall, way better cooling. Able to run both units at once without any thermal limiting. Should be able to overclock next. I'd definitely recommend the hybrid kit, just keep in mind the things noted above.
I ended up stripping one screw from the backplate when I was taking mine apart. I had to rip the inside bracket off. I think it's fixable if I really need it to be, but otherwise the hybrid kit went on without a hitch. Although my temps aren't that impressive. 2080 Ti FTW3, and I hit around 66C with heavy gaming in a push/pull combo. I was hitting 67, but the NZXT fan I replaced the EVGA one with is quieter and it helped temps by a C or two. It's only 5C cooler than the heatsink that was on it, but it is way quieter, so I can live with it.
|
zippitt
New Member

- Total Posts : 41
- Reward points : 0
- Joined: 2009/04/29 19:06:09
- Status: offline
- Ribbons : 0

Re: Thoughts after installing the HYBRID kit on a 2080 ti XC Ultra
2019/02/23 09:26:55
(permalink)
vxpulse
Are these ever coming back in stock?
I know it's a late reply, but a month later this part is as bad as buying the 2080 TI when they were first released. If you get the email notification that it's available, you literally have about 2 minutes to get the order in or it's gone, it's pretty frustrating if you own a 2080 TI model.
Case (Antec 1200) Mother Board ( EVGA X58 SLI ) Bios ( E75877 ) CPU ( 920 ) OC 4.0 GHZCPU Cooler ( Noctua NH-U12P SE1366 ) Memory ( CORSAIR DOMINATOR 12GB 8 8 8 24 ) PSU ( Cooler Master Gold 1000W ) GPU ( EVGA 780 TI ) Drivers ( 344.11 ) Operating System ( Windows 7 64)
|