rjohnson11
EVGA Forum Moderator

- Total Posts : 85038
- Reward points : 0
- Joined: 2004/10/05 12:44:35
- Location: Netherlands
- Status: offline
- Ribbons : 86


Re: Scratch Build: Rey's Speeder
2017/04/08 03:44:20
(permalink)
|
Boddaker
iCX Member

- Total Posts : 316
- Reward points : 0
- Joined: 2007/02/09 17:13:09
- Location: Where the beer flows like wine
- Status: offline
- Ribbons : 18
Re: Scratch Build: Rey's Speeder
2017/04/10 09:35:33
(permalink)
notfordmanI'm really enjoying this thread//build. The 3D parts are just cool. You're making some great progress, Bod!! You sure have a way to visualize what you're doing and making it happen. Great job so far!! .  Thanks man! Hoping to wrap up the fabrication this week so I can get on with all the smoothing, painting, and detailing. Got some work to show, despite being in LA on Saturday for a modding workshop at Newegg, and then coming down with a cold shortly thereafter.. Since the motherboard orientation is such that the IO panel is facing down, I needed to make a new panel at the back of the speeder for easier accessibility. And that's where these panel mount extension cables come in! I love these things. Here are the USB 3.0 cables.. one connects to the motherboard, while the other two plug into the mobo's IO. 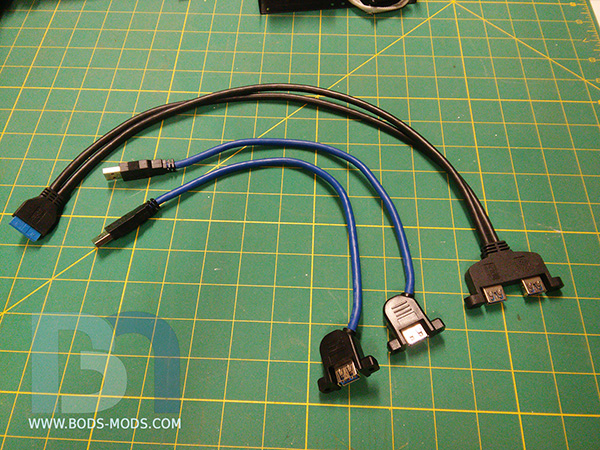 And here's the ethernet and displayport. I had to go with a shorty DP cable and a F/F adapter as that's the only thing they had for DP that was a panel mount. 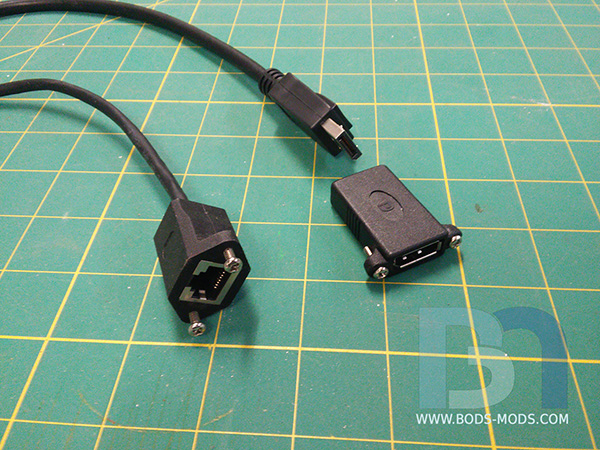 And last but not least, the power cable extension.. Home-made, using a standard power cable that was cut down, and a socket pilfered from an old psu. 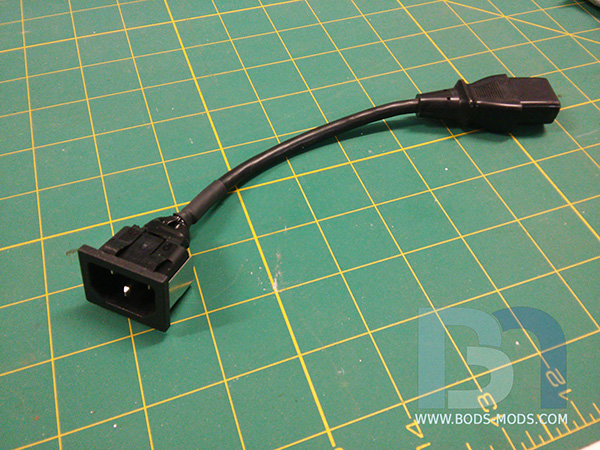 I cut out a piece of aluminum to fit just underneath the engine tubes at the rear bulkhead. After positioning the extensions, I proceeded to cut out the holes one by one. I put a piece of painter's tape over the actual plug and cut out the holes, then transferred the tape over to the new panel and marked it. It's not the most accurate method, but it gets me in the ball park, and once most of the material is removed, I just use the actual cable as reference from there on out to get it perfect. 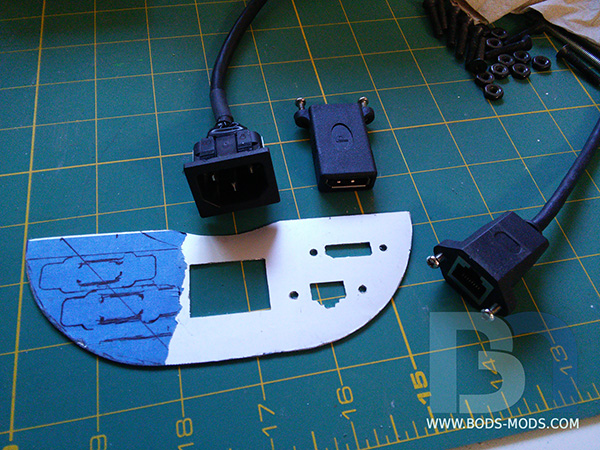 Continuing on, I got the USB ports done as well.. Another cool thing about panel mounts, is that you can use the other end to test fit your hole! 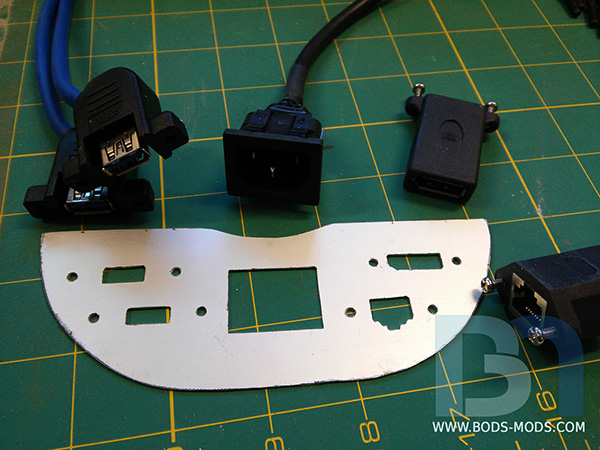 And here's the finished panel-mount panel with panel-mounts mounted to the panel. :P  Will show pics of the panel installed on the bulkhead next..
|
Cool GTX
EVGA Forum Moderator
- Total Posts : 31353
- Reward points : 0
- Joined: 2010/12/12 14:22:25
- Location: Folding for the Greater Good
- Status: offline
- Ribbons : 123
Re: Scratch Build: Rey's Speeder
2017/04/10 10:01:33
(permalink)
notfordman
I'm really enjoying this thread//build. The 3D parts are just cool. You're making some great progress, Bod!! You sure have a way to visualize what you're doing and making it happen. Great job so far!! .
+1 This is an interesting full custom build Thank you for sharing the adventure of this build
Learn your way around the EVGA Forums, Rules & limits on new accounts Ultimate Self-Starter Thread For New Members
I am a Volunteer Moderator - not an EVGA employee
Older RIG projects RTX Project Nibbler

When someone does not use reason to reach their conclusion in the first place; you can't use reason to convince them otherwise!
|
Sleinous
CLASSIFIED ULTRA Member

- Total Posts : 7663
- Reward points : 0
- Joined: 2010/06/12 12:22:01
- Location: France
- Status: offline
- Ribbons : 32
Re: Scratch Build: Rey's Speeder
2017/04/10 16:20:03
(permalink)
This is coming along real nice!
My Affiliate Code: GL1IAAFWJF
|
MitchWh
Superclocked Member

- Total Posts : 146
- Reward points : 0
- Joined: 2017/04/10 14:18:42
- Status: offline
- Ribbons : 0
Re: Scratch Build: Rey's Speeder
2017/04/11 10:15:01
(permalink)
This is going to look pretty cool! Could be also from Fallout 4 when i take a look at the first idea.
|
notfordman
Omnipotent Enthusiast

- Total Posts : 8772
- Reward points : 0
- Joined: 2007/08/09 23:52:23
- Location: In a van, down by the
- Status: offline
- Ribbons : 28
Re: Scratch Build: Rey's Speeder
2017/04/11 10:51:54
(permalink)
That USB/power panel looks factory man. I'm not surprised though... 
|
Boddaker
iCX Member
- Total Posts : 316
- Reward points : 0
- Joined: 2007/02/09 17:13:09
- Location: Where the beer flows like wine
- Status: offline
- Ribbons : 18
Re: Scratch Build: Rey's Speeder
2017/04/12 13:11:38
(permalink)
Thanks a lot guys! Here's the top panel progress.. The total length of the top panel is about 14", and that is right at the max height of my printer. But I didn't want to push it, so I broke it up into two separate prints. This is the main part. 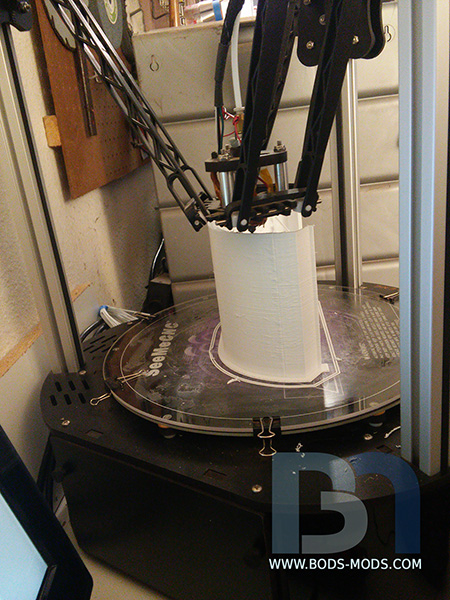 So far, so good.. 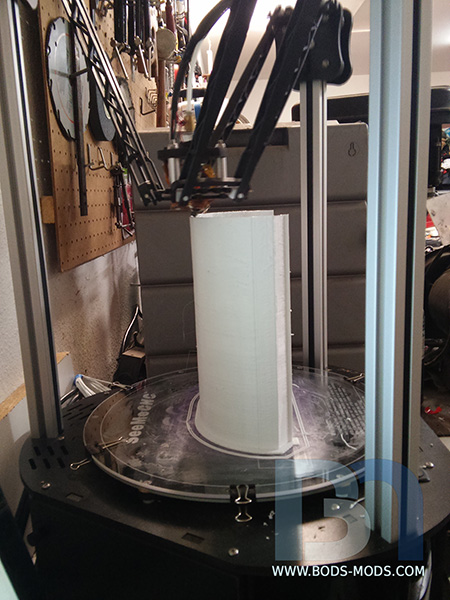 ..and it finished! Total print time, 17hrs. 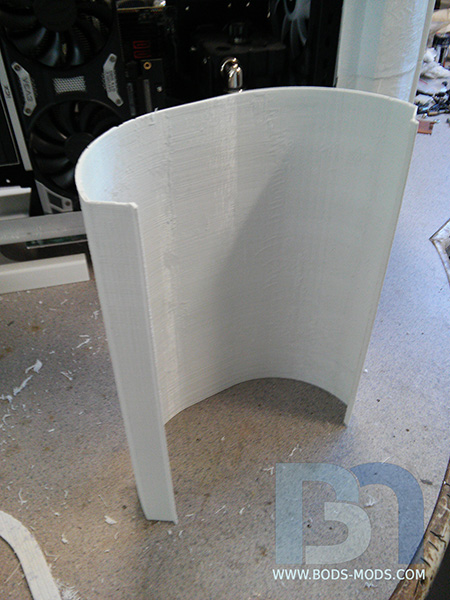 This part is 9 1/2" tall. The next part will be easier since it has a cutaway for the instrument panel and windshield.  A shot of the panel on the case.. 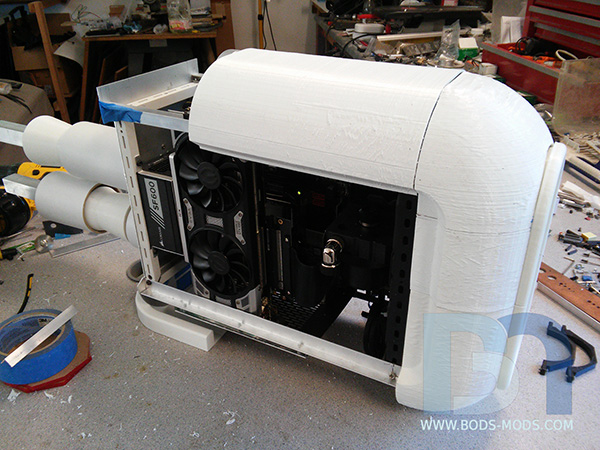 Fits on there pretty well! I'll have a couple metal cross braces underneath that will match the curvature of the panel, and give it something to fasten to. 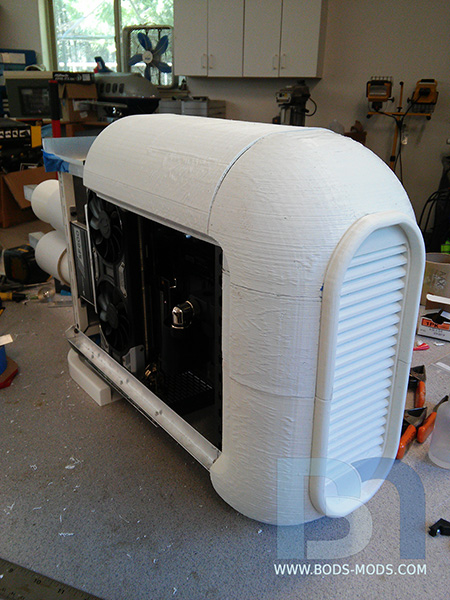 And of course, I run out of filament with only 1/2" left to go! Fortunately, it was easy to pause the print and re-thread with a new spool.. except I don't have any more white, and all I have in PLA is pink (from my daughter's rose case) and purple. So, purple it is! :P 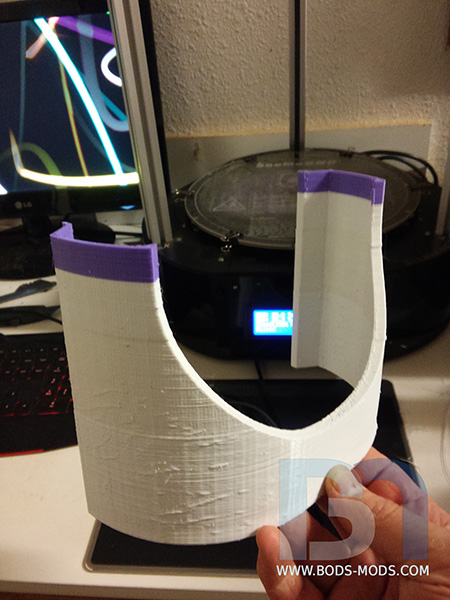
|
Boddaker
iCX Member
- Total Posts : 316
- Reward points : 0
- Joined: 2007/02/09 17:13:09
- Location: Where the beer flows like wine
- Status: offline
- Ribbons : 18
Re: Scratch Build: Rey's Speeder
2017/04/17 15:45:35
(permalink)
Here's the IO panel installed on the back bulkhead, under the engines. 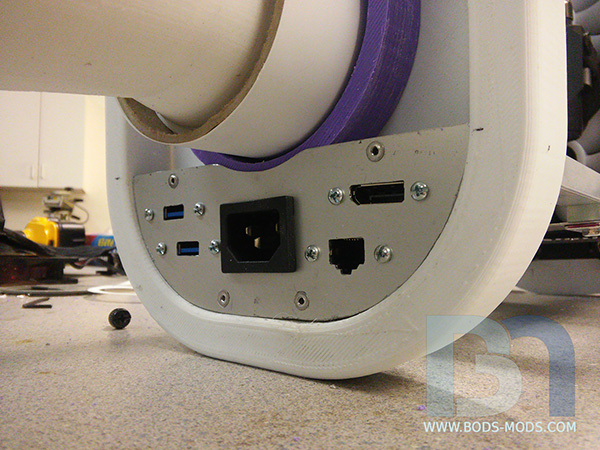 A reverse shot of the other side.. 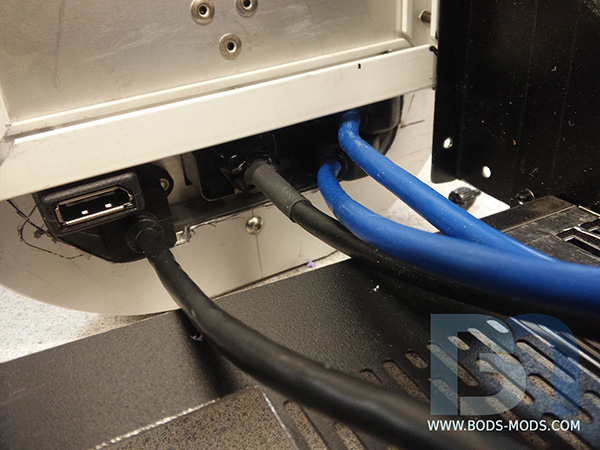 Moving up to the instrument panel, where the power button will be located, as well as the 2nd set of USB ports. I might throw a couple LEDs in there, if time allows. 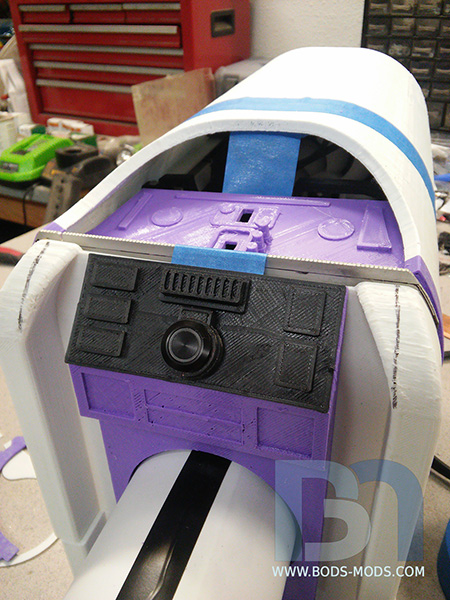 I have to cut down the bulkhead a bit, and make some other adjustments so all the pieces mate up better. Also will be adding a piece of styrene to fill in above the top instrument panel. 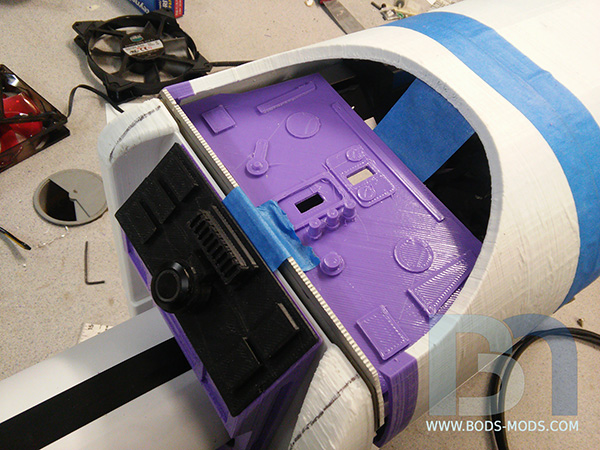 Here's the progress on the exhaust ports, starting with the 3D model in Sketchup.. 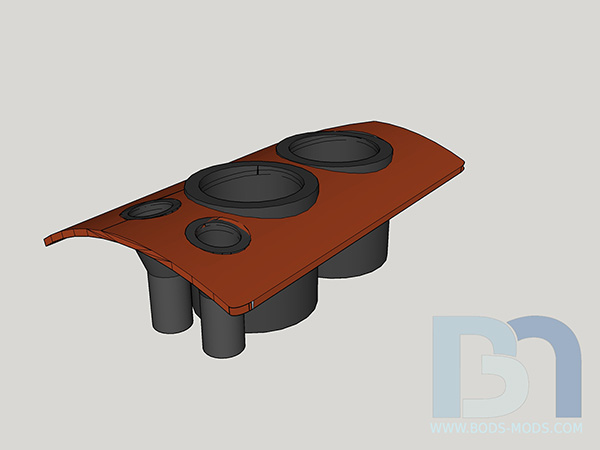 ..printing.. I repositioned the top plate to print vertically next to all the tubes.. otherwise I'd need a lot of support material, which would be a waste. 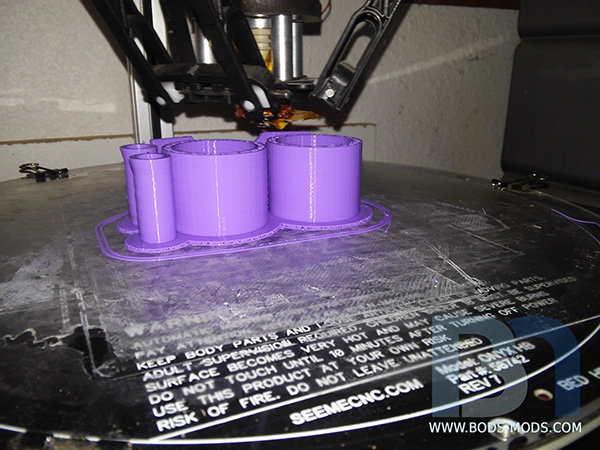 After a bit of cleanup, the top plate presses nicely over the tubes. Now I just need to cut a few holes in the bottom panel to mount it on the Speeder. 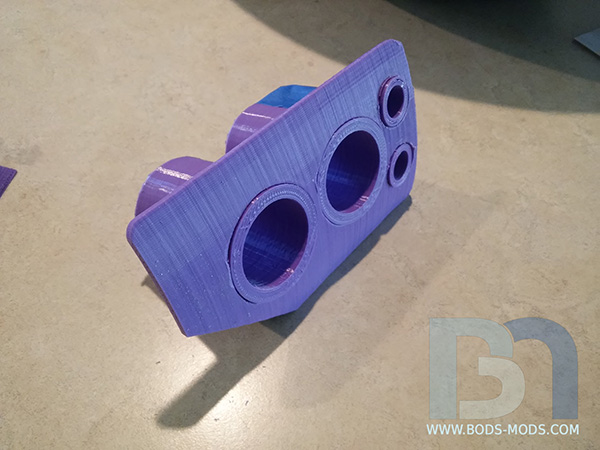
|
PascalD
New Member

- Total Posts : 100
- Reward points : 0
- Joined: 2017/03/29 12:47:47
- Status: offline
- Ribbons : 0
Re: Scratch Build: Rey's Speeder
2017/04/18 05:54:03
(permalink)
Dayummm this is one of the cooler fully custom builds I've seen. Looks pretty huge though xD subbed
|
Boddaker
iCX Member
- Total Posts : 316
- Reward points : 0
- Joined: 2007/02/09 17:13:09
- Location: Where the beer flows like wine
- Status: offline
- Ribbons : 18
Re: Scratch Build: Rey's Speeder
2017/04/18 12:44:35
(permalink)
PascalD
Dayummm this is one of the cooler fully custom builds I've seen. Looks pretty huge though xD subbed
Thanks Pascal! Size is relatively small, since its an ITX build.. 12"H X 7"W x 24"L :)
|
Boddaker
iCX Member
- Total Posts : 316
- Reward points : 0
- Joined: 2007/02/09 17:13:09
- Location: Where the beer flows like wine
- Status: offline
- Ribbons : 18
Re: Scratch Build: Rey's Speeder
2017/04/19 11:10:51
(permalink)
Working off of reference pics, I whipped up a model of the steering control unit. 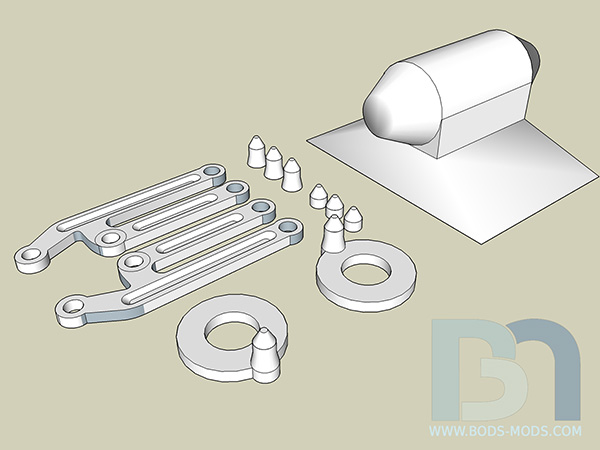 The printer made quick work of the small parts.. 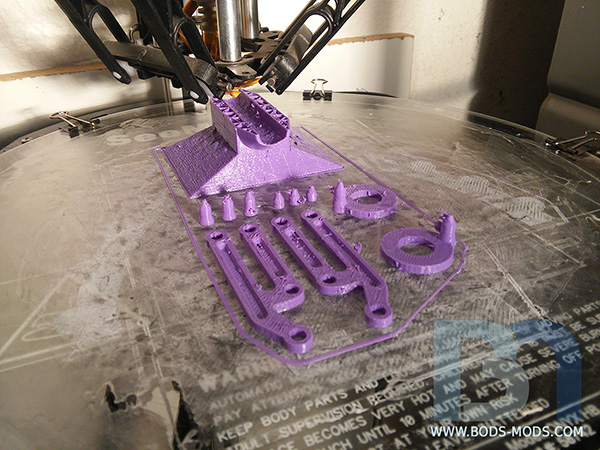 Some basic cleanup before initial assembly. I printed the base with a 1/2" hole through it so I could just use a piece of acylic tube as the pivot rod. 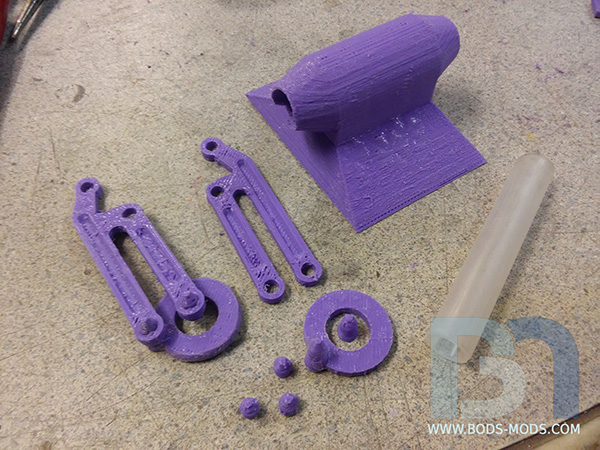 After putting it together, I added some wooden dowels for the handles. 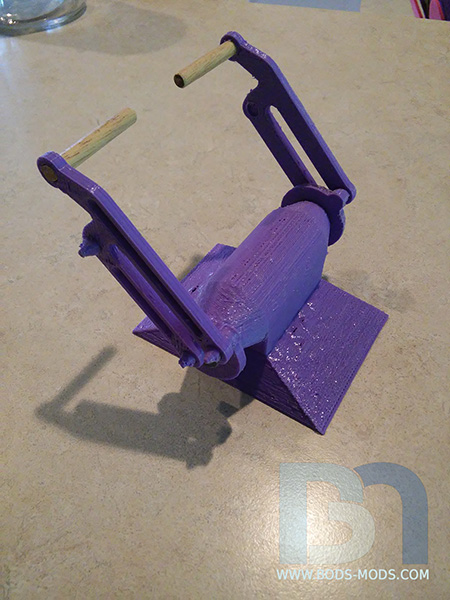 But after reviewing the reference pic again, I realized I assembled the steering arms backwards! Luckily I hadn't glued them together yet, so it was a quick fix. Now it looks more like the actual thing. :) 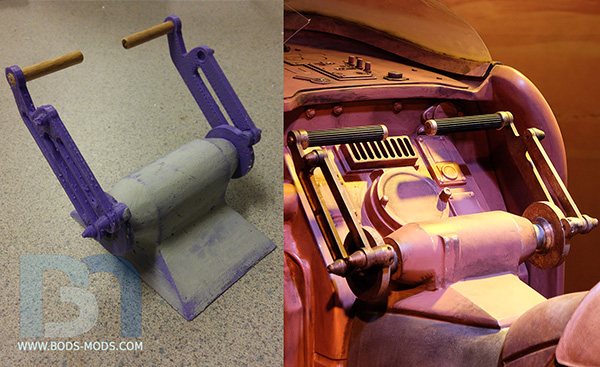
|
soullesshunter
Superclocked Member
- Total Posts : 143
- Reward points : 0
- Joined: 2016/05/21 14:33:54
- Location: Jacksonville, florida
- Status: offline
- Ribbons : 4
Re: Scratch Build: Rey's Speeder
2017/04/20 13:36:00
(permalink)
I really want to get a 3 d printer and just go nutz on making pcs etc.. ideas. love it
+1
|
Boddaker
iCX Member
- Total Posts : 316
- Reward points : 0
- Joined: 2007/02/09 17:13:09
- Location: Where the beer flows like wine
- Status: offline
- Ribbons : 18
Re: Scratch Build: Rey's Speeder
2017/04/21 09:30:13
(permalink)
Here's my smoothing technique.. since directly sanding the PLA doesn't work too well (the friction just creates heat and gums up the plastic, making the surface more rough), I decided to coat the panels with an epoxy putty. It's a two-part system that you knead together into a dough. After a few hours it hardens to a strong but light-weight substance. 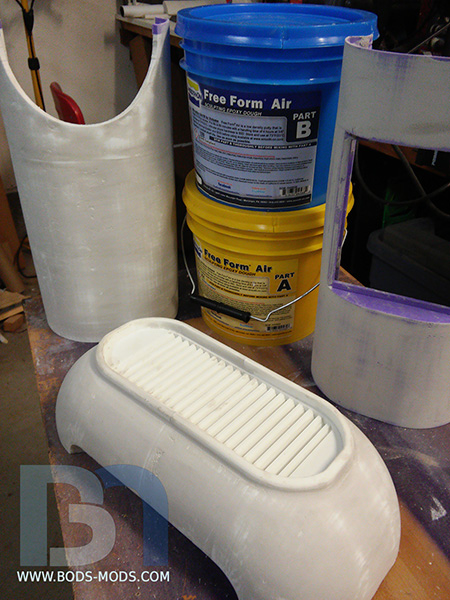 Using gloves, I just smear the putty onto the surface of the panels. Once cured, it's much easier to sand than the PLA. 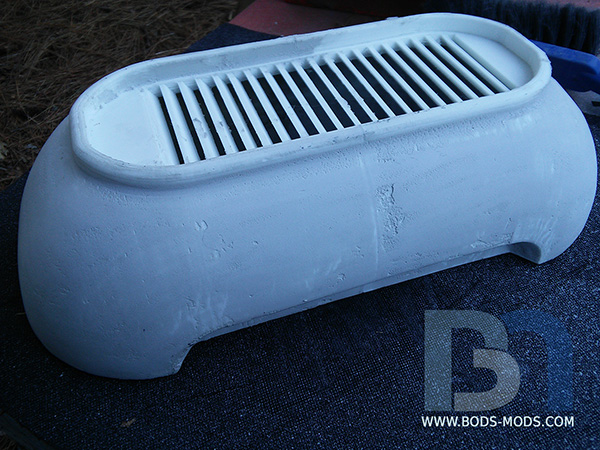 I sand down until I start seeing the ridges of the PLA, leaving all the valleys filled. 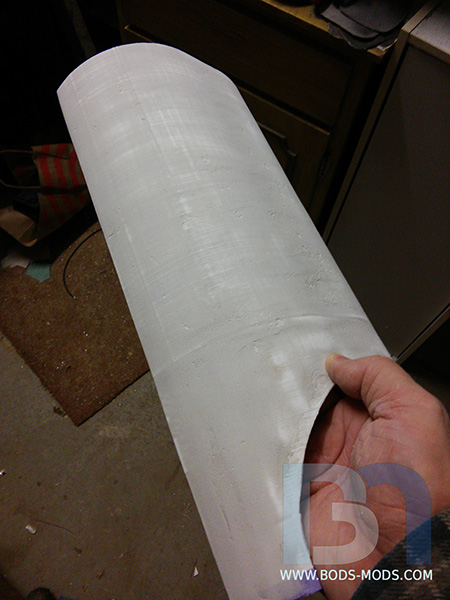 Here's the bottom panel. There are a few divots here and there, and I'll go back and spot fill those. 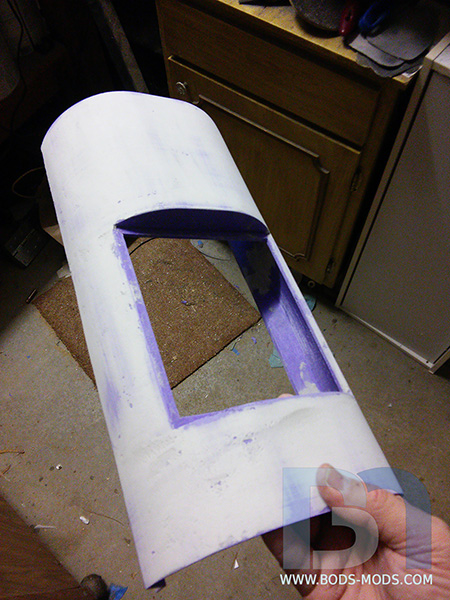 After sanding all the panels, I had to throw them onto the case for an overall look. Then I decided to test the hovering capabilities as well.. 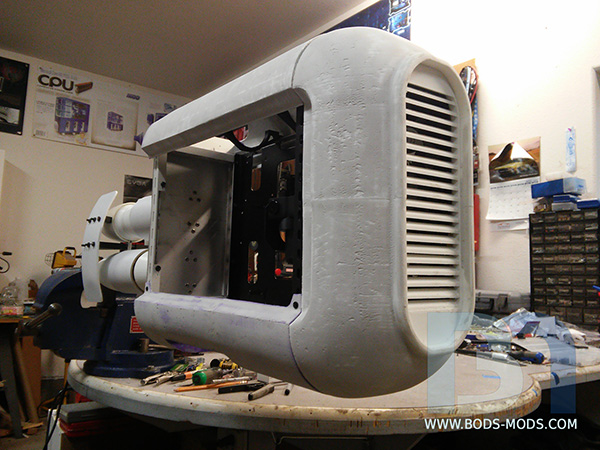 Getting the repulsorlifts dialed in! Of course, once I add all the hardware, I'll have to re-adjust them to account for the added weight. :P 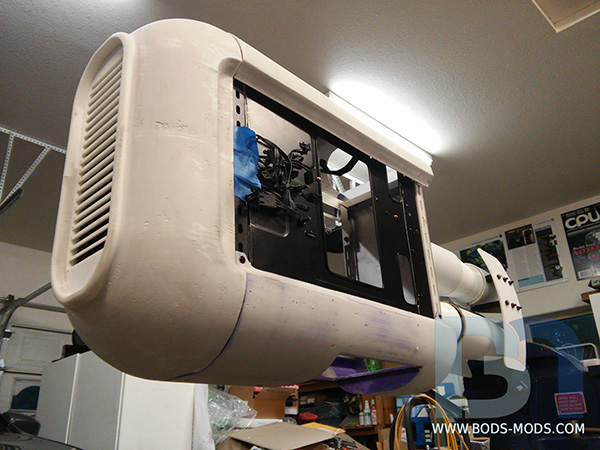 Less than 2 weeks to go! Hope I can make it..
|
rjohnson11
EVGA Forum Moderator
- Total Posts : 85038
- Reward points : 0
- Joined: 2004/10/05 12:44:35
- Location: Netherlands
- Status: offline
- Ribbons : 86
Re: Scratch Build: Rey's Speeder
2017/04/22 04:30:20
(permalink)
Two weeks is tight so hope you can make it
|
Boddaker
iCX Member
- Total Posts : 316
- Reward points : 0
- Joined: 2007/02/09 17:13:09
- Location: Where the beer flows like wine
- Status: offline
- Ribbons : 18
Re: Scratch Build: Rey's Speeder
2017/04/24 10:59:16
(permalink)
Ok, time for the Monday Modding Update! :) Getting down to the wire now, with about 10 days left in the competition. I was hoping to get the Speeder primed and all one color over the weekend, but things never work out the way you want. But I'm really close and should have it prepped and ready to paint this evening! Fingers crossed.. Anyway, here is what I did manage to get done.. Mounted the exhaust ports onto the bottom panel by cuttin a few holes to match the four pipes. 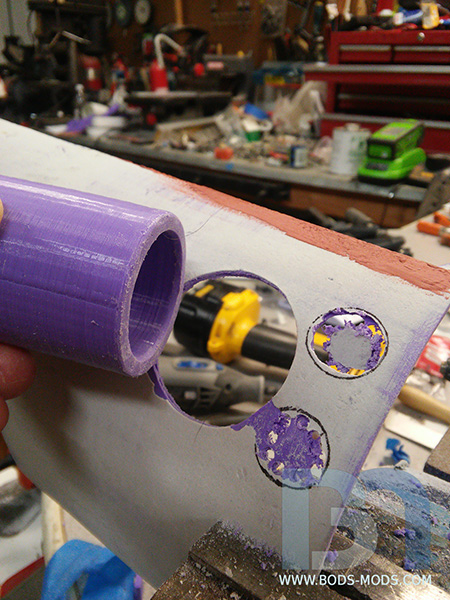 Of course, in my haste, I cut the small holes too large and had to add a support piece in behind with the correct size holes. I used the plate as my template, but forgot that the small tubes were smaller at the other end. doh! 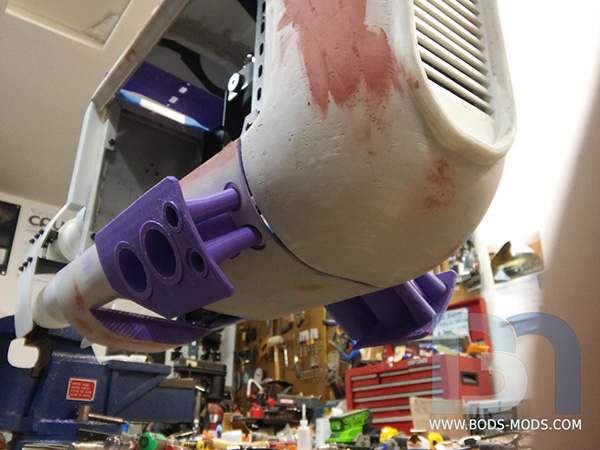 Thankfully I didnt make the same mistake on the other side lol.. 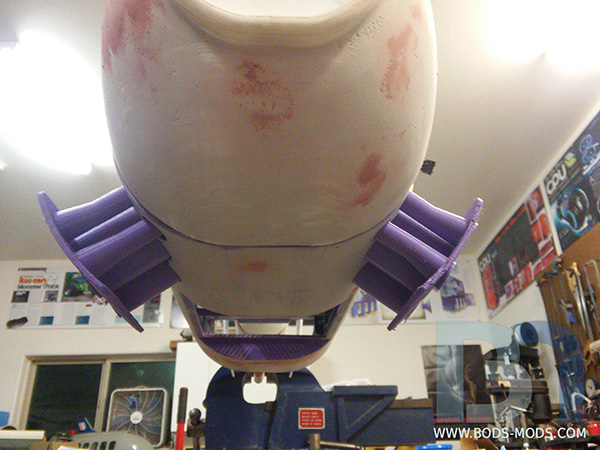 Onto the side panels. Luckily I didn't have to print any of this since they are just flat panels, and my printer is still down. So I used .08" thick styrene sheet. Going off the reference pics, I drew up the design for the panel sections and seams. 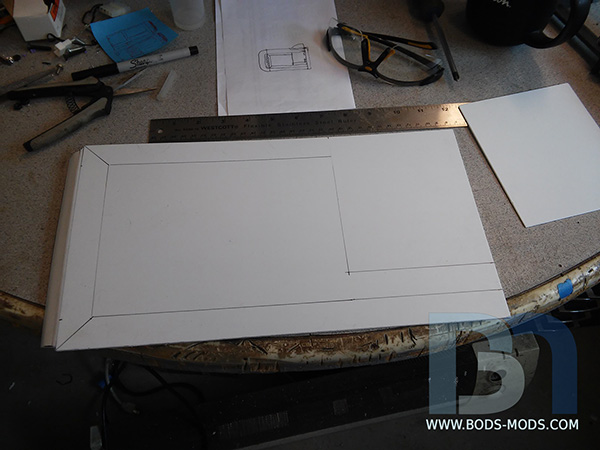 I used thinner sheets to make the subpanels that break up the flat surface. I also curved the left end of the panel to create the waste-gate, or gills that are on each side of the speeder. 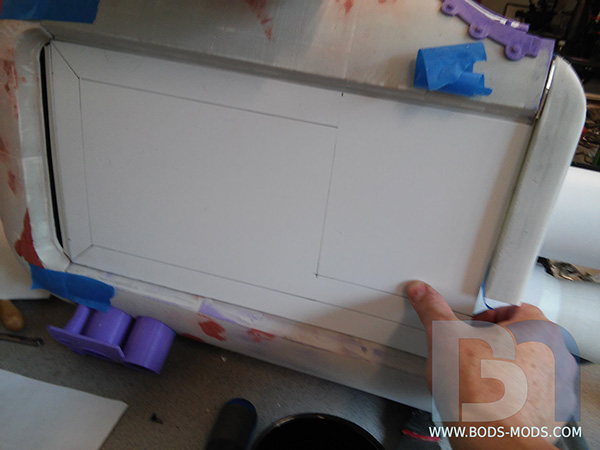 A closer up shot of the front gill. I cut away the center portion of the front nose, and will add some wire mesh in behind for effect. 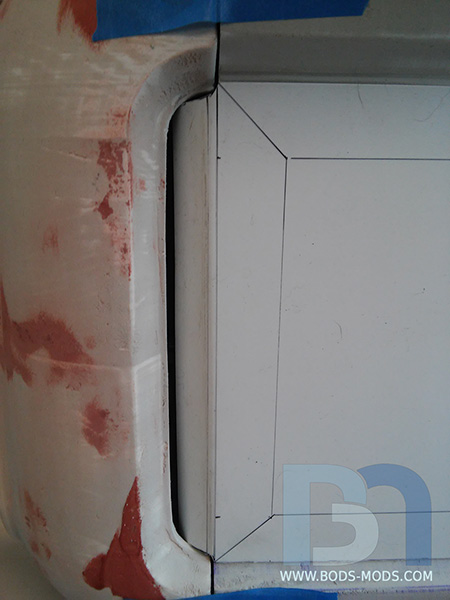 Then I added some faux hinges on the right to simulate an access panel. 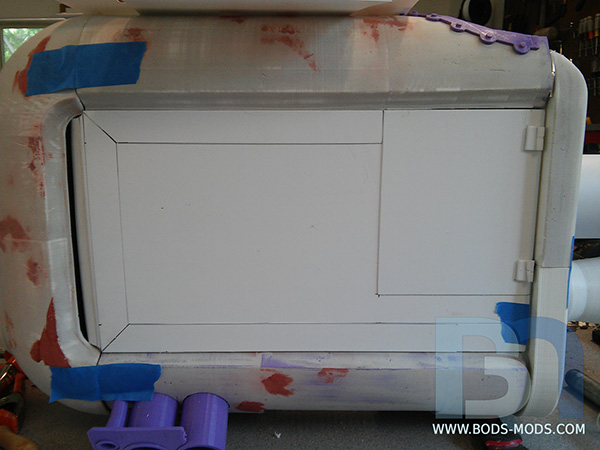 Movin on to the other side, this panel will be a bit more involved, since it has the video card fans, and will have a window integrated into it so you can see all the PC components inside. 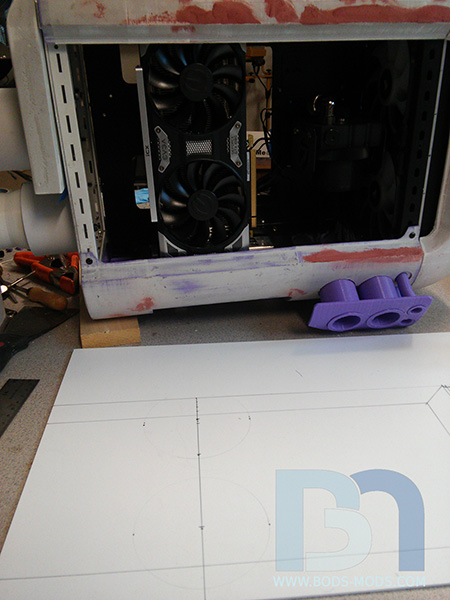 After taking measurements withe the EVGA 1080 SC2 in place, I figured out where the fan grills were going to be, so I started cutting the slots out. Beginning with pilot holes for each slot, I used the scroll saw to finish the job. 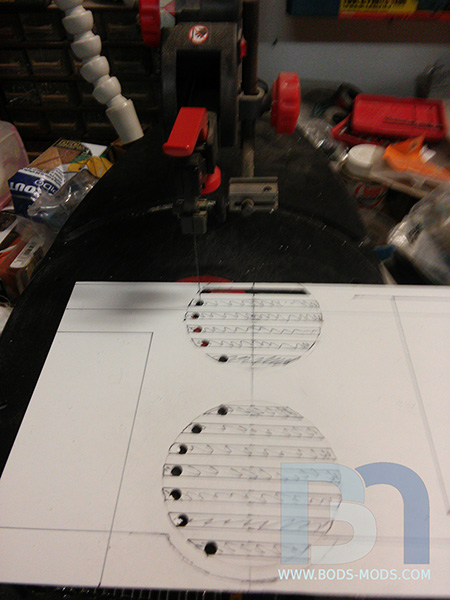 Slots cut, now I can figure out the rest of the panel, and where the window will go. I must have gone through 6 or 7 different designs before settling on one I liked. 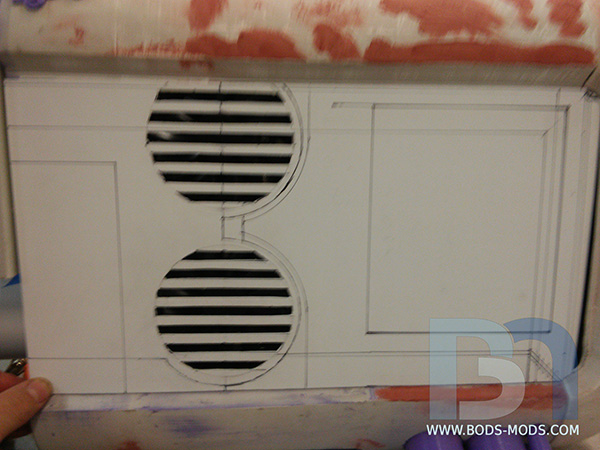 Even with the window as large as I could make it, I decided to go with a barn door style hinged panel so I could open it up completely. 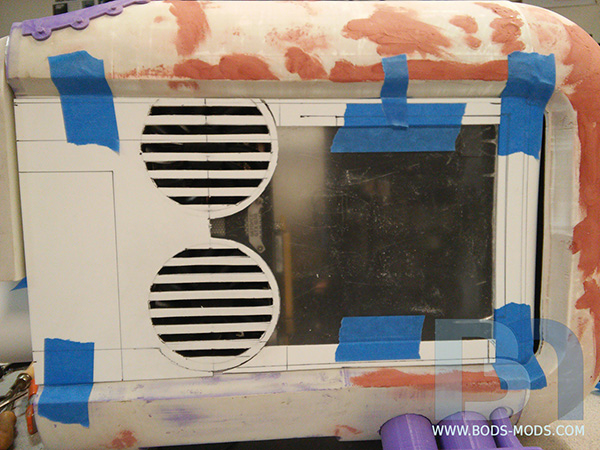 I finally get to use these acrylic hinges I've had laying around for a couple years. These will go on the window side..  ..and just standard metal hinges for the left. I'm splitting the barn doors right at the fan grills. 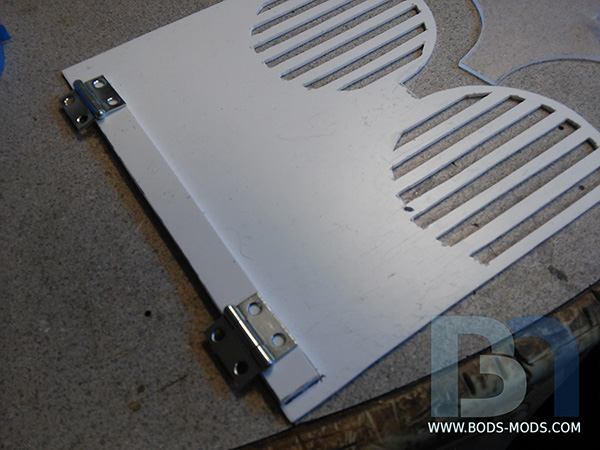 Hinges on!  And a close up of the acrylic hinges. 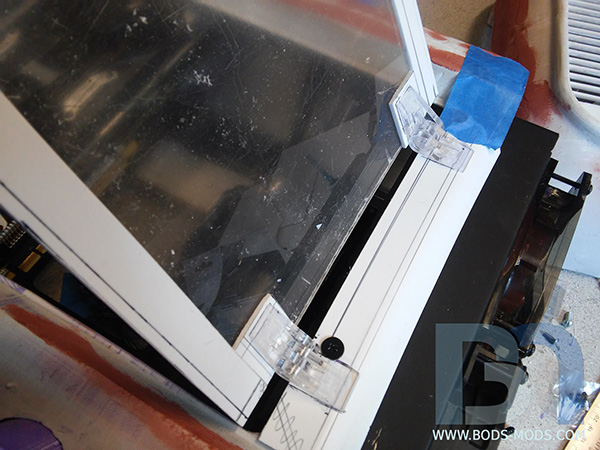 Now with the panels finally done, I can start prepping for paint! I still have a few items left to fabricate, like the windshield, seat, and some random engine detail parts, but the main body is complete. I spent the last few hours on Sunday smoothing all the remaining parts with the epoxy putty, and will be sanding everything tonight, and hopefully get things primed. Then I'll be painting and detailing the rest of the week.
|
Boddaker
iCX Member
- Total Posts : 316
- Reward points : 0
- Joined: 2007/02/09 17:13:09
- Location: Where the beer flows like wine
- Status: offline
- Ribbons : 18
Re: Scratch Build: Rey's Speeder
2017/04/27 09:46:27
(permalink)
Quick update: Painting has commenced! I managed to get a good coat of filler primer on Tuesday evening. 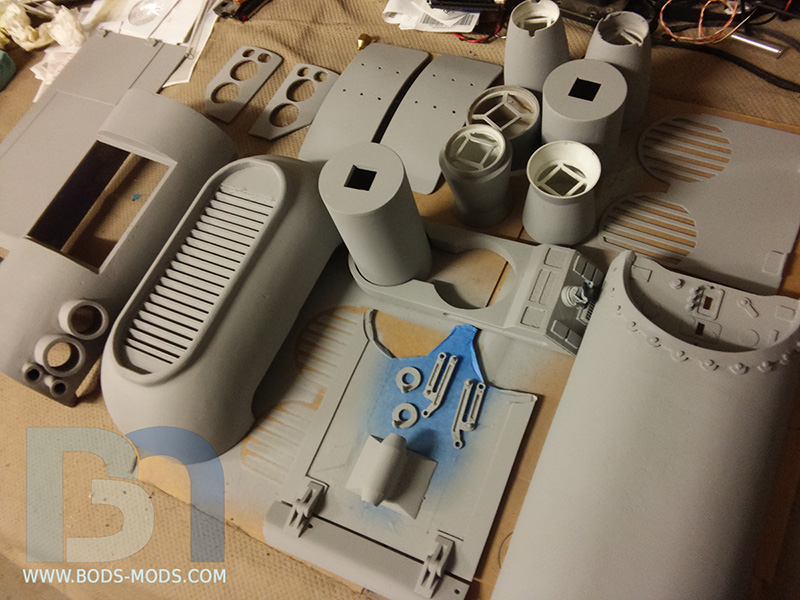 Last night it decided to rain again, so I couldn't do much in the way of paint, but I did get a few more parts made.. But first check out what goodies came in from EVGA!! <drool> 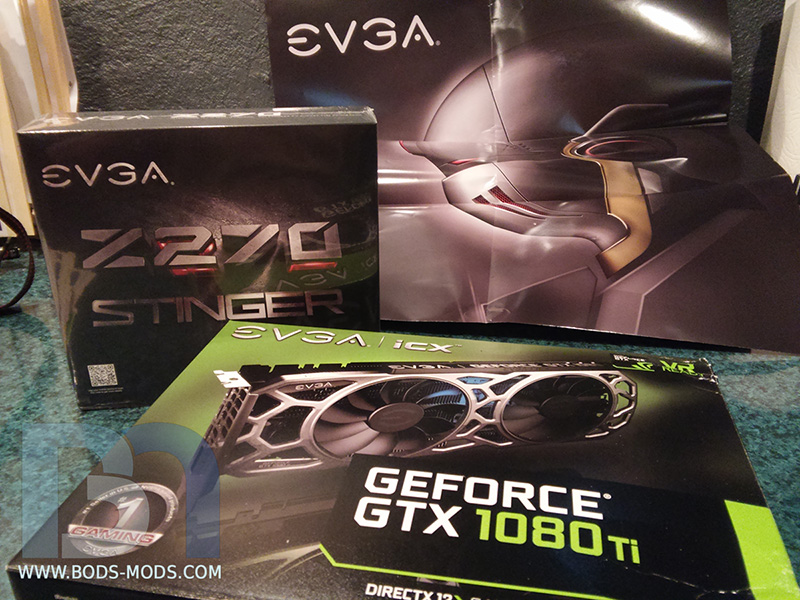 I now have the long-awaited Z270 Stinger in my possession! 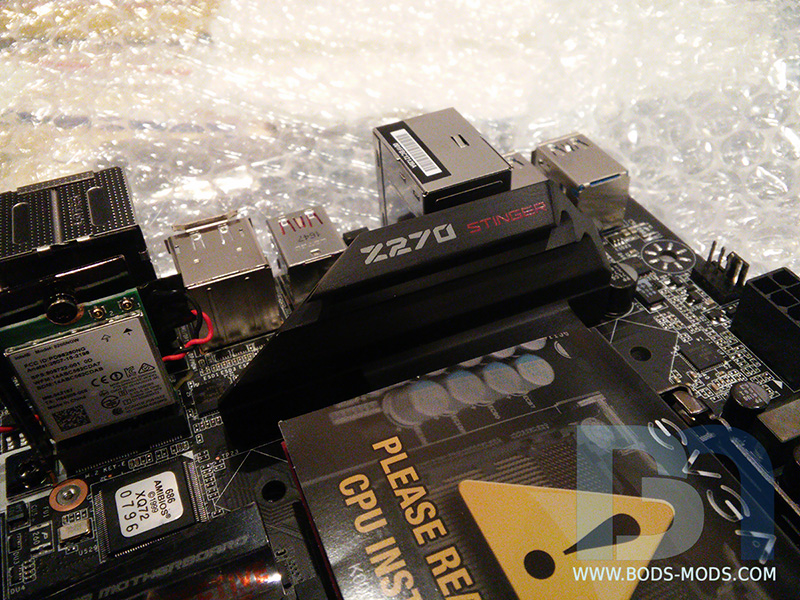 And they also sent me an unexpected surprise... a 1080Ti SC2! This is one sexy card! :D 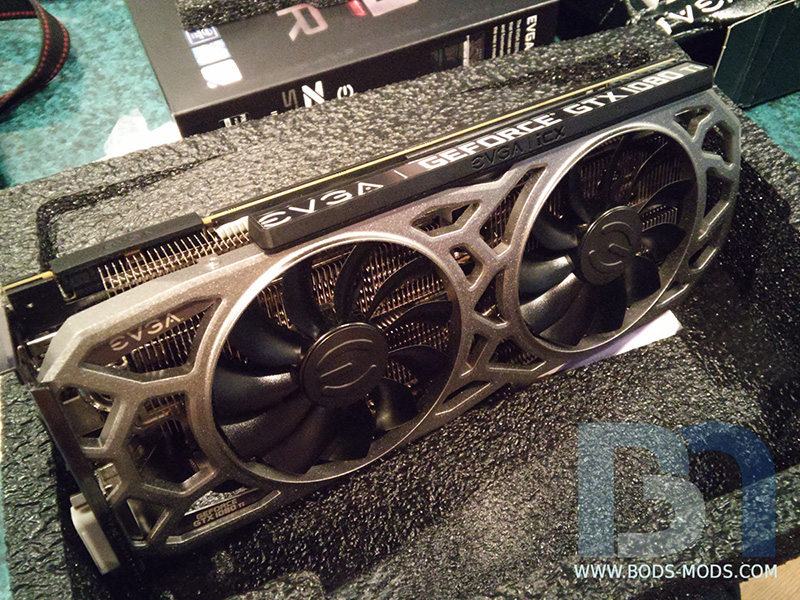 Ok, now that I got the pr0n out of the way, here are the parts I got checked off my list.. First was the windscreen. My first attempt was a piece of acrylic but failed miserably at heat-forming over a carved piece of foam.. So I went with a more simplistic approach: Soda bottle! It was already curved, all I had to do was cut it down to the size and shape I needed. I dremeled a thin slot around the edge on the top panel and slid it right in. Done! I'll glue it in once I get everything painted. 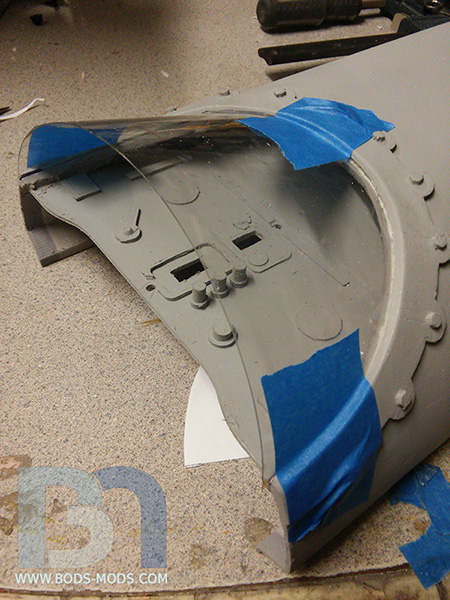 Next up was the heat shield that goes over the top engine, and the saddle sits on. This was a 4" drier vent duct in its former life. Just had to cut it down using some metal shears.   Now I'm in the process of carving the saddle to fit over it.  The sun is out today, and should be nice throughout the weekend, so I should be able to get all the painting done in the next few days. woot!!
|
Jszupiany
Superclocked Member
- Total Posts : 103
- Reward points : 0
- Joined: 2004/01/22 17:32:29
- Status: offline
- Ribbons : 0
Re: Scratch Build: Rey's Speeder
2017/04/28 14:24:06
(permalink)
I've been following this build on another board and have had the chance to see several of Boddaker's mods in person at PDXLAN. This is by far my favorite build of his.
|
rjohnson11
EVGA Forum Moderator
- Total Posts : 85038
- Reward points : 0
- Joined: 2004/10/05 12:44:35
- Location: Netherlands
- Status: offline
- Ribbons : 86
Re: Scratch Build: Rey's Speeder
2017/04/29 00:34:31
(permalink)
Looking forward to more updates
|
Boddaker
iCX Member
- Total Posts : 316
- Reward points : 0
- Joined: 2007/02/09 17:13:09
- Location: Where the beer flows like wine
- Status: offline
- Ribbons : 18
Re: Scratch Build: Rey's Speeder
2017/05/01 11:49:30
(permalink)
Jszupiany
I've been following this build on another board and have had the chance to see several of Boddaker's mods in person at PDXLAN. This is by far my favorite build of his. Thanks Jszupiany, did we meet at the lan?
|
Boddaker
iCX Member
- Total Posts : 316
- Reward points : 0
- Joined: 2007/02/09 17:13:09
- Location: Where the beer flows like wine
- Status: offline
- Ribbons : 18
Re: Scratch Build: Rey's Speeder
2017/05/01 11:51:42
(permalink)
Got a crap-ton of work done over the weekend.. so much painting! Its a 2-tone color scheme plus faux metal parts, so there was a lot of masking.. and then there's the weathering and detailing as well. So yeah, lots of work! But I somehow managed to get it all done in two days. My wife doesn't know me anymore. But I digress.. on to the progress pics! After painting all the body panels a flat red, I masked off the front grill to be painted metallic aluminum.  All the body panels painted.. 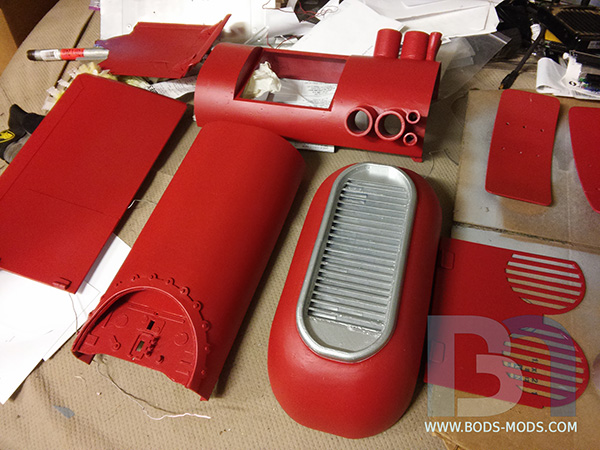 Sweet double-exposure closeup of the front grill.. 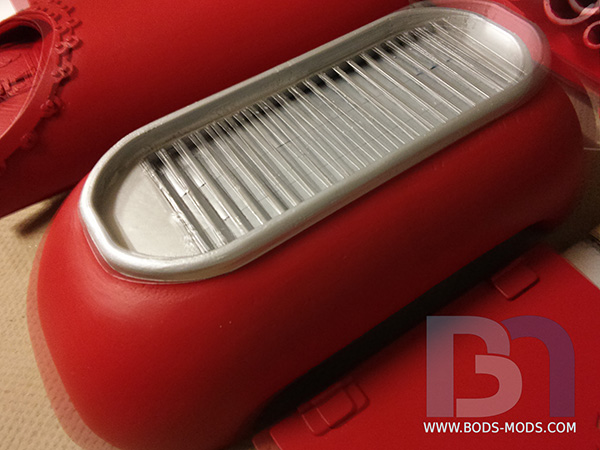 All the engine tubes were painted metallic aluminum as well.. 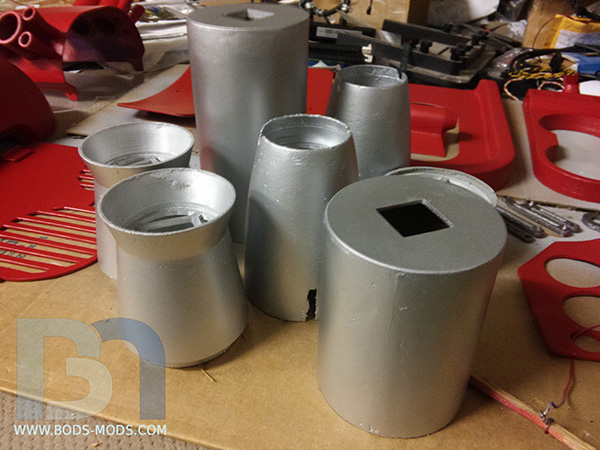 Then all the body panels were masked off again to paint the yellow stripes. The front nose took forever to mask! 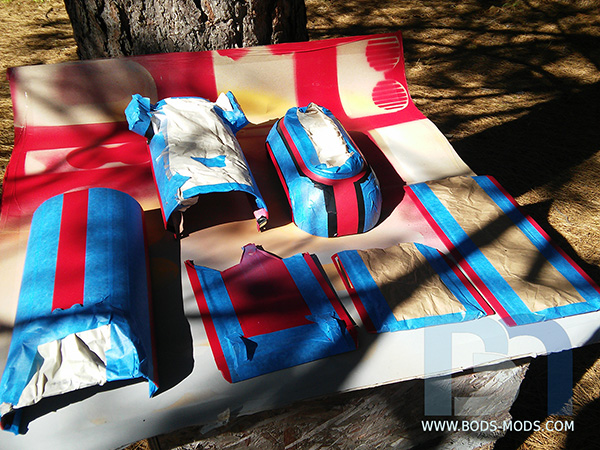 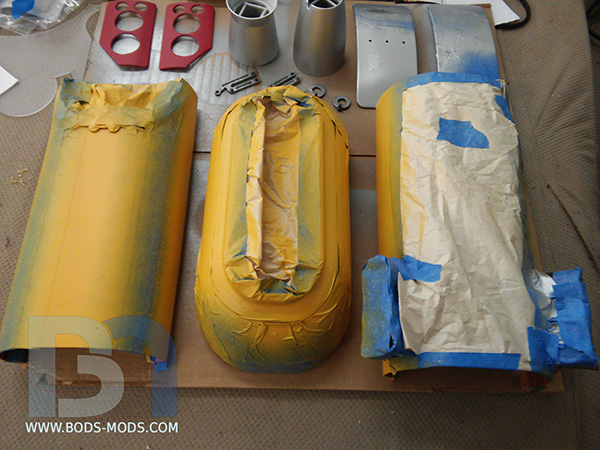 The dramatic removal of the tape..  Ooh purdy! 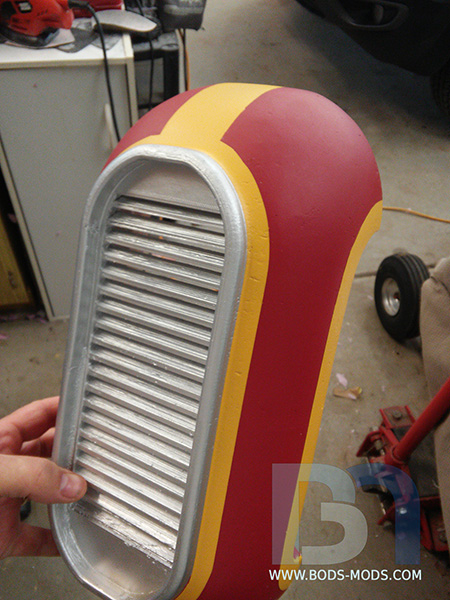 Ok, now it's looking too new. Gotta do something about that! 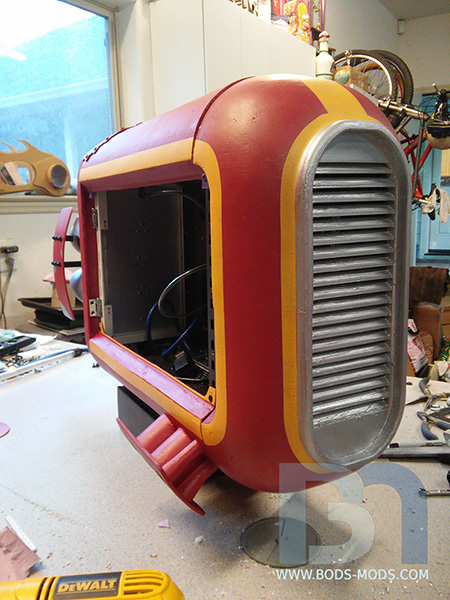 Going off of reference pics, I start masking off the areas where the paint has been worn or peeling off. I drew a basic shape to mimic the actual speeder's defects, then I taped around it, using the ripped edges of the tape to get a nice rough delineation.  After doing the edges, I filled in with normal tape to protect the rest of the panel. 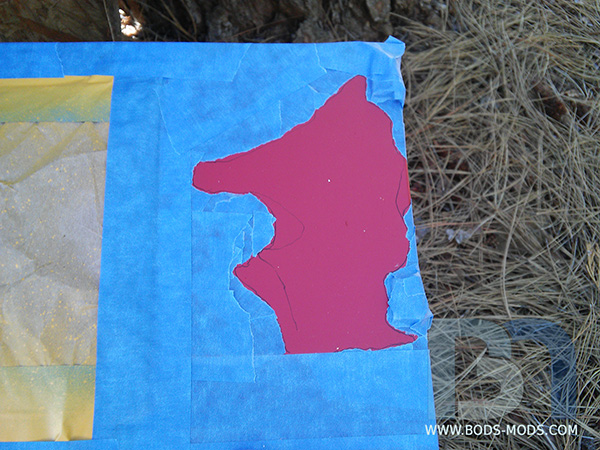 Did the same with the other pieces. 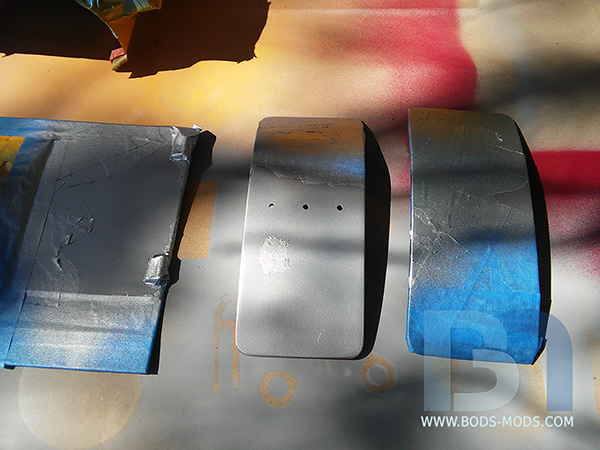 Rear fins unmasked. The left one has been lightly sanded along the edges to add more wear. 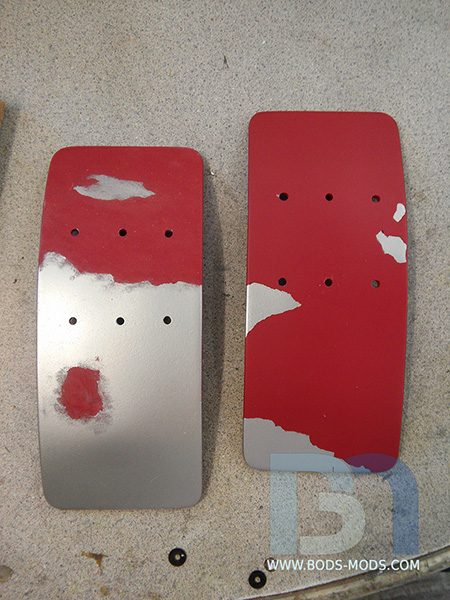 And here's the large area on the side panel. 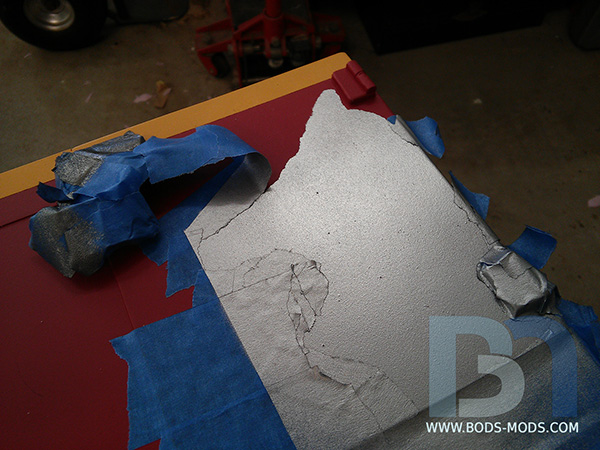 More suspenseful tape removal.. 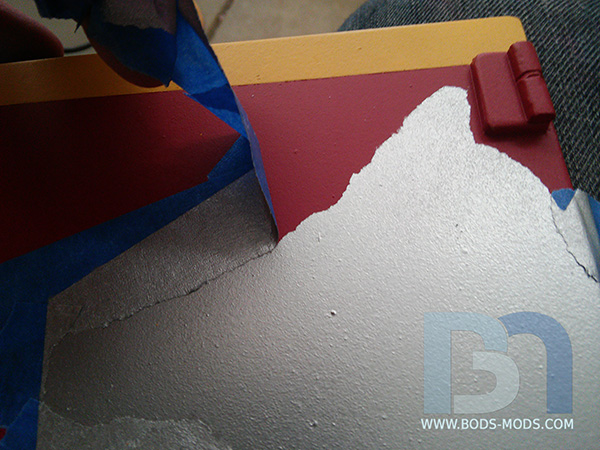 And the final shot for today, all the panels painted and on the case.  Still looks too nice, so we'll be taking care of that in the next post. Stay tuned!
|
rjohnson11
EVGA Forum Moderator
- Total Posts : 85038
- Reward points : 0
- Joined: 2004/10/05 12:44:35
- Location: Netherlands
- Status: offline
- Ribbons : 86
Re: Scratch Build: Rey's Speeder
2017/05/01 12:25:42
(permalink)
|
Vlada011
Omnipotent Enthusiast
- Total Posts : 10126
- Reward points : 0
- Joined: 2012/03/25 00:14:05
- Location: Belgrade-Serbia
- Status: offline
- Ribbons : 11
Re: Scratch Build: Rey's Speeder
2017/05/02 01:04:19
(permalink)
This is amazin, I don't know what is better hardware or mod.
Great hand work.
|
nikkocortez
CLASSIFIED Member

- Total Posts : 2625
- Reward points : 0
- Joined: 2010/02/01 10:04:03
- Status: offline
- Ribbons : 14
Re: Scratch Build: Rey's Speeder
2017/05/02 07:09:26
(permalink)
|
Boddaker
iCX Member
- Total Posts : 316
- Reward points : 0
- Joined: 2007/02/09 17:13:09
- Location: Where the beer flows like wine
- Status: offline
- Ribbons : 18
Re: Scratch Build: Rey's Speeder
2017/05/02 09:30:45
(permalink)
Thanks guys! Ok, now we get to the fun part! Weathering and detailing.. keep in mind that this is my first time with an airbrush, so I'm trying to get the hang of it while I'm painting this. I know some of you are asking, 'why didnt you practice first?' Who has time to practice! Plus I figured this is weathering.. a very random thing. So there's no way I can screw this up! ...right? :P So with that in mind, here's the first go-round.. I started with the exhaust ports and some black, going into the tubes and lightly around the edges.  I then moved around the panels, adding black here and there, in the crevasses and where ever I thought it should be darker. On the grill I just darkened the corners and added a few burns. Also I went over the red/yellow paint with some steel wool to dull it down a bit, and then a sand colored wash to flatten the color even more.  Another shot of the grill with the fans lit behind it.  Taking a break from the weathering, I finished work on the saddle. After carving the second part, I used spray adhesive to stick them together. 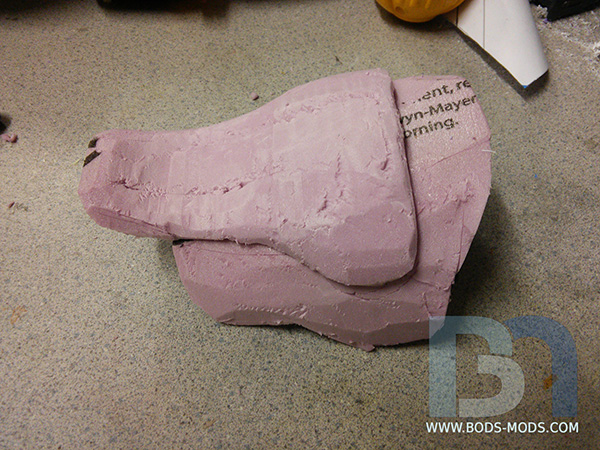 Then I smoothed out the foam with some drywall sandpaper. Also made the knee pads and stuck them all onto the heat shield for a test fit. 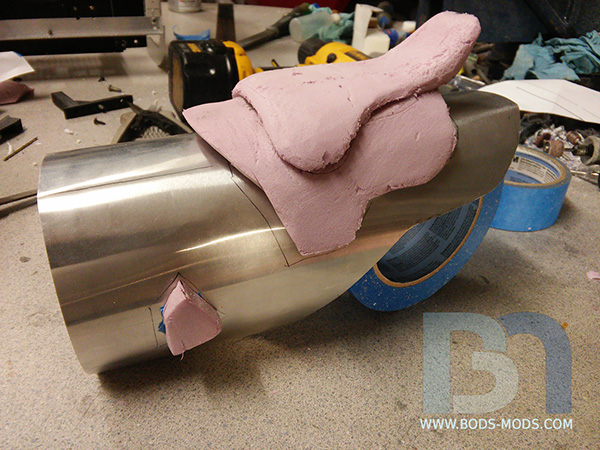 Fast forward past the puttying, sanding, test-fitting, and airbrushing, and here's the final version on the speeder. Most of the detailing is done on the engines, and you can see the weathering I did on the fins. 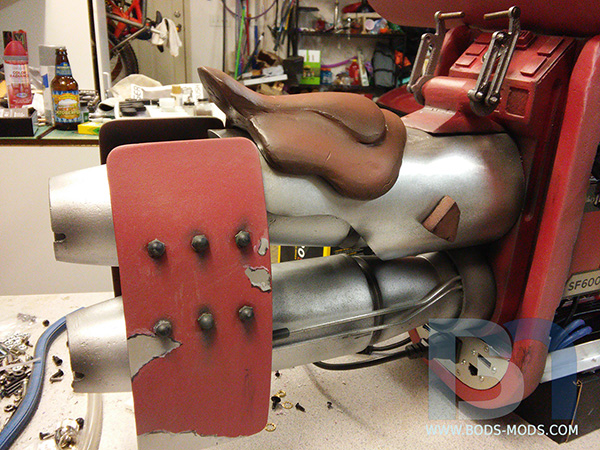 And here's the 1080Ti painted up to match. 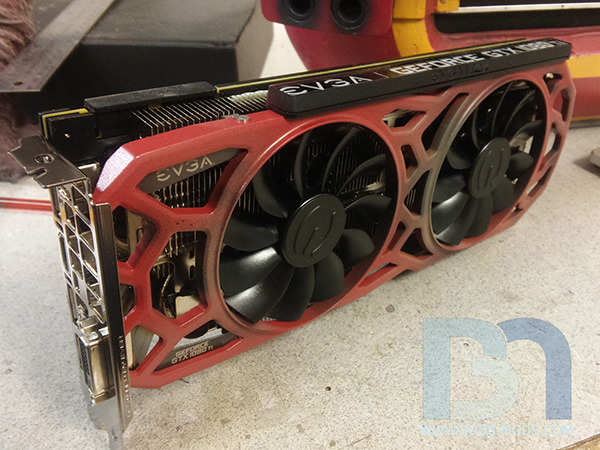 If I have time, I want to go back over everything again with another wash, soften the lines between the red and yellow, and add more weathering streaks. But I'm mostly done painting since the contest deadline is tomorrow night! I might post one more update with some last minute detailing, but if not, you'll be seeing final pics in a few days. woot!
|
rjohnson11
EVGA Forum Moderator
- Total Posts : 85038
- Reward points : 0
- Joined: 2004/10/05 12:44:35
- Location: Netherlands
- Status: offline
- Ribbons : 86
Re: Scratch Build: Rey's Speeder
2017/05/02 10:40:23
(permalink)
Just great. Looking forward to final pics.
|
Nemes1s89
New Member
- Total Posts : 98
- Reward points : 0
- Joined: 2016/03/16 07:08:31
- Status: offline
- Ribbons : 0
Re: Scratch Build: Rey's Speeder
2017/05/04 06:07:50
(permalink)
|
Boddaker
iCX Member
- Total Posts : 316
- Reward points : 0
- Joined: 2007/02/09 17:13:09
- Location: Where the beer flows like wine
- Status: offline
- Ribbons : 18
Re: Scratch Build: Rey's Speeder
2017/05/04 09:47:33
(permalink)
Hehe thanks guys! Ok time for final pics! woot It's been a wild, fast and crazy ride, but it's done and just in time for the contest deadline. whew! So here's the pics, not the best, but I needed to get them uploaded to Cooler Master quickly last night. And I will be doing another shoot outside in the sunlight as well... Anyway, enjoy! 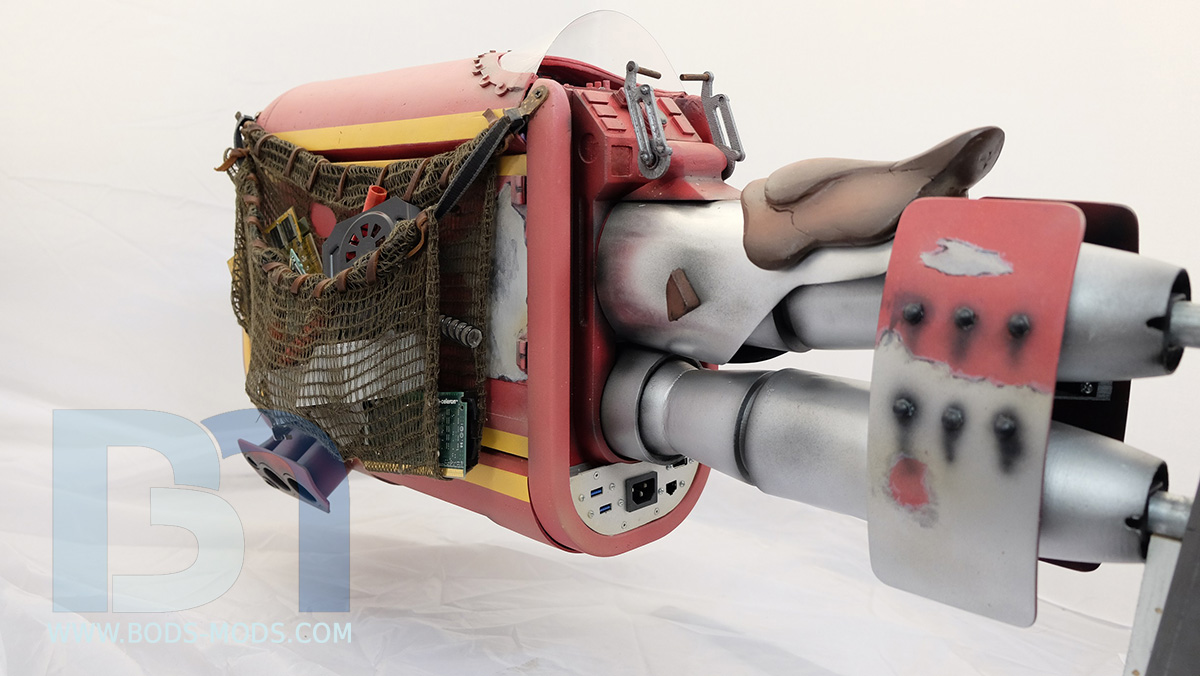 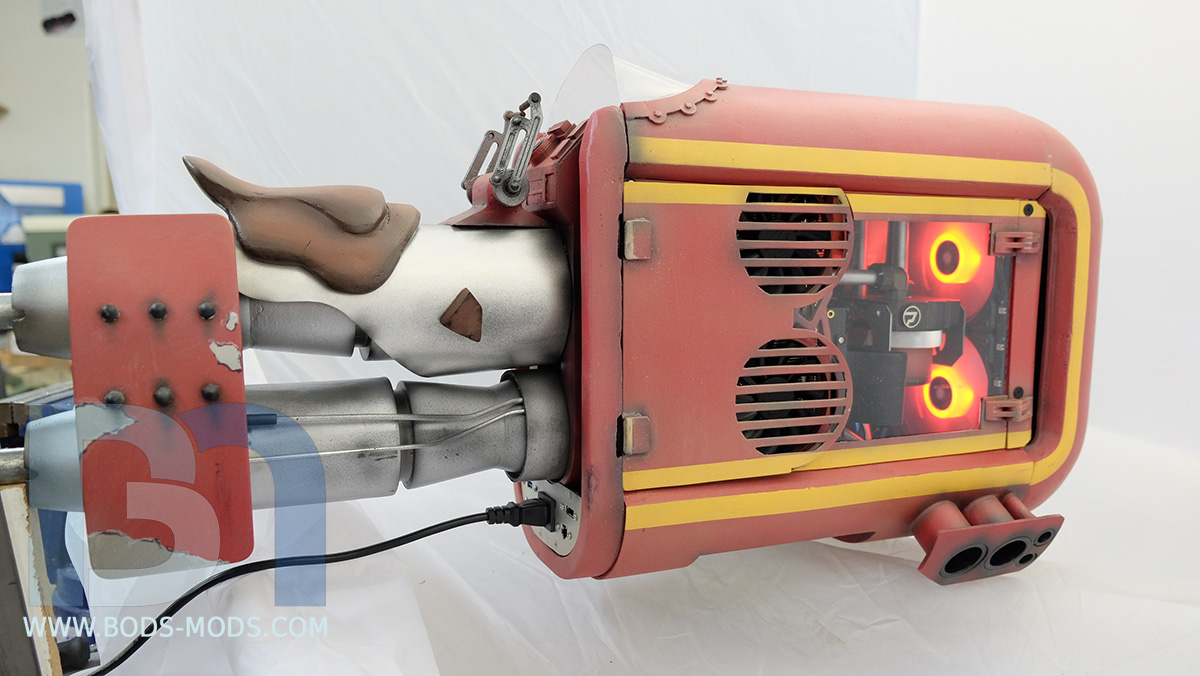 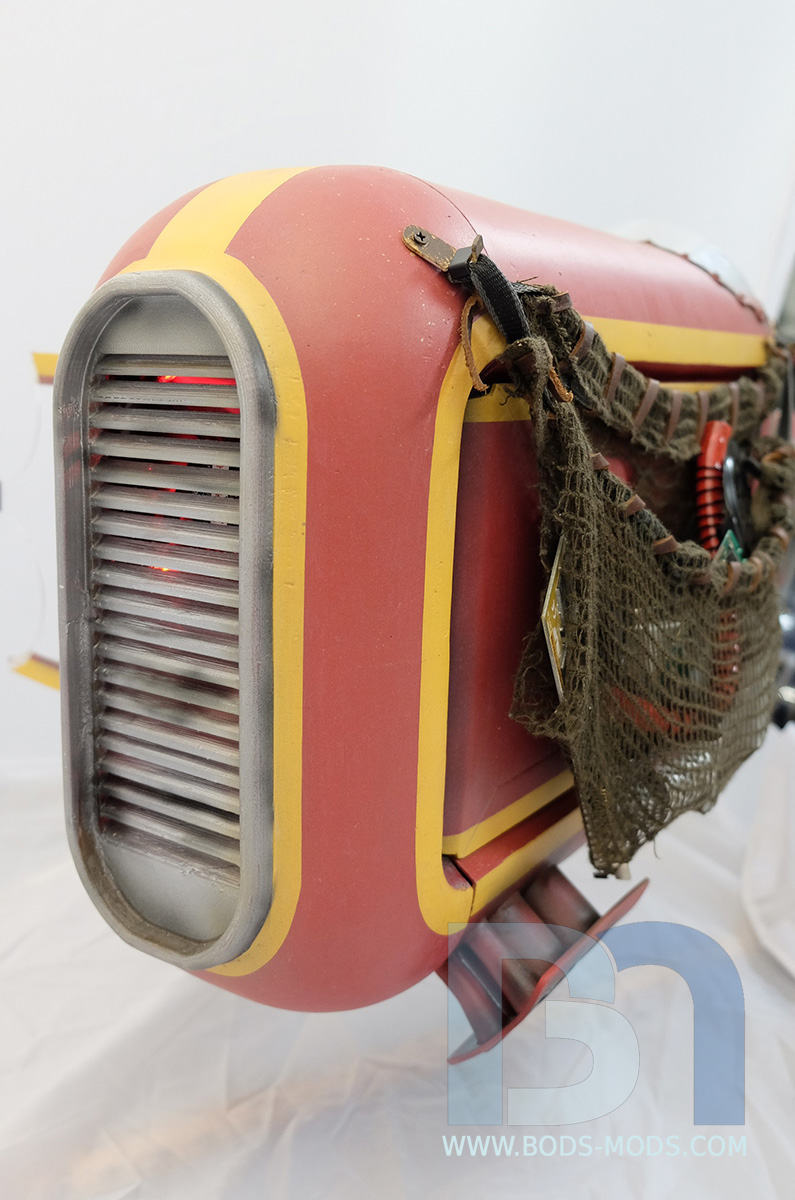 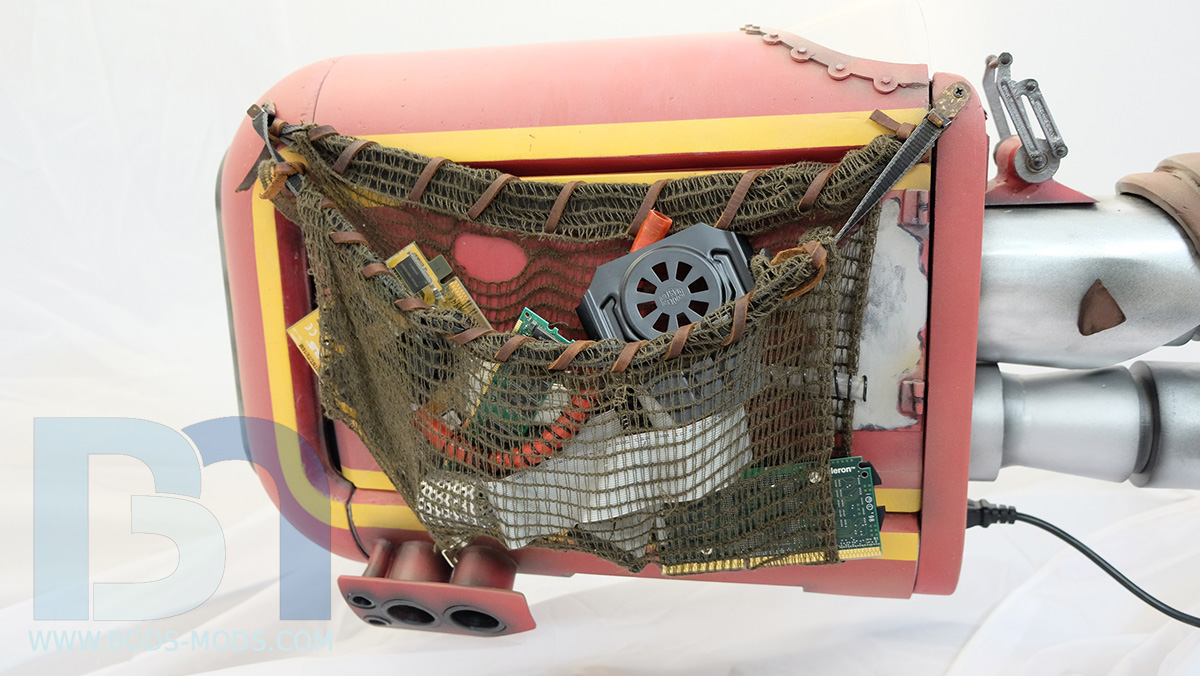  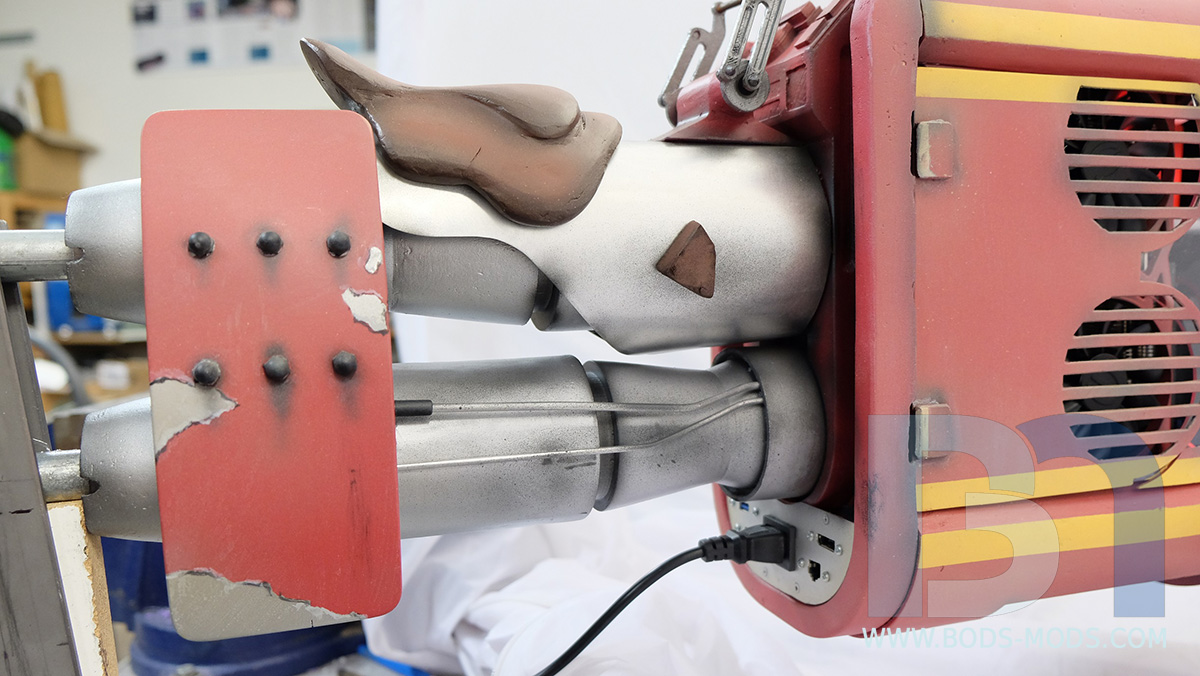 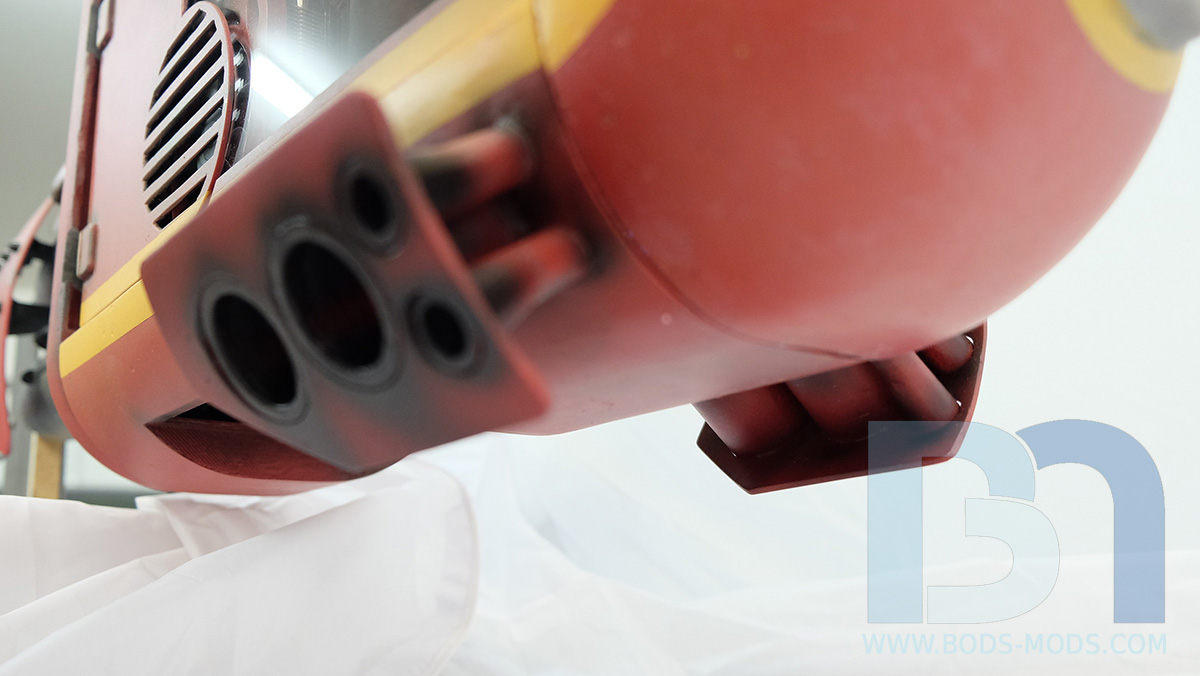 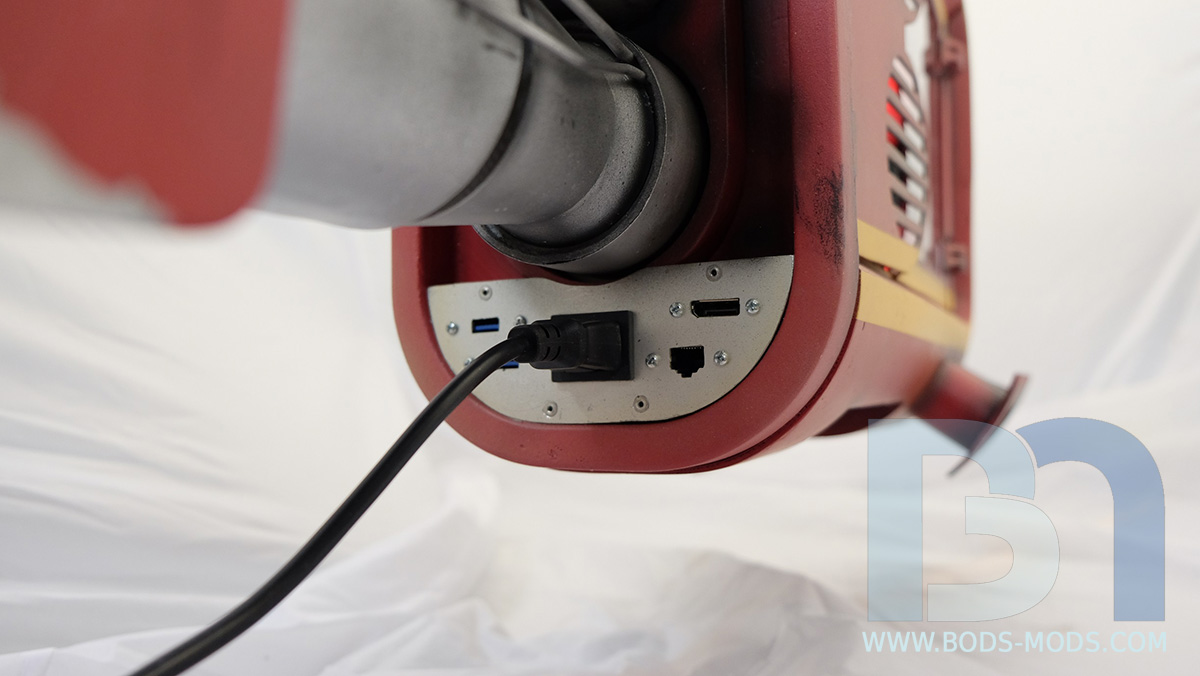 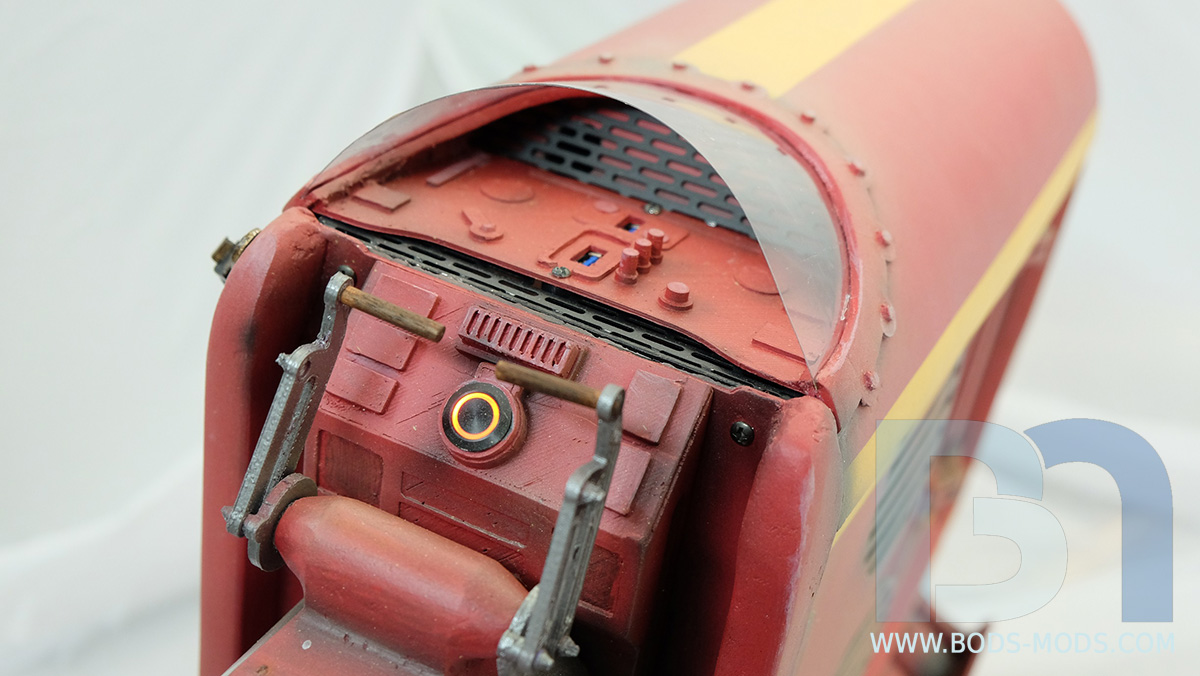  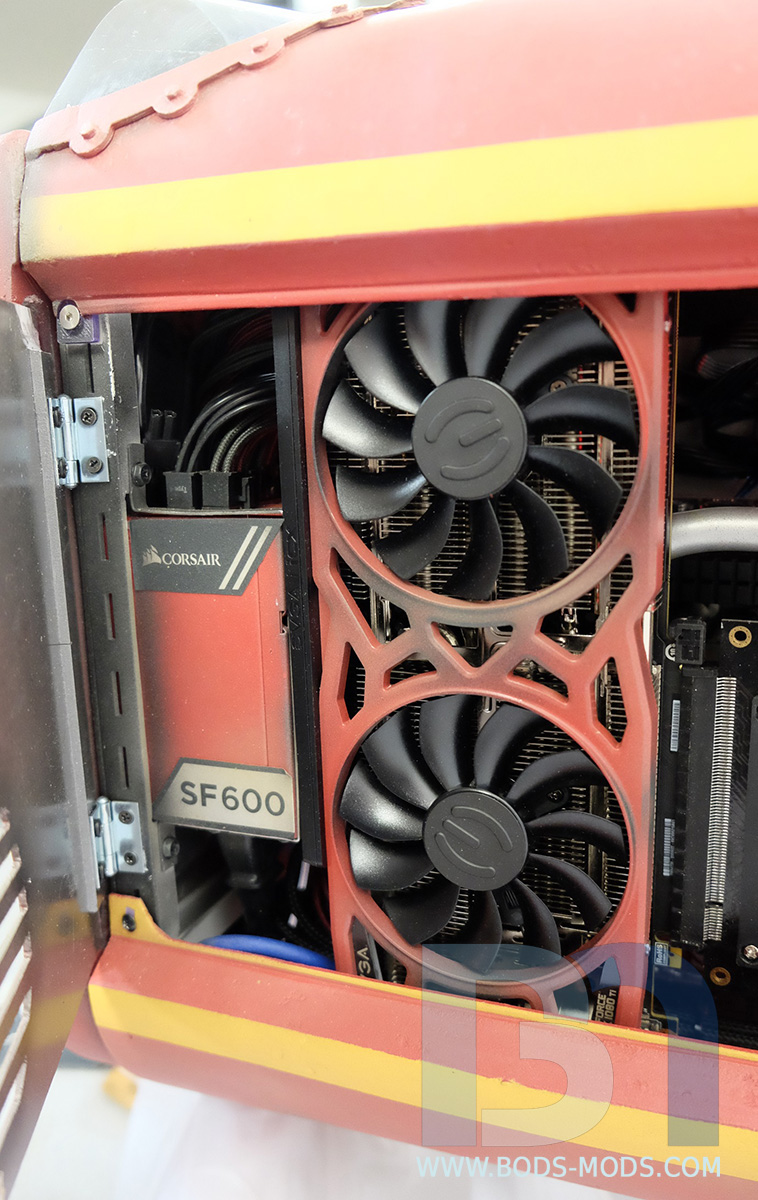 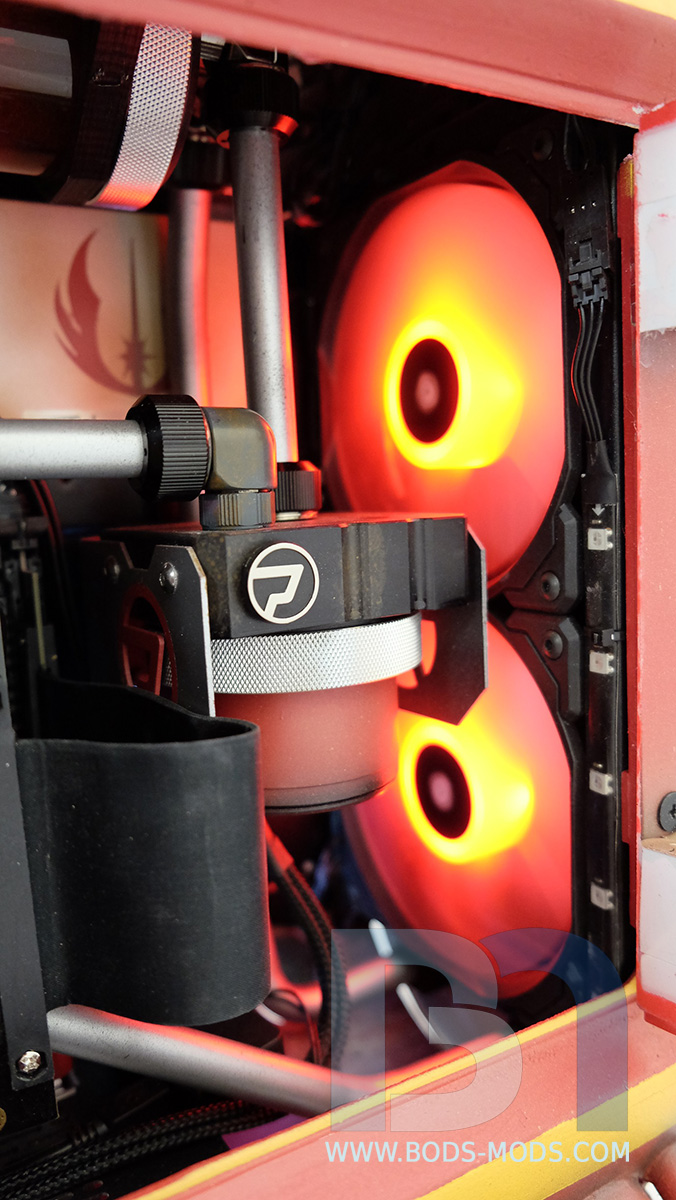 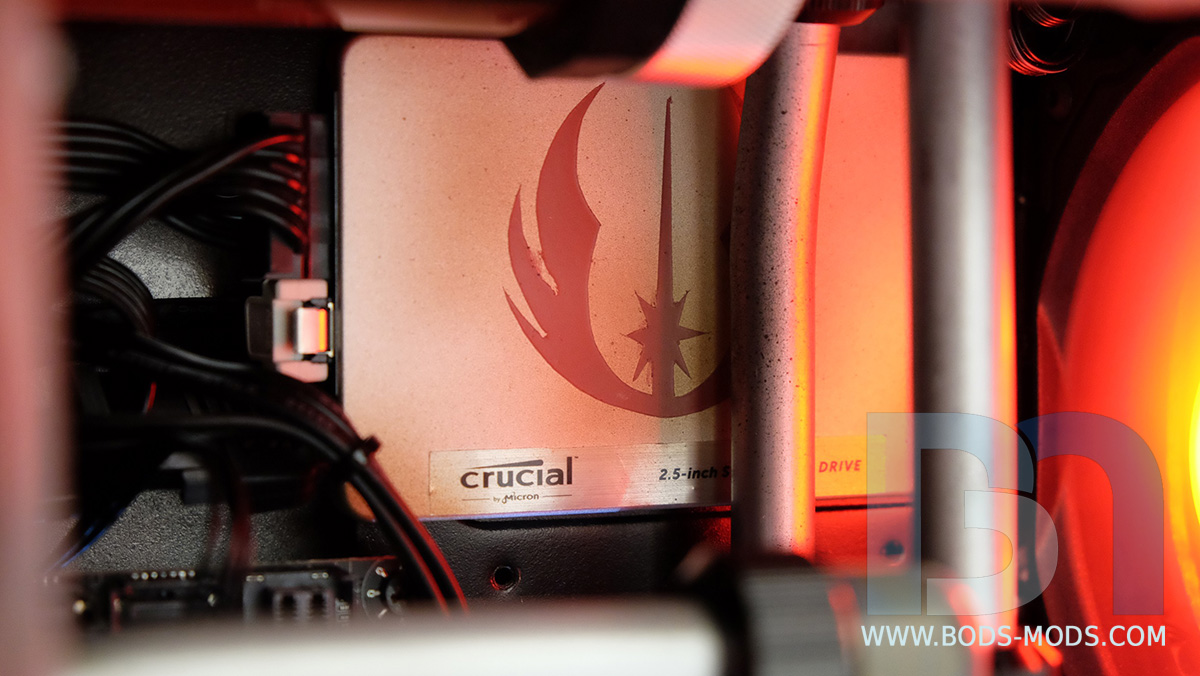 I had so much fun building this case, but it wouldn't have been possible without all the help and support from my sponsors: Primochill for all of the liquid cooling gear and the insanely beefy CPU block EVGA for getting me one of the first Z270 mITX motherboards available, and a 1080Ti SC2 video card Crucial for the 16Gb DDR4 Ballistix Elite memory kit and two 525Gb MX300 SSD's Corsair for the SFX 600w psu, RGB lighting and fan kits, as well as a keyboard and mouse which will be painted up to match the case Intel for providing me with a 7700k processor Thanks everyone for all your comments and support as well.. It's all very much appreciated!
|
Redrummitten
New Member
- Total Posts : 100
- Reward points : 0
- Joined: 2017/05/02 17:51:26
- Status: offline
- Ribbons : 0
Re: Scratch Build: Rey's Speeder
2017/05/04 18:02:54
(permalink)
Truly amazing work! Love the build!
|
LCRava
SSC Member

- Total Posts : 572
- Reward points : 0
- Joined: 2005/10/23 14:23:52
- Status: offline
- Ribbons : 8
Re: Scratch Build: Rey's Speeder
2017/05/05 01:18:42
(permalink)
MY AFFILIATE CODE: X6EXZ64PSH "I don't always GAME in 4K, but when I do, I prefer 4 TITANS" 
|
bdary
Omnipotent Enthusiast
- Total Posts : 10626
- Reward points : 0
- Joined: 2008/04/25 14:08:16
- Location: Florida
- Status: offline
- Ribbons : 118
Re: Scratch Build: Rey's Speeder
2017/05/05 09:57:44
(permalink)
Certainly is a unique build. Lots of work to make that happen. Nice job...
|