B0baganoosh
CLASSIFIED Member

- Total Posts : 2470
- Reward points : 0
- Joined: 8/4/2009
- Status: offline
- Ribbons : 42


I wanted to start this post to get some feedback on my plan before I actually do the build, so the pictures attached are of the current build before it becomes "Project Dark Water". Pictures of the build will come later (edit: skip to post 21 to see the new build up and running). Old system parts list: bequiet! Dark Base Pro 900 EVGA X99 Micro2 Intel i7 5820k @4.2GHz EVGA 2080 Super XC Hybrid G.Skill 32GB (8GBx4) Quad-Channel 3200MHz, 15-15-15-35 DDR4 EVGA 1000W G3 EVGA CLC-280 (with additional silent-wings 3 fans on back for push/pull) 2 old spinning drives with backup storage, 1 NVME drive in a PCI-e adapter card (this board doesn't have m.2 for storage drives), 1 sata SSD, 2 optical drives (fairly ancient...very infrequently used...going away)    Images don't have new mouse and keyboard (EVGA X17 and Z20). So, Here's what I'm looking at for post-water-logged-build: Dark Base 900 Pro (hence " dark water") EVGA z590 FTW Intel i9 11900k (OC's TBD) G.Skill 32GB 4000MHz 16-19-19-39 @1.4V DDR4 F4-4000C16D-32GTZR (stock config. not sure where we'll end up) EVGA 2080 Super XC Hybrid (this stays for this year. 3080ti Hybrid would be the only thing that may have a chance to convince me to upgrade this horrible cycle) EVGA 1000W G3 Keeping HD's, scrapping DVD drives. OK, here's the fun part that I'm looking for some feedback on, WATER LOOP: Optimus Foundation CPU Block (acrylic + black aluminum)Optimus Absolute Reservoir (8.5", satin black, 3 port plugs on top, getting a blemished one for the discount) EKWB D5 Xylem PWM pump (sleeved) EK-Coolstream CE 420mm Radiator (I have a whole bunch of silent-wings 3 PWM fans. Going to put 3 to push and depending on case limitations above it, probably 2 to pull. I don't think I can fit a 3rd fan over it because my case has a phone charger do-dad up there that is probably in the way) EK matte black tubing 16/10mm (I have used this at work, I love the dark industrial look and think it'll be sweet in this case) EK Quantum Torque compression fittingsEK Quantum Torque Splitter TEK Quantum Torque Drain ValveEK Y-splitter 3-fan PWM cable EK Y-splitter 2-fan PWM cable (I think the motherboard has 2 "CPU fan" headers. I'm hoping I can run 3 fans off one, and 2 fans off the other, pump plugged in somewhere else) EK CryoFuel Clear (I don't want to mess with colorants falling out over time) I have an EKWB filling bottle and unlimited supply of DI water at work, so I may borrow that to fill, leak-test, and flush the system before I put the EK fluid in. I am planning on putting the T-splitter near the bottom of the loop with the drain valve out the side of that. I got an extra fitting so I can run some tube down from there when I want to drain it. I don't think I'll need anything other than straight fittings, but if there's some problem, I think I may have some black Koolance 90° fittings just collecting dust at work that were extras from an old project and may just be scrapped that I can borrow until I get some matching ones. Looking at the manual page about pump mounting (attached), it looks like the bracket mounts to a drive bay. I'm thinking I take the two I have and move one of them under the shroud with the second one just on top of the shroud, mounting the pump on top of that. Without the Optical drives there (that whole bracket comes out), I think there'll be plenty of room.
post edited by Nike_7688 - Thursday, May 13, 2021 3:17 PM
Attached Image(s)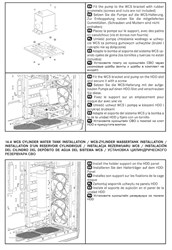
6Q6CPFHPBPCU691 is a discount code anyone can use. i9 13900k - EVGA Z690 Classy - Nvidia RTX 4090 FE - G.Skill 64GB DDR5-6000CL30 - WD SN850 2TB NVMe Gen4 - Be Quiet! Straight Power 12 1200W - Be Quiet! Dark Base 900 Pro. MO-RA3 420 Pro. Dark Palimpsest MODS RIGS post for build notes.
|
Cool GTX
EVGA Forum Moderator

- Total Posts : 31353
- Reward points : 0
- Joined: 12/12/2010
- Location: Folding for the Greater Good
- Status: offline
- Ribbons : 123
Re: Project Dark Water
Thursday, April 15, 2021 3:11 PM
(permalink)
as long as the reservoir is mounted higher than the pump ... so pump never runs dry .. do what you want
You just need a gravity feed to keep the pump wet with coolant
If your willing to drill some holes in the case ... mount the pump anywhere you like
I find it best to have the parts on site to do the visual testing, where it looks best & plumbing will not be a pain
That should be plenty of radiator for just the CPU
Learn your way around the EVGA Forums, Rules & limits on new accounts Ultimate Self-Starter Thread For New Members
I am a Volunteer Moderator - not an EVGA employee
Older RIG projects RTX Project Nibbler

When someone does not use reason to reach their conclusion in the first place; you can't use reason to convince them otherwise!
|
rjohnson11
EVGA Forum Moderator
- Total Posts : 85038
- Reward points : 0
- Joined: 10/5/2004
- Location: Netherlands
- Status: offline
- Ribbons : 86
Re: Project Dark Water
Thursday, April 15, 2021 3:21 PM
(permalink)
What a great looking mod.
|
B0baganoosh
CLASSIFIED Member
- Total Posts : 2470
- Reward points : 0
- Joined: 8/4/2009
- Status: offline
- Ribbons : 42
Re: Project Dark Water
Thursday, April 15, 2021 3:28 PM
(permalink)
Cool GTX
as long as the reservoir is mounted higher than the pump ... so pump never runs dry .. do what you want
You just need a gravity feed to keep the pump wet with coolant
If your willing to drill some holes in the case ... mount the pump anywhere you like
I find it best to have the parts on site to do the visual testing, where it looks best & plumbing will not be a pain
That should be plenty of radiator for just the CPU
Thanks! Yes, the pump mounts into the bottom of the reservoir, which will be at the bottom of the loop (but with res over it, I guess I could mount it anywhere...but it's at the bottom) The PSU shroud for this case was a late addition as it wasn't available when I bought the case and I only bought and installed it a few months ago. It was...way more complicated than expected because there's almost zero access to two of the screws they want you to put in and the LED strip I had double-sided taped in place was sort of in the way. That's an easy fix, but I just didn't want to deal with it at least until I have the whole thing torn apart for this upgrade. Anyway, There are a bunch of nice removeable panels on the psu shroud, so if the hard-drive cage plan doesn't work, I can always put a couple holes in one of those panels and mount the reservoir there. It doens't come with brackets, but there are two holes in the back of the pump-top and four holes in the bottom. One way or another, it will at least someone line up with either the pump-mount bracket that came with the case, which will then be mounted...somewhere...or directly into two new holes that will magically arrive lol. I will know more when I have everything in and take out the DVD drives to do more fit-checks.
6Q6CPFHPBPCU691 is a discount code anyone can use. i9 13900k - EVGA Z690 Classy - Nvidia RTX 4090 FE - G.Skill 64GB DDR5-6000CL30 - WD SN850 2TB NVMe Gen4 - Be Quiet! Straight Power 12 1200W - Be Quiet! Dark Base 900 Pro. MO-RA3 420 Pro. Dark Palimpsest MODS RIGS post for build notes.
|
Cool GTX
EVGA Forum Moderator
- Total Posts : 31353
- Reward points : 0
- Joined: 12/12/2010
- Location: Folding for the Greater Good
- Status: offline
- Ribbons : 123
Re: Project Dark Water
Thursday, April 15, 2021 4:21 PM
(permalink)
glanced at your attached jpg - top & middle pictures looked like a stand alone pump OK, your reservoir has a pump head built in 
Learn your way around the EVGA Forums, Rules & limits on new accounts Ultimate Self-Starter Thread For New Members
I am a Volunteer Moderator - not an EVGA employee
Older RIG projects RTX Project Nibbler
When someone does not use reason to reach their conclusion in the first place; you can't use reason to convince them otherwise!
|
Chaos_21
CLASSIFIED Member
- Total Posts : 3935
- Reward points : 0
- Joined: 10/27/2005
- Location: Redding, Ca
- Status: offline
- Ribbons : 10
Re: Project Dark Water
Thursday, April 15, 2021 11:22 PM
(permalink)
Nice and clean.  
ASUS TUF Gaming Z690-Intel Core i9-12900K- EVGA 360 CLC Cooler-Corsair Vengeance 4 x 16GB 3200mhz-2TB Solidigm P41 Plus M.2 SSD--Three 1TB 970 EVO SSD's-EVGA GeForce RTX 3080 XC3 ULTRA-Corsair HX1000i-Windows 11 64bit-Corsair iCUE 5000X RGB Case. Steam Twitter: https://twitter.com/Chaos_21 Use my associate code: JBGVM12HDYDJPIM to get 5%-10% discount on EVGA purchases. 
|
B0baganoosh
CLASSIFIED Member
- Total Posts : 2470
- Reward points : 0
- Joined: 8/4/2009
- Status: offline
- Ribbons : 42
Re: Project Dark Water
Wednesday, April 21, 2021 3:53 PM
(permalink)
Parts are arriving! Well, the CPU, memory, thermal paste, and some new fans have been here for a few weeks now:  The EKWB parts have all arrived too:  I did notice something a little odd and unexpected about the pump, in that the impeller top plastic is all scuffed up, straight from the factory. I did some googling and even asked Performance-PCs about it (I ordered that separately after finding out the reservoir I ordered didn't come with a pump...woops) and they said it was normal. I don't think the torn cardboard in the box actually hurt anything and the rest of the pump looks flawless, so I'm thinking it's probably fine. I will definitely run a test with just the pump/res and a tube just to make sure there's no rattling or anything. 
6Q6CPFHPBPCU691 is a discount code anyone can use. i9 13900k - EVGA Z690 Classy - Nvidia RTX 4090 FE - G.Skill 64GB DDR5-6000CL30 - WD SN850 2TB NVMe Gen4 - Be Quiet! Straight Power 12 1200W - Be Quiet! Dark Base 900 Pro. MO-RA3 420 Pro. Dark Palimpsest MODS RIGS post for build notes.
|
driam
Superclocked Member

- Total Posts : 160
- Reward points : 0
- Joined: 10/8/2008
- Status: offline
- Ribbons : 2
Re: Project Dark Water
Wednesday, April 21, 2021 9:17 PM
(permalink)
I heard Optimus was the best, I may want to go the route you did with the Optimus Absolute Reservoir B stock and a separate D5 pump. Let us know how it goes, excited to see the final result.
|
B0baganoosh
CLASSIFIED Member
- Total Posts : 2470
- Reward points : 0
- Joined: 8/4/2009
- Status: offline
- Ribbons : 42
Re: Project Dark Water
Saturday, April 24, 2021 2:28 AM
(permalink)
CPU block came in:  
6Q6CPFHPBPCU691 is a discount code anyone can use. i9 13900k - EVGA Z690 Classy - Nvidia RTX 4090 FE - G.Skill 64GB DDR5-6000CL30 - WD SN850 2TB NVMe Gen4 - Be Quiet! Straight Power 12 1200W - Be Quiet! Dark Base 900 Pro. MO-RA3 420 Pro. Dark Palimpsest MODS RIGS post for build notes.
|
B0baganoosh
CLASSIFIED Member
- Total Posts : 2470
- Reward points : 0
- Joined: 8/4/2009
- Status: offline
- Ribbons : 42
Re: Project Dark Water
Sunday, April 25, 2021 6:03 PM
(permalink)
The CPU block actually came with kingpin kpx. Now I have to decide between the pk-3 and the kpx. Anybody have any recommendations? Reviews seem pretty split between the two. I think the pk-3 needs to be spread across the ihs because it isn't as fluid and won't spread so well itself, which leads to some of the review differences. Even then, I'm not sure if it makes any difference or if there's even a winner between them lol. I'd like to do one application and not touch it for a long time, if that impacts any recommendations. Thanks.
6Q6CPFHPBPCU691 is a discount code anyone can use. i9 13900k - EVGA Z690 Classy - Nvidia RTX 4090 FE - G.Skill 64GB DDR5-6000CL30 - WD SN850 2TB NVMe Gen4 - Be Quiet! Straight Power 12 1200W - Be Quiet! Dark Base 900 Pro. MO-RA3 420 Pro. Dark Palimpsest MODS RIGS post for build notes.
|
Cool GTX
EVGA Forum Moderator
- Total Posts : 31353
- Reward points : 0
- Joined: 12/12/2010
- Location: Folding for the Greater Good
- Status: offline
- Ribbons : 123
Re: Project Dark Water
Sunday, April 25, 2021 6:51 PM
(permalink)
tom's Hardware Best Thermal Paste for CPUs 2021: 90 Pastes Tested and Ranked temp are very close, so application technique become the biggest possible difference a quick look at the companies website fail to disclose any specific application limits KPx PK-3 If your ready to build, use what you have. - it is not clear if you were going to buy PK-3 or already have some If your worried about spreading the PK-3, do a test run & check your contact pattern
Learn your way around the EVGA Forums, Rules & limits on new accounts Ultimate Self-Starter Thread For New Members
I am a Volunteer Moderator - not an EVGA employee
Older RIG projects RTX Project Nibbler
When someone does not use reason to reach their conclusion in the first place; you can't use reason to convince them otherwise!
|
B0baganoosh
CLASSIFIED Member
- Total Posts : 2470
- Reward points : 0
- Joined: 8/4/2009
- Status: offline
- Ribbons : 42
Re: Project Dark Water
Sunday, April 25, 2021 8:06 PM
(permalink)
I now have both lol. I bought the pk-3, but the block came with kpx.
6Q6CPFHPBPCU691 is a discount code anyone can use. i9 13900k - EVGA Z690 Classy - Nvidia RTX 4090 FE - G.Skill 64GB DDR5-6000CL30 - WD SN850 2TB NVMe Gen4 - Be Quiet! Straight Power 12 1200W - Be Quiet! Dark Base 900 Pro. MO-RA3 420 Pro. Dark Palimpsest MODS RIGS post for build notes.
|
B0baganoosh
CLASSIFIED Member
- Total Posts : 2470
- Reward points : 0
- Joined: 8/4/2009
- Status: offline
- Ribbons : 42
Re: Project Dark Water
Tuesday, April 27, 2021 0:47 PM
(permalink)
6Q6CPFHPBPCU691 is a discount code anyone can use. i9 13900k - EVGA Z690 Classy - Nvidia RTX 4090 FE - G.Skill 64GB DDR5-6000CL30 - WD SN850 2TB NVMe Gen4 - Be Quiet! Straight Power 12 1200W - Be Quiet! Dark Base 900 Pro. MO-RA3 420 Pro. Dark Palimpsest MODS RIGS post for build notes.
|
driam
Superclocked Member
- Total Posts : 160
- Reward points : 0
- Joined: 10/8/2008
- Status: offline
- Ribbons : 2
Re: Project Dark Water
Tuesday, April 27, 2021 3:04 AM
(permalink)
One step closer!
What is the small power supply you are using? Looks very convenient for testing.
|
B0baganoosh
CLASSIFIED Member
- Total Posts : 2470
- Reward points : 0
- Joined: 8/4/2009
- Status: offline
- Ribbons : 42
Re: Project Dark Water
Tuesday, April 27, 2021 10:19 AM
(permalink)
driam
One step closer!
What is the small power supply you are using? Looks very convenient for testing.
https://www.digikey.com/short/mz0pvtrdIt is a little 35W 12VDC power supply that I wired a molex connector and switch to just to run the pump. Much easier to test the pump with than using the psu from the computer lol. It was lying around from another project.
6Q6CPFHPBPCU691 is a discount code anyone can use. i9 13900k - EVGA Z690 Classy - Nvidia RTX 4090 FE - G.Skill 64GB DDR5-6000CL30 - WD SN850 2TB NVMe Gen4 - Be Quiet! Straight Power 12 1200W - Be Quiet! Dark Base 900 Pro. MO-RA3 420 Pro. Dark Palimpsest MODS RIGS post for build notes.
|
SterisTheGreen
Superclocked Member
- Total Posts : 101
- Reward points : 0
- Joined: 4/28/2021
- Status: offline
- Ribbons : 0
Re: Project Dark Water
Thursday, April 29, 2021 2:34 AM
(permalink)
That's a really cool name, very fitting!
Buying EVGA? Use this code at checkout for up to 10% off your purchase: ZT4D9972JE14HZW Already bought EVGA? Register your product here: 
|
driam
Superclocked Member
- Total Posts : 160
- Reward points : 0
- Joined: 10/8/2008
- Status: offline
- Ribbons : 2
Re: Project Dark Water
Saturday, May 01, 2021 8:04 PM
(permalink)
Thank you for the info on that power supply.
|
B0baganoosh
CLASSIFIED Member
- Total Posts : 2470
- Reward points : 0
- Joined: 8/4/2009
- Status: offline
- Ribbons : 42
Re: Project Dark Water
Tuesday, May 11, 2021 3:43 AM
(permalink)
I took a risk today. The motherboard is due in tomorrow and I figured I wasn't going to want to do everything in one stint, so I spent a few hours today and disassembled the old build to start the upgrade process. Getting ready:  Disassembled:  I left the PSU in as the shroud is a colosal pain to take out and put back in. I think most of the cables will stay relatively close to where they are anyway so that should be fine. Bye Bye optical drives. Push side installed on 420mm rad:  Mocked up the water loop and cut tubes. I may have to trim a little off the CPU tubes when the motherboard is in, but we'll cross that bridge when we get there. Hooked everything up, got two pull fans installed on top of the rad, and started the leak test:  This case has a wireless phone charger in the front-top of the case and there isn't really room for a 3rd pull-fan. Also, I ran into my first actual snag. I had 3 extra 120mm fans that match the case, but they're not PWM and their cables are too short to run to the fan controller that mounts to the back of the motherboard. They came with a little splitter cable that hooks to ATX power and has a 12V, 7V, and 5V connector set (one for each fan). That basically forces them to run steady at three different speeds, so I hooked up the bottom one that half-blows under the PSU shroud, half blows under the pump/HDD at 5V (lowest speed), the middle one at 12V (highest speed as it has most direct airflow channel), and the top one at 7V (medium speed as I didn't want it creating a weird vortex issue with the intake for the 420mm. I may switch the top and bottom fan speeds after I power everything on and see what it feels like in there. Ideally, I'll get some extenders and run them all to the controller as it has 4 DC-fan headers for chassis fans like these. Or maybe I'll end up getting some new 140mm PWM fans for some quieter airflow...again, I'll have to see how it performs. Also, this reservoir is snug as a bug in here. Had to slide it out to fill it lol:  leak testing:  Other note, with how snug it is, I opted for a little extra service loop in the tubes to make sure I have room to slide it out for filling and to pull out the valve on the right to drain it. I had one of those 1L squeeze bottles with the thin nozzle on it that you can put right in the hole in top of the reservoir for filling so that was super handy here. Also, my little power supply with switch soldered into the output was wonderful again. Switching the 36W supply output on and off is much more comfortable than cycling the 1000W supply on the AC mains repeatedly lol. Definitely a learning experience. I have what looks like a tiny chunk of tubing stuck in my CPU block now........dag-nabit!...so I'm not sure what to do about that. I am currently running just distilled water and going to drain it to put in EK clear premix...is it possible that the little chunk will just drain with the water? How do I get that out of there? Edit: a further note...the whole motherboard tray is going to have to move down at least a half-inch. This case allows that to happen relatively easy...assuming I can get to all the screws with the PSU shroud in place lol. I just figured someone might have noticed that the rear fan-hole (which will be cleaned before the 2080 Super hybrid radiator is put back) is currently in a place where it may interfere with the 420mm rad-fan above it.
post edited by Nike_7688 - Tuesday, May 11, 2021 3:49 AM
6Q6CPFHPBPCU691 is a discount code anyone can use. i9 13900k - EVGA Z690 Classy - Nvidia RTX 4090 FE - G.Skill 64GB DDR5-6000CL30 - WD SN850 2TB NVMe Gen4 - Be Quiet! Straight Power 12 1200W - Be Quiet! Dark Base 900 Pro. MO-RA3 420 Pro. Dark Palimpsest MODS RIGS post for build notes.
|
driam
Superclocked Member
- Total Posts : 160
- Reward points : 0
- Joined: 10/8/2008
- Status: offline
- Ribbons : 2
Re: Project Dark Water
Tuesday, May 11, 2021 4:13 AM
(permalink)
You could take the CPU water block apart, optimus made their blocks easy to open and clean from the looks of it. Better to get that rubber piece out now, then when it goes back to the pump, or worse the radiator.
post edited by driam - Tuesday, May 11, 2021 4:15 AM
|
B0baganoosh
CLASSIFIED Member
- Total Posts : 2470
- Reward points : 0
- Joined: 8/4/2009
- Status: offline
- Ribbons : 42
Re: Project Dark Water
Wednesday, May 12, 2021 2:54 PM
(permalink)
The UPS driver showed up at 8:30PM last night with the motherboard. so much for "out for delivery, expected between 12:00PM and 3:00PM" lol. Oh well, they're busy and a question he asked me made it seem like he was a new driver or new to this route, so I definitely wasn't mad at the driver. It just meant that I couldn't actually finish the build last night. Some progress though. So here's the little chunk in the CPU block:  I drained it, took apart the block, which was easy...then put it back together, which was a little bit more complicated getting the outer O-ring to go back into that shape. Some gentle prodding and wiggling prevailed. I just didn't want to break the thing. Board in, CPU mounted, RAM in, most connections made:   The plastic film on the motherboard heatsinks is a real pain. They perforated the edges and covered the tops and sides (in between the HS and PCIe slots), which means when you try to peal it off, it tears and leaves all these pieces behind instead of coming off as one chunk. No idea why they did that lol. I have to borrow some fine-point tweezers to get those things out of there. Some notes so far: The PSU shroud, while looking great, is just a horrible thing to work around. It makes everything snug and hard to reach. It also was designed in after the case was designed (it comes with Rev 2, but not with this version of the case, they just offered it as an add-on after they designed it) and you cannot easily get to the screws behind the power supply. I did this install with it in place for that reason. I may at a future date just drill a hole in the motherboard tray below the motherboard for screw-driver pass-through so I can get the thing out of there easier. The bottom edge of the motherboard sits below the edge of the PSU shroud (mainly because I had to lower the motherboard tray to make clearance for the radiator fans). Now that It is all connected (which was a pain), I have to see if I can raise the motherboard tray back up because right now I can't get my NVMe adaptor card into the bottom PCIe slot. I had to put it in the second slot, which will limit me to 8X on each slot. I don't know how to get the pre-attached heat-sink off my M.2 drive to be able to use the motherboard slots. Heat gun? Any tips there would be helpful. If I could install this drive into one of those places, I wouldn't need to worry about the PCI-e slot usage. I realized that I have no 4-pin molex connectors in the case currently to use for the pump power lol. I need to add that accessory cable, which...getting things connected under this PSU shroud means sticking my fingers into that little opening in the middle there and about a 2" gap along the bottom of the rear panel with the other hand to try and shimmy connections in and out of the supply. Oh what a joy. I ordered some 45° fitting adaptors for the pump housing. The tubes currently stick out too far to put the glass panel back on and I'd have to kink them to get them to fit right. Putting a water loop just took up all the room this case had lol. I ordered some fan cable extensions while I was at it so that I could have the front fans controlled by temperature instead of just always-on at different speeds-each fan. I learned that I cannot fit a 3080 hybrid in here now. I thought there'd be room for that radiator on the front, but not so much. I mean... maybe...I could get angled fittings for the top rad, re-route the tubes, and fit the 240mm rad to the right of my reservoir...maybe...but getting the tubes to reach and look nice would be a chore. I'd likely have to disconnect the reservoir tubes and run a tube from the hybrid rad on each side of the pump housing. That might look rather terrible. Unless I could squeeze those tubes under that hard drive. A little room there and the hybrid tubes are pretty small. One thing I found concerning: The back of the motherboard has traces around the CPU mounting bracket holes. You have to put a metal nut there to mount the CPU-mount posts. I feel like they needed to leave some more clearance there and it makes me nervous. I may need to find some nylon or fiber washers to put there so I can sleep at night. OMG...so it has bothered me for years that on the GPU I have, it says "GEFORCE RTX" on it, but there's been this weird "HYBRID" lighting behind that sticker that doesn't line up with the letters for "GEFORCE RTX"...I was like "this is the weirded lighting choice...really don't know why they did that." the "GEFORCE RTX" was a sticker....a STICKER...I did not know that. I removed said sticker and there's a beautiful metal-feature that says EVGA Hybrid. Way better. I can't wait to see what it is actually supposed to look like lit up lol. Still to do: -install all the SATA cables (1 SSD on the back of the motherboard tray and two HDDs still in here (one under shroud now). -Install 4-pin Molex accessory cable from PSU to pump. -tidy up all the cables, get the far-side panel on. -drain loop, put 45° fitting adaptors on pump, put EK clear pre-mix fluid in (just running distilled for the moment). -Oh! Turn the thing on! See what happens lol. -tweak, tune, test, repeat until satisfied.
post edited by Nike_7688 - Wednesday, May 12, 2021 3:02 PM
6Q6CPFHPBPCU691 is a discount code anyone can use. i9 13900k - EVGA Z690 Classy - Nvidia RTX 4090 FE - G.Skill 64GB DDR5-6000CL30 - WD SN850 2TB NVMe Gen4 - Be Quiet! Straight Power 12 1200W - Be Quiet! Dark Base 900 Pro. MO-RA3 420 Pro. Dark Palimpsest MODS RIGS post for build notes.
|
B0baganoosh
CLASSIFIED Member
- Total Posts : 2470
- Reward points : 0
- Joined: 8/4/2009
- Status: offline
- Ribbons : 42
Re: Project Dark Water
Thursday, May 13, 2021 2:35 PM
(permalink)
IT'S ALIVE!    Well, I turned it on. I played around in the BIOS a bit to get it going, but I haven't done a whole lot of tuning or testing yet. I ran some tests just to see if it was obviously unstable (cinebench r23, intel XTU stability test (just a short one), the BIOS stress test, superposition, and time spy). One thing about this motherboard BIOS. It looks nice, has some cool features, but I am missing some of the details I've seen in other 11900k overclocking videos and I can't find the settings for power limits, ABT, or TVB. There must be a hidden menu somewhere. When I load the Intel XTU software, it shows that the PL1 and PL2 states are set at "unlimited" which is over the 1000W manual limit you can put in...so there's that. When running R23, the highest I saw the package draw was ~245W and individual cores got into the 70's°C. I want to do way more testing...oh, and that's not stock clocks...according to the BIOS "OC ROBOT", it's a 5.4GHz all-core OC. In windows, and what shows in HWiNFO64, is a 5.3GHz all-core. the XTU software and the OC Robot both show that 5.4GHz all-core is the optimal setting for my CPU, but I usually don't see the cores actually go there. I currently only have my pump and radiator fans go 100% when we get up to 64°C, so it is possible I could crank them up and get some better temps. I'm not positive my paste application was perfect. I went a little heavier than I normally would have in the past and I don't have a little spreader tool so I did a big blob and cranked it down hoping to spread out the PK-3. I honestly had several plans and when it came time to do the paste something in my brain just shut off when I realized the Pk-3 didn't come with a spreader like I thought it did and went "JUST DO IT TO IT" and a blob of paste came out on the center of the cpu lol. Current settings: 5.4GHz all-core OC. I let the OC-Robot set it so that any "behind the scenes" settings are changed too. I can't find them to change currently. I didn't touch voltages yet. Memory: 3733GHz, Gear 1, 16-16-36, 1.4V. (there are more 16's, but only 2 you can adjust in the BIOS? This was new to me) So, one thing I mentioned before was the proximity of traces to the CPU block mounting nuts. Here are some pictures and the little fiber-washers I found to space the nuts off the board:    Installed:  The left side is fine:  I'm on a different computer right now, so I can't get the real numbers, but my scores were roughly (will edit with links/pics/specifics later): CPU-Z - 715-SC, ~7233-MC (I'm confident in the SC, but don't remember the exact MC number here). Time Spy: 13136, GPU: 12969, CPU: 14173. Superposition: ~8033 My time spy score is currently #1 for people with an 11900k and a 2080 Super....all 27 of us...well...all 11 of us, some with multiple runs lol.
6Q6CPFHPBPCU691 is a discount code anyone can use. i9 13900k - EVGA Z690 Classy - Nvidia RTX 4090 FE - G.Skill 64GB DDR5-6000CL30 - WD SN850 2TB NVMe Gen4 - Be Quiet! Straight Power 12 1200W - Be Quiet! Dark Base 900 Pro. MO-RA3 420 Pro. Dark Palimpsest MODS RIGS post for build notes.
|
B0baganoosh
CLASSIFIED Member
- Total Posts : 2470
- Reward points : 0
- Joined: 8/4/2009
- Status: offline
- Ribbons : 42
Re: Project Dark Water
Thursday, May 13, 2021 3:24 PM
(permalink)
Something I'm noticing while looking at the pictures I took: I have no idea what the RGB lighting of the "Z590 FTW" over the I/O shield is doing with my 2080 hybrid radiator where it is lol. Also, the copper heat-sinks of the Dark board would have been pretty obscured by the graphics card and radiator in this build as I can't even see the "FTW" heat-sink over the m.2 drive slots. So visually...the black VRM heat-sinks look great in this build, as does the silver "EVGA" plate over the top M.2 slot. I'm quite pleased with the aesthetics of this board so far.
6Q6CPFHPBPCU691 is a discount code anyone can use. i9 13900k - EVGA Z690 Classy - Nvidia RTX 4090 FE - G.Skill 64GB DDR5-6000CL30 - WD SN850 2TB NVMe Gen4 - Be Quiet! Straight Power 12 1200W - Be Quiet! Dark Base 900 Pro. MO-RA3 420 Pro. Dark Palimpsest MODS RIGS post for build notes.
|
Jnatho
New Member

- Total Posts : 10
- Reward points : 0
- Joined: 5/12/2021
- Status: offline
- Ribbons : 0
Re: Project Dark Water
Thursday, May 13, 2021 3:29 PM
(permalink)
I am currently waiting for a 2070 super. I haven't had any first hand intel experience in more than a decade. Been out of touch for awhile. Currently working toward a ryzen setup for overclocking and setting up a full liquid cooling system. Ma things have changed alot in the time I stopped paying attention lol.
|
B0baganoosh
CLASSIFIED Member
- Total Posts : 2470
- Reward points : 0
- Joined: 8/4/2009
- Status: offline
- Ribbons : 42
Re: Project Dark Water
Saturday, May 15, 2021 2:52 AM
(permalink)
OK, I've been tweaking and playing a bit, here are some numbers: CPU-ZSingle-Core: 733, Multi-Core: 7244 Aida-64 memory benchmark:  Edit: Turns out the memory was a bit unstable at that^ Changed my CPU OC and Reverted timings and somehow it's better:  OK. definitely still tweaking. Stress test showed 5.4GHz all-core not stable after a few minutes in aida-64 stress test. I set up a package OC of 5.4, 5.4, 5.4, 5.3, 5.3, 5.3, 5.3, 5.3. Essentially, three cores at 5.4GHz and the rest at 5.3 if it demands more than two cores. stress test going strong at these settings. Here's a cinebench r23 result (1674 SC, 16390 MC): 
post edited by Nike_7688 - Saturday, May 15, 2021 4:15 AM
6Q6CPFHPBPCU691 is a discount code anyone can use. i9 13900k - EVGA Z690 Classy - Nvidia RTX 4090 FE - G.Skill 64GB DDR5-6000CL30 - WD SN850 2TB NVMe Gen4 - Be Quiet! Straight Power 12 1200W - Be Quiet! Dark Base 900 Pro. MO-RA3 420 Pro. Dark Palimpsest MODS RIGS post for build notes.
|
driam
Superclocked Member
- Total Posts : 160
- Reward points : 0
- Joined: 10/8/2008
- Status: offline
- Ribbons : 2
Re: Project Dark Water
Saturday, May 15, 2021 4:02 AM
(permalink)
Epic to see that you got it up and running! Also project name checks out, I like the black tubing and vibes. It reminds me of the lighting in submarines, like in the movies when they are on alert and things get red and dramatic. You could use accents in the case or outside like nautical bulkhead lights mapped to the current RGB of your system. Of course smaller ones that can fit lol!  You could also make a cage around the reservoir to look like a bulkhead light as well:  I wonder if you could place some LEDs on one side of the reservoir that the liquid pours into, this could potently refract and give a cool lighting effect, though I think you did that already on in one of the pictures, hard to tell. Nike_7688
I don't know how to get the pre-attached heat-sink off my M.2 drive to be able to use the motherboard slots. Heat gun? Any tips there would be helpful. If I could install this drive into one of those places, I wouldn't need to worry about the PCI-e slot usage.
There may be a chemical you can use that wont harm the PCB if it spills on it, but will break down the glue. A heat gun sounds terrifying to apply to a chip lol. You could twist it off, as I think pulling on it would place a lot of stress on the solder joints, but twisting would use force on a stronger axis, after maybe use a knife to carefully remove the rest. Nike_7688
One thing I found concerning: The back of the motherboard has traces around the CPU mounting bracket holes. You have to put a metal nut there to mount the CPU-mount posts. I feel like they needed to leave some more clearance there and it makes me nervous. I may need to find some nylon or fiber washers to put there so I can sleep at night.
While I know that those tracers are covered in a protective film (I soldered a new compactor to an old motherboard so I can attest to this lol), I to do not like the thought of metal contacting them, one scratch and that thing is toast. Good idea with the nylon. Nike_7688
OMG...so it has bothered me for years that on the GPU I have, it says "GEFORCE RTX" on it, but there's been this weird "HYBRID" lighting behind that sticker that doesn't line up with the letters for "GEFORCE RTX"...I was like "this is the weirded lighting choice...really don't know why they did that." the "GEFORCE RTX" was a sticker....a STICKER...I did not know that. I removed said sticker and there's a beautiful metal-feature that says EVGA Hybrid. Way better. I can't wait to see what it is actually supposed to look like lit up lol.
I had the same thing minus the RGB. I just recently looked at my EVGA GTX 950 and noticed a plastic clear film still on it, its like 10 years old. At least I felt like I was peeling it off a new card, so at least there was some satisfaction lol. The built looks nice, thanks for the update!
|
B0baganoosh
CLASSIFIED Member
- Total Posts : 2470
- Reward points : 0
- Joined: 8/4/2009
- Status: offline
- Ribbons : 42
Re: Project Dark Water
Monday, May 17, 2021 2:08 PM
(permalink)
I tried to play with the XTU app a bit more and it shows you your "strong cores" with Rocket Lake. I tried to set it so that those specific cores went to 5.4GHz and the rest to 5.3GHz. Stability test was not so good there. What seems odd is that it doesn't perform as you'd expect. When you set the package ratio settings to clock the CPU depending on how many cores are being used, you'd think that setting: 1-core workload: 5.4GHz 2-core workload: 5.4GHz 3-8 core workload: 5.3GHz You'd see that SC-workloads go to 5.4GHz on a random core, and it would run 5.3GHz the rest of the time basically. I've tried to shut down everything else, but watching HWiNFO during Cinebench SC, I see one core get warm and the utilization go up, but it jumps to different cores every time CB starts a new block. This is normal, but I never see it go to 5.4GHz. If I set the per-core OC so that it does 5.3GHz 5.3GHz 5.4GHz (strong core) 5.4GHz (strong core) 5.3 5.3 5.3 5.3 I thought you'd see one of the strong cores pick up the work for SC-workloads, but I had some stability issues here before I got too far into testing. Also, it looks like it locks them at that speed all the time (as opposed to downclocking when not busy). I haven't really messed with my voltages at all so far, I've just been running them at adaptive-auto. Right now I can run 5.3GHz all-core with zero issues. I can set it to run 3 cores at 5.4GHz in BIOS and 5.3GHz for the rest and it runs with zero issues, but when monitoring in Windows, it seems like none of the cores ever actually run at 5.4GHz. It seems a bit strange. It behaves the same exact way if I set the per-workload package OC in XTU (5.4 for 2-3 cores, 5.3 for the rest results in stabile performance, but it never does anything at 5.4GHz). it's only when I manually set in XTU package OC to all be at 5.4GHz, or do a per-core OC with 5.4GHz that I start running into stability issues. This could be voltage related. When I do stability testing, my temperatures max out in the low 70's. If I do a test with AVX instructions, they hit the low-to-mid 80's. On previous CPUz and EVGA motherboards, I've generally gone by Jacob and a couple others' recommendations for a safe 24/7 OC voltage. it was 1.3V for my 5820k and it never had an issue. I'm not sure what that number is for the 11900k, but it's higher than that. It is also higher than it was for 10900k's, so I may need to wait to see some guides from other people who are more experienced at this than I am. Maybe I need to re-watch some scatterbencher videos lol. Also, there's this issue: Nike_7688
I'm not positive my paste application was perfect. I went a little heavier than I normally would have in the past and I don't have a little spreader tool so I did a big blob and cranked it down hoping to spread out the PK-3. I honestly had several plans and when it came time to do the paste something in my brain just shut off when I realized the Pk-3 didn't come with a spreader like I thought it did and went "JUST DO IT TO IT" and a blob of paste came out on the center of the cpu lol.
-Yeah, I'm not convinced this is doing so well. This thing is a beast and a half, which I expected, but the temperature ramps seem to be a bit faster that I expected for some reason. This might just be the effect of ~240W hitting all at once when it cranks up the jams, but I might try and take the block off when I have to fix my loop anyway just to see how the mount was. I will be adjusting from there, and will either try to make a spreader tool from something I have laying around or I'll switch over to the KPx to see how it does. per the temperatures listed above, I don't think it's a terrible mount, but I'm just not yet convinced that it is optimal. I'm not going to be until I take it off and look at it. Most pastes I think are fine with the puffy grain of rice approach or a round blob, but the PK-3 seems to really prefer the thin spread as it is very thick and I don't think it squishes well. The reviews I read seemed to show different results for it depending on the application method and because I knew that, I'm a bit grumpy with myself that I just blobbed it anyway. driam
Epic to see that you got it up and running! Also project name checks out, I like the black tubing and vibes. It reminds me of the lighting in submarines, like in the movies when they are on alert and things get red and dramatic.
You could use accents in the case or outside like nautical bulkhead lights mapped to the current RGB of your system. Of course smaller ones that can fit lol!
You could also make a cage around the reservoir to look like a bulkhead light as well:
This is a pretty cool idea. I'll have to think about that. I'm not sure how I could pull it off with the design of the exterior of the case, but maybe with some searching I'll find something that fits. driam
I wonder if you could place some LEDs on one side of the reservoir that the liquid pours into, this could potently refract and give a cool lighting effect, though I think you did that already on in one of the pictures, hard to tell.
so I currently don't have liquid going into the top, it just goes into the left side of the front pump-top under the reservoir. The case lighting I have is just two LED strips that came with the case, one along the inside front edge and one along the top edge. It's sort of "front lighting", but the way it's hidden behind edges you don't see from anywhere you normally look at it, it sort of appears like "back-lighting" which I like. I prefer that to RGB-everything. I've been playing with the G-skill memory lighting tool, because I can't find a way through BIOS to make it work, but I've got the memory doing a very slow blue "breathing" effect. I also had the motherboard do that over the I/O shield, which you sort of see a glow of behind the GPU's radiator mounted to the back (left in pictures). I like this effect so far, but it does seem like I may need to open both g.skill's app and the ELEET X1 app to make them work right every time I boot the computer...which is annoying. If I could get those set up in BIOS, it would be significantly easier. driam
There may be a chemical you can use that wont harm the PCB if it spills on it, but will break down the glue. A heat gun sounds terrifying to apply to a chip lol. You could twist it off, as I think pulling on it would place a lot of stress on the solder joints, but twisting would use force on a stronger axis, after maybe use a knife to carefully remove the rest.
I did some more digging and even asked Patriot customer support. They said it would probably damage the drive to get it off, and some reviews I found that took it off to try and do some standardized temperature testing said that they couldn't get all the adhesive off the chips from whatever thermal tape Patriot used no matter what they threw at it. There were a lot of people that said they almost broke or did break their SSD trying, so I'm thinking it just stays. Maybe when prices sort of normalize (it has to happen some day, right?), I'll buy a gen-4 NVMe drive and sell this one. I may also just do it whenever it is that I upgrade my GPU. It's interesting that I'm probably losing a pinch of FPS on my 2080 Super, but if I upgrade my GPU, it would be using 8x gen 4, which would be much faster than the 8x gen 3 I'm currently utilizing, which means maybe it wouldn't matter at all anyway...idk lol. Edit: I was looking at my CPU-Z validations and all but one of them don't show the GPU. They also don't show the memory brand/model. The only one that does show it is the one I did where I messed up the memory timings by accident. test1, test2, test3, test4. I wonder if something has gone awry in my BIOS settings after I tweaked so many things, causing the instability with two cores at 5.4GHz, which seemed to work fine previously. I may reset defaults, check the version (I don't think I even checked to see if the version on the USB stick was different to what was on there...but there isn't one listed on this site yet), and then apply my settings from scratch. May also re-install CPU-z.
post edited by Nike_7688 - Monday, May 17, 2021 4:06 PM
6Q6CPFHPBPCU691 is a discount code anyone can use. i9 13900k - EVGA Z690 Classy - Nvidia RTX 4090 FE - G.Skill 64GB DDR5-6000CL30 - WD SN850 2TB NVMe Gen4 - Be Quiet! Straight Power 12 1200W - Be Quiet! Dark Base 900 Pro. MO-RA3 420 Pro. Dark Palimpsest MODS RIGS post for build notes.
|
Cool GTX
EVGA Forum Moderator
- Total Posts : 31353
- Reward points : 0
- Joined: 12/12/2010
- Location: Folding for the Greater Good
- Status: offline
- Ribbons : 123
Re: Project Dark Water
Monday, May 17, 2021 4:51 PM
(permalink)
Nice Rig
Learn your way around the EVGA Forums, Rules & limits on new accounts Ultimate Self-Starter Thread For New Members
I am a Volunteer Moderator - not an EVGA employee
Older RIG projects RTX Project Nibbler
When someone does not use reason to reach their conclusion in the first place; you can't use reason to convince them otherwise!
|
EpicBananaJuice
New Member
- Total Posts : 100
- Reward points : 0
- Joined: 5/17/2021
- Status: offline
- Ribbons : 0
Re: Project Dark Water
Monday, May 17, 2021 7:33 PM
(permalink)
What a nice buildlog to read! Great result aswell!
|
B0baganoosh
CLASSIFIED Member
- Total Posts : 2470
- Reward points : 0
- Joined: 8/4/2009
- Status: offline
- Ribbons : 42
Re: Project Dark Water
Wednesday, May 19, 2021 4:35 PM
(permalink)
I'm going to sell my Viper 2TB SSD and PCI-e card. I just ordered a WD BLACK SN850 2TB PCIe gen4 drive to put in my M1 slot so that my GPU has its 16 lanes back. I didn't do all this for a CPU boost to get a GPU dent from dropping to 8x lanes lol. I just didn't know that I wouldn't be able to access the 3rd PCIe slot with my PSU shroud where it is. I may try the for sale section of the forums for once when I'm ready. It still has like 99% of its life left, so it is practically new. What will be fun is watching the speed of all my game files moving from that drive to the new one lol.
6Q6CPFHPBPCU691 is a discount code anyone can use. i9 13900k - EVGA Z690 Classy - Nvidia RTX 4090 FE - G.Skill 64GB DDR5-6000CL30 - WD SN850 2TB NVMe Gen4 - Be Quiet! Straight Power 12 1200W - Be Quiet! Dark Base 900 Pro. MO-RA3 420 Pro. Dark Palimpsest MODS RIGS post for build notes.
|
B0baganoosh
CLASSIFIED Member
- Total Posts : 2470
- Reward points : 0
- Joined: 8/4/2009
- Status: offline
- Ribbons : 42
Re: Project Dark Water
Saturday, May 22, 2021 8:51 PM
(permalink)
I got my 45° fittings in, drained the distilled water and put the EK fluid in. I also swapped over to KPx to try it out. Also, there's still a little bit of air bubbles working their way out. Anyway, pictures!  
post edited by Nike_7688 - Tuesday, May 25, 2021 2:56 AM
6Q6CPFHPBPCU691 is a discount code anyone can use. i9 13900k - EVGA Z690 Classy - Nvidia RTX 4090 FE - G.Skill 64GB DDR5-6000CL30 - WD SN850 2TB NVMe Gen4 - Be Quiet! Straight Power 12 1200W - Be Quiet! Dark Base 900 Pro. MO-RA3 420 Pro. Dark Palimpsest MODS RIGS post for build notes.
|