V84x4
iCX Member

- Total Posts : 282
- Reward points : 0
- Joined: 10/4/2015
- Location: Michigan USA
- Status: offline
- Ribbons : 7


Step by Step Guide Using a X99 MICRO 2 MB
SHOULD BE THE SAME STEPS FOR ALL EVGA X99 MB'sParts Used:EVGA Micro 2 mother BoardIntel 5820K 6 core 3.3 ghz processorGSKIL "Trident "Z" quad channel 4 x 8ghz Samsung 950 pro M.2 512 ghz EVGA 980 ti Classified Video CardEVGA 850 G2 Power Supply ----------------------------------------------------------------------------------------------------------------------------------------------------------- STEP #1:
Lets start with the BIOS Revision: (1.03 when written)It is a "FIRST STEP" to having the Newest tools for the latest hardware in your system !!!!! evga does a "Great" job of keeping up with BIOS TweaksIt is vary important that you have the "Newest BIOS" revision loaded onto your Micro 2 Mother board FIRST Latest revision can be found here:http://forums.evga.com/EVGA-X99-Series-f98.aspx BIOS Installation
- Extract the contents of .zip file to USB flash drive (must be formatted as FAT32)
- Reboot the machine and go into the system BIOS
- From the BIOS, navigate to the Save & Exit tab and open "Select BIOS File."
- Select the .bin file you wish to flash from your USB thumb drive.
- Install and reboot
Please Note:
After Flashing your BIOS you will need to press the F12 key the first time to get into the BIOS
There after, it will always be the "DEL" key to get into the BIOS --------------------------------------------------------------------------------------------------------------------------------------------------------- STEP #2:The Samsung 950 Pro M.2 ssd NOTE: If you are running a 951 instead of the 950, some people report The SM951 needs to be formatted as GPT. first Getting the BIOS to recognized this super fast M.2 stick is easy if you follow this:Many people have problems with getting windows to recognize and load on this super fast Hard drive.With "Default Settings", the BIOS doesn't see the M.2 drive so neither will windows !!!! There are a few steps to get the BIOS and windows to recognize the M.2 ssd #1UEFI must be enabled found under "BOOT" manager 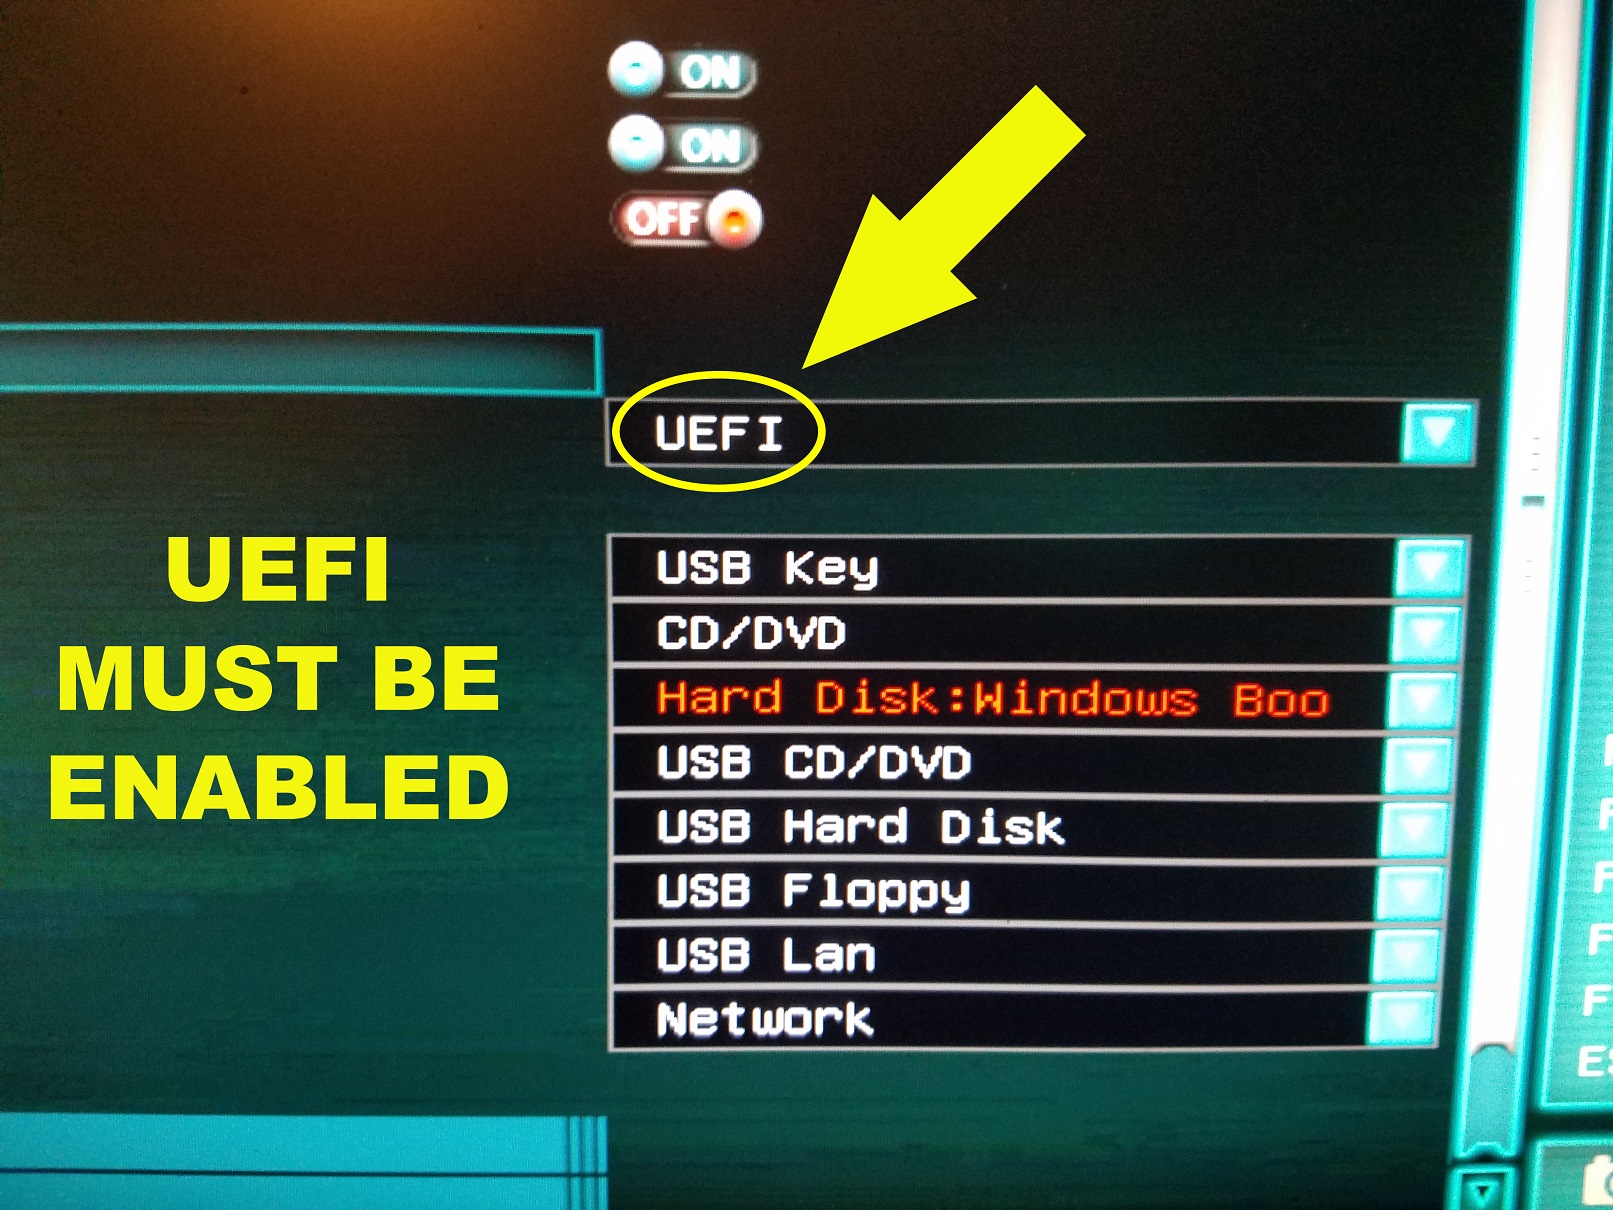 #2Make sure to enable M.2 support (Found under the advanced tab)and that "Improve Compatibility" is also enabled #2Make sure to enable M.2 support (Found under the advanced tab)and that "Improve Compatibility" is also enabled #3 #3Check to see that "CSM configuration" is enabled and that "UEFI Storage" is enabled (OPTIONAL)  #4Now "SAVE" & Re-Boot your system then go back into the bios #4Now "SAVE" & Re-Boot your system then go back into the bios
(Press "DEL" key while rebooting) #5Make sure "UEFI" is enabled in the "Fixed Boot order" And you should see Windows Boot Manager in "Boot Option #1" 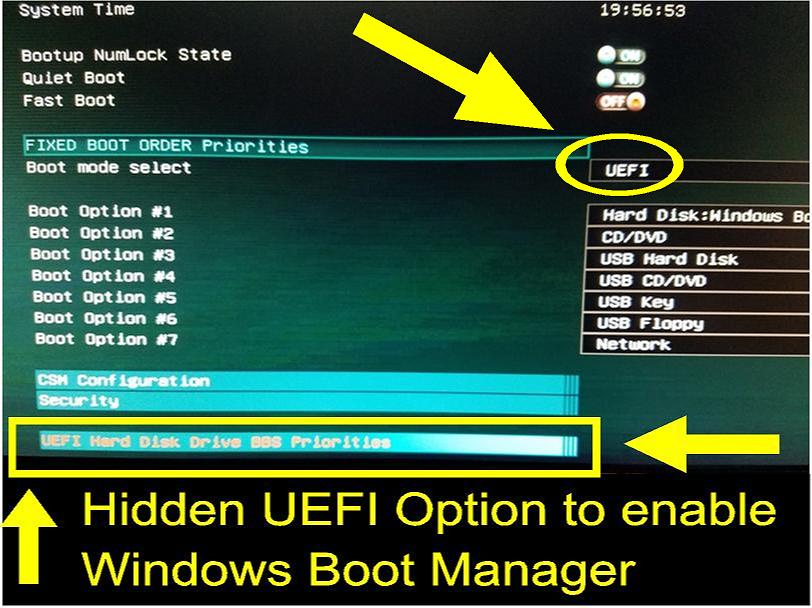 #6 #6If Not Check that the UEFI Hard Disk is set to "WINDOWS Boot Manager" under "UEFI Hard Disk Drive Priorities" 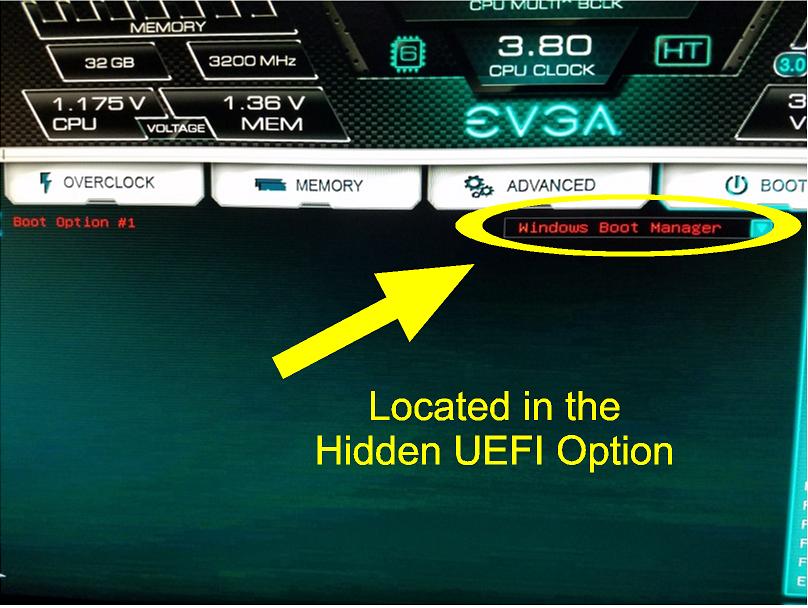 After a quick "SAVE & RESET" Boot back into the BIOS, You should now be able to see the Windows Boot Manger as your First selection for "BOOT OPTION #1" #7Now to Change your boot Order............... How are you loading Windows? USB stick or CD Drive ? Change the Boot order in the BIOS to reflect which devise should be detected first, seconded, Third and so-on 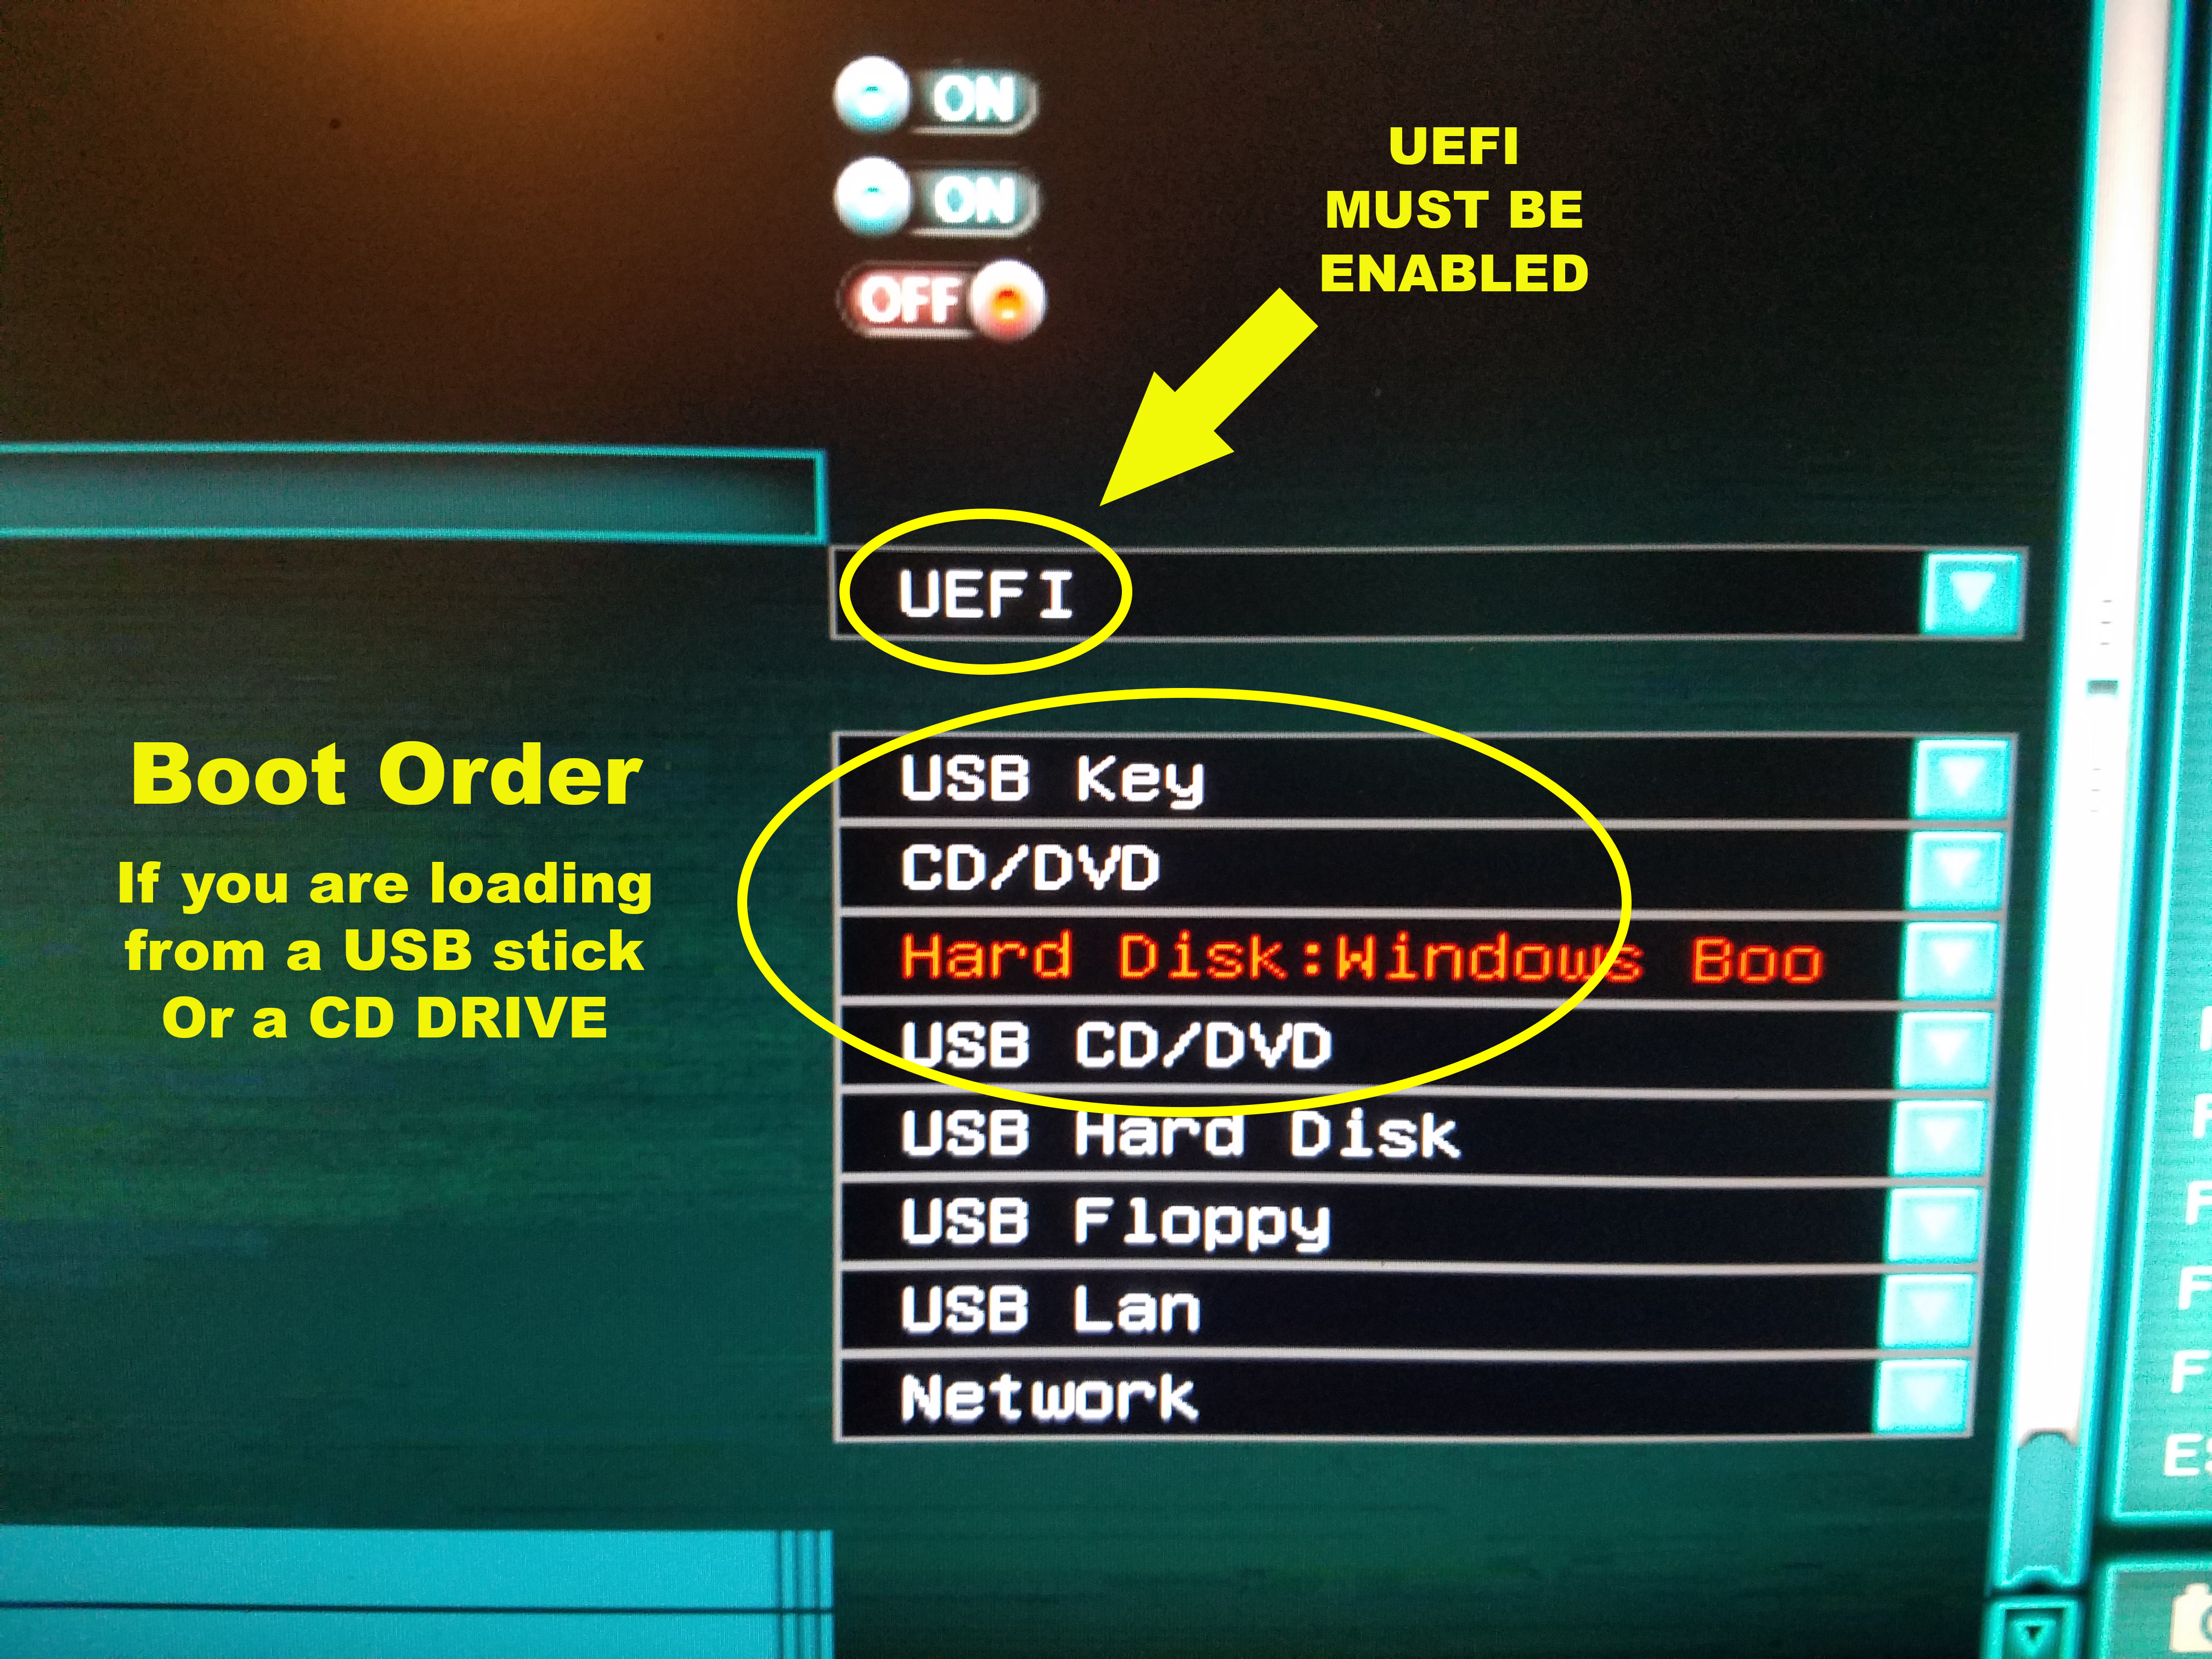 Save and restart.......... YOU ARE NOW READY TO LOAD WINDOWSload windows as normal I used a USB thumb drive to load windows Boot into windows and Un-Check Win 10 Power Button setting called "Turn on fast startup" 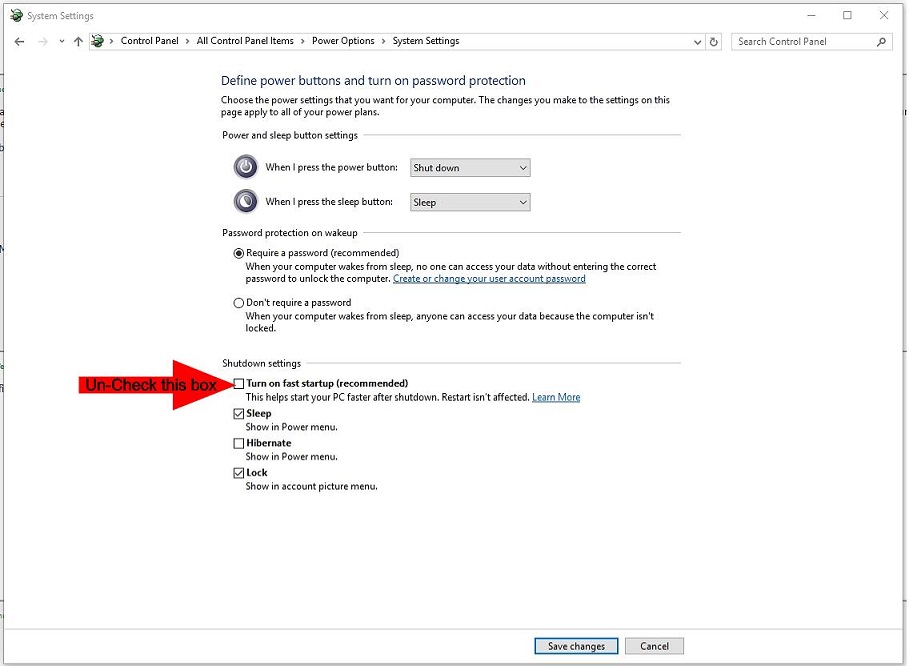 ---------------------------------------------------------------------------------------------------------------------------------------------STEP #3: (OPTIONAL)Overclocking the RAM ---------------------------------------------------------------------------------------------------------------------------------------------STEP #3: (OPTIONAL)Overclocking the RAM ( I chose GSKILL "TRYDENT "Z" 3200 4X8ghz) Some folks have gotten 3200MHz to work without any issues at all with their Haswell chips, while other folks can't get past 2400MHz**. (**From the Moderator: It should be noted that higher rated CPUs may not experience this. The i7 5960X for example has a default of 2133MHZ) I found that my ram likes to have a High Voltage (Mine liked 1.35v and 1.400v) and I was able to achieve a "Stable" 3200 Clock speed buy setting "XMP" in bios to #1 and Manually clocking my voltage to 1.350v's 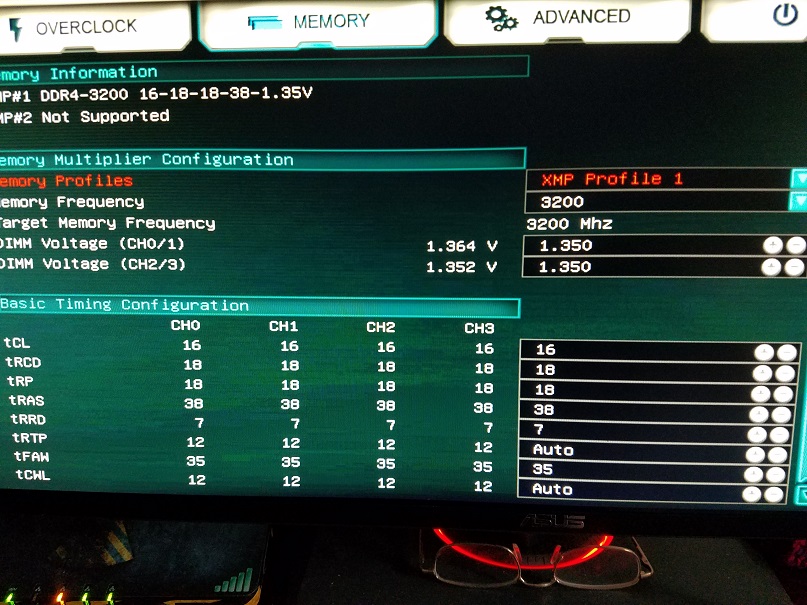 PLEASE NOTE: PLEASE NOTE:After changing to "XMP1", your CPU will automatically change Clock speeds (Over Clock) this is normal and expected when changing to "XMP1" so continue to STEP #4 below to change CPU clock speed to your liking.... ---------------------------------------------------------------------------------------------------------------------- STEP #4: (OPTIONAL)OVERCLOCKING the 5820KWhat Clock speed is best 3.8, 4.0 or 4.2 ? Overclocking the 5820K is straight forward I found a great guide to follow and it worked http://forums.evga.com/EVGA-X99-Quick-Overclocking-Guide-m2208949.aspx The issue for me is I have such a small case that I get a lot of ambient heat from overclocking When over clocking, you want to run the lowest Voltage possible so you can get you a lower temperature I have been able to Overclock my Processor to 4.2 ghz at 1.175v but I don't like the temps I'm getting (48 idle) So I run my 5820K at 3.8 ghz buy using the "Adaptive" setting in the "Overclocking" tab in the BIOS (See Photo Below) After manually setting all my cores to 3.8
I followed the steps below: #1Set "CPU Voltage Mode" to "Adaptive" #2Set "CPU Target Voltage" to 1.00 #3Set the CPU "Offset voltage" to 1.270 (or try lower and test) 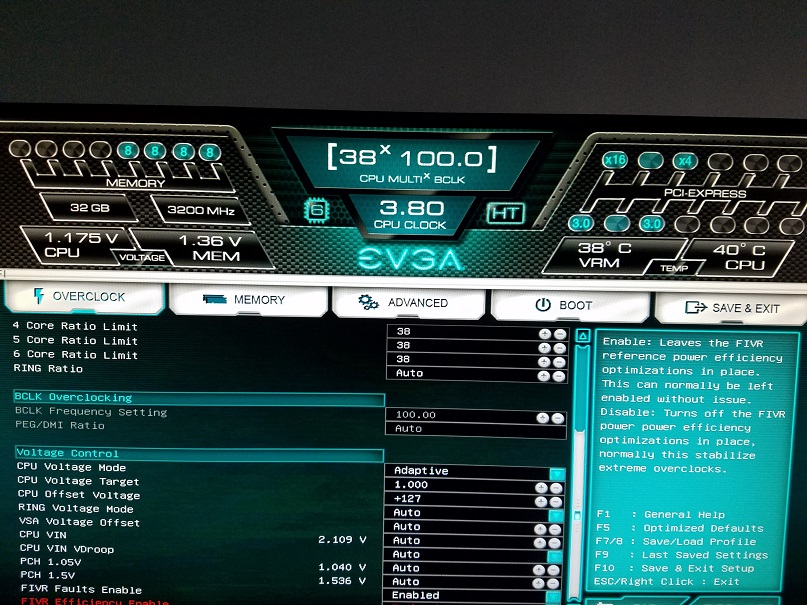 -------------------------------------------------------------------------------------------------------------------------------------- I figured I would put together this guide to Help others out and "Pay It Forward" for all the help I have received from this awesome community !!!!!! and now I have the fastest most reliable fun computer I have ever had -------------------------------------------------------------------------------------------------------------------------------------- I hope this can help at least One person Best Regards Rick
post edited by V84x4 - Thursday, June 29, 2017 11:09 PM
Computer Specs:Lilan Li 011D Bitspower DISTRO, MSI 570 Carbon Pro MB, AMD 3900X @ 3.8ghz, Bitspower Water Loop, TRIDENT Z 64GB (4x16GB) DDR4 3200, evga 2080 Super, EK waterblock 980 PRO M.2 1TB ,evga 1000w G3 psu, LG GSYNC 4KK Curved 32 inch, Windows 10 64bit  
|
Vlada011
Omnipotent Enthusiast

- Total Posts : 10126
- Reward points : 0
- Joined: 3/25/2012
- Location: Belgrade-Serbia
- Status: offline
- Ribbons : 11
Re: X99 Micro "2" Complete GUIDE Setting it all up !!
Sunday, May 08, 2016 7:56 AM
(permalink)
Hi, I think you should overclock on 4.0GHz, try with default voltage, adaptive.
You don't need to afraid if temps are 45C in idle.
Put Power Mode in Windows on Balanced and temps will drop below 40C...
And when you play games turn on High Performance.
|
Jet_Bl4ck87
New Member

- Total Posts : 50
- Reward points : 0
- Joined: 10/22/2015
- Status: offline
- Ribbons : 0
Re: X99 Micro "2" Complete GUIDE Setting it all up !!
Monday, August 15, 2016 5:48 AM
(permalink)
I do not have a m2 ssd so I can skip this step. However, in terms of the i7 5820k OC, I cannot get to 4.0. No matter what I do, windows does not load beyond 3.8. Any recommendation?
|
V84x4
iCX Member
- Total Posts : 282
- Reward points : 0
- Joined: 10/4/2015
- Location: Michigan USA
- Status: offline
- Ribbons : 7
Re: X99 Micro "2" Complete GUIDE Setting it all up !!
Monday, August 15, 2016 2:03 PM
(permalink)
Jet_Bl4ck87
I do not have a m2 ssd so I can skip this step. However, in terms of the i7 5820k OC, I cannot get to 4.0. No matter what I do, windows does not load beyond 3.8. Any recommendation?
hello over clocking to 3.8 stable is awesome and where I run most of the time I can get all the way to 4.2 but Windows is not stable so I can only get to 4.0 stable It can be the "Luck of the draw" (Silicon lottery) But you should be able to get to at least 4.0 Are you in "Adaptive mode or? Have you raised your CPU off set voltage to +125 or a bit higher ? What ram are you using? is it over clocked too? Try messing with all the settings one at a time to slowly bring your processor speed up It's a process of elimination (Game) to find that sweet spot 200 MHZ more isn't really going to make any difference Performance and stability is what your looking for im a graphics artist and need performance but have to have stability Regards, Rick
Computer Specs:Lilan Li 011D Bitspower DISTRO, MSI 570 Carbon Pro MB, AMD 3900X @ 3.8ghz, Bitspower Water Loop, TRIDENT Z 64GB (4x16GB) DDR4 3200, evga 2080 Super, EK waterblock 980 PRO M.2 1TB ,evga 1000w G3 psu, LG GSYNC 4KK Curved 32 inch, Windows 10 64bit
|
Jet_Bl4ck87
New Member
- Total Posts : 50
- Reward points : 0
- Joined: 10/22/2015
- Status: offline
- Ribbons : 0
Re: X99 Micro "2" Complete GUIDE Setting it all up !!
Monday, August 15, 2016 9:37 PM
(permalink)
I am using adaptive voltage. I have tried with the 1.175 v to get to 4.0 and even 1.3000 v it does not work. I do not know what is the problem. I cannot get beyond 3.8. My ram is working with the XMP profile at 2666 mhz.
|
V84x4
iCX Member
- Total Posts : 282
- Reward points : 0
- Joined: 10/4/2015
- Location: Michigan USA
- Status: offline
- Ribbons : 7
Re: X99 Micro "2" Complete GUIDE Setting it all up !!
Tuesday, August 16, 2016 3:05 PM
(permalink)
Ok start from scratch
lets turn off XMP and everything else (Stock BIOS)
Lets just try getting your processor to 4.0 first
then if you do get it to 4.0 then you can start playing with ram
Give this a try and see what happens
LMK
Regards, Rick
Computer Specs:Lilan Li 011D Bitspower DISTRO, MSI 570 Carbon Pro MB, AMD 3900X @ 3.8ghz, Bitspower Water Loop, TRIDENT Z 64GB (4x16GB) DDR4 3200, evga 2080 Super, EK waterblock 980 PRO M.2 1TB ,evga 1000w G3 psu, LG GSYNC 4KK Curved 32 inch, Windows 10 64bit
|
Jet_Bl4ck87
New Member
- Total Posts : 50
- Reward points : 0
- Joined: 10/22/2015
- Status: offline
- Ribbons : 0
Re: X99 Micro "2" Complete GUIDE Setting it all up !!
Tuesday, August 16, 2016 8:56 PM
(permalink)
Without the XMP. I tried 1.150v, 1.175v, 1.200v at 4 and it did not work. When I used 1.200v, it only loaded windows one time and then crashed in the Stress test. It never loaded windows again! Can I play with other options beside Voltage Target and the Offset target?
post edited by Jet_Bl4ck87 - Tuesday, August 16, 2016 9:20 PM
|
V84x4
iCX Member
- Total Posts : 282
- Reward points : 0
- Joined: 10/4/2015
- Location: Michigan USA
- Status: offline
- Ribbons : 7
Re: X99 Micro "2" Complete GUIDE Setting it all up !!
Tuesday, August 16, 2016 10:48 PM
(permalink)
That's what I thought so that tells me that you got a low processor.......(Silicon lottery) When it comes to overclocking processors, every CPU is different. Imperfections during fabrication cause each CPU to have different limits in terms of clock speed Look at this site https://siliconlottery.com/collections/2011-3So here's my experiance with X99 mother boards I have used Gskill Trydent 3200 then I tried Corsair Vengance 3000 then I tried EVGA 2667 ram all on XMP They all made different problems with my Micro 2 in a whole......... The X99 Mother Boards are Very Very finicky about the kind of RAM it uses and how it will preform so you have to sacrifice one thing or the other But again the thing is that the x99 is already Quad channel ram with 8 or 12 cores processor so why try to over clock????? so you have to ask yourself a question Do you want to be able to over clock for bragging rights and gaming? then buy a 170 chipset mother board do you want to be able to do video editing and work with Photoshop and Adobe products? Then buy a x99 chipset The X99 chipset is already smoking fast stock with tons of band width for massive production and also the buss speed on the x99 mother board can only go as high as 2400 or so using XMP to get 3000 or 3200 is senseless I say run your ram at stock speed and enjoy 3.8 stable Regards Rick
post edited by V84x4 - Tuesday, August 16, 2016 10:57 PM
Computer Specs:Lilan Li 011D Bitspower DISTRO, MSI 570 Carbon Pro MB, AMD 3900X @ 3.8ghz, Bitspower Water Loop, TRIDENT Z 64GB (4x16GB) DDR4 3200, evga 2080 Super, EK waterblock 980 PRO M.2 1TB ,evga 1000w G3 psu, LG GSYNC 4KK Curved 32 inch, Windows 10 64bit
|
Jet_Bl4ck87
New Member
- Total Posts : 50
- Reward points : 0
- Joined: 10/22/2015
- Status: offline
- Ribbons : 0
Re: X99 Micro "2" Complete GUIDE Setting it all up !!
Wednesday, August 17, 2016 0:02 PM
(permalink)
To be honest I just wanted to get to 4.0 because I saw everyone could do it easily and it looks "cool". But you are right, my motherboard has no problem to run at 3.8 with the XMP at 2666. So, I will keep it that way.
|
Jet_Bl4ck87
New Member
- Total Posts : 50
- Reward points : 0
- Joined: 10/22/2015
- Status: offline
- Ribbons : 0
Re: X99 Micro "2" Complete GUIDE Setting it all up !!
Wednesday, August 17, 2016 3:10 AM
(permalink)
|
GTXJackBauer
Omnipotent Enthusiast
- Total Posts : 10335
- Reward points : 0
- Joined: 4/20/2010
- Location: (EVGA Discount) Associate Code : LMD3DNZM9LGK8GJ
- Status: offline
- Ribbons : 48
Re: X99 Micro "2" Complete GUIDE Setting it all up !!
Wednesday, August 17, 2016 4:17 AM
(permalink)
That doesn't look good.
How does the socket and its pins look?
What cooler did you use for the CPU?
I think you should create your own thread before this OCing guilde gets thrown in the deep end. If a moderator can help us here and move this to a complete new thread, would be great.
Use this Associate Code at your checkouts or follow these instructions for Up to 10% OFF on all your EVGA purchases: LMD3DNZM9LGK8GJ
|
Jet_Bl4ck87
New Member
- Total Posts : 50
- Reward points : 0
- Joined: 10/22/2015
- Status: offline
- Ribbons : 0
Re: X99 Micro "2" Complete GUIDE Setting it all up !!
Wednesday, August 17, 2016 4:25 AM
(permalink)
The sockets and pins look good. I use a corsair H75 as the cooler. Should I send my CPU to Intel or something?
|
V84x4
iCX Member
- Total Posts : 282
- Reward points : 0
- Joined: 10/4/2015
- Location: Michigan USA
- Status: offline
- Ribbons : 7
Re: X99 Micro "2" Complete GUIDE Setting it all up !!
Wednesday, August 17, 2016 4:36 PM
(permalink)
Almost look as if it got hot at some point or that in came in contact with water............. gtxjackbauer
That doesn't look good.
How does the socket and its pins look?
What cooler did you use for the CPU?
I think you should create your own thread before this OCing guilde gets thrown in the deep end. If a moderator can help us here and move this to a complete new thread, would be great.
I agree .......... This is a different problem and needs to be discussed on a new thread Jet_Bl4ck87 Please start a new post in the X99 mother board section so as to get the appropriate response about this problem Thanks, Rick
Computer Specs:Lilan Li 011D Bitspower DISTRO, MSI 570 Carbon Pro MB, AMD 3900X @ 3.8ghz, Bitspower Water Loop, TRIDENT Z 64GB (4x16GB) DDR4 3200, evga 2080 Super, EK waterblock 980 PRO M.2 1TB ,evga 1000w G3 psu, LG GSYNC 4KK Curved 32 inch, Windows 10 64bit
|
4B91AAD8A56F4AA
iCX Member
- Total Posts : 379
- Reward points : 0
- Joined: 12/9/2011
- Status: offline
- Ribbons : 0
Re: X99 Micro "2" Complete GUIDE Setting it all up !!
Saturday, December 03, 2016 1:17 AM
(permalink)
you did set it to 1.25v and not 125v?
another thing to note is you want to get your RAM stable before messing with the CPU, System Agent voltage is the key i.e start @ 0.350v and work up
|
V84x4
iCX Member
- Total Posts : 282
- Reward points : 0
- Joined: 10/4/2015
- Location: Michigan USA
- Status: offline
- Ribbons : 7
Re: X99 Micro "2" Complete GUIDE Setting it all up !!
Saturday, December 03, 2016 11:16 AM
(permalink)
Edit
post edited by V84x4 - Saturday, December 03, 2016 11:22 AM
Computer Specs:Lilan Li 011D Bitspower DISTRO, MSI 570 Carbon Pro MB, AMD 3900X @ 3.8ghz, Bitspower Water Loop, TRIDENT Z 64GB (4x16GB) DDR4 3200, evga 2080 Super, EK waterblock 980 PRO M.2 1TB ,evga 1000w G3 psu, LG GSYNC 4KK Curved 32 inch, Windows 10 64bit
|
4B91AAD8A56F4AA
iCX Member
- Total Posts : 379
- Reward points : 0
- Joined: 12/9/2011
- Status: offline
- Ribbons : 0
Re: X99 Micro "2" Complete GUIDE Setting it all up !!
Saturday, December 03, 2016 12:54 AM
(permalink)
V84x4
Edit
edit: meeting of minds are being held
post edited by baconinabun - Saturday, December 03, 2016 1:59 PM
|
rjohnson11
EVGA Forum Moderator

- Total Posts : 85038
- Reward points : 0
- Joined: 10/5/2004
- Location: Netherlands
- Status: offline
- Ribbons : 86
Re: X99 Micro "2" Complete GUIDE Setting it all up !!
Saturday, December 03, 2016 1:07 PM
(permalink)
baconinabun
V84x4
Edit
I've sent you a PM, you want to read my PM and change this thread
EDIT: DO NOT TRY THIS AT HOME!
Please point out what you believe is wrong so that everyone can see
post edited by rjohnson11 - Saturday, December 03, 2016 1:18 PM
|
4B91AAD8A56F4AA
iCX Member
- Total Posts : 379
- Reward points : 0
- Joined: 12/9/2011
- Status: offline
- Ribbons : 0
Re: X99 Micro "2" Complete GUIDE Setting it all up !!
Saturday, December 03, 2016 1:29 PM
(permalink)
what i believe to be wrong in this is STEP #3: Get your RAM stable first, timing should be entered manually as memory volts, don't use XMP. to get your memory stable and showing fully you need to increase the system agent voltage start at 0.350 and work up till stable, i have 64gb of corsair 3000mhz my system agent is set to 0.450 STEP #4: "CPU VIN" should be set to 1.95v give the CPU enough oomf to get it going If you using offset/adaptive you only want to set that @0.050 then CPU voltage Target to 1.25 never go above 1.40v it's not good for the chip, if you do intend to go above that value intel offer a chip replacement service, (statement removed) the silicon lottery is a urban myth, once your X99 starts responding to the sweet voltages the sweet frequencys start flooding in and voltages can either be reduced or increased, softly softly catchy monkey my 5960x will happily bench @4.8 when i got the thing to start with it i couldn't get it to go above 4.2 Never Push the x99 to hard to start with or you'll get a black bummed CPU i have no interest in dissecting or rubbishing the @ops post, as i say great part about enabling the M.2, but off your trolly regarding voltages your trying to feed it!
post edited by baconinabun - Saturday, December 03, 2016 2:52 PM
|
GTXJackBauer
Omnipotent Enthusiast
- Total Posts : 10335
- Reward points : 0
- Joined: 4/20/2010
- Location: (EVGA Discount) Associate Code : LMD3DNZM9LGK8GJ
- Status: offline
- Ribbons : 48
Re: X99 Micro "2" Complete GUIDE Setting it all up !!
Saturday, December 03, 2016 2:41 PM
(permalink)
Bacon, off your meds again? Don't trash this post as it was intended to help others. Nothing wrong here, carry on.
Use this Associate Code at your checkouts or follow these instructions for Up to 10% OFF on all your EVGA purchases: LMD3DNZM9LGK8GJ
|
4B91AAD8A56F4AA
iCX Member
- Total Posts : 379
- Reward points : 0
- Joined: 12/9/2011
- Status: offline
- Ribbons : 0
Re: X99 Micro "2" Complete GUIDE Setting it all up !!
Saturday, December 03, 2016 2:46 PM
(permalink)
GTXJackBauer
Bacon, off your meds again? Don't trash this post as it was intended to help others. Nothing wrong here, carry on.
strangely enough i didn't take my meds till later than i should today, but that wasn't my issue that i saw with this thread, the @op and myself have spoken about what has been said and what i've brought to the thread, that's what the forums are about, are they not?
|
V84x4
iCX Member
- Total Posts : 282
- Reward points : 0
- Joined: 10/4/2015
- Location: Michigan USA
- Status: offline
- Ribbons : 7
Re: X99 Micro "2" Complete GUIDE Setting it all up !!
Saturday, December 03, 2016 2:53 PM
(permalink)
baconinabun
what i believe to be wrong in this is
STEP #3:
Get your RAM stable first,
timing should be entered manually as memory volts, don't use XMP.
to get your memory stable and showing fully you need to increase the system agent voltage start at 0.350 and work up till stable, i have 64gb of corsair 3000mhz my system agent is set to 0.450
IN MY GUIDE MY RAM IS STABLE FIRST
STEP #4:
"CPU VIN" should be set to 1.95v give the CPU enough oomf to get it going
If you using offset/adaptive you only want to set that @0.050 then CPU voltage Target to 1.25 never go above 1.40v it's not good for the chip, if you do intend to go above that value intel offer a chip replacement service, attacking a chip with 2.270V is so wrong
the silicon lottery is a urban myth, once your X99 starts responding to the sweet voltages the sweet frequencys start flooding in and voltages can either be reduced or increased, softly softly catchy monkey
my 5960x will happily bench @4.8 when i got the thing to start with it i couldn't get it to go above 4.2
Never Push the x99 to hard to start with or you'll get a black bummed CPU
i have no interest in dissecting or rubbishing the @ops post, as i say great part about enabling the M.2, but off your trolly regarding voltages your trying to feed it!
I'll try my best to explain............. Im not sure how things work on a ASUS but these steps were taken directly from EVGA's overclocking guide so I will trust EVGA to know what they are talking about Step #3XMP profiles are there for a reasonI dont want to have to mess with voltages for my GSKIL ram when XMP1 is perfect at 0.350 and I get 3200 mhz without any effortPLEASE NOTE ........when switching to XMP1 your processor will automatically overclock as the voltage has to change with this profile Step #4Using "Adaptive" settings and changing Voltage to +127 is a recommended setting by EVGAand is here in my guide as a great starting point
If you look at my CPU voltage in the picture above you will see that my CPU voltage is at 1.75V NOT 2.70v as you state
So i'm really not sure that you understand how adaptive setting work here
As far as "Silicon Lottery"
I am taken back by your statement " silicon lottery is a urban myth"
Microsoft's own web site explains
that the Silicon Die's come out with a huge mhz tolerance
and that they are Binned accordingly.........
if you are getting 4.8 stable then that's incredible and you are very lucky
Best Regards, Rick
post edited by V84x4 - Saturday, December 03, 2016 3:58 PM
Computer Specs:Lilan Li 011D Bitspower DISTRO, MSI 570 Carbon Pro MB, AMD 3900X @ 3.8ghz, Bitspower Water Loop, TRIDENT Z 64GB (4x16GB) DDR4 3200, evga 2080 Super, EK waterblock 980 PRO M.2 1TB ,evga 1000w G3 psu, LG GSYNC 4KK Curved 32 inch, Windows 10 64bit
|
bcavnaugh
The Crunchinator

- Total Posts : 38516
- Reward points : 0
- Joined: 9/19/2012
- Location: USA Affiliate E5L3CTGE12 Associate 9E88QK5L7811G3H
- Status: offline
- Ribbons : 282
Re: X99 Micro "2" Complete GUIDE Setting it all up !!
Saturday, December 03, 2016 2:54 PM
(permalink)
This Thread Would be a Great Sticky for the X99 Area if it could be cleaned up.
post edited by bcavnaugh - Saturday, December 03, 2016 3:03 PM
|
4B91AAD8A56F4AA
iCX Member
- Total Posts : 379
- Reward points : 0
- Joined: 12/9/2011
- Status: offline
- Ribbons : 0
Re: X99 Micro "2" Complete GUIDE Setting it all up !!
Saturday, December 03, 2016 2:55 PM
(permalink)
bcavnaugh
This Thread Would be a Great Sticky for the X99 Area if it could be cleaned up.
surprise surprise, but i do agree with you is would make a great sticky if steps #3 and #4 were removed and given there own sticky?
post edited by baconinabun - Saturday, December 03, 2016 3:14 PM
|
bcavnaugh
The Crunchinator
- Total Posts : 38516
- Reward points : 0
- Joined: 9/19/2012
- Location: USA Affiliate E5L3CTGE12 Associate 9E88QK5L7811G3H
- Status: offline
- Ribbons : 282
Re: X99 Micro "2" Complete GUIDE Setting it all up !!
Saturday, December 03, 2016 3:39 PM
(permalink)
All is Great, If need be MODS please delete this Post.
post edited by bcavnaugh - Saturday, December 03, 2016 8:14 PM
|
rjohnson11
EVGA Forum Moderator
- Total Posts : 85038
- Reward points : 0
- Joined: 10/5/2004
- Location: Netherlands
- Status: offline
- Ribbons : 86
Re: X99 Micro "2" Complete GUIDE Setting it all up !!
Saturday, December 03, 2016 3:42 PM
(permalink)
I'm seeing a few complaints about this thread. I have noted no violations of the EVGA forum rules and as moderators we have to be objective so let me list some things here: 1: The OP is trying to help with his own knowledge 2: The steps given may not agree with everyone. I think post number 21 helps clear things up a bit. 3. Arguments against come of the steps in the OPs post are forum members worried about safety, nothing wrong with being overcautious 4. The OP refers to the overclocking guide here from Jacob and this is the preferred method for overclocking ( http://forums.evga.com/EVGA-X99-Quick-Overclocking-Guide-m2208949.aspx)
|
rjohnson11
EVGA Forum Moderator
- Total Posts : 85038
- Reward points : 0
- Joined: 10/5/2004
- Location: Netherlands
- Status: offline
- Ribbons : 86
Re: X99 Micro "2" Complete GUIDE Setting it all up !!
Saturday, December 03, 2016 3:45 PM
(permalink)
I should also note that if anyone believes they have a better "guide" to setting up the X99 Micro 2 make your own guide with pictures. The moderators will look over all similar posts and can select the best written one for a sticky.
|
V84x4
iCX Member
- Total Posts : 282
- Reward points : 0
- Joined: 10/4/2015
- Location: Michigan USA
- Status: offline
- Ribbons : 7
Re: X99 Micro "2" Complete GUIDE Setting it all up !!
Saturday, December 03, 2016 10:19 PM
(permalink)
rjohnson11
I should also note that if anyone believes they have a better "guide" to setting up the X99 Micro 2 make your own guide with pictures. The moderators will look over all similar posts and can select the best written one for a sticky.
I have revised My first post (with more pictures) in hopes for it to be a Sticky someday ;-) Thanks for all of your support best regards, Rick
post edited by V84x4 - Saturday, December 03, 2016 10:57 PM
Computer Specs:Lilan Li 011D Bitspower DISTRO, MSI 570 Carbon Pro MB, AMD 3900X @ 3.8ghz, Bitspower Water Loop, TRIDENT Z 64GB (4x16GB) DDR4 3200, evga 2080 Super, EK waterblock 980 PRO M.2 1TB ,evga 1000w G3 psu, LG GSYNC 4KK Curved 32 inch, Windows 10 64bit
|
rjohnson11
EVGA Forum Moderator
- Total Posts : 85038
- Reward points : 0
- Joined: 10/5/2004
- Location: Netherlands
- Status: offline
- Ribbons : 86
Re: X99 Micro "2" Complete GUIDE Setting it all up !!
Sunday, December 04, 2016 10:39 AM
(permalink)
After the changes that have been made this has been stickied. If anyone has an objective PM me with your reasoning.
|
rjohnson11
EVGA Forum Moderator
- Total Posts : 85038
- Reward points : 0
- Joined: 10/5/2004
- Location: Netherlands
- Status: offline
- Ribbons : 86
Re: X99 Micro "2" Complete GUIDE Setting it all up !!
Sunday, December 04, 2016 12:06 AM
(permalink)
I have added a small comment to the sticky post
|
jmesserfish
New Member
- Total Posts : 1
- Reward points : 0
- Joined: 9/17/2016
- Status: offline
- Ribbons : 0
Re: X99 Micro "2" Complete GUIDE Setting it all up !!
Monday, January 23, 2017 1:52 PM
(permalink)
Hello! I am looking to do a build with the x99 FTW K and was wondering if the m.2 steps still apply or has it been adjusted in a BIOS release. Meaning does it just recognize it or should I still do these steps? Thanks!
|