lee63
New Member

- Total Posts : 87
- Reward points : 0
- Joined: 5/30/2005
- Location: Murrieta CA/Taunton UK
- Status: offline
- Ribbons : 0

Re:TIM Replacement - GTX 480s - DIY How To
Saturday, April 24, 2010 7:24 PM
(permalink)
All I have is MX-2.....you guys think that will work good ?
|
mwparrish
CLASSIFIED Member

- Total Posts : 3278
- Reward points : 0
- Joined: 1/8/2009
- Status: offline
- Ribbons : 23

Re:TIM Replacement - GTX 480s - DIY How To
Saturday, April 24, 2010 7:28 PM
(permalink)
lee63
All I have is MX-2.....you guys think that will work good ?
LOL, did you read the OP? What you need:
- High-Quality TIM ... MX-2 seems to be preferred. ...

Intel Core i7 3930K - 4.7 GHz | ASUS Rampage IV Extreme | 8x4GB G.Skill Ripjaws Z DDR3-2133 2x EVGA GTX 780 Ti SC | BenQ XL2420TX - 1920x1080 120Hz LCD | Logitech G9x | Corsair Vengeance 1500
5x Crucial 128GB SSD | LG BD-R Drive | Danger Den Torture Rack | Enermax Galaxy EVO 1250W 
|
heydabop
SSC Member

- Total Posts : 635
- Reward points : 0
- Joined: 3/4/2009
- Status: offline
- Ribbons : 0
Re:TIM Replacement - GTX 480s - DIY How To
Saturday, April 24, 2010 7:40 PM
(permalink)
Thanks for the guide. I tried it on my GTX 470 with AS5 only to find it now runs 3-4° C hotter.  I'm not sure if my TIM application was bad, or I seated the heatsink poorly, or if it's just a lot warmer in here today. But I'll probably try it again later and hope for better results. Even if I am a noob, thanks again for the guide.
|
sneakywookie
Superclocked Member

- Total Posts : 166
- Reward points : 0
- Joined: 7/26/2009
- Status: offline
- Ribbons : 0
Re:TIM Replacement - GTX 480s - DIY How To
Saturday, April 24, 2010 9:01 PM
(permalink)
Thanks for the guide im going to try this on my GTX 480 even though my temps arent breaking 80c with furmark. but ill see what it drops it down too.
Thank you
|
mwparrish
CLASSIFIED Member
- Total Posts : 3278
- Reward points : 0
- Joined: 1/8/2009
- Status: offline
- Ribbons : 23
Re:TIM Replacement - GTX 480s - DIY How To
Saturday, April 24, 2010 9:20 PM
(permalink)
heydabop
Thanks for the guide. I tried it on my GTX 470 with AS5 only to find it now runs 3-4° C hotter. I'm not sure if my TIM application was bad, or I seated the heatsink poorly, or if it's just a lot warmer in here today. But I'll probably try it again later and hope for better results.
Even if I am a noob, thanks again for the guide.
AS5 has a cure time of 200 hours. They should equalize -- but double check everything just to be sure.
Intel Core i7 3930K - 4.7 GHz | ASUS Rampage IV Extreme | 8x4GB G.Skill Ripjaws Z DDR3-2133 2x EVGA GTX 780 Ti SC | BenQ XL2420TX - 1920x1080 120Hz LCD | Logitech G9x | Corsair Vengeance 1500
5x Crucial 128GB SSD | LG BD-R Drive | Danger Den Torture Rack | Enermax Galaxy EVO 1250W
|
heydabop
SSC Member
- Total Posts : 635
- Reward points : 0
- Joined: 3/4/2009
- Status: offline
- Ribbons : 0
|
mo888
New Member
- Total Posts : 11
- Reward points : 0
- Joined: 12/24/2006
- Status: offline
- Ribbons : 0
Re:TIM Replacement - GTX 480s - DIY How To
Sunday, April 25, 2010 2:59 AM
(permalink)
Thanks this really helped. One card is still hotter than the other but I figured out it's because it has a higher voltage set. Still this dropped my temps 5c.
Win 7 Ultimate x64 i7 3960X @ 4.7 1.35v cooled by Boreas Asus Rampage IV Extreme EVGA GTX 580 Classfied Hydro (still waiting on second one) Triple Radiator Scythe fans push pull 32 gigs G.skil 2133mhz 1.6v with 8gb ram cache Patriot Wildfire x2 in raid 0 Hitachi 2TB sata 6gb/s Xonar Xense Strider 1500w PSU Corsair 800D
|
Alucard666
CLASSIFIED Member
- Total Posts : 4402
- Reward points : 0
- Joined: 12/22/2007
- Status: offline
- Ribbons : 12
Re:TIM Replacement - GTX 480s - DIY How To
Monday, April 26, 2010 1:51 AM
(permalink)
mwparrish
Alucard666
I have a stripped screw on my 470 which prevents me from obtaining access to the tim :-(
Ruh, roh...
They have tools for that.
....-shrugs- Belive it or not just loosening and re-tightening the heatsink *as much as I could before that once screw held me up.* made a 2C difference in temps lol
AMD Ryzen 7 3700x | 32GB Crucial Ballistix PRO RGB 3600mhz| ASUS RTX 3080 TUF OC | ASUS X570i STRIX | 2TB Sabrent Rockit M.2 SSD| NZXT H1 w Ghost Sheets Mesh Front | Noctua 140mm & 2 40mm | Samsung Odyssey G7 32" | Logitech G Pro Wireless | Logitech G915 | SteelSeries Arctis Pro Wireless | Logitech G560 RGB Speakers |
|
_SeaWolf_
New Member
- Total Posts : 1
- Reward points : 0
- Joined: 4/14/2010
- Status: offline
- Ribbons : 0
Re:TIM Replacement - GTX 480s - DIY How To
Monday, April 26, 2010 8:47 PM
(permalink)
artic silver ceramique dropped my idle temps about 7c with fan at 59% idle temp is 39c as opposed to 46c with the nvidia paste, now what impressed me the most is furmark extreme burn,fan at 75% max temp was 79c (oc clocks are 1500 and memory at 1900),rather impressed after replacing the tim edit: also after testing games an benchmarks temps are barely breaking 70c, artic silver ceramique ftw!
post edited by _SeaWolf_ - Monday, April 26, 2010 11:29 PM
core i7 920@3.8ghz gigabyte ud5 6gb ocz 7-7-7-18 timings corsair 750 tx psu EVGA GTX 480 sparkle 260gtx for physx
|
efeman
New Member
- Total Posts : 2
- Reward points : 0
- Joined: 4/16/2010
- Status: offline
- Ribbons : 0
Re:TIM Replacement - GTX 480s - DIY How To
Tuesday, April 27, 2010 1:31 AM
(permalink)
I did this to my GTX 470 last Friday with AS5. I know there's a cure time, but I haven't seen any improvements in temps (around 45c idle, 90c load). I had taken a couple of photos when applying the TIM myself; it was my first time not letting the heatsink do the spreading work, and my first time on a GPU. Does it look right?
Attached Image(s)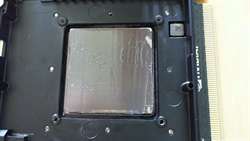 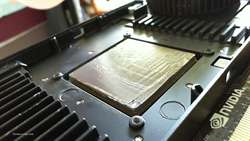
|
mwparrish
CLASSIFIED Member
- Total Posts : 3278
- Reward points : 0
- Joined: 1/8/2009
- Status: offline
- Ribbons : 23
Re:TIM Replacement - GTX 480s - DIY How To
Tuesday, April 27, 2010 4:18 PM
(permalink)
efeman
I did this to my GTX 470 last Friday with AS5. I know there's a cure time, but I haven't seen any improvements in temps (around 45c idle, 90c load). I had taken a couple of photos when applying the TIM myself; it was my first time not letting the heatsink do the spreading work, and my first time on a GPU. Does it look right?
It might be a little thick but there's a number of reasons why you may not see a decrease in temperatures: - Cure time
- Good factory paste application
- Inefficient air cooling/fan profile
- Card default voltage
Overall, your temps appear to be just fine. 45*C idle isn't too bad assuming it's the default fan profile. 90*C in vantage or with OC Scanner/Furmark or in-game? If it's 90*C with OC Scanner/Furmark with the default fan profile that's better than me.
Intel Core i7 3930K - 4.7 GHz | ASUS Rampage IV Extreme | 8x4GB G.Skill Ripjaws Z DDR3-2133 2x EVGA GTX 780 Ti SC | BenQ XL2420TX - 1920x1080 120Hz LCD | Logitech G9x | Corsair Vengeance 1500
5x Crucial 128GB SSD | LG BD-R Drive | Danger Den Torture Rack | Enermax Galaxy EVO 1250W
|
Petey1013
New Member
- Total Posts : 95
- Reward points : 0
- Joined: 11/9/2007
- Status: offline
- Ribbons : 0
Re:TIM Replacement - GTX 480s - DIY How To
Tuesday, April 27, 2010 4:44 PM
(permalink)
My 470 Idles at about 69C running dual monitors, this about normal? Gaming it usually doesnt go above 80C
|
heydabop
SSC Member
- Total Posts : 635
- Reward points : 0
- Joined: 3/4/2009
- Status: offline
- Ribbons : 0
Re:TIM Replacement - GTX 480s - DIY How To
Tuesday, April 27, 2010 5:39 PM
(permalink)
efeman
I did this to my GTX 470 last Friday with AS5. I know there's a cure time, but I haven't seen any improvements in temps (around 45c idle, 90c load). I had taken a couple of photos when applying the TIM myself; it was my first time not letting the heatsink do the spreading work, and my first time on a GPU. Does it look right?
Meh, better than me. I put AS5 on a few days ago an actually increased my temps a bit. I idle at ~49° C.
|
mwparrish
CLASSIFIED Member
- Total Posts : 3278
- Reward points : 0
- Joined: 1/8/2009
- Status: offline
- Ribbons : 23
Re:TIM Replacement - GTX 480s - DIY How To
Tuesday, April 27, 2010 5:44 PM
(permalink)
Petey1013
My 470 Idles at about 69C running dual monitors, this about normal? Gaming it usually doesnt go above 80C
That seems to be just on the better side of normal.
Intel Core i7 3930K - 4.7 GHz | ASUS Rampage IV Extreme | 8x4GB G.Skill Ripjaws Z DDR3-2133 2x EVGA GTX 780 Ti SC | BenQ XL2420TX - 1920x1080 120Hz LCD | Logitech G9x | Corsair Vengeance 1500
5x Crucial 128GB SSD | LG BD-R Drive | Danger Den Torture Rack | Enermax Galaxy EVO 1250W
|
mwparrish
CLASSIFIED Member
- Total Posts : 3278
- Reward points : 0
- Joined: 1/8/2009
- Status: offline
- Ribbons : 23
Re:TIM Replacement - GTX 480s - DIY How To
Tuesday, April 27, 2010 5:46 PM
(permalink)
heydabop
efeman
I did this to my GTX 470 last Friday with AS5. I know there's a cure time, but I haven't seen any improvements in temps (around 45c idle, 90c load). I had taken a couple of photos when applying the TIM myself; it was my first time not letting the heatsink do the spreading work, and my first time on a GPU. Does it look right?
Meh, better than me. I put AS5 on a few days ago an actually increased my temps a bit. I idle at ~49° C.
Yeah, that's why I only recommend it for folks who have temps outside the norm. Look at this way though -- that paste will get crusty in about 6 months and lose most of it's performance ability. The AS5 will continue performing long after the crusty paste hardens. So it's not all bad news.
Intel Core i7 3930K - 4.7 GHz | ASUS Rampage IV Extreme | 8x4GB G.Skill Ripjaws Z DDR3-2133 2x EVGA GTX 780 Ti SC | BenQ XL2420TX - 1920x1080 120Hz LCD | Logitech G9x | Corsair Vengeance 1500
5x Crucial 128GB SSD | LG BD-R Drive | Danger Den Torture Rack | Enermax Galaxy EVO 1250W
|
efeman
New Member
- Total Posts : 2
- Reward points : 0
- Joined: 4/16/2010
- Status: offline
- Ribbons : 0
Re:TIM Replacement - GTX 480s - DIY How To
Tuesday, April 27, 2010 7:37 PM
(permalink)
Hmm... well I'm hoping it's cure time. I'm still seeing the 45c idle, and 90-92c load (that's not stress testing, basically any game brings it up there; BFBC2, WoW, etc.).
|
GNielson
iCX Member

- Total Posts : 258
- Reward points : 0
- Joined: 3/23/2002
- Status: offline
- Ribbons : 1
Re:TIM Replacement - GTX 480s - DIY How To
Tuesday, April 27, 2010 7:42 PM
(permalink)
Let me add a warning to those who like to just use a really thin layer of paste. One of my two 480's seemed like it might benefit from replacing the paste, so I popped the heatsink off and cleaned things up. That's when I noticed that the heatpipes were actually recessed into the base of the heatsink compared to the "strips" of base material between the heatpipes. In other words, I could lay a small metal ruler across the heatsink and see a gap between the ruler and the heatpipes. If I'd just used a really thin layer of paste it wouldn't have even been contacting the heatpipes. After thinking about things for a bit I decided to solve the problem by lapping the heatsink base. Yeah, it probably voided the warranty, but I figured if I ever had to return the card that I'd just swap heatsinks with the unmodifed one from my other card. I did gain a couple of degrees improvement from doing all this, but really if I had it to do over again I wouldn't bother changing anything. The gain was minor. I really think that the thermal resistance of the heatsink to air is large enough to swamp out the minor gain from improving the thermal interface between the heatsink base and the fermi heatspreader.
post edited by GNielson - Tuesday, April 27, 2010 7:56 PM

|
mwparrish
CLASSIFIED Member
- Total Posts : 3278
- Reward points : 0
- Joined: 1/8/2009
- Status: offline
- Ribbons : 23
Re:TIM Replacement - GTX 480s - DIY How To
Tuesday, April 27, 2010 7:43 PM
(permalink)
efeman
Hmm... well I'm hoping it's cure time. I'm still seeing the 45c idle, and 90-92c load (that's not stress testing, basically any game brings it up there; BFBC2, WoW, etc.).
I assume fans are on AUTO -- do you know your default voltage? It varies by card. It seems like your card may just run a little hotter. What's your case airflow and ambient temps?
Intel Core i7 3930K - 4.7 GHz | ASUS Rampage IV Extreme | 8x4GB G.Skill Ripjaws Z DDR3-2133 2x EVGA GTX 780 Ti SC | BenQ XL2420TX - 1920x1080 120Hz LCD | Logitech G9x | Corsair Vengeance 1500
5x Crucial 128GB SSD | LG BD-R Drive | Danger Den Torture Rack | Enermax Galaxy EVO 1250W
|
heydabop
SSC Member
- Total Posts : 635
- Reward points : 0
- Joined: 3/4/2009
- Status: offline
- Ribbons : 0
Re:TIM Replacement - GTX 480s - DIY How To
Tuesday, April 27, 2010 9:05 PM
(permalink)
mwparrish
heydabop
efeman
I did this to my GTX 470 last Friday with AS5. I know there's a cure time, but I haven't seen any improvements in temps (around 45c idle, 90c load). I had taken a couple of photos when applying the TIM myself; it was my first time not letting the heatsink do the spreading work, and my first time on a GPU. Does it look right?
Meh, better than me. I put AS5 on a few days ago an actually increased my temps a bit. I idle at ~49° C.
Yeah, that's why I only recommend it for folks who have temps outside the norm. Look at this way though -- that paste will get crusty in about 6 months and lose most of it's performance ability. The AS5 will continue performing long after the crusty paste hardens.
So it's not all bad news.
Well that's good. And it's not like I'm getting dangerously hot right now anyway. Thanks again for the guide.
|
Tech_Noob
iCX Member
- Total Posts : 465
- Reward points : 0
- Joined: 11/20/2008
- Location: Middle of Nowhere.
- Status: offline
- Ribbons : 0
Re:TIM Replacement - GTX 480s - DIY How To
Wednesday, April 28, 2010 4:24 AM
(permalink)
Well, I tried using that Shin-Etsu.....I failed miserably....That stuff just does NOT want to spread, at all.....I must be really bad...I wasted a whole syringe (please don't flame lol, I've never used anything other than AS5) trying to get that stuff to even out....used my covered finger, used a credit card, and no dice. I just ended up using AS5 again....lol. Temps dropped an immediate 3 degrees, without curing. I now idle at 47 instead of 50 on an auto fan profile. I will post back load results.
The SW1TCH_BL4DE: HTPC edition! Silverstone GD04B HTPC Case Intel i5 2500k Asus P8P67-M Corsair Vengeance 8GB (4GB x2) DDR3 1600 eVGA GTX 560 (non Ti) Kingston SSDNow V Series SNV425-S2/64GB Samsung 1TB HDD Western Digital 500GB HDD Raidmax Hybrid 2 RX-730SS 730W PSU
|
bigc4200
New Member
- Total Posts : 44
- Reward points : 0
- Joined: 2/27/2009
- Status: offline
- Ribbons : 0
Re:TIM Replacement - GTX 480s - DIY How To
Wednesday, April 28, 2010 11:49 AM
(permalink)
i had a question my temps on idle were 47c.and 70c playing just cause.so i opened the card up to look and sure enough glob of paste ulgy,so i cleaned it up and used as5 i first applied to heatsink to fill in cracks so it would be flush with heat sink then scraped of remaining as5.then i applied to gpu and nice 35c on idle 60-63c playing just cause.
but when i install second monitor idle shoots to 47c does anyone else see temp's raise like that with second monitor?when new drivers come out will they fix that
MSI 990fxa-gd80 Kingston savage 1866 2x8 16 gb sansung 250 ssd evo kingwin 1000 watt power supply evga 970 ssc model 3975 amd 8310 cpu running 4.3 windows 7 64bit inwin 707 case with raijntek cpu cooler
|
mwparrish
CLASSIFIED Member
- Total Posts : 3278
- Reward points : 0
- Joined: 1/8/2009
- Status: offline
- Ribbons : 23
Re:TIM Replacement - GTX 480s - DIY How To
Wednesday, April 28, 2010 12:48 AM
(permalink)
bigc4200
i had a question my temps on idle were 47c.and 70c playing just cause.so i opened the card up to look and sure enough glob of paste ulgy,so i cleaned it up and used as5 i first applied to heatsink to fill in cracks so it would be flush with heat sink then scraped of remaining as5.then i applied to gpu and nice 35c on idle 60-63c playing just cause.
but when i install second monitor idle shoots to 47c does anyone else see temp's raise like that with second monitor?when new drivers come out will they fix that
this is a well documented issue because with dual-monitors the card runs at full clocks... a future driver update should resolve this.
Intel Core i7 3930K - 4.7 GHz | ASUS Rampage IV Extreme | 8x4GB G.Skill Ripjaws Z DDR3-2133 2x EVGA GTX 780 Ti SC | BenQ XL2420TX - 1920x1080 120Hz LCD | Logitech G9x | Corsair Vengeance 1500
5x Crucial 128GB SSD | LG BD-R Drive | Danger Den Torture Rack | Enermax Galaxy EVO 1250W
|
Pentium777
iCX Member
- Total Posts : 405
- Reward points : 0
- Joined: 3/28/2010
- Status: offline
- Ribbons : 0
Re:TIM Replacement - GTX 480s - DIY How To
Wednesday, April 28, 2010 12:56 AM
(permalink)
Excellent post, grats on the BR very well deserving. Taking the time to help others is what this hobby is all about. Glad we have you here on the forums!
Do you or anyone have an opinion on application of TIM, I had always used the grain of salt method of old days. However now that I am water cooling I searched around and found people using credit cards to spread a thin layer all over the chip(s).
I did this myself about 3-4 hours ago for my NB/SB and CPU before installing water blocks. Did a quick power on test to ensure I didn't brick my board somehow foolishly and all is well. Went to bios really quick and seems to have worked out pretty good.
With the little drop in the center I always found it did not spread evenly now spreading carefully with credit card (cut up into a small piece) I was able to get a very thin layer on the entire chip area.
|
Tech_Noob
iCX Member
- Total Posts : 465
- Reward points : 0
- Joined: 11/20/2008
- Location: Middle of Nowhere.
- Status: offline
- Ribbons : 0
Re:TIM Replacement - GTX 480s - DIY How To
Wednesday, April 28, 2010 11:54 PM
(permalink)
yea, using a credit card, or using a plastic bag wrapped around your finger would work perfectly fine. But not with Shin Etsu. that stuff is probably some of the weirdest textured stuff I've come across lol. It would probably work with the grain of rice or line method with Shin Etsu.
post edited by Tech_Noob - Thursday, April 29, 2010 0:43 PM
The SW1TCH_BL4DE: HTPC edition! Silverstone GD04B HTPC Case Intel i5 2500k Asus P8P67-M Corsair Vengeance 8GB (4GB x2) DDR3 1600 eVGA GTX 560 (non Ti) Kingston SSDNow V Series SNV425-S2/64GB Samsung 1TB HDD Western Digital 500GB HDD Raidmax Hybrid 2 RX-730SS 730W PSU
|
mwparrish
CLASSIFIED Member
- Total Posts : 3278
- Reward points : 0
- Joined: 1/8/2009
- Status: offline
- Ribbons : 23
Re:TIM Replacement - GTX 480s - DIY How To
Thursday, April 29, 2010 0:13 PM
(permalink)
Pentium777
Excellent post, grats on the BR very well deserving. Taking the time to help others is what this hobby is all about. Glad we have you here on the forums!
Do you or anyone have an opinion on application of TIM, I had always used the grain of salt method of old days. However now that I am water cooling I searched around and found people using credit cards to spread a thin layer all over the chip(s).
I did this myself about 3-4 hours ago for my NB/SB and CPU before installing water blocks. Did a quick power on test to ensure I didn't brick my board somehow foolishly and all is well. Went to bios really quick and seems to have worked out pretty good.
With the little drop in the center I always found it did not spread evenly now spreading carefully with credit card (cut up into a small piece) I was able to get a very thin layer on the entire chip area.
Yeah, with CPUs... if you're not using Indigo Xtreme, I recommend the rice grain method in the long direction of the die with a flat polished heat sink. If it's a HDT sink (pipes exposed with grooves between pipes and surface) then I recommend filling in those cracks first then two thin rice grains so it spreads evenly across the pipes. This works best to eliminate voids. For GPUs, it's spread with a card only for me. Voids aren't as big of an issue because the heatsink is held on with as much pressure anyway to trap air. Also, the GPU die usually takes up more space relative to the heatspreader so you want to adequately cover it all for optimal thermal transfer.
Intel Core i7 3930K - 4.7 GHz | ASUS Rampage IV Extreme | 8x4GB G.Skill Ripjaws Z DDR3-2133 2x EVGA GTX 780 Ti SC | BenQ XL2420TX - 1920x1080 120Hz LCD | Logitech G9x | Corsair Vengeance 1500
5x Crucial 128GB SSD | LG BD-R Drive | Danger Den Torture Rack | Enermax Galaxy EVO 1250W
|
tano22
New Member
- Total Posts : 85
- Reward points : 0
- Joined: 2/17/2010
- Status: offline
- Ribbons : 0
Re:TIM Replacement - GTX 480s - DIY How To
Thursday, April 29, 2010 6:22 AM
(permalink)
Props for the DIY. I followed the instructions, used Arctic Silver Ceramique, and my idle temps dropped nearly 10 celcius, and that's from the moment I put the cards back in. Can't wait to see if it drops another 2-3 celcius after it cures.
System Specs:
Corsair HX1000W PSU EVGA e760 CLASSIFIED X58 3x SLI Intel i7 920 2.66 GHz @ 4.2 GHz (D0) Cogage True Spirit CPU Heatsink/Fan Western Digital Caviar Black 1 TB 6 GB Corsair Dominator DDR3 1600 2x EVGA GTX 480 SC in SLI Thermaltake Armor Plus Full Tower Case Samsung Syncmaster 2253BW @ 1680x1050 Logitech G15 Gaming Keyboard Logitech G500 Gaming Laser Mouse
|
tano22
New Member
- Total Posts : 85
- Reward points : 0
- Joined: 2/17/2010
- Status: offline
- Ribbons : 0
Re:TIM Replacement - GTX 480s - DIY How To
Thursday, April 29, 2010 4:46 PM
(permalink)
Just an update to the above post. 12:45 PM in South Florida, air conditioner set to 74 F.
GPU Temps @ Idle (EVGA GTX 480 SCx2):
41 C
44 C
System Specs:
Corsair HX1000W PSU EVGA e760 CLASSIFIED X58 3x SLI Intel i7 920 2.66 GHz @ 4.2 GHz (D0) Cogage True Spirit CPU Heatsink/Fan Western Digital Caviar Black 1 TB 6 GB Corsair Dominator DDR3 1600 2x EVGA GTX 480 SC in SLI Thermaltake Armor Plus Full Tower Case Samsung Syncmaster 2253BW @ 1680x1050 Logitech G15 Gaming Keyboard Logitech G500 Gaming Laser Mouse
|
yapchagi
FTW Member
- Total Posts : 1604
- Reward points : 0
- Joined: 3/10/2006
- Status: offline
- Ribbons : 1
Re:TIM Replacement - GTX 480s - DIY How To
Thursday, April 29, 2010 6:12 PM
(permalink)
tano22
Just an update to the above post. 12:45 PM in South Florida, air conditioner set to 74 F.
GPU Temps @ Idle (EVGA GTX 480 SCx2):
41 C
44 C
WOW. Those are nice temps.
|
Jayden2009x
New Member
- Total Posts : 52
- Reward points : 0
- Joined: 3/31/2009
- Location: San Diego, CA (home again!)
- Status: offline
- Ribbons : 0
Re:TIM Replacement - GTX 480s - DIY How To
Thursday, April 29, 2010 6:34 PM
(permalink)
Great guide and well deserved BR! I can't wait to get back from deployment and check out my before and after on my new 480s waiting for me when I get home! (after all the QT with the wife and kids of course!) 
 "The Sentinel" "The Sentinel" Thermaltake Spedo Advance Core i7 920 @ 3.6Ghz Coolermaster V8 TT Toughpower 1200W EVGA GTX 295 (2x GTX 480 when I get home) Gigabyte EX58-UD4P 12GB Corsair Dominator 1600 300GB VelociRaptor Logitech G15/MX518 LG Blu-Ray Burner LG DVD-RW
|
mwparrish
CLASSIFIED Member
- Total Posts : 3278
- Reward points : 0
- Joined: 1/8/2009
- Status: offline
- Ribbons : 23
Re:TIM Replacement - GTX 480s - DIY How To
Friday, April 30, 2010 0:40 PM
(permalink)
Jayden2009x
Great guide and well deserved BR! I can't wait to get back from deployment and check out my before and after on my new 480s waiting for me when I get home! (after all the QT with the wife and kids of course!)
I hope Afghanistan is treating you well. Thank you for your service. Ha, QT with the wife... take good care of her. If you do that first she'll give you plenty of time with the 480s. I typically do not touch my rig until late in the evening -- I have to be disciplined or I'd spend way more time here than I should. I love them to death but tech can be an addiction!
Intel Core i7 3930K - 4.7 GHz | ASUS Rampage IV Extreme | 8x4GB G.Skill Ripjaws Z DDR3-2133 2x EVGA GTX 780 Ti SC | BenQ XL2420TX - 1920x1080 120Hz LCD | Logitech G9x | Corsair Vengeance 1500
5x Crucial 128GB SSD | LG BD-R Drive | Danger Den Torture Rack | Enermax Galaxy EVO 1250W
|