tpb7463
iCX Member

- Total Posts : 432
- Reward points : 0
- Joined: 2010/08/21 16:51:59
- Location: Utica, NY
- Status: offline
- Ribbons : 9


Re:My SR-2: the Second Rebuild
2011/06/12 08:40:55
(permalink)
I got a few PM's about the process of putting in the bottom drain, so I'll explain it here so everyone can see: First, get acquainted with the fillport/drainport that I used: http://www.sidewindercomputers.com/big14shsicat.html As you can see, it's designed to go into a hole that is larger than the internal threading and smaller than the locking collar. I've measured this diameter to be roughly 3/4". So I bought a drill-bit in that size from my local hardware store. Ask a in-store helper if you're unsure on what to buy. Buy some Ear and Eye Protection. This drilling will be very loud and metal shavings will fly everywhere! Tools: Ear and Eye Protection ( I cannot stress this enough! ) Power-Drill (preferably a corded drill with a leveling sight) 3/4" drill bit Clamps Wood Blocks 1/4" or 1/8" bit Metal File First the prep: My case bottom was made out of Aluminum, a very soft metal. The best way to prep for this is to prop the surface against a sturdy block of wood. Use some clamps if at all possible. The biggest problem you'll face is your target moving on you. The best suggestion I have is to find a piece of scrap metal and practice first, rather than going straight to drilling holes in your case. (Old case, anybody?) Your goal during practice is to drill a hole precisely where you want, without having the drill travel away from your target. Drill a guide hole: I determined the center that I wanted for my drainport, then drilled a small guide hole using a 1/8" bit. This basically keeps the larger bit from traveling while drilling the 3/4" hole. The important thing is to go SLOW and do not PRESS. Going fast will heat up the aluminum and may melt the sections you are cutting, causing it to warp, while pressing may bend your surface. Drill the final hole: Get those blocks out clamp everything down. Don't press the drill bit hard into the metal. Apply just enough pressure to let the drill bit do the work. USE A LOW RPM. For me, a hole of this size takes about 5 minutes of gentle drilling. "Slow and steady wins the race." Deburr: Get a metal file out and remove any burrs from the edge of the hole. You can be fairly aggressive with the file as 3/4" is slightly small for the drain port. You will need to file ever-so-slightly to get the drain to fit. [For my top port, I needed a Dremel to clean both layers of aluminum.] Clean-up: Grab an air-compressor/canned air and a big vacuum. Blow-out and vacuum every corner of your case and get all those metal-filings out. We don't want one piece left to short out our parts! I really should've posted pictures whole process, but hopefully this will suffice. Thanks for all the comments, everyone. Glad you like my work.
|
ajohnes2
iCX Member
- Total Posts : 282
- Reward points : 0
- Joined: 2008/01/23 18:46:32
- Status: offline
- Ribbons : 0
Re:My SR-2: the Second Rebuild
2011/06/12 09:05:54
(permalink)
Great guide on fill and drain ports. I remember my 800D experience with the fillport.
|
nikkocortez
CLASSIFIED Member

- Total Posts : 2625
- Reward points : 0
- Joined: 2010/02/01 10:04:03
- Status: offline
- Ribbons : 14
Re:My SR-2: the Second Rebuild
2011/06/12 13:11:42
(permalink)
Great info and sweet setup! 
|
Tiger95
New Member

- Total Posts : 54
- Reward points : 0
- Joined: 2010/12/11 10:19:29
- Status: offline
- Ribbons : 0
Re:My SR-2: the Second Rebuild
2011/06/12 14:19:42
(permalink)
ohhh beautiful configuration!
|
PM_DMNKLR
FTW Member
- Total Posts : 1253
- Reward points : 0
- Joined: 2007/01/22 15:53:08
- Location: Somehow stuck on a ridge in Blood Gulch...
- Status: offline
- Ribbons : 4
Re:My SR-2: the Second Rebuild
2011/06/12 19:42:53
(permalink)
I use a prick punch (lol) and a hammer to make a guide hole when doing any kind of drilling like that, it helps immensely with bit-walking.
Just as any other form of art, modding is a passion, not just a hobby. We fawn over it, we love it, we hold it near and dear to our hearts, we are passionate about it. We are modders, and we are artists. Also, if you like any of the advice I give, please recommend I get a BR, thanks! 
|
HeThing
CLASSIFIED ULTRA Member

- Total Posts : 6764
- Reward points : 0
- Joined: 2010/05/11 07:45:49
- Location: 6F4-72Y-6A8J <-- My Affiliate Code :D
- Status: offline
- Ribbons : 42
Re:My SR-2: the Second Rebuild
2011/06/13 02:29:16
(permalink)
You just made me want a SR-2 rig!
|
tpb7463
iCX Member
- Total Posts : 432
- Reward points : 0
- Joined: 2010/08/21 16:51:59
- Location: Utica, NY
- Status: offline
- Ribbons : 9
|
PM_DMNKLR
FTW Member
- Total Posts : 1253
- Reward points : 0
- Joined: 2007/01/22 15:53:08
- Location: Somehow stuck on a ridge in Blood Gulch...
- Status: offline
- Ribbons : 4
Re:My SR-2: the Second Rebuild
2011/06/13 19:47:12
(permalink)
tpb7463
All a matter of personal preference. But, a while back when I tried that (on my Northwood 3.0 GHz PIV build  ) I popped a rivet. I agree, if you can pull off the punch, travel is practically a non-issue. ) I popped a rivet. I agree, if you can pull off the punch, travel is practically a non-issue.
Wow, you must've hit that punch pretty hard, lol. The one I'm referring to is a prick punch, are you sure you didn't use a center punch? I've seen that happen with center punches before cuz they're usually not as pointed and a little broader of a head. A prick punch will put a hole through/into most metals with good ease, which shouldn't disrupt any rivets.
Just as any other form of art, modding is a passion, not just a hobby. We fawn over it, we love it, we hold it near and dear to our hearts, we are passionate about it. We are modders, and we are artists. Also, if you like any of the advice I give, please recommend I get a BR, thanks!
|
tpb7463
iCX Member
- Total Posts : 432
- Reward points : 0
- Joined: 2010/08/21 16:51:59
- Location: Utica, NY
- Status: offline
- Ribbons : 9
Re:My SR-2: the Second Rebuild
2011/06/13 20:13:20
(permalink)
Naw just a really cheap case.  . I was surprised when it happened. Piece of junk fell apart on me :/ And yes, it was a prick punch. But come to think of it, that one was steel, not aluminum.
post edited by tpb7463 - 2011/06/13 20:15:27
|
PM_DMNKLR
FTW Member
- Total Posts : 1253
- Reward points : 0
- Joined: 2007/01/22 15:53:08
- Location: Somehow stuck on a ridge in Blood Gulch...
- Status: offline
- Ribbons : 4
Re:My SR-2: the Second Rebuild
2011/06/13 23:12:42
(permalink)
Cheap + steel = bad, lol. I've been there plenty of times. There was this one Diablotek case that a customer absolutely HAD TO HAVE, they adamantly refused to listen to me when I told them how garbage it was, and then they found out when I showed them. I myself was very easy going on the thing, but they didn't like what happened when I told them to pull off the side panel. It took a good 10+ minutes to bend it back just right, and it was a royal pain. They still chose to stick with it, but I think from the look on their face, it's cuz they felt bad for me having to go thru all the hours n hours of setup work I did on it, lol. Either way, they learned their lesson and upgraded months down the road.
Just as any other form of art, modding is a passion, not just a hobby. We fawn over it, we love it, we hold it near and dear to our hearts, we are passionate about it. We are modders, and we are artists. Also, if you like any of the advice I give, please recommend I get a BR, thanks!
|
tpb7463
iCX Member
- Total Posts : 432
- Reward points : 0
- Joined: 2010/08/21 16:51:59
- Location: Utica, NY
- Status: offline
- Ribbons : 9
Re:My SR-2: the Second Rebuild
2011/08/25 17:24:12
(permalink)
Update!  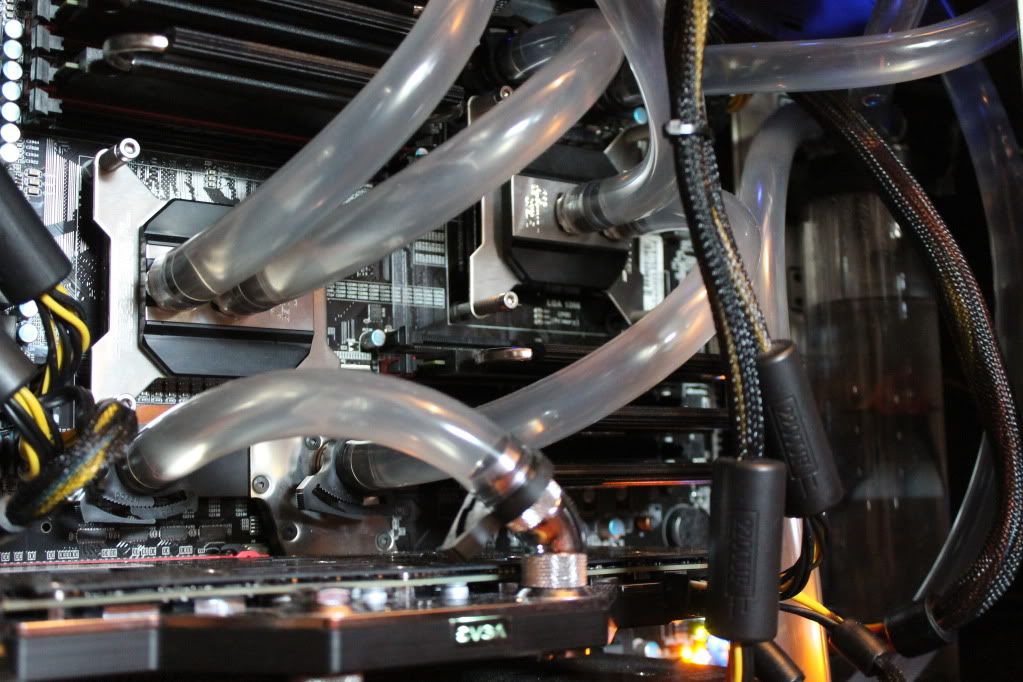 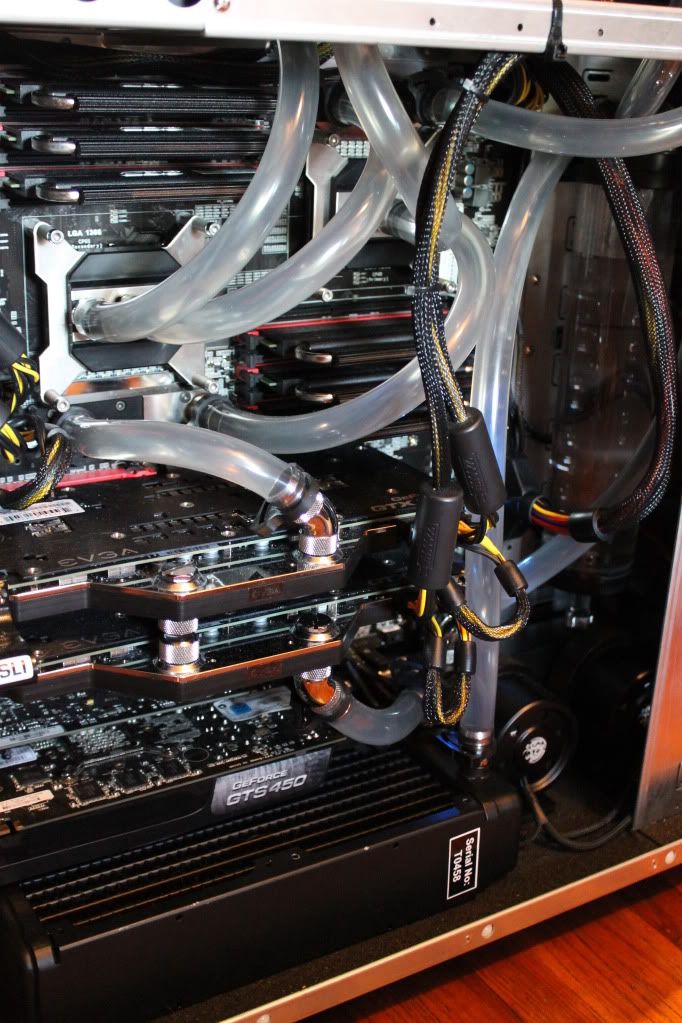  Yes, I managed to fit a third rad in: TA120.2 in the top and bottom. PA140.3 in the front. Drilling the holes for the bottom rad was...fun.  I had intended to tax my machine exclusively CPUs only or GPUs only. Problem was...those GTX590's are really toasty! (DUH) My idle CPU temps were pathetic to say the least. ~45C. And if I chose to game for a few hours, even without taxing the CPUs, I'd average nearly 60C! At <10% CPU usage! I felt that having the 590's in parallel in such a long loop really killed my flow. I learned that parallel is only a good option if they have a dedicated loop--parallel works against me in long loops. Third rad in, and now my temps are great! GPUs and CPUs now idle at 35C. CPU temps during gaming hovers around 40C. Folding on the entire system w/ 5GPUs and 22 Threads: CPU's 60C GPU's 45C  IMO, I managed to really improve the overall look of the tubing as well. Designing the loop was a little easier this time with the GPUs exhausting towards the bottom--it opened up a lot of space. Alright, no more rebuilds for a while. It took me 5 years to save enough money to finish this one off. Thanks for watching.
|
thesphinx37
New Member
- Total Posts : 63
- Reward points : 0
- Joined: 2009/04/22 11:35:44
- Status: offline
- Ribbons : 2
Re:My SR-2: the Second Rebuild
2011/08/25 19:41:25
(permalink)
|
monster-tiger
New Member
- Total Posts : 8
- Reward points : 0
- Joined: 2011/09/29 07:07:20
- Status: offline
- Ribbons : 0
Re:My SR-2: the Second Rebuild
2011/10/02 08:32:45
(permalink)
I think it' great. this is a pro work 
|
jingiko
FTW Member
- Total Posts : 1258
- Reward points : 0
- Joined: 2009/02/04 22:17:42
- Location: New York City
- Status: offline
- Ribbons : 5
Re:My SR-2: the Second Rebuild
2011/10/02 12:07:19
(permalink)
Awesome build!
Genius drain port on the bottom with the lever ( i might have to borrow this idea ). Is draining the system a lot easier since you have a separate line out?
Also do all GTX590 gpus come bundled as two separate cards? or did you buy the 590 at 8-900 each?
|
Simba123
CLASSIFIED Member
- Total Posts : 2844
- Reward points : 0
- Joined: 2011/05/10 23:15:21
- Location: Australia
- Status: offline
- Ribbons : 14
|
tpb7463
iCX Member
- Total Posts : 432
- Reward points : 0
- Joined: 2010/08/21 16:51:59
- Location: Utica, NY
- Status: offline
- Ribbons : 9
Re:My SR-2: the Second Rebuild
2011/10/16 17:53:33
(permalink)
jingiko
Is draining the system a lot easier since you have a separate line out?
Also do all GTX590 gpus come bundled as two separate cards? or did you buy the 590 at 8-900 each?
It's actually quite comical watching me drain it. I unplug the machine and put it in the bathtub and let 'er loose! Yeah, it is a lot easier that way--no buckets, no dangling drain-lines, no dripping. As for refills, my funnel has a twist-off valve so that I can avoid over-filling. As for the 590's, I bought them straight from Evga as a two-pack. The packaging AFAIK still has room for two cards even when you only purchase them one at a time. I still had to register them both as separate products, both have unique serial numbers.
|
AlphaNerd
CLASSIFIED Member
- Total Posts : 2373
- Reward points : 0
- Joined: 2010/11/01 05:51:12
- Location: United States
- Status: offline
- Ribbons : 7
Re:My SR-2: the Second Rebuild
2011/10/16 18:17:05
(permalink)
Very nice, I like the "library" look of your last image..
|
kurruppt
iCX Member
- Total Posts : 282
- Reward points : 0
- Joined: 2008/08/20 20:28:28
- Location: Texas/Colorado
- Status: offline
- Ribbons : 4
Re:My SR-2: the Second Rebuild
2011/10/16 18:33:40
(permalink)
nice rig 
|
new2019
SSC Member

- Total Posts : 994
- Reward points : 0
- Joined: 2010/11/01 05:57:44
- Status: offline
- Ribbons : 0
Re:My SR-2: the Second Rebuild
2012/04/26 18:28:32
(permalink)
Your 3D mark 06 looks pretty low , can you bench it again.
because I got 14200 with single e5603 and gtx 465.
your system should score more than 40000 for sure.
EVGA SR2 | X5650 | X5650 | Corsair Dominator |  
|
blood4guts
iCX Member
- Total Posts : 419
- Reward points : 0
- Joined: 2009/10/20 16:14:21
- Location: Here
- Status: offline
- Ribbons : 0
Re:My SR-2: the Second Rebuild
2012/04/26 20:21:34
(permalink)
Wow, awesome build. Even now that the tubing is done I'm sure that you can still find many weekend projects in that build... A keeper
|
tpb7463
iCX Member
- Total Posts : 432
- Reward points : 0
- Joined: 2010/08/21 16:51:59
- Location: Utica, NY
- Status: offline
- Ribbons : 9
Re:My SR-2: the Second Rebuild
2012/04/26 22:03:10
(permalink)
new2019
Your 3D mark 06 looks pretty low , can you bench it again.
because I got 14200 with single e5603 and gtx 465.
your system should score more than 40000 for sure.
Alright, I'll bite. I haven't re-run the benchmark since BIOS-modding my cards. I have to take myself back a bit considering '06 came out right around when my 7800GTX's were getting replaced by the 8800-series and this benchmark smoked my old machine. But, then again, the development period for '06 was before the advent of (consumer available) Quad-SLI and 3-Way was in its infancy. This is only confirmed by what I see from my reruns: http://3dmark.com/3dm06/16625213 28032 - Quad-SLI http://3dmark.com/3dm06/16625225 27490 - 590 (In SLI-mode) Yes, that's right folks, I get fewer futuremark points going quad than the original MSRP of a EVGA 590 Hydrocopper. In other news... Since my chips have aged, they no longer handle the turbo as well as they used to--I was starting to get random 124 BSOD's with balanced power profiles. Most likely this was due to a random x23 multiplier popping up for a single-threaded app. After several days of tweaking I finally managed a 200 bclk so I could disable turbo and still manage 4.0 GHz. Memory timings had to be loosened to run at 2000MHz, but ahh what the heck, Adobe Premier loves the extra throughput. Thanks again for the comments / views everyone, even if "Cecilia" is starting to show her age.
post edited by tpb7463 - 2012/04/26 22:34:48
|