Boddaker
iCX Member

- Total Posts : 316
- Reward points : 0
- Joined: 2007/02/09 17:13:09
- Location: Where the beer flows like wine
- Status: offline
- Ribbons : 18


Re:Cosmos Cruizer
2013/01/22 11:52:41
(permalink)
Ok, I think it's about time I got back on this project! :D After I wrapped up the Level 10GTS-M case, I was able to spend some time installing some newly acquired parts from EK. :twisted:  Yes, they were gracious enough to offer up some very cool products for this build, and I can't thank them enough. Here's a shot of what they sent me: 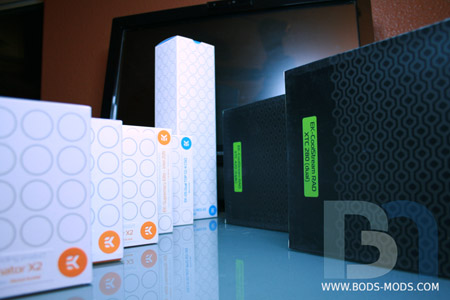 We got a CPU waterblock, motherboard blocks for the X79, Dominator memory blocks x2, ram module adapters (to fit the dominator blocks on my Crucial memory), a 250mm tube res, a 280 and a 420 radiator, and a dual pump top. I had been searching for a WC solution for my Crucial Ballistix memory, and there are a few universal blocks out there, but I was very pleased to find out EK offers these adapters to fit the ever popular Corsair Dominator blocks. :) So the first thing I did was install them onto the Crucial memory. They come very securely packaged in bubble wrap. 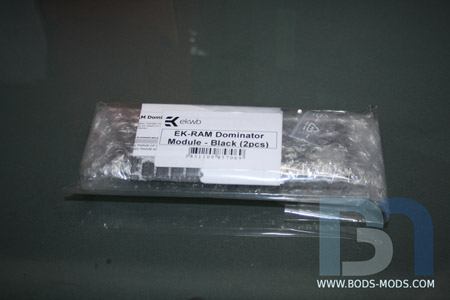 Opening it up we have two sets of adapters, with all the necessary thermal padding and hardware. 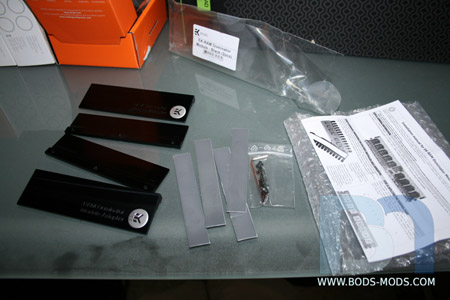 Here are the memory sticks with their heat spreaders which will need to be removed. 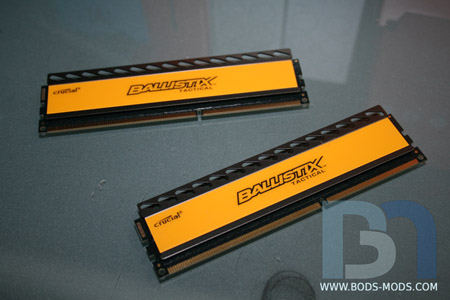 I had to be extremely careful not to damage the memory in the removal process. I found that pulling both sides off at the same time alleviated any bending of the memory stick. 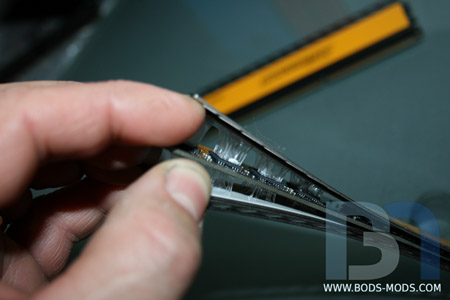 Crucial uses some really tough adhesive on their thermal pads. It took awhile to get it all off the chips. 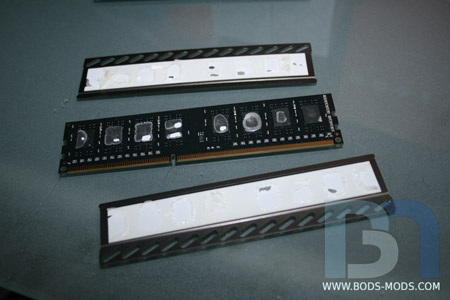 All four sticks cleaned off and ready for the adapters. 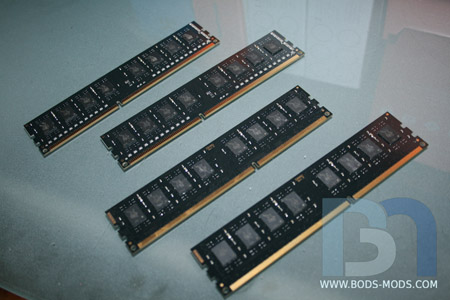 Applying the new thermal padding. The strips were too short to just lay over all the chips, so I had to cut them up into individual squares, one for each chip. Now for the other side. 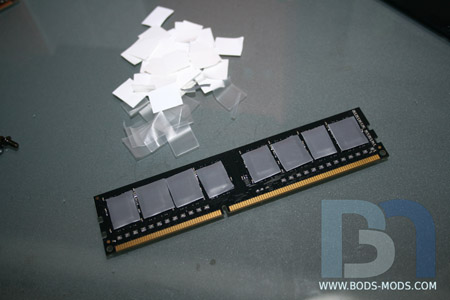 Once the thermal pads were all on, it was just a matter of sandwiching the memory stick in between the two adapter plates and screwing them together. Two down, two to go! 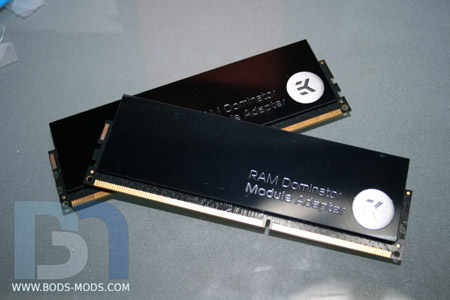 All done! I had to install the ram onto the motherboard and add the actual Dominator blocks to see how it looked. Looks very nice along with the Supremacy CPU and motherboard blocks. 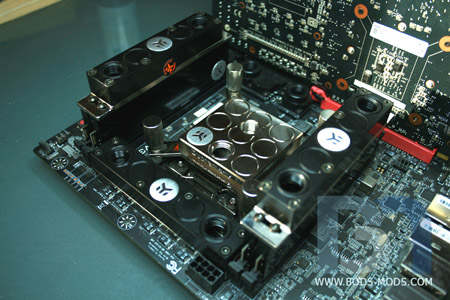 I'm super excited to be back on this. I'll be updating more consistently from now on, as this case is top priority! :)
|
Boddaker
iCX Member
- Total Posts : 316
- Reward points : 0
- Joined: 2007/02/09 17:13:09
- Location: Where the beer flows like wine
- Status: offline
- Ribbons : 18
Re:Cosmos Cruizer
2013/01/27 12:09:25
(permalink)
Planning out the plumbing on the backside of the Cruizer. I'm going with stainless steel tubing, to simulate automotive fuel/brake lines. Should look pretty sweet! But before running the lines, I had to figure out the best placement for the wc components. It's amazing that even on a cavernous case such as the Cosmos II, I still had to deal with clearance issues lol. 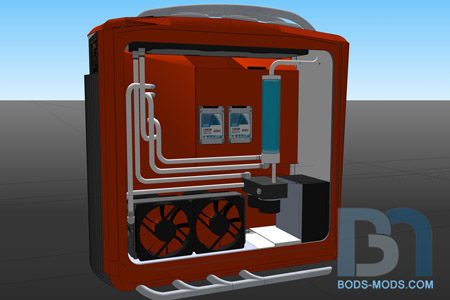 I'll be running two separate loops: CPU/motherboard/ram, and graphics cards. I got the 420mm EK radiator up top cooling the CPU loop, and the 280mm EK rad in the GFX loop. I figure the 680s won't be putting out as much heat as the processor, especially since I want to do some OCing this time. Both loops go into the EK 250mm X3 res, with one line connecting the res to the dual pumps. Then the two loops split off again from there. I'm a little concerned about the bottleneck there, but I'm trying to eliminate any unnecessary tubing where possible. And with the dual D5 pumps, I'm hoping it will be a non-issue. Lemme know what you guys think.
|
jhansz
Superclocked Member

- Total Posts : 130
- Reward points : 0
- Joined: 2010/09/26 10:42:19
- Status: offline
- Ribbons : 8
Re:Cosmos Cruizer
2013/01/27 17:11:33
(permalink)
Nice work Boddaker. Cant wait to see at pdxlan. Are you going to be at Feb. pdxlan?
CaseLabs TH10 with windows on both sides Intel I7 2700k Sandy Bridge Evga Z68 FTW Evga GTX 580 Classified 3g Hydro Mushkin Enhanced Redline 16g 2133 9-10-9-27 Corsair AX1200 Gold series Corsair Force GT 120g (x2 in raid 0) Samsung 2tb hd Phobya nano 2g fans (x28) FrozenQ Dual Bay Res.
|
Boddaker
iCX Member
- Total Posts : 316
- Reward points : 0
- Joined: 2007/02/09 17:13:09
- Location: Where the beer flows like wine
- Status: offline
- Ribbons : 18
Re:Cosmos Cruizer
2013/01/27 17:18:46
(permalink)
Thanks man, I won't be at 21, but I'm gunning for 22 in July. :)
Your new rig done yet?
|
jhansz
Superclocked Member
- Total Posts : 130
- Reward points : 0
- Joined: 2010/09/26 10:42:19
- Status: offline
- Ribbons : 8
Re:Cosmos Cruizer
2013/01/27 18:15:16
(permalink)
Its getting close. I'm going for Feb. I have a few things that i still need to do. most of the hard stuff is done.
CaseLabs TH10 with windows on both sides Intel I7 2700k Sandy Bridge Evga Z68 FTW Evga GTX 580 Classified 3g Hydro Mushkin Enhanced Redline 16g 2133 9-10-9-27 Corsair AX1200 Gold series Corsair Force GT 120g (x2 in raid 0) Samsung 2tb hd Phobya nano 2g fans (x28) FrozenQ Dual Bay Res.
|
Boddaker
iCX Member
- Total Posts : 316
- Reward points : 0
- Joined: 2007/02/09 17:13:09
- Location: Where the beer flows like wine
- Status: offline
- Ribbons : 18
Re:Cosmos Cruizer
2013/02/10 15:37:51
(permalink)
After designing out the plumbing in Sketchup, I've been placing the real parts in the case, to verify my plan will work as it is layed out. So far things have been lining up with minimal adjustments. :) Here are the 280 and 420 radiators from EK. These things are massive, at 2" thick, but they fill the Cosmos II nicely. :) 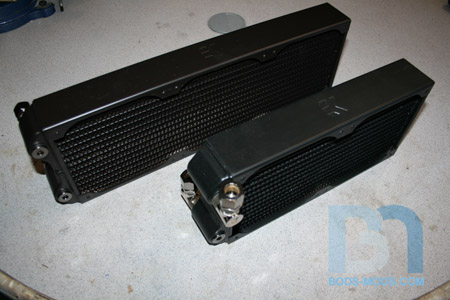 Got my stack of 140mm fans plus a 200mm intake fan for the case. 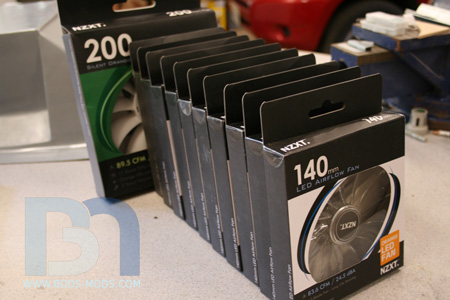 Trying the fans out on the 280 rad, and placing it in the case. 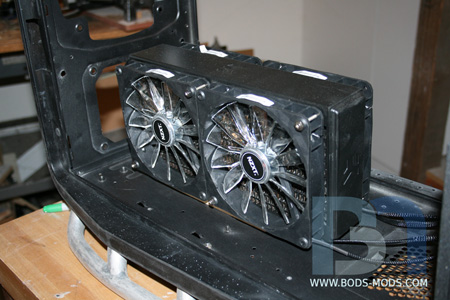 The top 420 rad will go up top, but just barely. 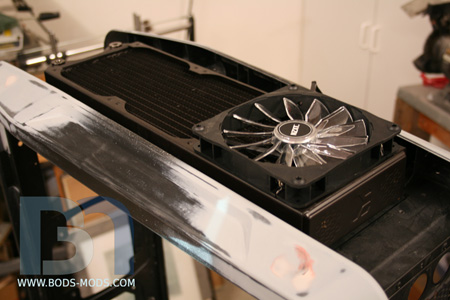 As you can see from the side, the radiator will need to be mounted lower into the case so it fits below the bezel. The Cosmos II only has provisions for a 360mm radiator, so I'd have to cut the top panel anyway. 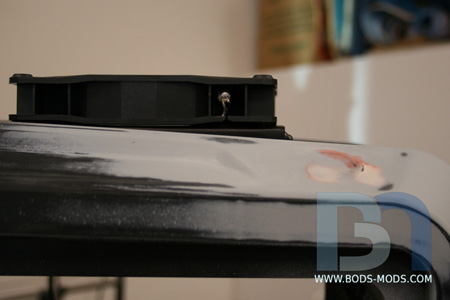 Lastly, here is a shot of the Koolance quick disconnect fittings I'll be using to connect the custom manifold, along with the Koolance 1/2" pipe adapters and EK 90º elbow fittings. 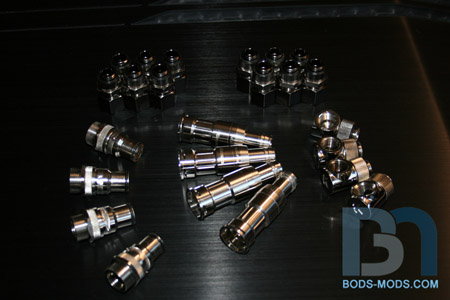 And I've got more fittings on the way! I found some really awesome push fittings from E22 that will be a perfect fit for this project... 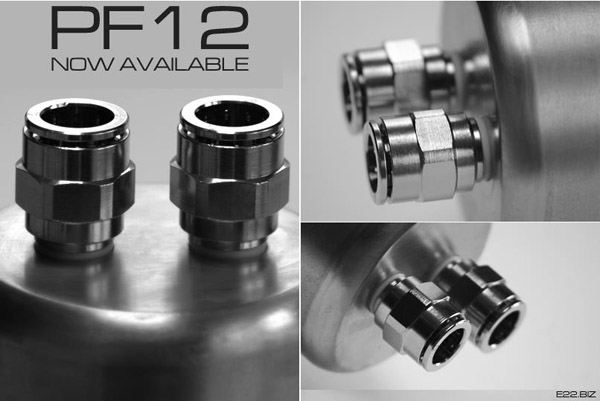 They also carry the 12mm rigid tubing I'll be using along with these fittings. So as soon as I get those in, I'll be able to get the custom manifold together and mounted on the hardware. Can't wait! :)
|
Boddaker
iCX Member
- Total Posts : 316
- Reward points : 0
- Joined: 2007/02/09 17:13:09
- Location: Where the beer flows like wine
- Status: offline
- Ribbons : 18
Re:Cosmos Cruizer
2013/02/15 10:56:41
(permalink)
Got a little bit more work done last night on the rads. :) I cut out the top panel to fit the 420mm EK radiator. You can see the size difference between it and the stock provisions for a 360mm rad.  Here is the radiator set in place with a couple fans to check height clearance. 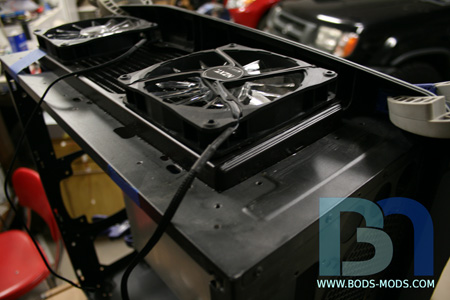 I also checked the lower radiator clearance. To do this, I set the fiberglass form into the case to give me an idea where the actual fiberglass piece will be. Right now the rad is resting on the form, so it will need to raise up just a bit to clear. I still have about 1/4" room above the fans on top, so I think I'm good. 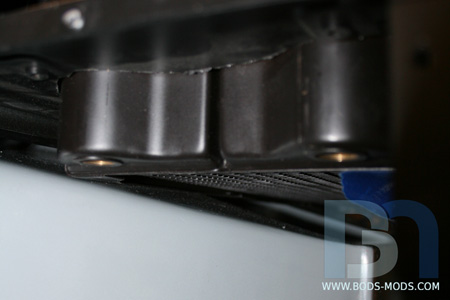 This weekend, I'll file the edges down and get the mounting brackets made up for this rad as well as the lower 280mm rad.
|
zophar
CLASSIFIED Member

- Total Posts : 4749
- Reward points : 0
- Joined: 2008/08/26 09:48:56
- Location: KC,MO
- Status: offline
- Ribbons : 26
Re:Cosmos Cruizer
2013/02/15 16:03:09
(permalink)
Looking good, love watching you work.
|
Phoenixx45
CLASSIFIED Member
- Total Posts : 3390
- Reward points : 0
- Joined: 2009/05/22 15:07:07
- Location: Texas
- Status: offline
- Ribbons : 8
Re:Cosmos Cruizer
2013/02/15 16:45:54
(permalink)
fsuwade
Boy i can not wait to see what you do with this one this year. Dang I have been waiting to see another great mod from you.
Couldn't of said it better.. Can't wait to see this thing come to life!
White Widow - NZXT 810 Processor: Intel Core i7 2700 @ ? Memory: 8GB Corsair Dominator GT Hard Drive(s): 1. 2x 120Gb Vertex 2 SSD 2. Raptor 70GB 3. Raptor 300GB 4. Western Digital 1TB Video Card: 3x EVGA GTX 480 w/ Back Plate & HF Bracket in SLI Sound Card: X-Fi Titanium Fatal1ty Champion Series Motherboard: EVGA z68 FTW 
|
seth89
CLASSIFIED Member
- Total Posts : 4420
- Reward points : 0
- Joined: 2007/11/13 11:26:18
- Status: offline
- Ribbons : 14
Re:Cosmos Cruizer
2013/02/17 05:54:09
(permalink)
Awesome!
I wish I had the tools and know how to build this level of custom parts.
|
Boddaker
iCX Member
- Total Posts : 316
- Reward points : 0
- Joined: 2007/02/09 17:13:09
- Location: Where the beer flows like wine
- Status: offline
- Ribbons : 18
Re:Cosmos Cruizer
2013/02/17 23:33:57
(permalink)
Thanks guys! :) Ok, I got a crap-ton of work done on this case over the weekend. :P Firstly, I got the top radiator mounts made. After measuring how far the rad could go, I cut and bent these four mounts. 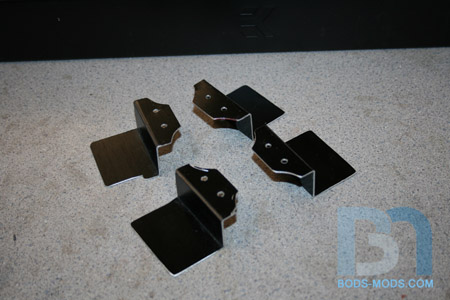 These will mount to the center fan holes on each side of the rad. 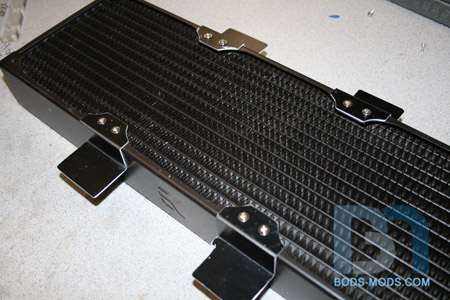 And it fits into the case thusly. I still have to add holes to the brackets where they will be fastened to the case. 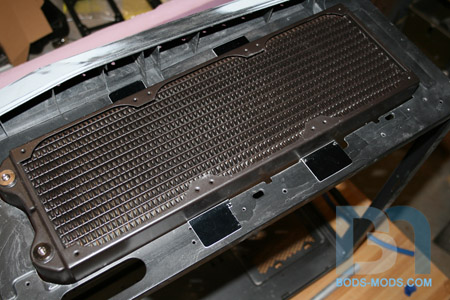 Using my flexible curve to simulate where the top piece will be, you can see how much clearance I will have over the fans once it's all said and done. 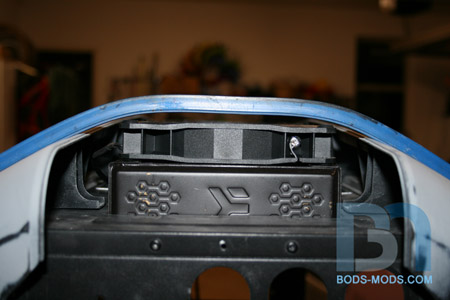 Here's a front shot of the rad & fans. 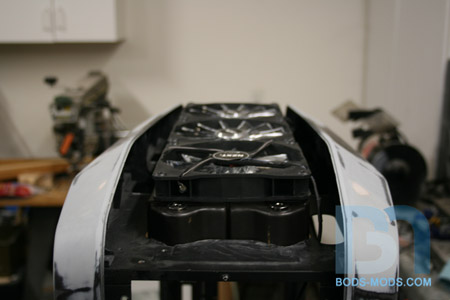 Now comes the major part of the update. I took the plunge and got the side panel laid up with fiberglass today. It was pretty warm the whole weekend, so I figured I'd give it a go. Here's a shot of all the materials I had to acquire: Resin, catalyst, gel coat, curing agent, cabosil (a thickener), assorted brushes, mixing cups, roller, dispersing pump, measuring squeeze bottle, mixer, gloves, and not shown are the paste wax and PVA mold release. 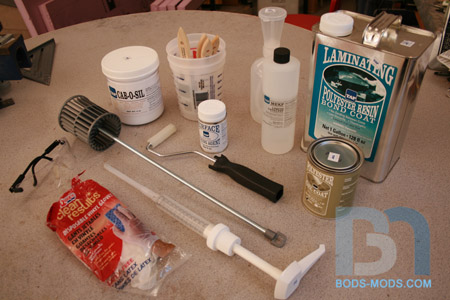 And of course, the fiberglass cloth. I got some heavy duty strand mat and 4oz cloth. 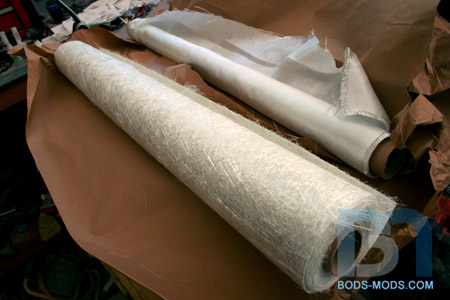 Before I could start any of this, I had to prep the form. After sanding up to 1000 grit, I used some meguire's car polish on it. Then I waxed the whole thing four times. After that, I sprayed it with 2 coats of PVA mold release. That was Saturday. Sunday morning I got the fiberglass cloth pre-cut and clamped the side bezel down around the form. 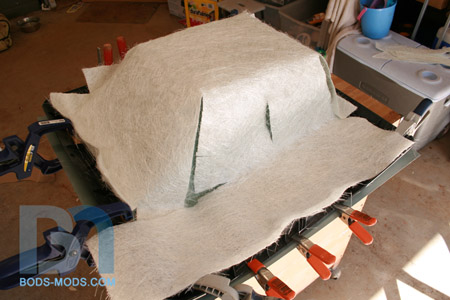 After everything was set up and ready, I started brushing on the gel-coat. This was the point of no return, since the cloth had to go on as soon as the gel-coat was tack-free. Then each subsequent layer of cloth had to follow non-stop until it was finished.  After the gel-coat set up, I mixed up some resin with the cabosil thickener to make a paste, then worked it into the tight corners and overhangs where air bubbles were sure to form.  After the paste, it was time for the first layer of fiberglass. Starting with the heavy duty strand mat, I layed it over the form and added the resin.  This took a good two cups of resin to saturate the mat.  Next layer was the 4oz cloth. Procedure was the same, adding resin where needed, saturating the cloth. 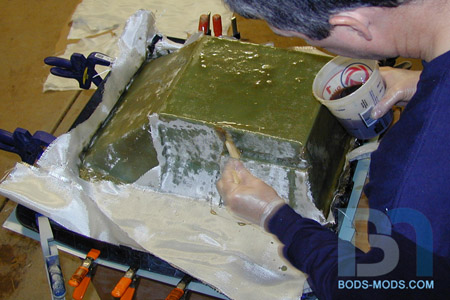 After three layers of cloth, I added a few scrap pieces to reinforce the corners and overlap the joints. Then I mixed up one last small batch of resin, this time with the curing agent, which helps the final surface cure without being tacky. 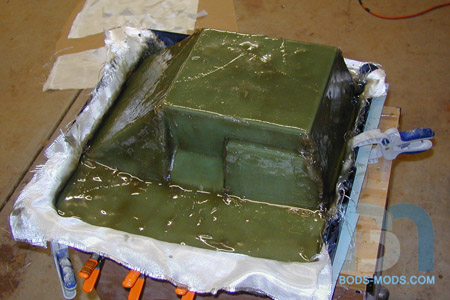 After a few hours under the heat lamps, it was rock hard and smooth. Time to demold! I turned the form upside down and removed the aluminum sheet, exposing the layered foam. 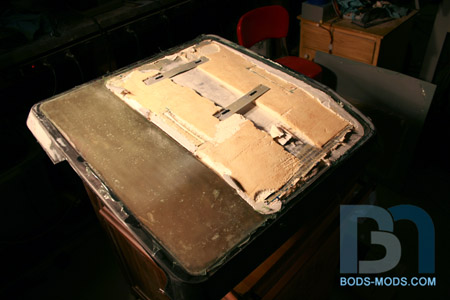 After working the edges, it became apparent I was not going to be able to save the form, so I proceeded to remove it one foam layer at a time. 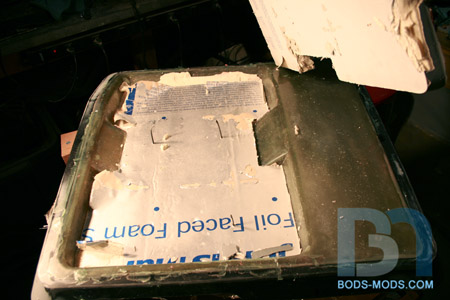 After two layers of foam, I was able to pop the remaining piece of the form out of the fiberglass. 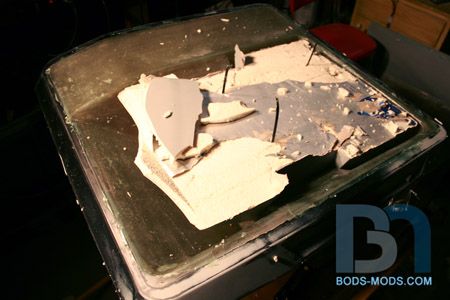 And there ya go. Thanks to the 4 coats of wax and 2 coats of PVA, I had no trouble with sticking. 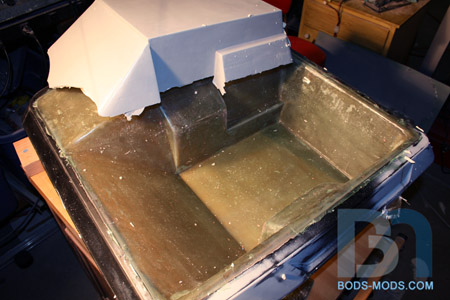 behold! A one-piece fiberglass side panel! 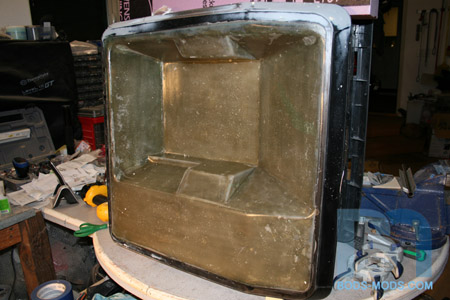 Now this thing is not totally without its flaws. Upon closer inspection, there are countless air bubbles and a few spots where the gel-coat was too thin. But I can mix up some more of the resin paste and fill those areas back in. And I will undoubtedly have a bunch of bodywork to do before this thing is ready for paint. But I think for the most part, it came out really well considering this was my first fiberglassing adventure. :)
|
chump7431
CLASSIFIED Member
- Total Posts : 2074
- Reward points : 0
- Joined: 2008/03/28 20:24:34
- Location: Wisconsin
- Status: offline
- Ribbons : 7
Re:Cosmos Cruizer
2013/02/23 16:14:01
(permalink)
Great Job!!!!! 
Build log +1EVGA X79 DARK, 2 EVGA 780 Classified's, I7 4930K, Custom EK H2O, 16G 2133 GSkill Ram, Corsair AX1200, 900DubsD, Logitech G700-19-35
|
davestune
iCX Member
- Total Posts : 464
- Reward points : 0
- Joined: 2009/01/31 17:17:07
- Location: Cape Cod
- Status: offline
- Ribbons : 4
Re:Cosmos Cruizer
2013/02/23 19:42:50
(permalink)
Bud. you need a hair dryer or heat gun. It pulls the bubbles out of the epoxy. also system 3 is prolly the best you can use.
clear coat is the strongest and mirror coat for the best gloss luster.
also if that is sticky to the touch you can mix a batch up with alittle more hardner in it brush it on and blow it at the same time.
Im a master lure builder and a mad man with an airbrush for custom paint and epoxy.............
P.S awsome work man
  Intel 965 Intel 520 X2 Raid 0 X58 Classic 3 Lian Li case Gskill ripjaws DDR3 9 9 9 24 GTX 680 X2 SLI 900D , X99 Classified, 5930k, 2x 860evo 2 TB ssd 2800 Corsair Platinum, duel loop 480's AX1200I , EVGA RTX 2080 Super , EK waterblock gaming at 4.6 OC
|
Boddaker
iCX Member
- Total Posts : 316
- Reward points : 0
- Joined: 2007/02/09 17:13:09
- Location: Where the beer flows like wine
- Status: offline
- Ribbons : 18
Re:Cosmos Cruizer
2013/02/25 11:03:20
(permalink)
davestune
Bud. you need a hair dryer or heat gun. It pulls the bubbles out of the epoxy. also system 3 is prolly the best you can use.
clear coat is the strongest and mirror coat for the best gloss luster.
also if that is sticky to the touch you can mix a batch up with alittle more hardner in it brush it on and blow it at the same time.
Im a master lure builder and a mad man with an airbrush for custom paint and epoxy.............
P.S awsome work man
Thanks davestune. I have a heat gun, I'll remember to use that for the bubbles next time. I was looking at the System 3 stuff, but it was pretty pricey so I ended up going with the lesser expensive Tap Plastics resin. I added a curing agent to the last coat of resin and it took care of the tackiness. 
|
Boddaker
iCX Member
- Total Posts : 316
- Reward points : 0
- Joined: 2007/02/09 17:13:09
- Location: Where the beer flows like wine
- Status: offline
- Ribbons : 18
Re:Cosmos Cruizer
2013/02/25 11:06:11
(permalink)
Spent a good portion of the weekend cleaning up the side panel. I had to remove quite a bit of fiberglass and resin around the edges where the panel mates up with the case. Small oversight on my part, as I should have taped those areas off so I wouldn't glass over them. Ah well, a few extra hours of work and it now fits back on the case. I also exposed all the bubbles just under the surface so I could fill them in with more resin paste. I should be able to do some filling at some point this week, as it is supposed to be warmer. along with the cleanup, I managed to make a mold of side scoop I made a few months ago. If you recall, I carved the shape out of foam, then covered it with bondo. 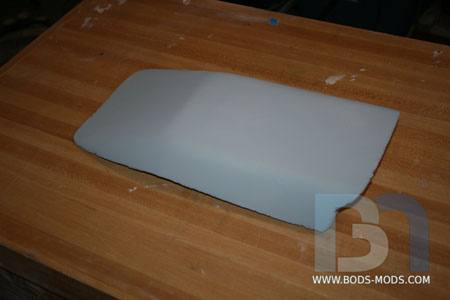 I prepped the scoop in the same way as the side panel form, sanding to 1000 grit, polishing compound, 4 coats of wax, 2 coats of PVA. I glued it down to the back side of the same aluminum sheet I had the side panel form on. Using the epoxy dough, I covered the scoop and let it set up overnight. 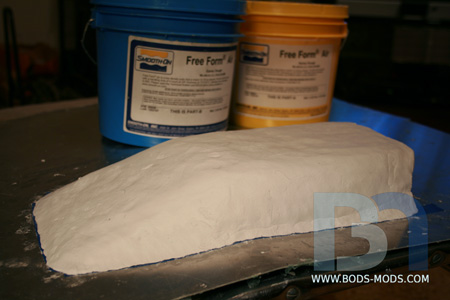 The next morning, I popped it out of the mold. After a bit of cleanup and prep on the inner surface, it will be ready for fiberglass. I'll be able to make both scoops from this mold. 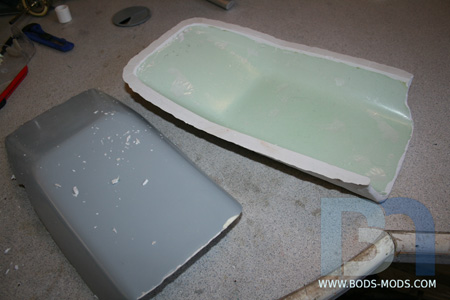 Work continues...
|
Madrias
CLASSIFIED Member
- Total Posts : 4825
- Reward points : 0
- Joined: 2010/03/29 17:46:54
- Location: My space-ship orbiting the moon
- Status: offline
- Ribbons : 6
Re:Cosmos Cruizer
2013/02/25 11:09:28
(permalink)
Can't wait to see more of this epic build!
|
davestune
iCX Member
- Total Posts : 464
- Reward points : 0
- Joined: 2009/01/31 17:17:07
- Location: Cape Cod
- Status: offline
- Ribbons : 4
Re:Cosmos Cruizer
2013/02/25 13:45:24
(permalink)
Boddaker
Thanks davestune. I have a heat gun, I'll remember to use that for the bubbles next time. I was looking at the System 3 stuff, but it was pretty pricey so I ended up going with the lesser expensive Tap Plastics resin. I added a curing agent to the last coat of resin and it took care of the tackiness.
yah I know cost alot but looks awesome if you paint that and use clear coat over what ever you paint , it looks like glass :) gppd job on getting rid of the tackies
Intel 965 Intel 520 X2 Raid 0 X58 Classic 3 Lian Li case Gskill ripjaws DDR3 9 9 9 24 GTX 680 X2 SLI 900D , X99 Classified, 5930k, 2x 860evo 2 TB ssd 2800 Corsair Platinum, duel loop 480's AX1200I , EVGA RTX 2080 Super , EK waterblock gaming at 4.6 OC
|
Boddaker
iCX Member
- Total Posts : 316
- Reward points : 0
- Joined: 2007/02/09 17:13:09
- Location: Where the beer flows like wine
- Status: offline
- Ribbons : 18
Re:Cosmos Cruizer
2013/03/03 12:32:06
(permalink)
Got the first side scoop done yesterday, as well as quite a bit of bodywork done on the side panel. :) I prepped the mold friday night, so I was ready to go first thing on Saturday. Here's a shot after laying down the fiberglass. First layer was the strand mat, followed by two layers of woven roving. 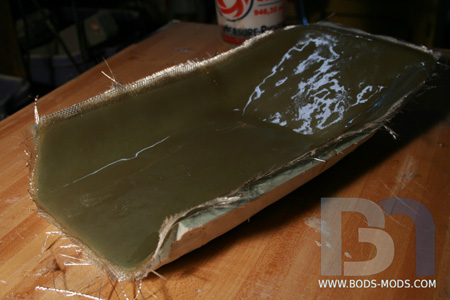 Popped it out of the mold. Had one area where it stuck a bit, so I'll have to repair that before laying up the second scoop. 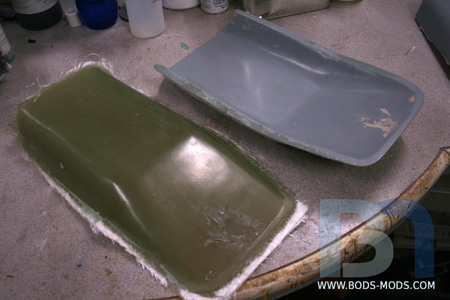 Side by side comparison between the original foam scoop and the fiberglass piece. 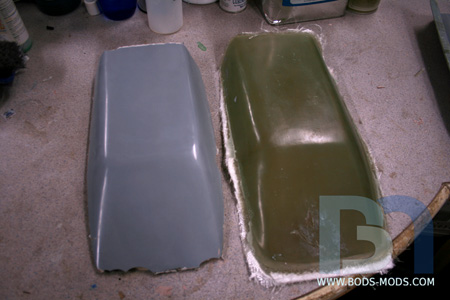 After trimming the scoop, I set it onto the side panel for a test fit. You can also see the bondo work, where I've been filling in the problem areas. I broke through all the bubbles near the surface and filled them back in with resin paste. After grinding them smooth, I went over the areas with bondo. I also went around the whole thing where the fiberglass meets up with the plastic panel and covered up the seam. That large patch of bondo is where I noticed a minor low spot in the fiberglass. I thought I had that part of the form pretty flat, but I guess not! 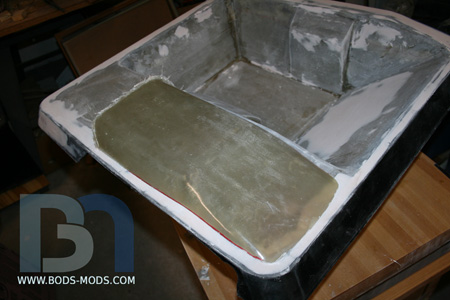 I still have to trim the end of the scoop, and I'm thinking it's a bit too long so I'll take about an inch off.  Once I get it trimmed down to where I want it, I'll cut the fan holes in the side panel and glue the scoop down using some resin paste. Then I'll finish it up with some more bondo. Looking forward to getting some primer on the whole thing so it's one solid color. Hopefully by next week! Thanks for reading. :)
|
kungfulemonade
New Member

- Total Posts : 16
- Reward points : 0
- Joined: 2012/08/02 14:56:33
- Status: offline
- Ribbons : 1
Re:Cosmos Cruizer
2013/03/04 06:27:44
(permalink)
Can't wait to see more this is looking awesome
|
Boddaker
iCX Member
- Total Posts : 316
- Reward points : 0
- Joined: 2007/02/09 17:13:09
- Location: Where the beer flows like wine
- Status: offline
- Ribbons : 18
Re:Cosmos Cruizer
2013/03/14 10:04:25
(permalink)
Last weekend was more family time than modding time, but I did get some additional work done on the side panel, filling, sanding, and trimming. Was having difficulties fitting it back on the case. The fiberglass must have distorted or shrunk the bezel, so I had to trim most of the stock mounting tabs off and add new ones. But now it fits on the frame again, so I can start marking areas that need to be cut away, like the side scoop hole. 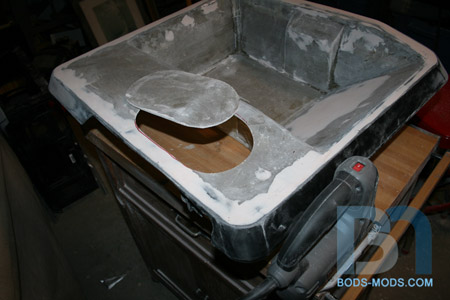 Then I also brought the motherboard in and did a test fit so I could mark all the cable holes. 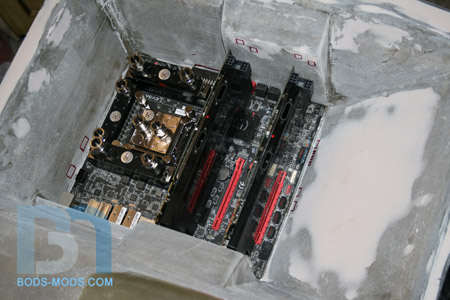 Roughed out the IO plate and video card holes.  I also started on the motherboard mounting, marking those holes. I'll be using some T-nut inserts from the back that will accept the stand-offs, which I will epoxy in place. I should have another update tonight on that. 'Til then!
|
alain-s
Superclocked Member
- Total Posts : 117
- Reward points : 0
- Joined: 2012/06/06 03:31:18
- Status: offline
- Ribbons : 7
Re:Cosmos Cruizer
2013/03/15 01:34:52
(permalink)
Oh man this is really getting better with every Update :D
|
Boddaker
iCX Member
- Total Posts : 316
- Reward points : 0
- Joined: 2007/02/09 17:13:09
- Location: Where the beer flows like wine
- Status: offline
- Ribbons : 18
Re:Cosmos Cruizer
2013/03/18 11:31:33
(permalink)
Thanks alain! Motherboard mounting progress... After marking the holes with a template, I drilled them out, then routed out a wider area for the T-nuts so they would sit flush. 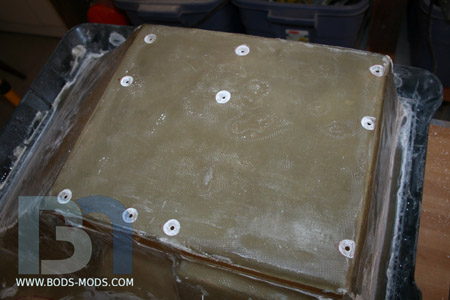 The T-nuts had barbs sticking up that needed to be flattened since they wouldn't be able to penetrate the fiberglass. I also drilled some holes around the outer base to have something for the resin to grab onto when I permanently set the T-nuts in place. 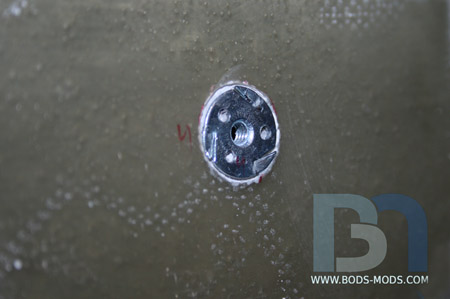 A shot of the motherboard side with a standoff... 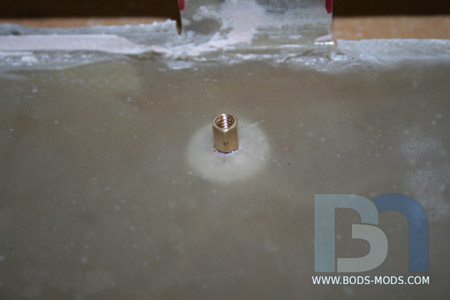 I also got a bit more work done on the access hole cutouts, trimming and filing the edges down, and got another layer of bondo on the low spots of the panel. Which means more sanding grunt work in the very near future. yay! In other news, I picked up more of the pink stuff from Home Depot (had to drive 20 miles to the next town for it since the local HD doesn't carry it :x ). 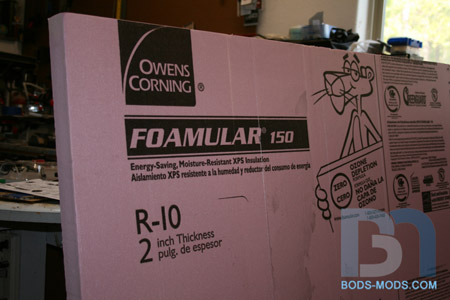 No, I won't be insulating my house with it. ;-) Got more pieces to fabricate, namely the top, front, and back panels. I might even start shaping the top panel this week, as I'm in need of a change of pace after all the work I've been doing on the side panel.
|
rjohnson11
EVGA Forum Moderator

- Total Posts : 85038
- Reward points : 0
- Joined: 2004/10/05 12:44:35
- Location: Netherlands
- Status: offline
- Ribbons : 86
Re:Cosmos Cruizer
2013/03/18 12:21:06
(permalink)
I'm continuing to keep an eye on this....
|
speedbump
Superclocked Member
- Total Posts : 111
- Reward points : 0
- Joined: 2005/12/22 03:24:53
- Status: offline
- Ribbons : 1
Re:Cosmos Cruizer
2013/03/18 15:01:24
(permalink)
I love these kinda builds. Custom building is so much more difficult, but the satisfaction of a job like this is unlike anything else. +1 and subbed.
HEAT Speedbump613 EBAY redskinii  
|
jhansz
Superclocked Member
- Total Posts : 130
- Reward points : 0
- Joined: 2010/09/26 10:42:19
- Status: offline
- Ribbons : 8
Re:Cosmos Cruizer
2013/03/19 20:15:31
(permalink)
great work bro, cant wait to see it in july.
CaseLabs TH10 with windows on both sides Intel I7 2700k Sandy Bridge Evga Z68 FTW Evga GTX 580 Classified 3g Hydro Mushkin Enhanced Redline 16g 2133 9-10-9-27 Corsair AX1200 Gold series Corsair Force GT 120g (x2 in raid 0) Samsung 2tb hd Phobya nano 2g fans (x28) FrozenQ Dual Bay Res.
|
jordan23james
New Member
- Total Posts : 80
- Reward points : 0
- Joined: 2007/10/14 13:13:26
- Status: offline
- Ribbons : 9
Re:Cosmos Cruizer
2013/03/20 00:38:08
(permalink)
jhansz
great work bro, cant wait to see it in july.
Me too!
|
davestune
iCX Member
- Total Posts : 464
- Reward points : 0
- Joined: 2009/01/31 17:17:07
- Location: Cape Cod
- Status: offline
- Ribbons : 4
Re:Cosmos Cruizer
2013/03/20 05:29:34
(permalink)
Can You finish this..
Your killin me :P
Intel 965 Intel 520 X2 Raid 0 X58 Classic 3 Lian Li case Gskill ripjaws DDR3 9 9 9 24 GTX 680 X2 SLI 900D , X99 Classified, 5930k, 2x 860evo 2 TB ssd 2800 Corsair Platinum, duel loop 480's AX1200I , EVGA RTX 2080 Super , EK waterblock gaming at 4.6 OC
|
Boddaker
iCX Member
- Total Posts : 316
- Reward points : 0
- Joined: 2007/02/09 17:13:09
- Location: Where the beer flows like wine
- Status: offline
- Ribbons : 18
Re:Cosmos Cruizer
2013/03/20 10:44:43
(permalink)
Thanks guys! lol davestune patience my friend. :) So I'm taking a breather from all the sanding and filling on the side panel, to do a little foam shaping for the top panel. I think I love this part the most, creating a shape totally from scratch. :) I cut four strips off the main sheet of foam and glued them together, making a solid block that fits in between the two side panels. 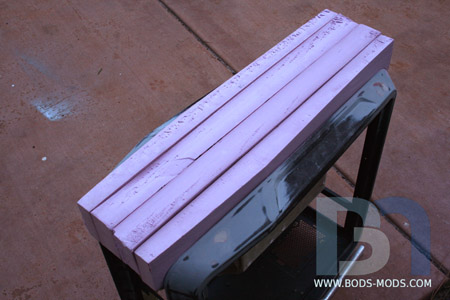 Then I started shaving material off to get down to the basic shape I'm looking for. I want it to follow the contours of the side panels and raise up a bit more in the center to make room for the 420mm EK radiator and fans underneath. 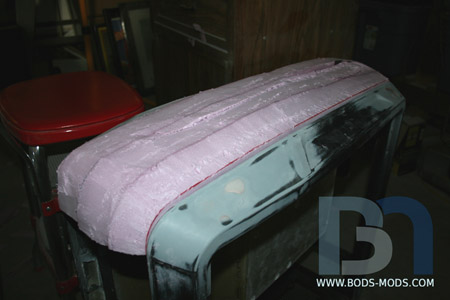 Starting to take shape now. 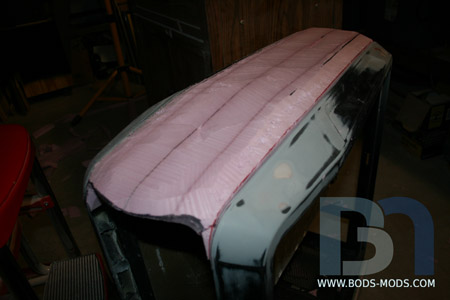 The front of the top panel will have a dashboard hood feel over the lcd screen, which will display EVGA's Precision overclocking utility. 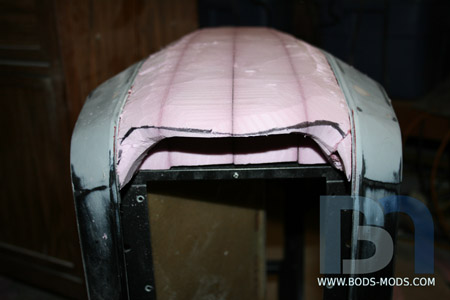 A shot of the other side. 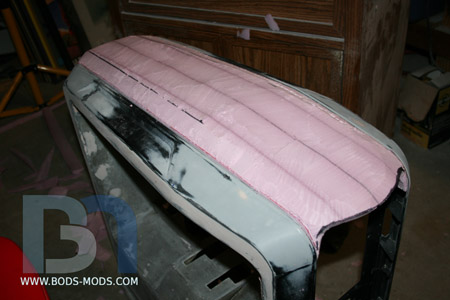 Next I'll be relocating the top bars over the radiator, mounted parallel to each other. The new top panel design will need to accommodate the bars on both ends, so I'll have to work that into the foam as well.
|
ir0nslug
New Member
- Total Posts : 10
- Reward points : 0
- Joined: 2011/02/12 10:02:25
- Status: offline
- Ribbons : 0
Re:Cosmos Cruizer
2013/03/20 11:01:31
(permalink)
|
Boddaker
iCX Member
- Total Posts : 316
- Reward points : 0
- Joined: 2007/02/09 17:13:09
- Location: Where the beer flows like wine
- Status: offline
- Ribbons : 18
Re:Cosmos Cruizer
2013/03/22 10:41:35
(permalink)
Thanks ir0nslug! Got the top bars modded and relocated last night. :) Since the bars would be mounted straight up, I had to get rid of the angled flat ends. 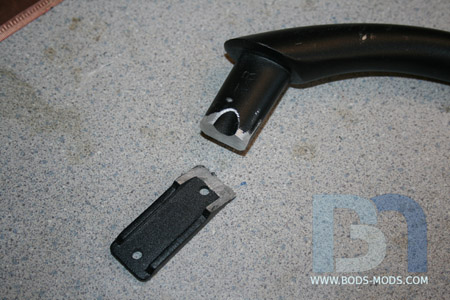 After filing the ends, I drilled and tapped them to accept an 8-32 socket screw. 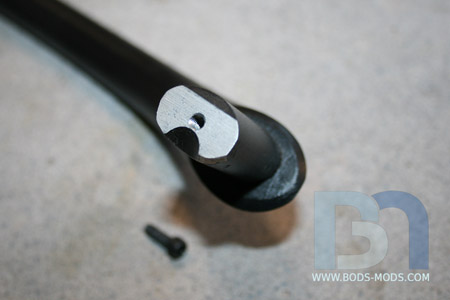 I placed the bars onto the case and adjusted their height with wood blocks until I got them where I wanted them. Then I whipped up a couple mounting brackets from 1/4" flat bar stock. This case will be quite heavy and these bars will need to support the weight, so merely attaching them straight down into the case's top panel wouldn't be prudent, especially now with the 420 rad cutout. These mounting brackets will distribute the lifting forces across to both sides where the case frame is stronger. 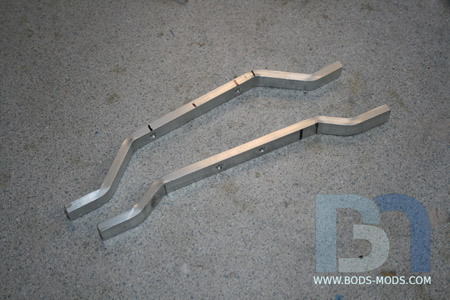 Here are the top bars mounted to the brackets. 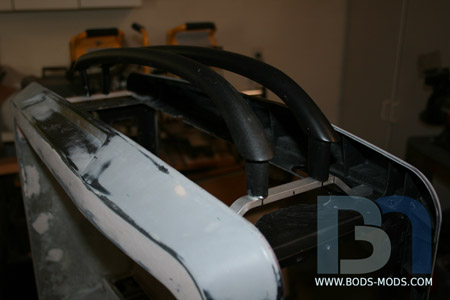 A close up shot of the front bracket. I still need to secure them to the case frame. 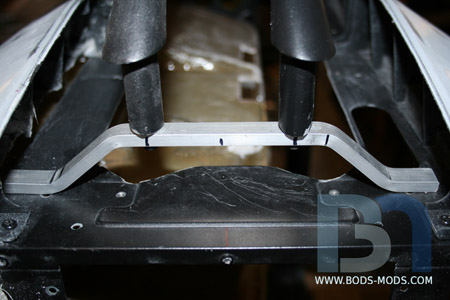 Once I got the positioning of the bars, I used cardboard templates to mark the ends, then transferred those markings over to the foam piece and cut the holes. 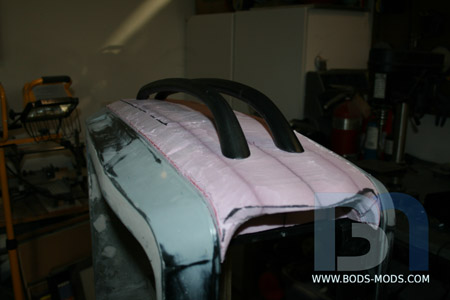 A look-see from the front. 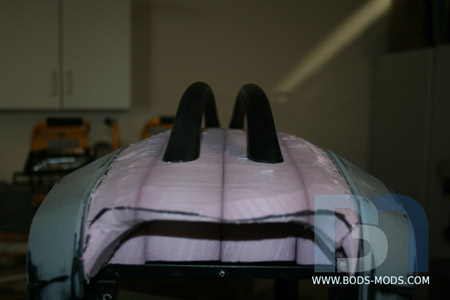 The bars are not completely parallel to each other. I widened the spacing more at the front to go along with the overall look of the case.  Here's a quick wide shot of the whole case from the side.  Now that the bars are in place, I can continue shaping the foam, adding some contours down the center and working around the bar ends. If all goes well this weekend, I might actually get the foam fiberglass-ready. :)
|