ILikeBeans
CLASSIFIED Member

- Total Posts : 2942
- Reward points : 0
- Joined: 2006/05/22 17:27:11
- Status: offline
- Ribbons : 6


Re:Cosmos Cruizer
2013/07/22 20:38:28
(permalink)
Suicide doors aren't just cool, it make way more sense when your case is under desk  yah, that spray foam is nasty. It doesn't clean well, I think you have to pretty much let it wear off. I prefer to wear a space suit if I have to use it  ...anxious to see how you make the window.
W7 Pro 64, MSI X99A Godlike , I7-6850K, EVGA GTX 1080 Ti, G.Skill DDR4 3200MHz 32GB, Samsung 960 EVO 1TB M.2 and 850 EVO 1TB SATA, WD Velociraptor 1TB, Corsair AX1200W, Acer Predator X34 and Oculus.
|
rjohnson11
EVGA Forum Moderator

- Total Posts : 85038
- Reward points : 0
- Joined: 2004/10/05 12:44:35
- Location: Netherlands
- Status: offline
- Ribbons : 86
Re:Cosmos Cruizer
2013/07/23 03:56:06
(permalink)
This build continues to amaze......
|
coolmistry
CLASSIFIED Member
- Total Posts : 2506
- Reward points : 0
- Joined: 2009/04/08 11:13:01
- Location: Hemel Hempstead , London
- Status: offline
- Ribbons : 45
Re:Cosmos Cruizer
2013/07/23 09:53:06
(permalink)
That so great with build on your own super case!! I will keep watching on this until finish building!!!! Keep up good job!!!  
Windows 11 Home 64bits up to Dated i9 11900K 5,328 MHz (3,500 MHz) || EVGA Z590 FTW WIFI || Nvidia RTX 3080 Ti FE || 32Gb Dominator Platinum DDR3 3600mhz XMP OC 3762mhz || 500gb Samsung 980 Pro NVMe || 500gb Samsung 970 EVO and Sata M.2 (1 x SSD and 1xHHD) || EVGA CLCx 360 Cooler || EVGA Supernova 1300w X3 || EVGA Z10 Keyboard || EVGA TORQ X10 mouse ||EVGA DG 77 case || Acer Predator X35 35" 200Hz G-Sync || EVGA Nu Audio Soundcard || Logitech Z906 5.1 system sounds SPDIF|| Kaspersky Internet Security
|
Boddaker
iCX Member

- Total Posts : 316
- Reward points : 0
- Joined: 2007/02/09 17:13:09
- Location: Where the beer flows like wine
- Status: offline
- Ribbons : 18
Re:Cosmos Cruizer
2013/07/23 10:59:46
(permalink)
Now that the door hinge is moved, I need to modify the door frame to accept the new hinge location. This was relatively easy, since I just had to transfer the measurements for the two notches from one side of the frame to the other. 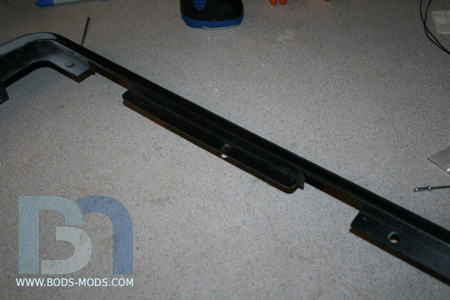 An overall shot of the frame. 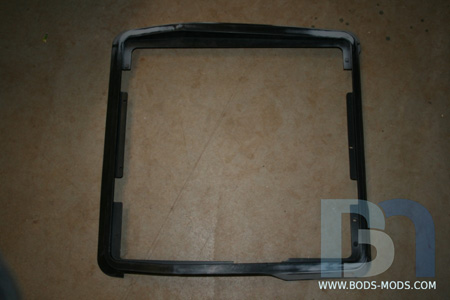 With that done I could mark the hinge locations onto the chassis. 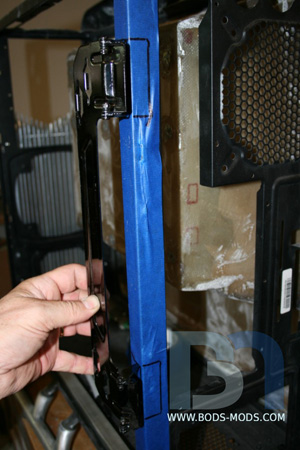 I went to town on the chassis, cutting out the marked areas and fabricating some brackets to fit in behind. This proved quite the challenge, since the bracket's positioning was crucial to having the door line up correctly. 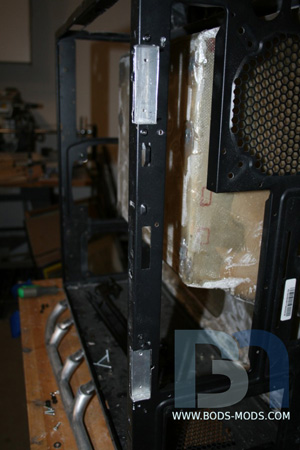 A couple close up shots of the bracket, from the outside... 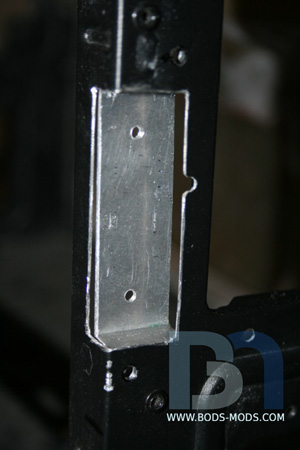 ...and from the inside. 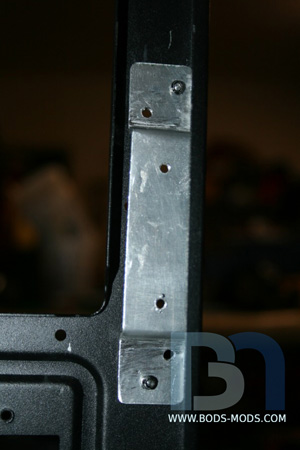 Mounting the hinge... 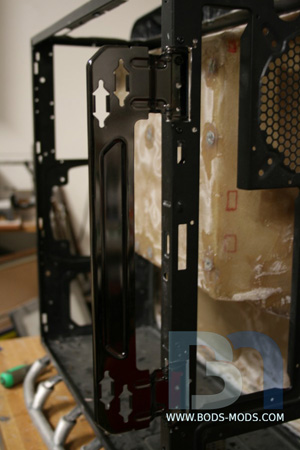 Test fitting with the door frame... 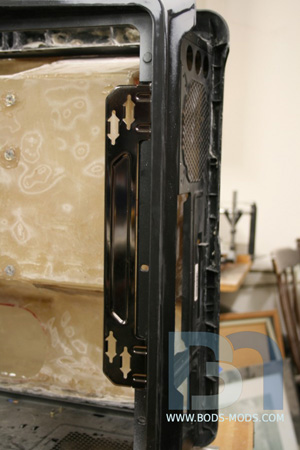 ... and with the door. 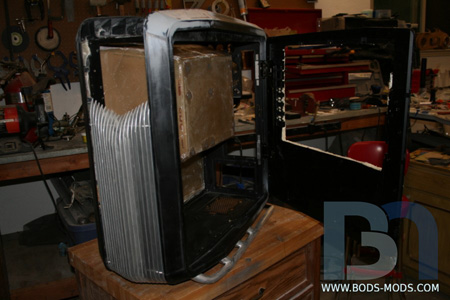 After a few adjustments, I could then permanently secure the brackets to the chassis with black pop rivets. 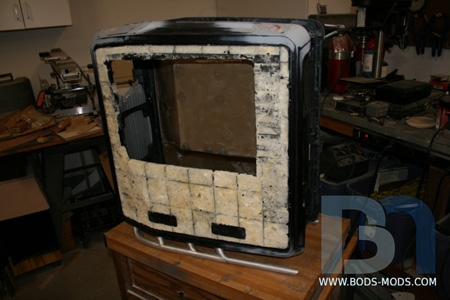 Next step is adding a fiberglass door skin over the foam, unfortunately I ran out of resin and need to order more.
|
staba2009
New Member

- Total Posts : 14
- Reward points : 0
- Joined: 2009/01/24 07:43:14
- Status: offline
- Ribbons : 1
Re:Cosmos Cruizer - Suicide Door
2013/07/23 14:13:02
(permalink)
Amazing project. Keep up the good work.
|
Boddaker
iCX Member
- Total Posts : 316
- Reward points : 0
- Joined: 2007/02/09 17:13:09
- Location: Where the beer flows like wine
- Status: offline
- Ribbons : 18
Re:Cosmos Cruizer - Suicide Door
2013/07/24 11:23:09
(permalink)
Thank you staba2009. :) I also managed to get some more fiberglassing done last weekend as well. It was a fine display of mindful modding multitasking. :) I'd lay down some gel-coat, then work on the suicide door while that was setting up. Then I'd go over and apply the layers of fiberglass, and continue on the door. Here are a couple shots of the second side scoop I made. 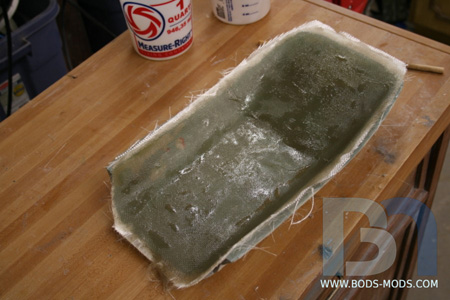 After it cured, I started trimming it down, matching the original. Here is a side-by-side comparison in mid-trim. 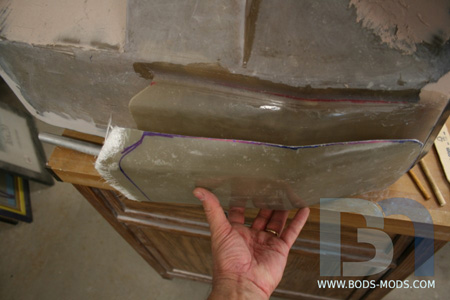 I also made significant progress on the top panel. I was not happy with how the epoxy dough mold came out last time, so I ditched that in favor of a new Plasti-Paste mold. The epoxy dough, as I found out, would not stick to itself which was crucial since I had to make the mold in two parts. So here is the first part of the plasti-paste mold, the top. 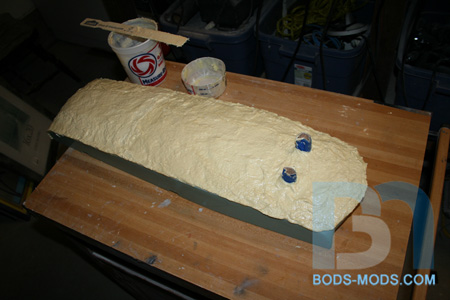 With the top piece fully cured, I could demold it, then proceed to add the sides. I had to do this in two parts because it would be almost impossible to demold it all at once without ruining the original form. 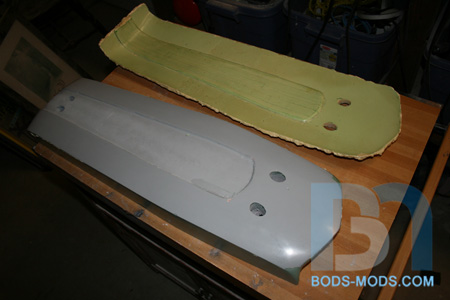 I set the top back on the form and added the sides and front. Once that cured I could demold the entire things as a whole. 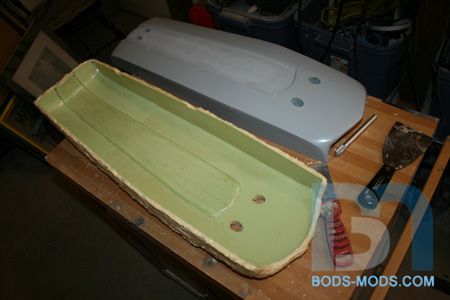 Had a bit of trouble with the fiberglass lay-up this time. I had mixed too much hardener in the resin and it started curing too fast, so I only managed to get two layers of cloth down. And I had just used the last bit of resin so I couldn't mix up any more. It's probably ok, but I think I will want to add some form of reinforcement underneath for strength. I will have to add some mounting posts or something to secure it to the case anyways. 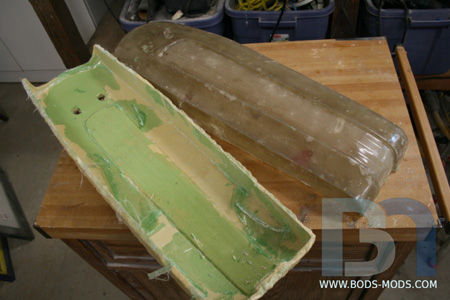 Here's a shot of the top panel on the case. It's not pretty, as it still needs to be trimmed, but I can work with it. 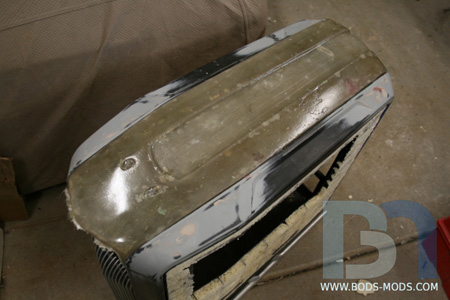 Work continues!
|
Boddaker
iCX Member
- Total Posts : 316
- Reward points : 0
- Joined: 2007/02/09 17:13:09
- Location: Where the beer flows like wine
- Status: offline
- Ribbons : 18
Re:Cosmos Cruizer - Suicide Door
2013/08/08 12:50:36
(permalink)
More progress on the top panel! I got more resin in, so I was able to mix up more paste and fill in bubbles and other problem areas. I also added some temporary dowels underneath in preparation for cutting away the center section. This will reinforce the piece and help retain its shape. 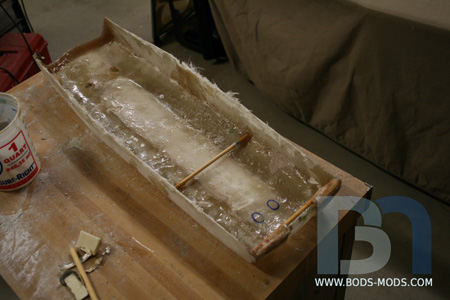 Center section cut out. 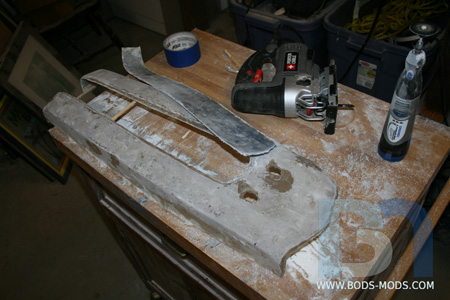 Now I can work the edges and smooth out the lip where the mesh will sit. 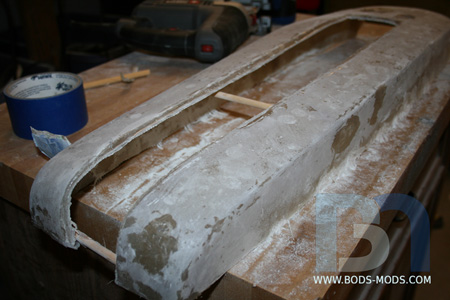 I cut out a piece of mesh roughly to the size of the center area and marked the edges. 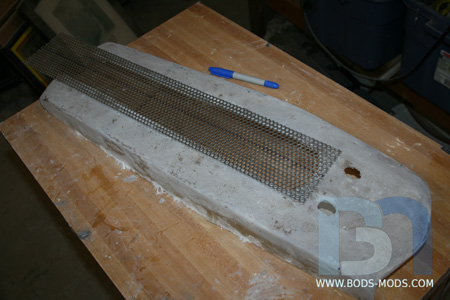 Here's the mesh after cutting and bending the back end down and around the bottom. 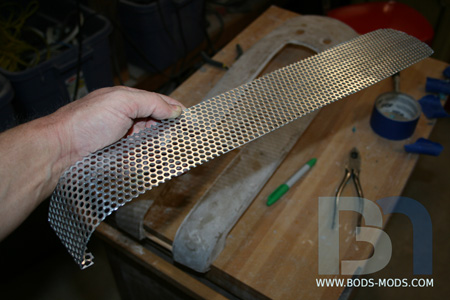 After some additional cutting and filing, I got the mesh to sit flush with the top surface. 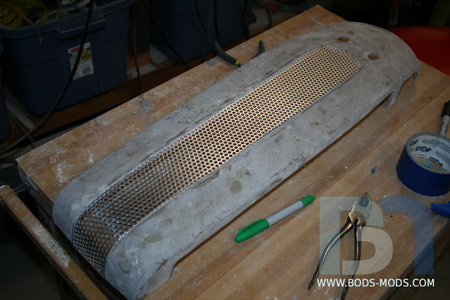 I placed the top panel with mesh onto the case for a look-see. 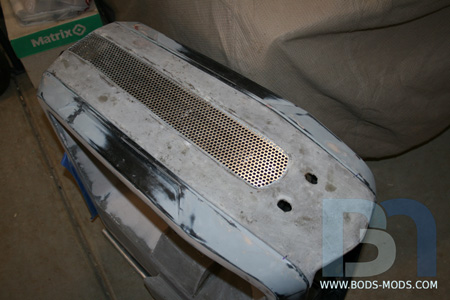 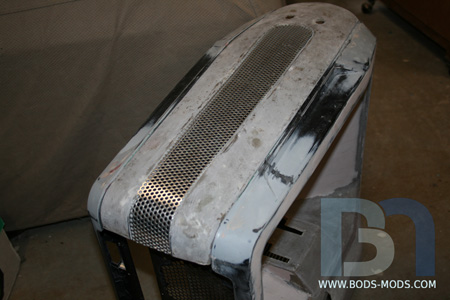 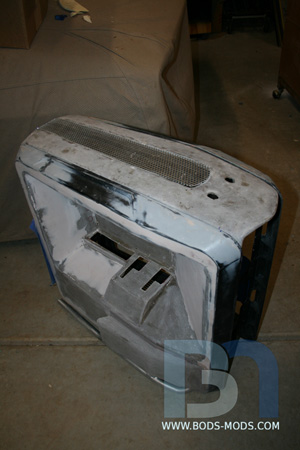 It's getting there! Still have some bodywork to do to smooth it out a bit more, and I have to add holes in the mesh for the top bars. If all goes well, I might be able to get a shot of the whole case this weekend, with everything assembled thus far. Maybe even a coat of primer on it all so its all one consistent color! :shock:
|
davestune
iCX Member
- Total Posts : 464
- Reward points : 0
- Joined: 2009/01/31 17:17:07
- Location: Cape Cod
- Status: offline
- Ribbons : 4
Re:Cosmos Cruizer - Suicide Door
2013/08/09 05:56:31
(permalink)
  Intel 965 Intel 520 X2 Raid 0 X58 Classic 3 Lian Li case Gskill ripjaws DDR3 9 9 9 24 GTX 680 X2 SLI 900D , X99 Classified, 5930k, 2x 860evo 2 TB ssd 2800 Corsair Platinum, duel loop 480's AX1200I , EVGA RTX 2080 Super , EK waterblock gaming at 4.6 OC
|
Boddaker
iCX Member
- Total Posts : 316
- Reward points : 0
- Joined: 2007/02/09 17:13:09
- Location: Where the beer flows like wine
- Status: offline
- Ribbons : 18
Re:Cosmos Cruizer - Suicide Door
2013/08/09 09:21:30
(permalink)
davestune
(O)(o)

post edited by rjohnson11 - 2013/08/09 09:57:40
|
Boddaker
iCX Member
- Total Posts : 316
- Reward points : 0
- Joined: 2007/02/09 17:13:09
- Location: Where the beer flows like wine
- Status: offline
- Ribbons : 18
Re:Cosmos Cruizer - Suicide Door
2013/08/09 10:34:42
(permalink)
Ordered the 4-position key switch from Watson's Streetworks. Super fast shipping, only took 2 days from New Hampshire to CA. 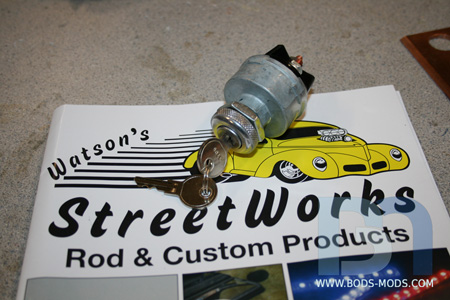 Drilled a 3/4" mounting hole in the front faceplate  And did a quick pre-fit to see how it looks. 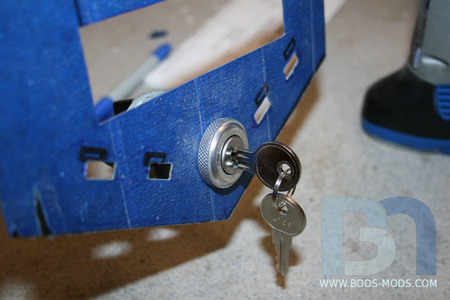 Looks pretty good, however, if I can find a better looking finish nut without the knurled sides, I'll swap this one out. But it will suffice for now. I'm hoping to get the whole front bezel assembled and mounted on the case this weekend, and get the top panel to fit over it. This has been one of the most difficult parts of the build because the top front of the case is where everything meets, and is the most visible, so it has to line up perfectly. Not to mention I'm creating both the top panel and front bezel completely from scratch, which compounds the situation. I predict more trial fits in my near future! :)
|
Boddaker
iCX Member
- Total Posts : 316
- Reward points : 0
- Joined: 2007/02/09 17:13:09
- Location: Where the beer flows like wine
- Status: offline
- Ribbons : 18
Re:Cosmos Cruizer - Suicide Door
2013/08/11 01:41:11
(permalink)
Making more headway on the top panel and its mesh. I wanted to continue the lines from the front grill across the top, so I added some 1/8" aluminum bar to the top of the mesh piece. 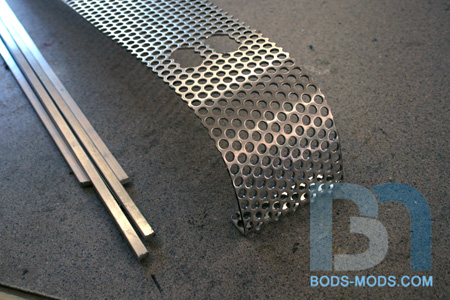 After cutting the bars to length, I proceeded to bend them to match the back curve of the mesh. Looking around the garage, I found a suitable pipe to bend the bar around. 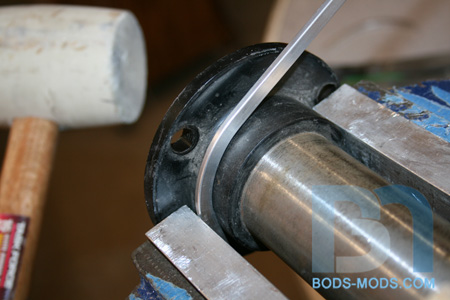 The bend in the mesh is not a perfect circular curve, so I just tweaked the bends until they matched up perfectly. Here's the first bar. 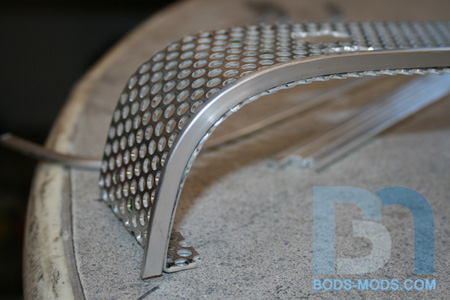 And here are the rest of the pieces for the back, propped up on the mesh for a quick pic. 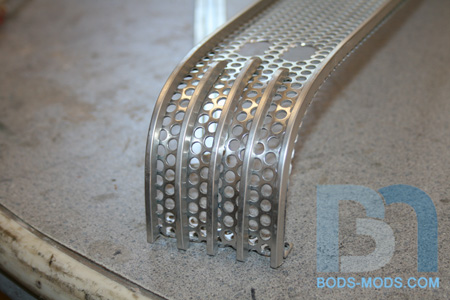 Just had three more easy straight pieces to make for the center. 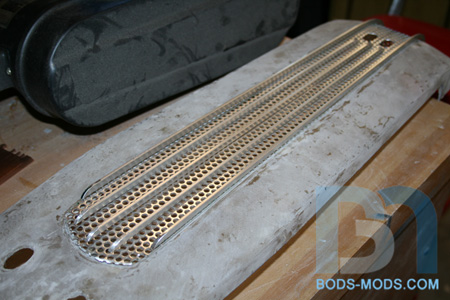 Once all the pieces were made and the ends rounded, it was time to mount them to the mesh. These bars being only 1/8" thick, I had to use very small 2/56 size screws to fasten them down. So out came the 2/56 tap! A small piece of tape on the tap served as my depth gauge so I wouldn't go too far and bottom out. These taps are quite brittle and can break easily. 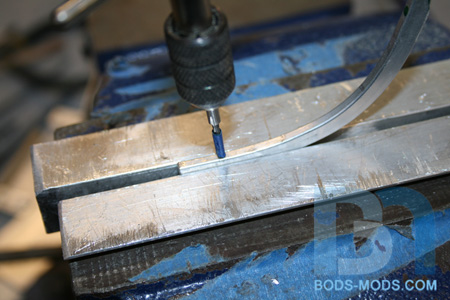 And the resulting tapped hole... 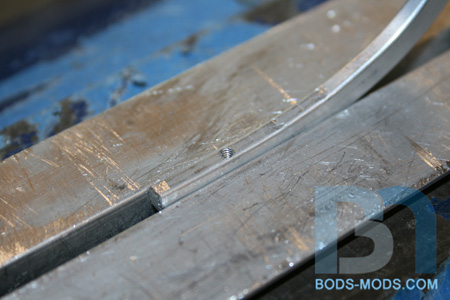 I'm using these tiny screws that have a large head and 1/8" shank, which allow me to use a piece of black acrylic behind the mesh as a backing. 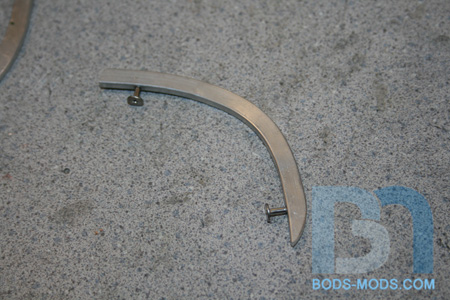 Got all the bars tapped and fastened to the mesh. 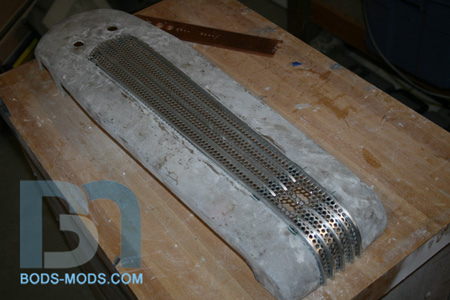 Looks like the back pieces need a little adjustment. 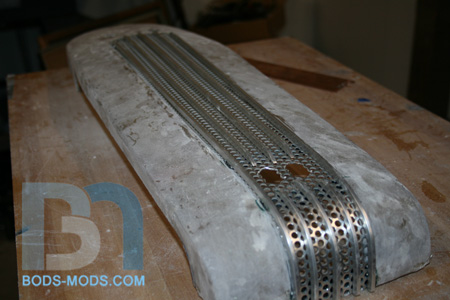 Threw the top main bars on to see how it looks. 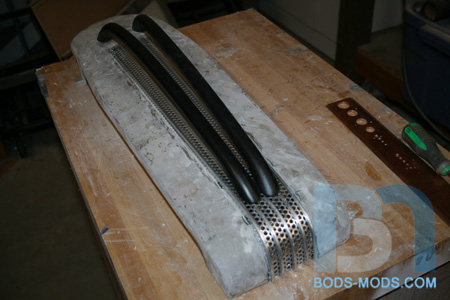 And a shot from the front. I'll need to secure the front part of the mesh down onto the panel so it doesn't stick up like this. The back part will be secured by the main bars themselves since the ends go through the mesh. 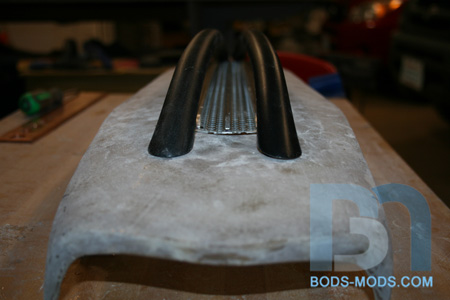 Keep in mind this will look quite different when it's done. The 1/8" aluminum bars will be chromed and the mesh itself will be black, to mimic the look of the front. I'm debating whether to chrome the larger main bars as well, or paint them the same color as the rest of the case. Might make the smaller bars stand out more that way.
|
Boddaker
iCX Member
- Total Posts : 316
- Reward points : 0
- Joined: 2007/02/09 17:13:09
- Location: Where the beer flows like wine
- Status: offline
- Ribbons : 18
Re:Cosmos Cruizer - Suicide Door
2013/08/11 22:12:15
(permalink)
Well, I didn't get to the primer stage, but I did get the top panel and front bezel to play nice together. So I was able to assemble the entire case and get a shot to see how it looks so far. 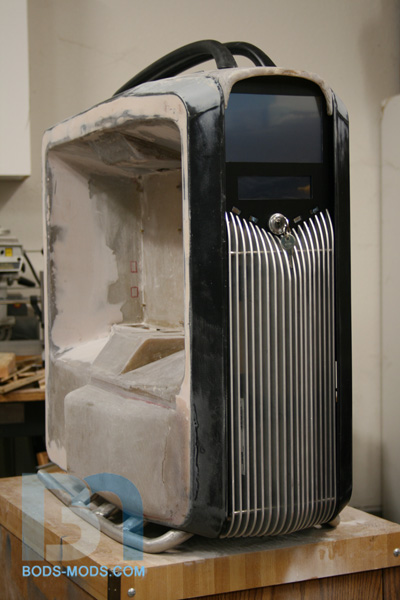 A closer up shot of the front bezel featuring the 7" touch screen LCD, Lamptron Touch fan controller, and ignition key switch. :) 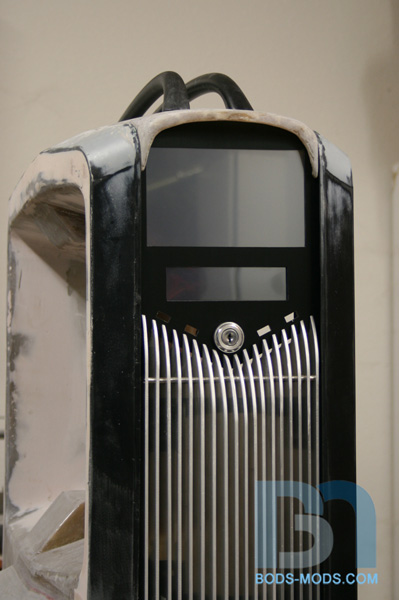 So I guess this week will consist of mainly bodywork and smoothing out the top panel. I may get some time in on the right side door as well.
|
rjohnson11
EVGA Forum Moderator
- Total Posts : 85038
- Reward points : 0
- Joined: 2004/10/05 12:44:35
- Location: Netherlands
- Status: offline
- Ribbons : 86
Re:Cosmos Cruizer - Suicide Door
2013/08/12 06:01:41
(permalink)
Continuing to evolve into a great looking rig
|
Boddaker
iCX Member
- Total Posts : 316
- Reward points : 0
- Joined: 2007/02/09 17:13:09
- Location: Where the beer flows like wine
- Status: offline
- Ribbons : 18
Re:Cosmos Cruizer - Suicide Door
2013/08/26 10:09:16
(permalink)
It's time for Bods-Mods Monday Morning Update... The only proven cure to the case of the Mondays! I was able to get the windowed side panel skinned with fiberglass over the weekend, and the other side scoop attached as well. Before laying down the fiberglass though, I needed to get the window opening dialed in. But before doing that, I had to add pieces to fill in all the open areas on the back side. I want the inside to be totally smooth, so I began adding thin pieces of ABS scavenged from the other door's webbing. These pieces were the perfect thickness to fill in the depression where the door hinge used to be.  I also cut out a couple pieces to fill in the door handle cavities. Since they are on the bottom now, there is no reason to keep them.  I cut the pieces from the other door, just above the holes, so they had the same bends. I beveled the edges so they sat right in.  ...and glued them down. 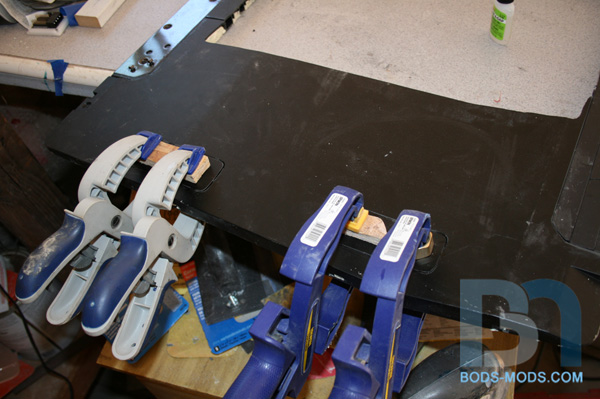 Another section around the window had to be filled in as well. 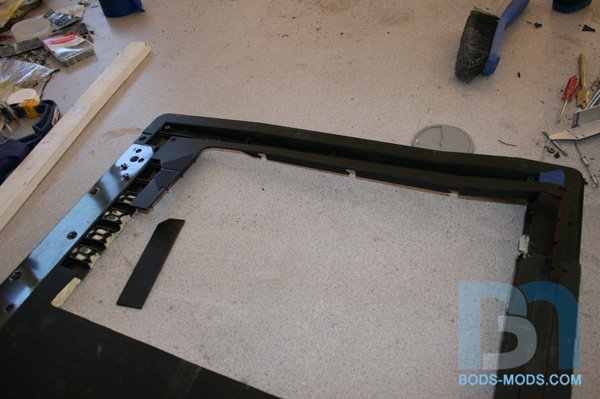 Once these pieces were glued in place, I could fill in the in-between areas with more foam. 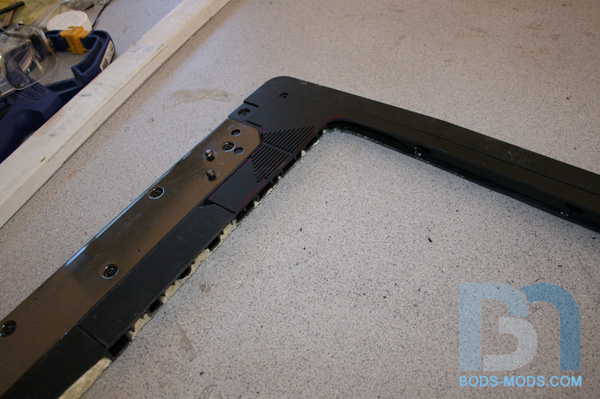 Once I started thinking about the side scoop positioning and where the hole would be, I realized I didn't really need to cover up one of the handle cavities, as it would be cut away. Oh well.  Cut out the hole with my trusty jig saw. 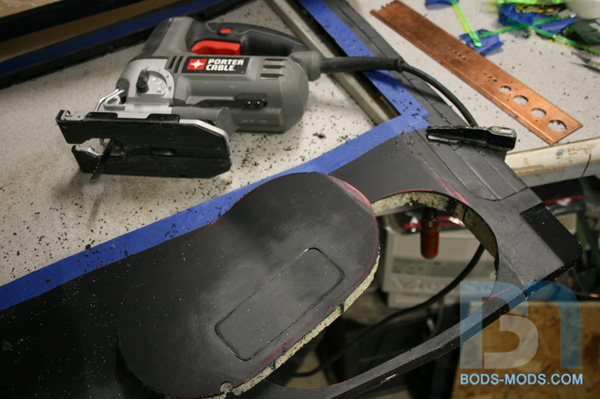 The front side, after filling in all the remaining voids with more foam. I also rounded the window edges with my router, using a 3/8" round-over bit. 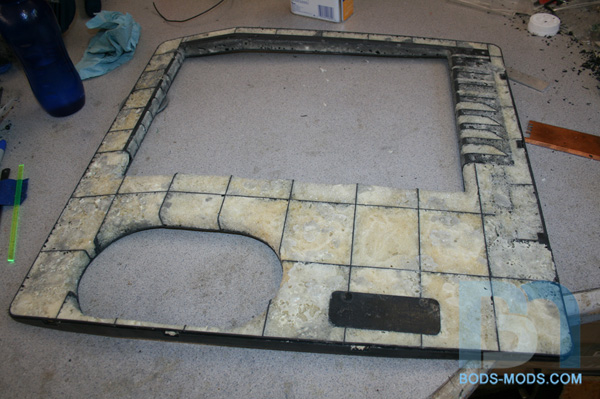 I then cut out a piece of fiberglass cloth to fit. 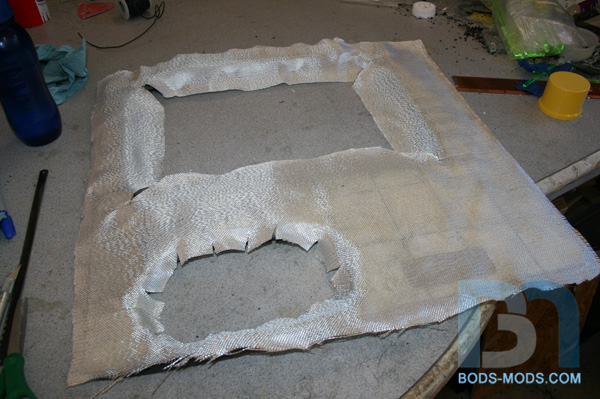 Couldn't pause to get any pics during the lay-up process, so here is the result. I mixed up a batch of resin and used a thickener so it wouldn't run down into the foam too much (spray foam isn't very dense and leaves some bubbles). I taped a piece of cardboard in the window area to give myself an edge to later place the clear window up against. 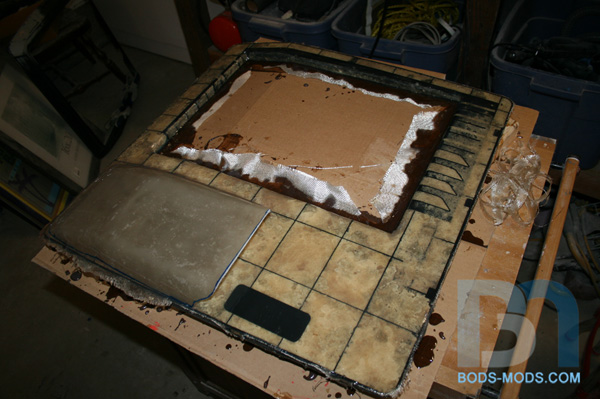 After laying down the cloth, I used the remaining thickened resin to saturate all areas, then Mixed up a smaller batch of resin with a curing agent as a top coat. Once that was on, I set the scoop in place, added more thickener to the remaining resin and used it to reinforce the joint. 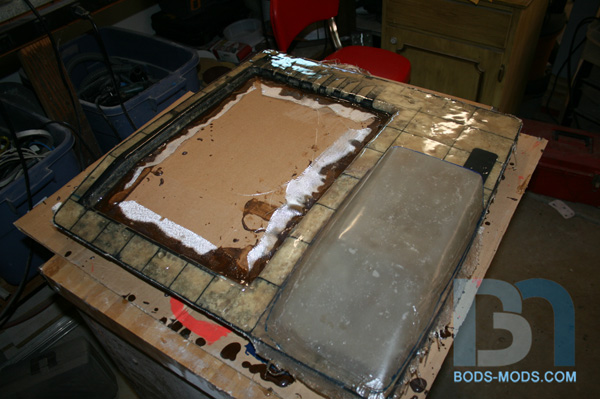 After about an hour, I came back to the door and shaved off all the excess around the edges with a utility knife. The resin hadn't cured fully, so it was relatively easy to trim at this point. 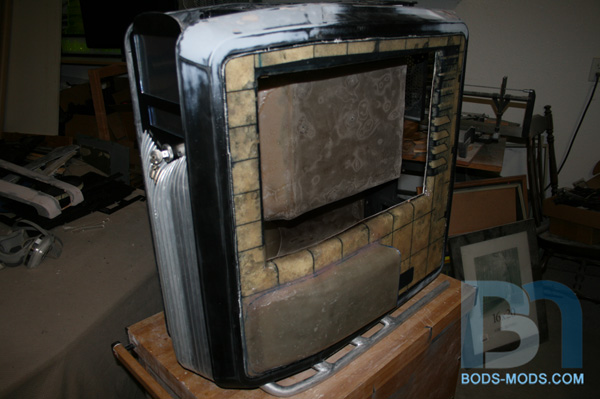 I hung the door on the case to see how it looked. It's hard to tell in pics since the resin is transparent, but it's pretty flat, There are a couple ripples here and there, but that will be taken care of with sanding and adding a bit of filler to flatten it all out.  And with that, I think that is the last bit of fiberglassing I will have to do on this case. I still have one more panel to fabricate, but I will be using aluminum sheet for that (the back panel). Getting closer to starting work on the internals. Can't wait!
|
rjohnson11
EVGA Forum Moderator
- Total Posts : 85038
- Reward points : 0
- Joined: 2004/10/05 12:44:35
- Location: Netherlands
- Status: offline
- Ribbons : 86
Re:Cosmos Cruizer - Suicide Door
2013/08/26 10:26:18
(permalink)
Thanks for the update...I'm continuing to monitor this build.
|
gb091685
New Member
- Total Posts : 67
- Reward points : 0
- Joined: 2012/02/14 03:28:44
- Status: offline
- Ribbons : 1
Re:Cosmos Cruizer
2013/09/09 14:13:44
(permalink)
i7-3770K (not overclocked at the moment) GA-Z77X-UD3H 2 x 8gb Crucial Ballistics Ram Corsair H100i Liquid System EVGA GTX 580 3GB CM Silent Pro 850W 128gb OCZ Vertex SSD, 1TB WD Black Windows 7 64
|
Boddaker
iCX Member
- Total Posts : 316
- Reward points : 0
- Joined: 2007/02/09 17:13:09
- Location: Where the beer flows like wine
- Status: offline
- Ribbons : 18
Re:Cosmos Cruizer
2013/09/10 12:57:21
(permalink)
gb091685
got my subscription
Thanks for following along gb! :) Smallish update, just doing a lil bodywork on the suicide door panel... 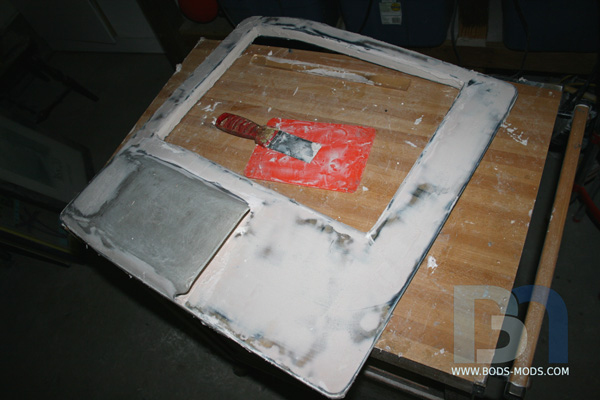 Smoothing it all out on the inside as well.. 
|
rjohnson11
EVGA Forum Moderator
- Total Posts : 85038
- Reward points : 0
- Joined: 2004/10/05 12:44:35
- Location: Netherlands
- Status: offline
- Ribbons : 86
Re:Cosmos Cruizer
2013/09/10 13:01:21
(permalink)
Nice, keep up the great work
|
Boddaker
iCX Member
- Total Posts : 316
- Reward points : 0
- Joined: 2007/02/09 17:13:09
- Location: Where the beer flows like wine
- Status: offline
- Ribbons : 18
Re:Cosmos Cruizer
2013/11/20 01:31:35
(permalink)
Dang, another two months have just flown by again. Can't seem to stay consistent on this project, as other things keep taking precedence. Just gotta continue pluggin away at it as time allows, and it will get done eventually. :) Anyway, I finally accumulated enough pics to warrant an update. I've been working on this wc manifold since like February, and it's gone through numerous re-designs to get to it's current state. What started out as a simple laminated piece is now a multi-section, multi-directional part incorporating rigid acrylic tubing and stainless steel braided lines! But let's start with the rigid tubing. Primochill recently came out with a whole line of rigid acrylic tubing, and I just had to work it into this build somehow. So I got some of the amber tubes with the special 1/2" rigid fittings. 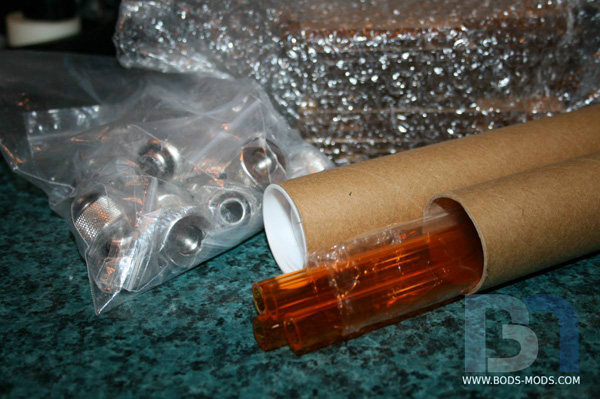 They also included a piece of the silicone rubber hose that fits into the tube to aid in the heat bending process. I made a quick and dirty bending jig that enabled me to get any 90° radius I need, using whatever pipe or cylinder I may have on hand.  For the tighter bends, I made a helper mold to keep the tube from flattening out. 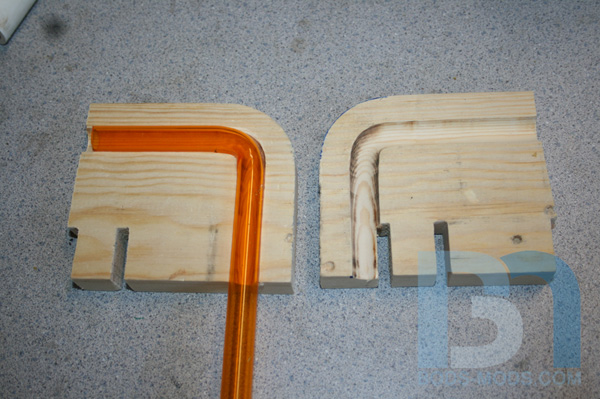 About a week after getting the regular fittings, Primochill announced their new badass Revolver style fittings, so I had to grab them.. 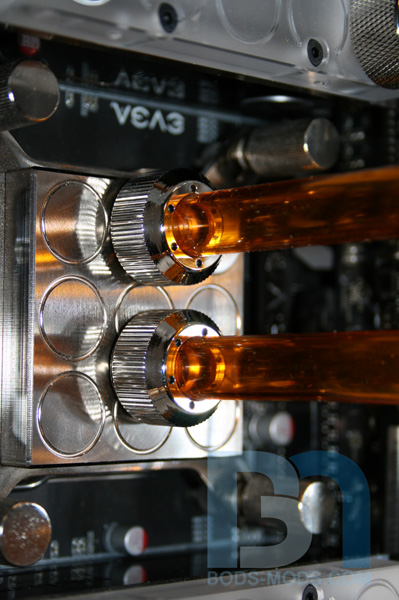 Getting the hang of heat-bending. 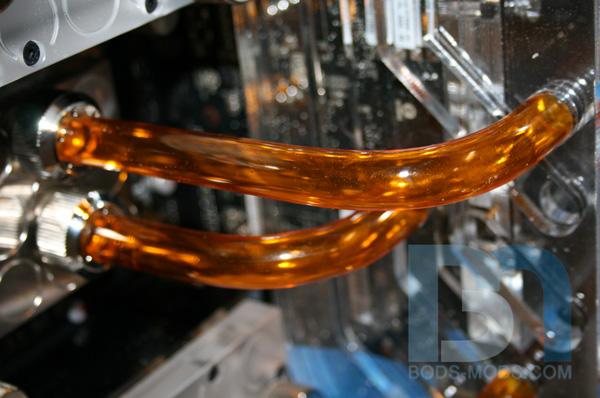 After a few bends, it became apparent that I would have to finish gluing the manifold together so I could get more accurate measurements between it and the motherboard blocks. So I turned my attention onto that. 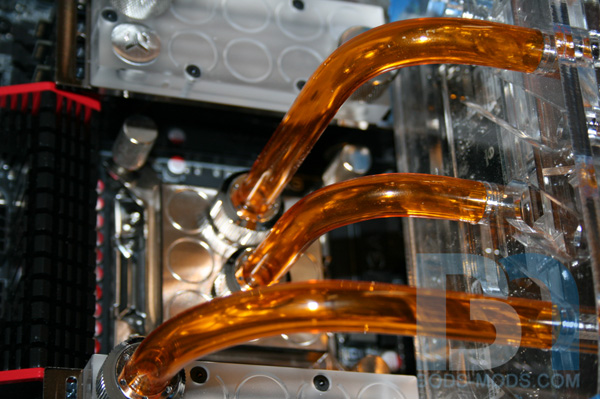 The manifold accommodates two separate loops.. One for the motherboard blocks, and one for the video cards. The manifold will replace the SLI adapters from EVGA's Hydro Copper blocks, so I took measurements from them and transferred the holes. 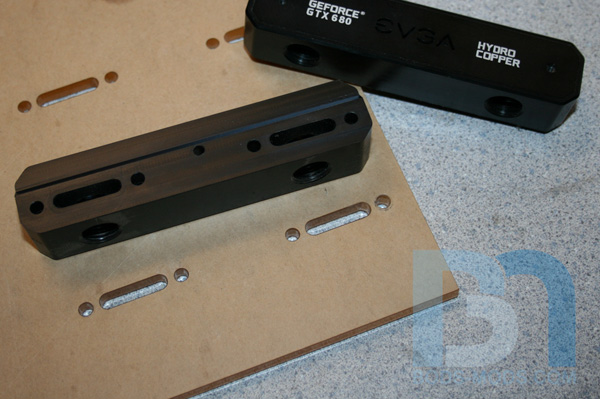 Here are the two pieces, after much alterations and revisions. The smaller section on top will mount directly to the hydro copper blocks and will fit into a notch in the larger part, which will be mounted vertically next to the first video card. 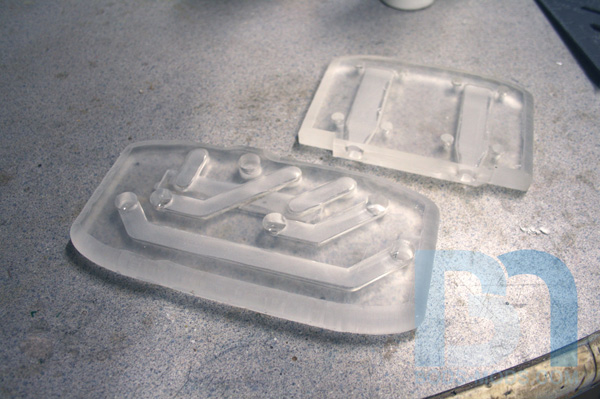 They fit together like so... 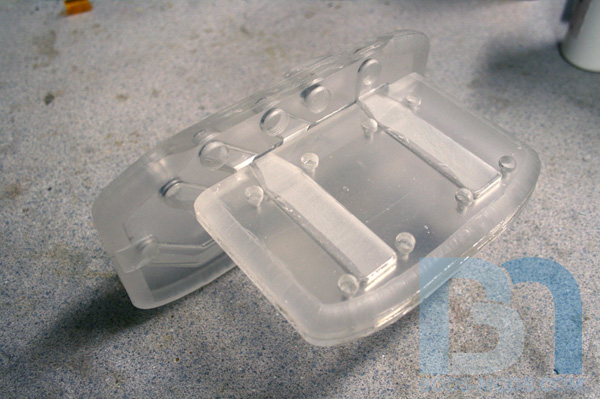 The steel braided lines are the main feeds to and from the pump, rads, etc... via quick disconnects that will pass through the fiberglass panel. 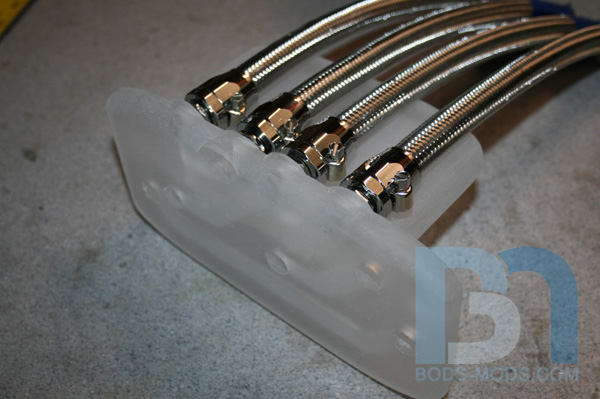 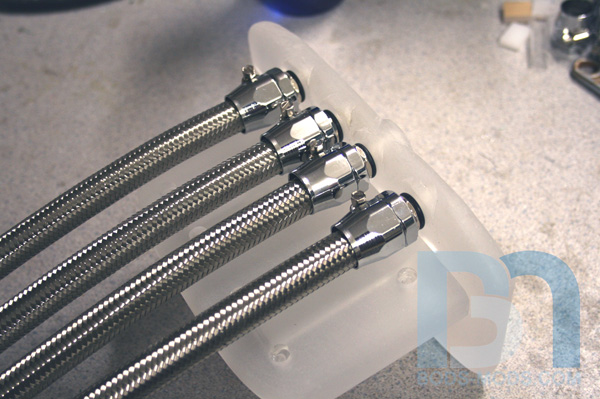 As a final shot, I fitted the rigid tubing into the manifold. 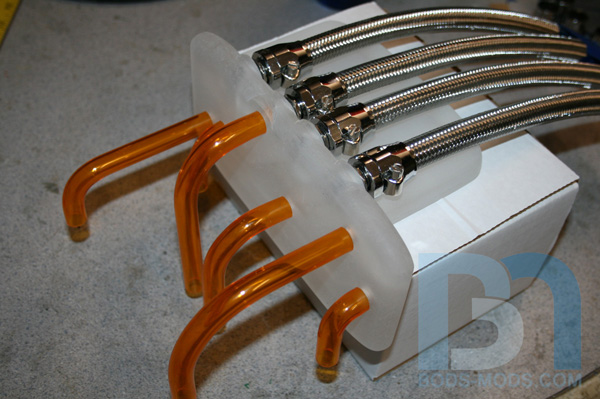 Once I finalize the rigid tubing and everything fits perfectly, I will mount the quick disconnects into the fiberglass panel. Then I can cut the steel braid to length and finish them off with the same chrome hose ends. Hoping to tackle that this week, and then I can start plumbing out the back side.
|
nosilla
New Member
- Total Posts : 60
- Reward points : 0
- Joined: 2007/10/25 12:12:36
- Location: Humboldt
- Status: offline
- Ribbons : 3
Re:Cosmos Cruizer
2013/11/20 05:16:55
(permalink)
holy hell! this is awesome.
i7 975 Extreme 4.4ghz @ 1.4volts Evga x58 SLI motherboard Evga 780 GTX 3gb SLI G.Skill 12gb DDR3 @ 1600mhz EVGA 1300 watt G2 PSU 
|
rjohnson11
EVGA Forum Moderator
- Total Posts : 85038
- Reward points : 0
- Joined: 2004/10/05 12:44:35
- Location: Netherlands
- Status: offline
- Ribbons : 86
Re:Cosmos Cruizer
2013/11/20 05:21:21
(permalink)
Post 109 looks awesome. I wish I had those skills!
|
Gold Leader
CLASSIFIED Member
- Total Posts : 3955
- Reward points : 0
- Joined: 2009/05/30 03:06:17
- Location: Dirksland, The Netherlands
- Status: offline
- Ribbons : 65
Re:Cosmos Cruizer
2013/11/20 05:49:28
(permalink)
|
drake187
iCX Member
- Total Posts : 372
- Reward points : 0
- Joined: 2009/09/25 13:59:28
- Location: durty jerz
- Status: offline
- Ribbons : 4
Re:Cosmos Cruizer
2013/11/24 12:16:10
(permalink)
Wow speechless keep it up
|
LCRava
SSC Member

- Total Posts : 572
- Reward points : 0
- Joined: 2005/10/23 14:23:52
- Status: offline
- Ribbons : 8
Re:Cosmos Cruizer
2013/11/24 15:22:27
(permalink)
This is incredible. Awesome build!
MY AFFILIATE CODE: X6EXZ64PSH "I don't always GAME in 4K, but when I do, I prefer 4 TITANS" 
|
Boddaker
iCX Member
- Total Posts : 316
- Reward points : 0
- Joined: 2007/02/09 17:13:09
- Location: Where the beer flows like wine
- Status: offline
- Ribbons : 18
Re:Cosmos Cruizer
2013/12/22 01:48:55
(permalink)
Crap, another month gone by! I've been making progress here and there, but mainly on the back side and mounting things like the lower radiator and pumps. So let's get to it! First thing I needed to do was make a sub-floor. This cleans up the area and allows for some stealthy cable management. 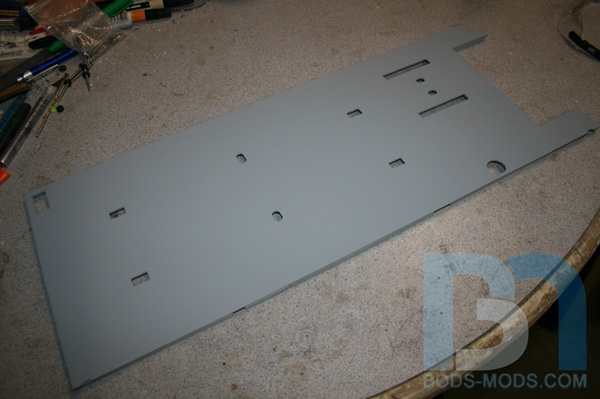 I cut the floor to fit, then added various holes for mounting and cable access. 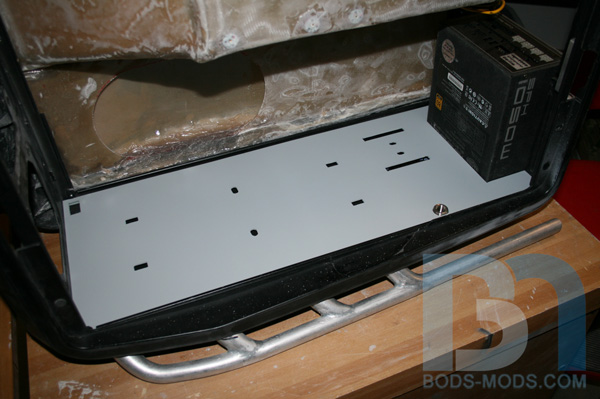 I also installed a pass-through fitting from Koolance, to serve as a drain for the WC system. 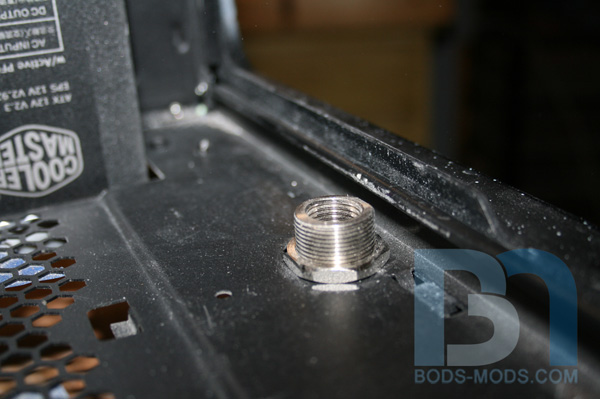 Here's a shot from below. I added a 45º elbow to clear the side bezel. 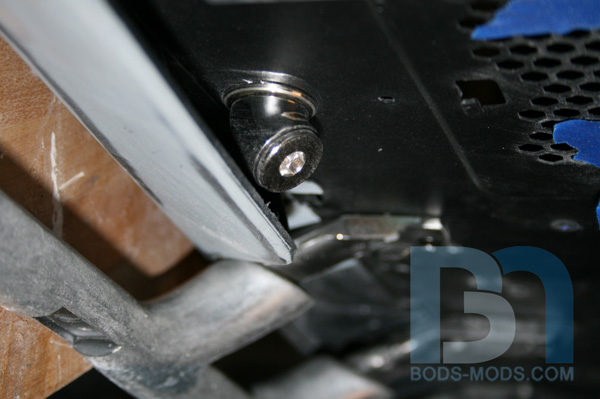 A close-up shot of the floor with drain hole.  Now that the floor was done, I could move onto the mounting system for the lower radiator. I wanted something simple, yet stealthy. So I fabricated some aluminum posts that make use of the fan's mounting screws. 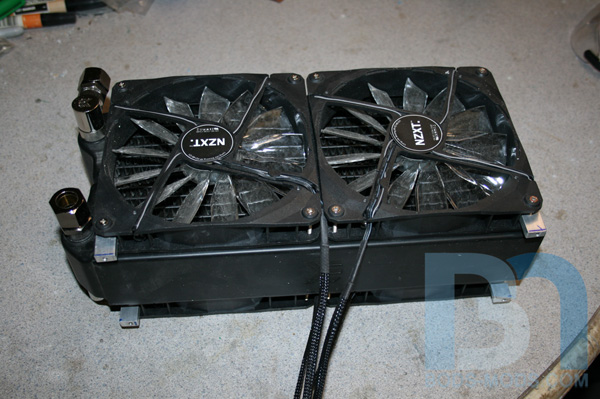 A closer up view shows the 3/16" tube that runs through the aluminum post. It's a pretty tight fit, so it doesn't float. 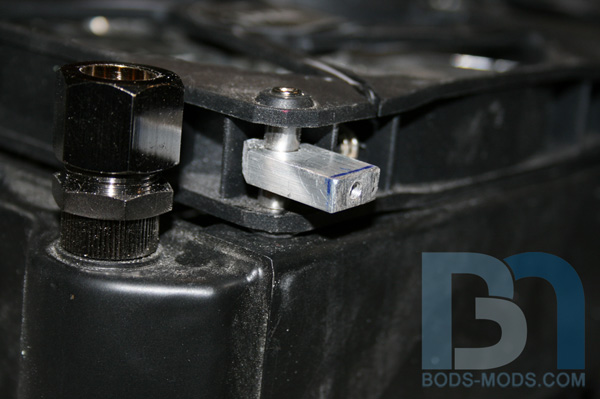 With the radiator in place, you can't really see the posts at first glance. 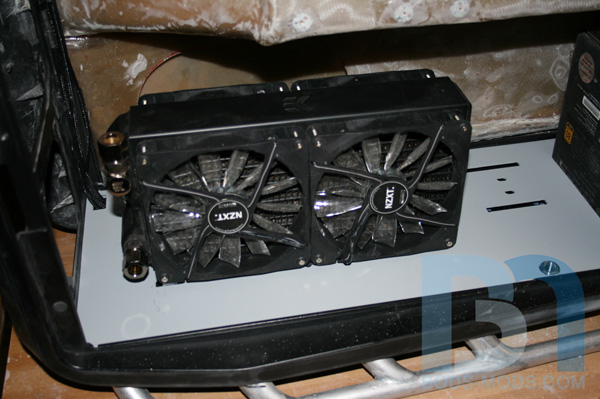 The posts go through the floor and fasten to the bottom panel with standard 6-32 case screws. 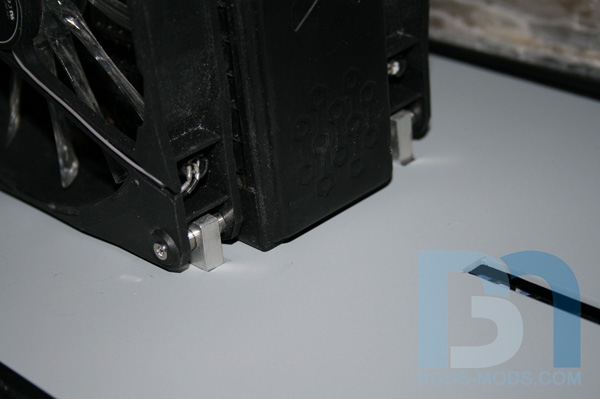 I made sure to include some cable access holes in between the fans on each side of the rad. 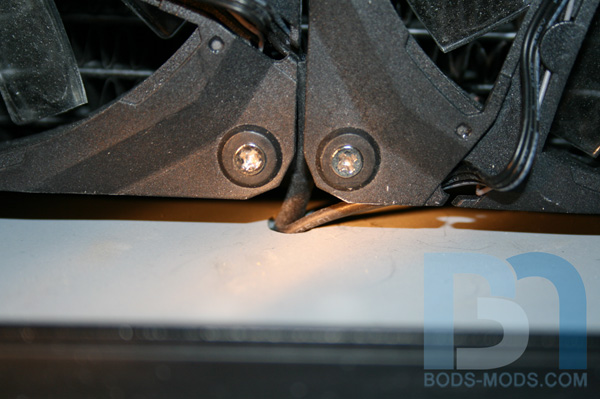 They travel under the floor to the front corner, where the cables will come up to the Lamptron Touch fan controller. I'll need to get (or make) a 3pin 4-way splitter to complete the connection. 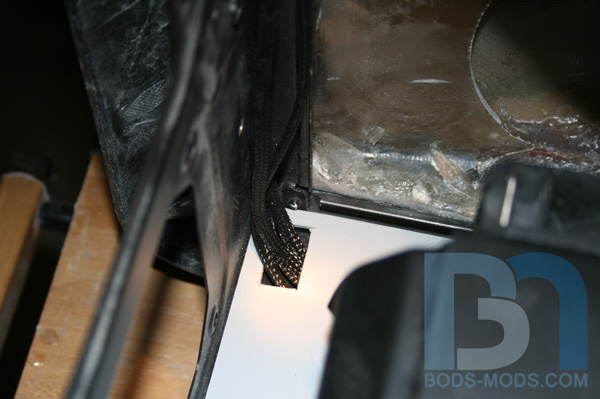 Next up will be the pump mounting, and some pipe bending. Stay tuned!
|
Boddaker
iCX Member
- Total Posts : 316
- Reward points : 0
- Joined: 2007/02/09 17:13:09
- Location: Where the beer flows like wine
- Status: offline
- Ribbons : 18
Re:Cosmos Cruizer
2013/12/23 00:12:34
(permalink)
Ok, time to mount the EK pump top and D5 pumps, however, I did not want to use conventional bracketry. Keeping with the automotive theme, I looked at various oil system setups and noticed how there was a striking resemblance to a dual oil filter system. So I devised a mounting method that replicates that look. Of course I had to incorporate the requisite amount of chrome, so I found the perfect donor item for the pump covers: a 2 1/2" chrome exhaust tip! :D I wasted no time cutting it up into two equal lengths. 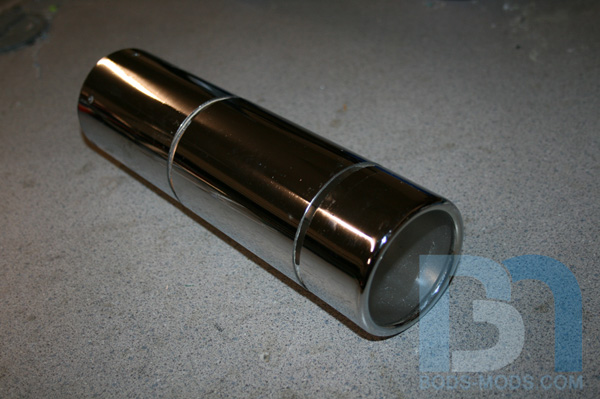 For the actual mounting, I used a piece of left-over 3/8" acrylic, cut it in half and drilled/tapped some holes. 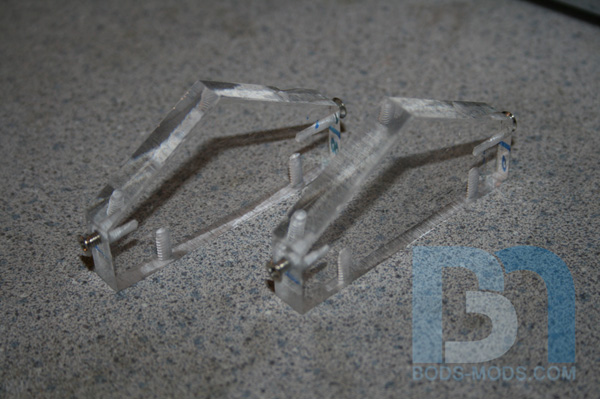 They fit snuggly inside the covers. Some tiny flush-mount screws hold them in place.  The covers fit loosely over the pumps, so I had to add some o-rings to take up the extra space. 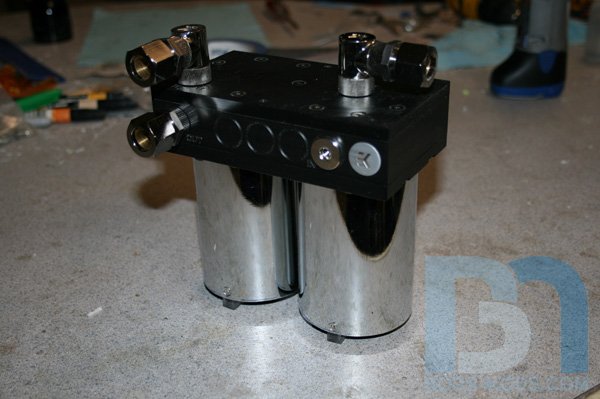 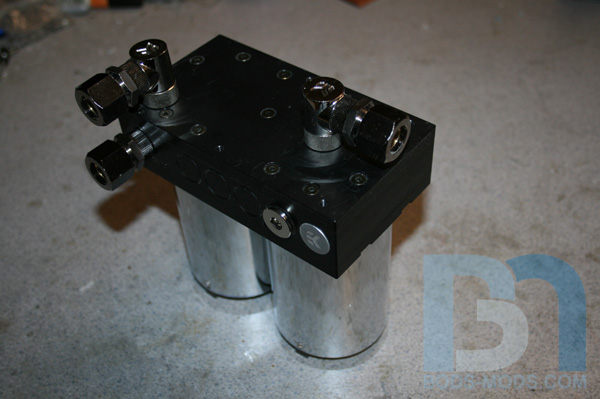 I cut slots into the sub-floor so the acrylic mounts would slide right in. They're secured to the bottom panel with a couple case screws. 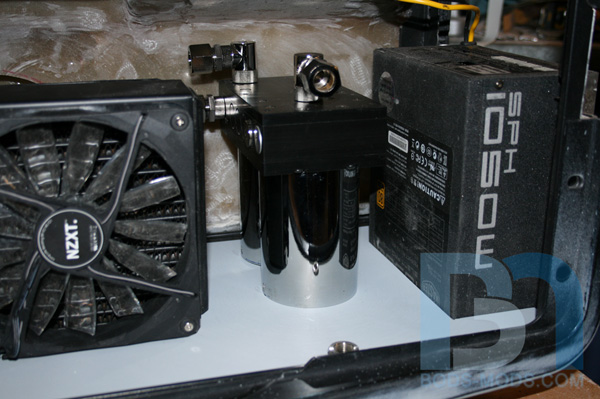 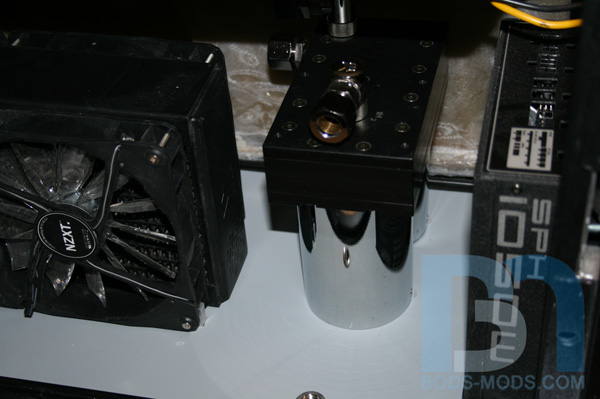 So with the lower rad and pumps mounted, I could finally start running some stainless steel tubing! Using the bender is a bit tricky, but after a few practice bends, I got the hang of it. 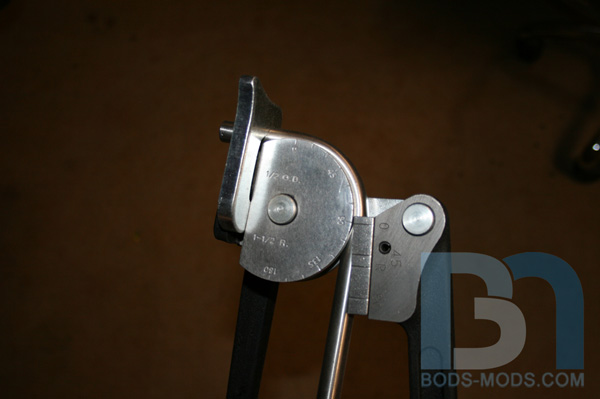 A pipe cutter is way better than a hack saw or dremel for cutting tubing. Well worth the money! 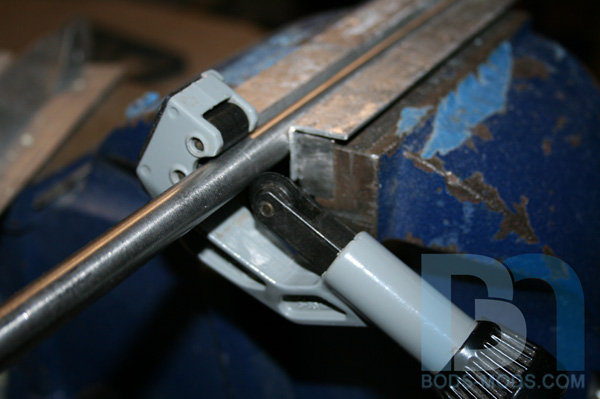 This is the lower drain pipe going from rad to drain. 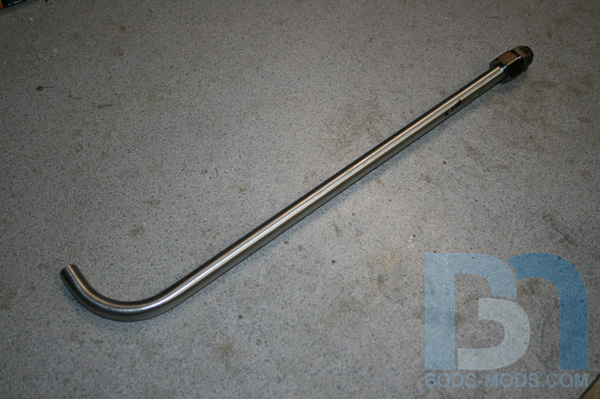 Pipe in place. I'm not tightening anything down just yet, since I still have much to do before final assembly. 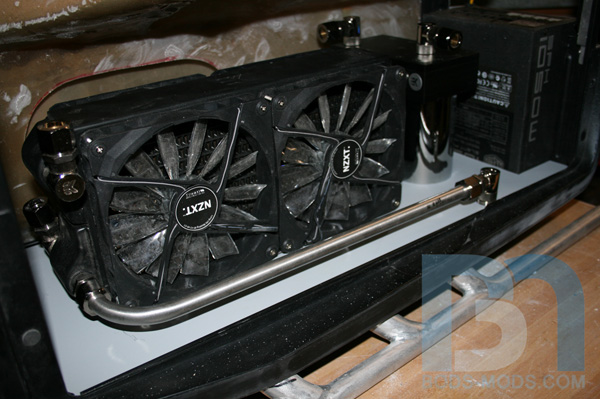 Next piece was the reservoir-pump feed line, which is just a simple 90º bend. 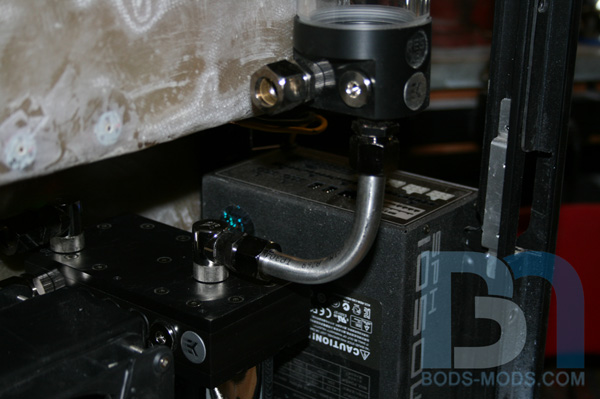 Another angle showing both pieces. I'm liking the look so far! 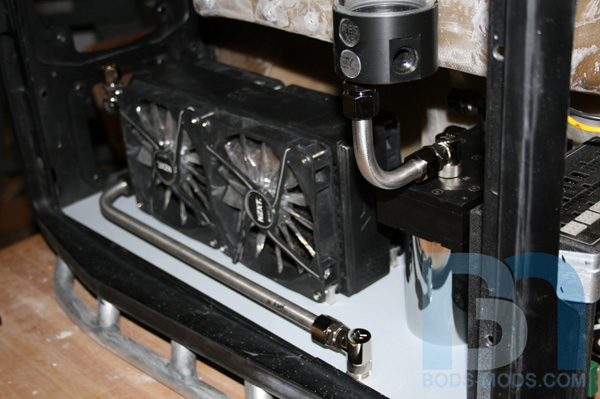 The next pieces will be a bit more challenging, with compound bends on the longer runs. Should be fun!
|
Boddaker
iCX Member
- Total Posts : 316
- Reward points : 0
- Joined: 2007/02/09 17:13:09
- Location: Where the beer flows like wine
- Status: offline
- Ribbons : 18
Re:Cosmos Cruizer
2013/12/29 21:48:43
(permalink)
Ok, time for another update! Today I'll show you what I did to this poor power supply lol. As I mentioned on Facebook, I was not phased by the little sticker covering up one of the screw holes, put there by some dude named Warren T Void. :P Upon removing the cover, I proceeded to cut pretty much the whole top and end away. Since the case has rounded corners, I needed to do the same to the PSU cover in order for it to fit as close as possible. I'm also replacing the stock 130mm fan with a 140mm NZXT orange led fan, which will be mounted directly to the back panel. 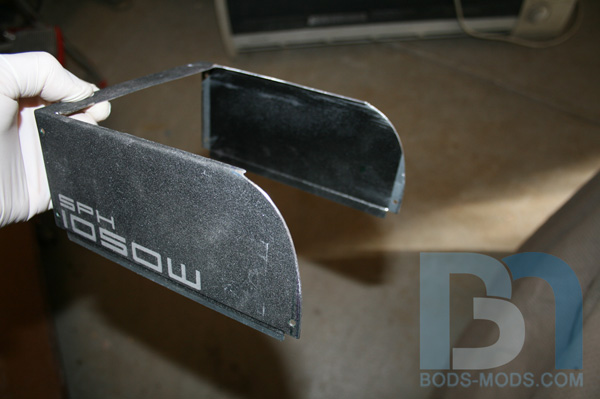 The power switch and plug will be relocated to a custom IO panel, so I cut the main wires and extended them. 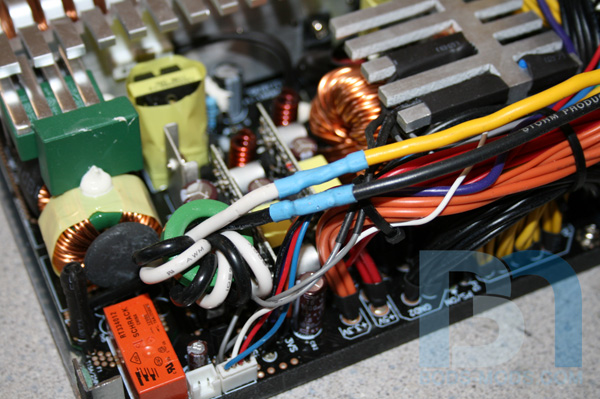 Here's the power switch/plug cluster that I de-soldered from the main wires. 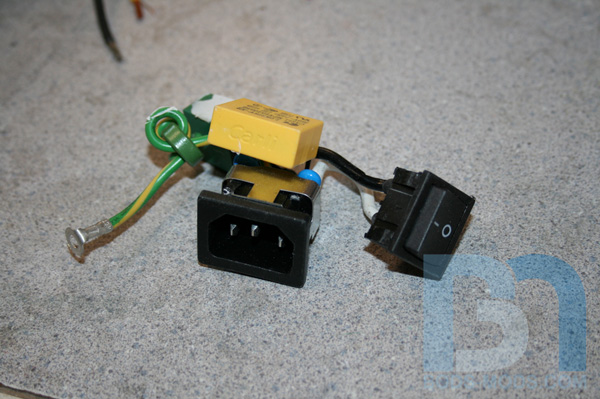 It will be re-soldered to the extensions once I know how long they need to be. I won't know that until I get the switch and plug mounted to the new IO panel. 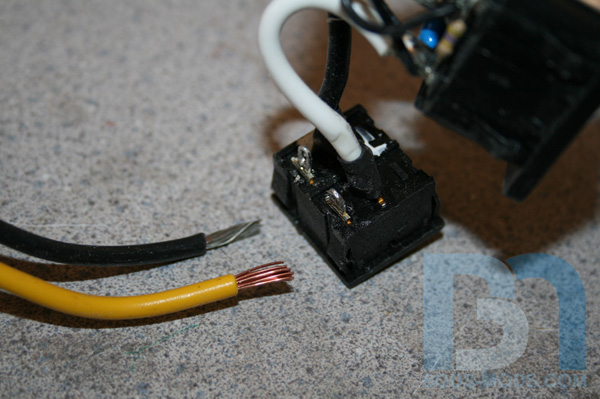 I routed the extension wires through the top of the PSU, insulating the hole with a rubber grommet. 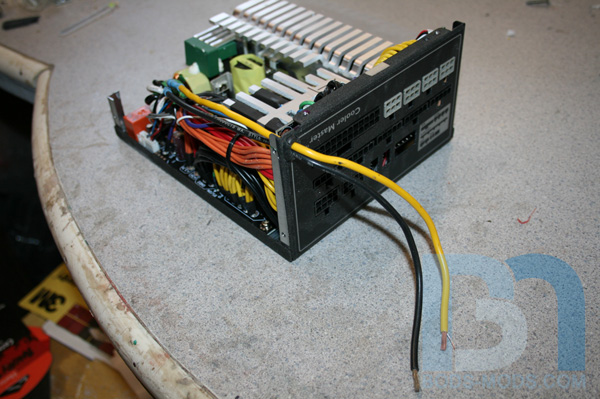 Now that the cover has been thoroughly transmorgrified, I placed it back onto the psu. (Warren is going to be soooo pissed!) 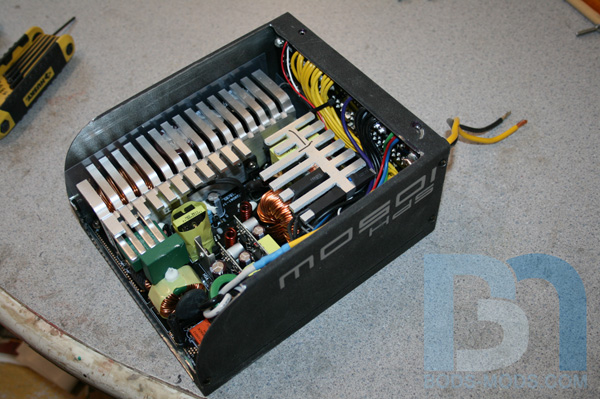 To secure the PSU vertically in place, I whipped up a couple aluminum brackets. The PSU will rest on this one across the bottom. 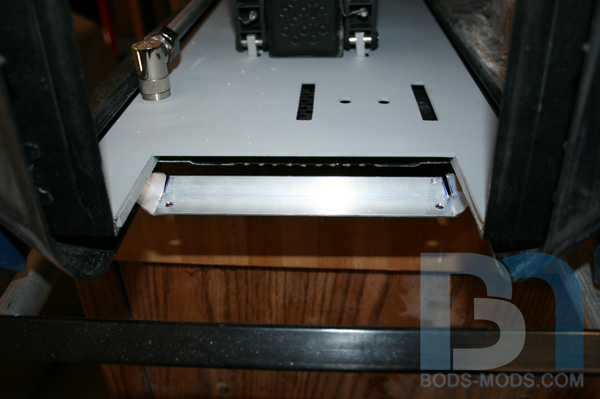 A shot of the bottom bracket from underneath... 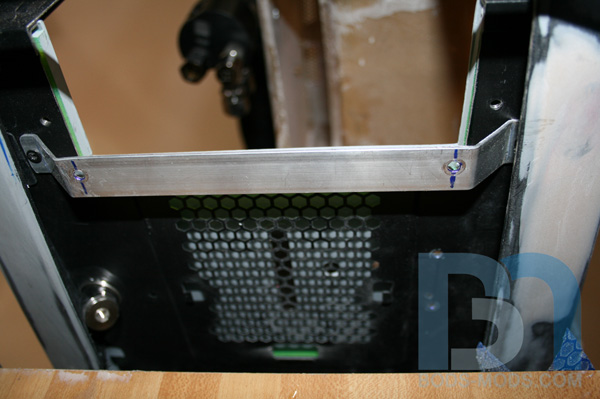 ... and with the PSU mounted..  Here's the top bracket, mounted for a test fit. You can also see how the PSU matches the rounded corners. 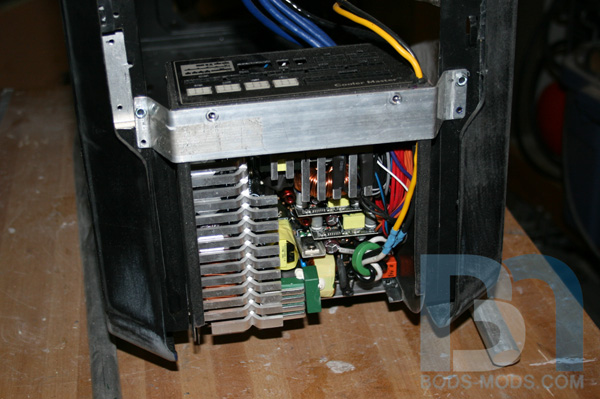 In order for the 140mm fan to fit, I had to notch the top bracket just a little. 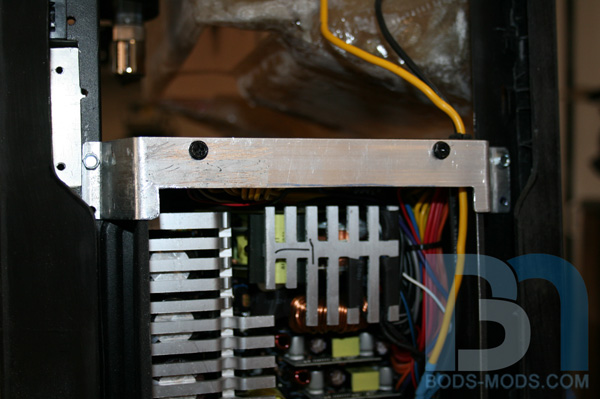 I've also been working constantly on the back panel for the last couple months. It's taken a while, but it's finally starting to come together. If all goes well, I will be able to show that progress right after the new year. :)
|
Boddaker
iCX Member
- Total Posts : 316
- Reward points : 0
- Joined: 2007/02/09 17:13:09
- Location: Where the beer flows like wine
- Status: offline
- Ribbons : 18
Re:Cosmos Cruizer
2014/01/05 21:27:18
(permalink)
Hey guys, I'm back again with some progress on the back panel. Originally I wasn't going to do much to it, but it quickly became clear it would be easier to just create a whole new panel, rather than trying to modify the stock one. Here's a pic I took a while ago, cutting the stock rear panel away. I think I did this just prior to working on the suicide door and hinges. 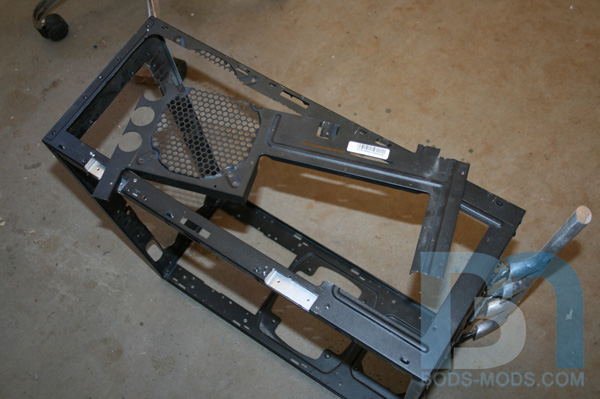 Using 1/8" acrylic sheet, I made the center piece along with two vertical pieces, a top mounting piece, and a curved piece on the bottom. Here I'm gluing the two vertical pieces at an angle to match up with the side panels. 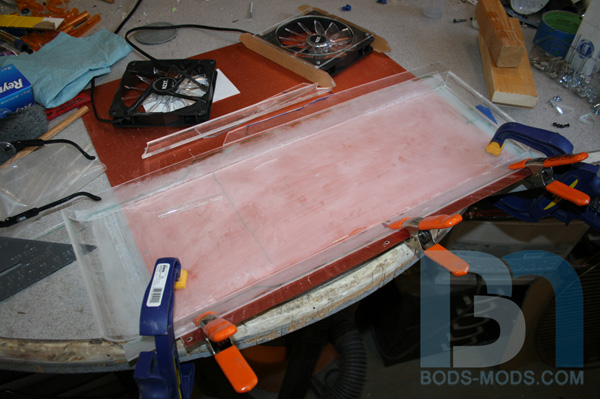 I made a couple fan mounts out of 1/4" acrylic that also serve as cross braces to give the panel some rigidity. 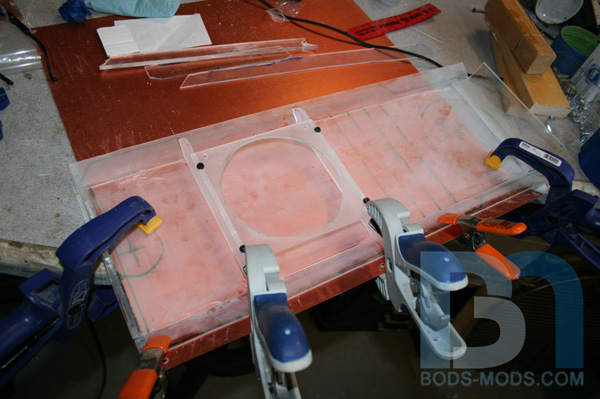 Trying the panel on the case, checking for fit and marking positions for fans, fillport, and the new IO panel.  Back panel trimmed, glued, reinforced, and fans mounted.  For the fillport, I was going to do something like those flip-up fuel doors on Dodge Daytonas, but I thought a hide-away system would be more appropriate for a custom rod theme. So I drew up a quick model in Sketchup...  The lid will continue the design of the top panel, with the aluminum bars ending in a half circle. Custom hinges will allow the lid to raise up over the bars on the top panel, revealing the fillport underneath.  I grabbed some pieces of acrylic from my scrap bin and started making the pieces for the base. 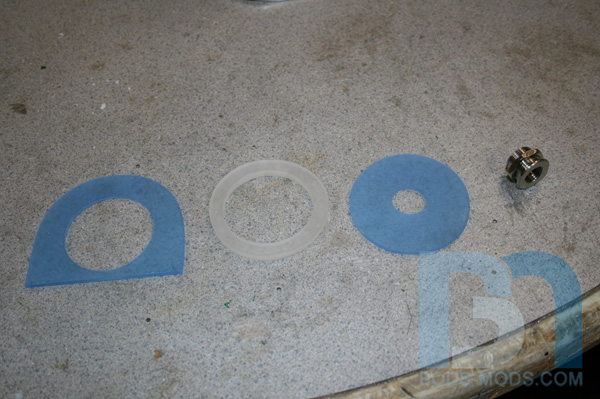 When assembled, they will stack up like this: 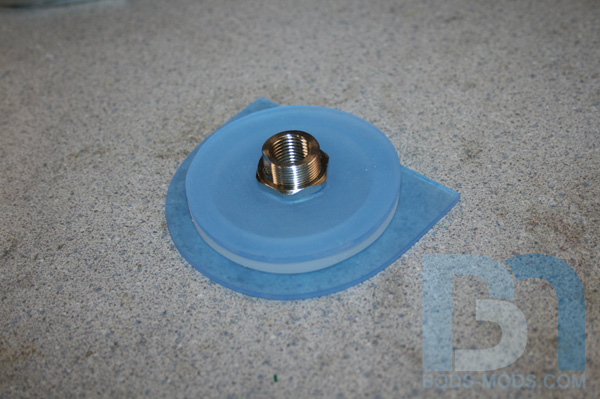 And top view: 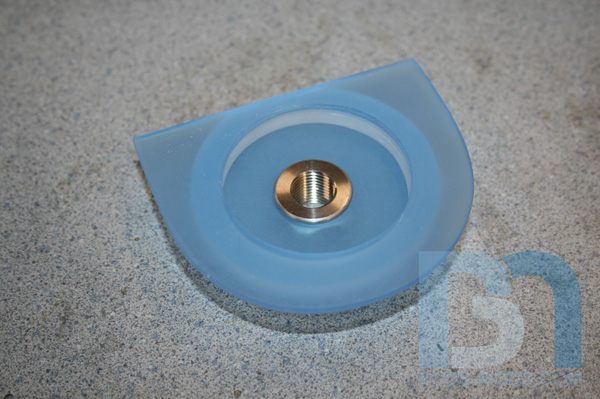 Using acrylic cement, I started gluing the pieces up. 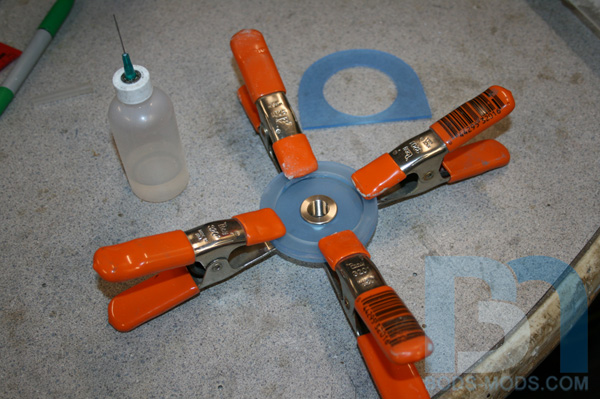 While that was setting up, I proceeded to make the lid, cutting the mesh, trim ring, and bending the aluminum bars. 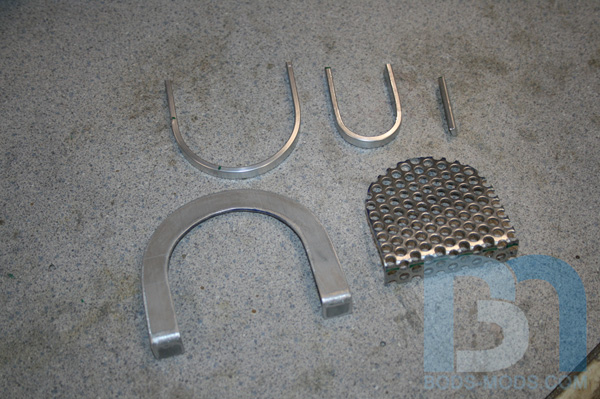 I'm thinking I will use my alumiweld brazing rods to solder the bars to the mesh, rather than tapping/screwing them from underneath. Either way, they will look like this when done: 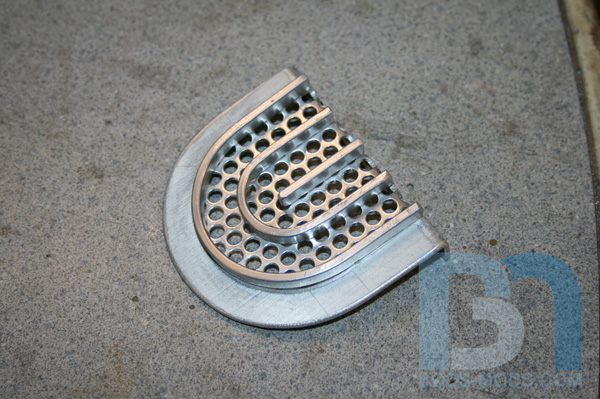 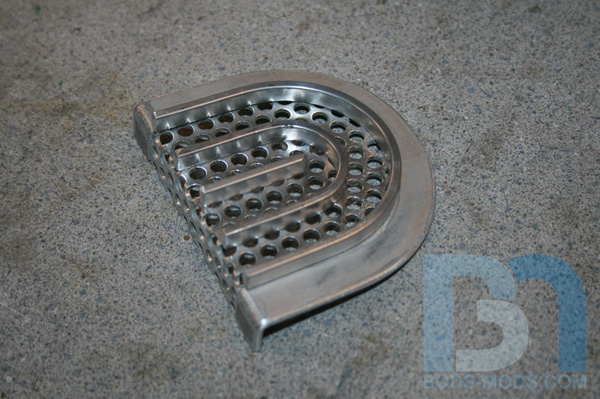 Preparing the back panel for the fillport...  Fillport set in place for a test fit.. 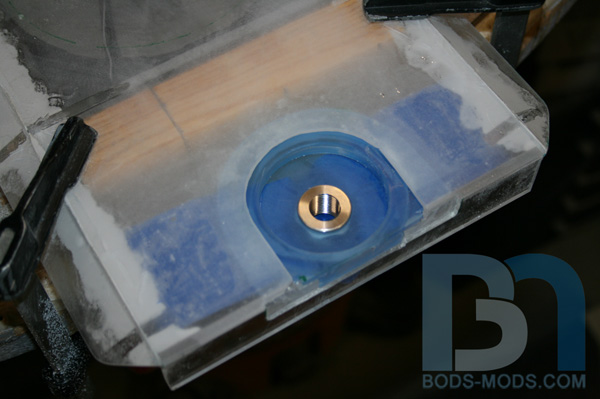 ..and with lid. 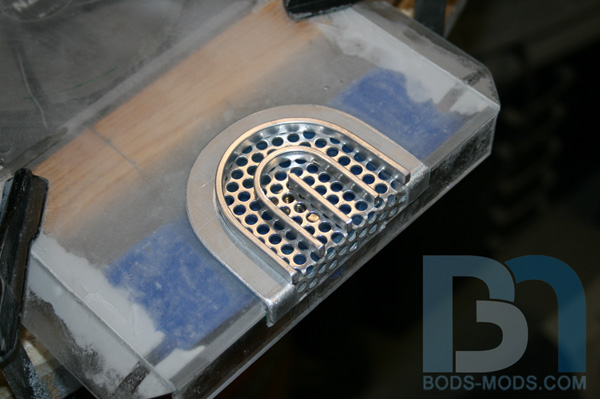 Now I have to tackle the hinges next. Looks like I'll have to modify the design a bit to accommodate the mesh, but that shouldn't take too long. Thanks for reading, 'til next time!
|
rjohnson11
EVGA Forum Moderator
- Total Posts : 85038
- Reward points : 0
- Joined: 2004/10/05 12:44:35
- Location: Netherlands
- Status: offline
- Ribbons : 86
Re:Cosmos Cruizer
2014/01/05 23:35:00
(permalink)
I'm very curious how you intend to tackle the hinges
|
Importz2k1
iCX Member
- Total Posts : 380
- Reward points : 0
- Joined: 2014/01/05 08:30:59
- Location: New Cumberland, PA
- Status: offline
- Ribbons : 0
Re:Cosmos Cruizer
2014/01/11 17:17:24
(permalink)
Fairly new to pc's and never imagined anything like this to be possible. You have some serious skills and knowledge. Thank you for sharing such incredible work with us.
http://www.heatware.com/eval.php?id=94752Gaming Rig: GIGABYTE GA-990FXA-UD3/Phenom II X4 980 3.70/G.skill Ripjaws X Series 16gb DDR3 1600/EVGA GeForce GTX 780 Ti Superclocked/PC Power and Cooling Silencer Mk II 950W/COOLER MASTER Storm Trooper/2-Seagate Barracuda ST31000524AS 1TB/Creative Sound Blaster Fatal1ty Professional/Corsair Hydro H100i/NZXT Sentry-2 5.25" Touch Screen fan controller/Windows 7 Professional 64 bit/ASUS VG248QE Black 24 2 new builds and 1 major upgrade in the works.
|