Disclaimer: I don't have a fluid thermodynamics or chemistry degree or any professional HVAC certification, so don't follow this article here, even if it looks like step-by-step how-to. It's just something I was tinkering with on summer days of year 2007-2009 after uni graduation. I wanted my personal confuser with dual-core CPU go fast! Very fast! Warning! Brazing copper with oxypropane torch, using Freon gases which are known carcinogens, playing with mains powered motors can be dangerous and even lethal!Now that we learned a thing or two
about DIY chiller, I hope somebody can join up for more interesting toy - DIY phase-change "direct-die" cooler. Old-timers might still remember
Asetek Vapochill and
Prometea Mach GT "commercial" phase-change direct-die coolers for PC. Those are "The Coolers" for Intel P4 NetBurst hot days. Of course being a hobbyist I could not afford one of these, so the alternative was to learn and build one of these systems with market and DIY parts.
In chiller we have phase-change system cooling the liquid cooling agent, like alcohol or glycol, which in turn cooling GPU/CPU waterblock, resulting in heat transfer and desired temperature drops. But there are always some loss and heat picked up from ambient in the process, and condensation issues over all chilled components of the system that are below dew point. What if we remove this unnecessary intermediate cooling agent and just cool the CPU or GPU directly?
This is precisely what direct phase-change coolers do! Instead of cooling agent, we can have custom copper hermetic block, mounted on CPU or GPU. This block will have channels for Freon flow inside, just like the waterblocks do to pass cooling liquid. However, there is important difference, as watercooling loop just pass water between components, but here Freon will change phase and evaporate it into gas. Evaporation absorb lots of heat. This makes evaporation a very good process to cool the copper block (which is called evaporator now). Here’s why comes the name “Phase-change cooling” and also this is reason why liquid boiling/evaporation process is used in the heat pipe tubes as heat transfer agent. Essentially heat pipe is a phase-change cooler too, just a weak passive one :).
So we start with CPU cooling block first. We cannot use existing waterblocks because system need to be hermetic, resistant to Freon chemicals and lubricant oil and also stay that way under higher than ambient pressures, when system is turned off. Usually brazed copper blocks are good solution for this purpose. There is also important difference between waterblock structures and evaporator for phase-change. Evaporator need to have pressure change to get Freon liquid boiling. In usual watercooling loops you have two pipes of same diameter to bring cool liquid in, and take hot liquid out. In evaporator we have thin capillary tube from condenser (often less than 1mm ID) that injects warm Freon liquid into evaporator center with high pressure. At this point inner chambers of the evaporator have pressure below atmospheric, often 20-30% of ambient air pressure. Due to huge pressure change liquid Freon start to boil very much and absorbing lot of heat in process.
Evaporated Freon (now it's just cold gas) is sucked out by compressor, compressed and transferred to radiator, where compressed hot gas will give its heat into ambient air and condense into the liquid Freon again. This is why big finned radiator in phase-change systems called condenser. And the whole cycle repeats itself. Congratulations, now you know how to build a phase-change system :)
No more theory here, let's go thru the build.
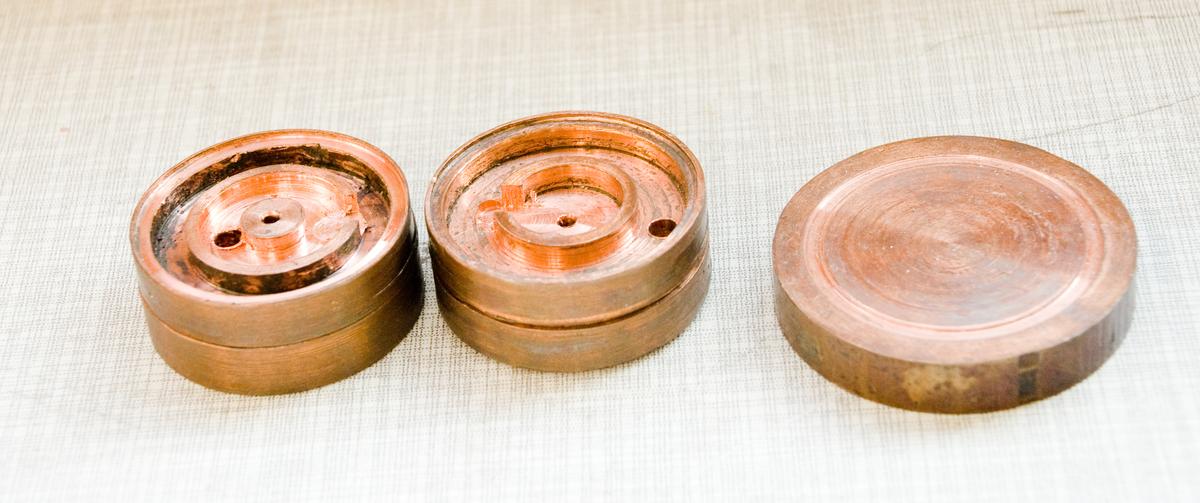
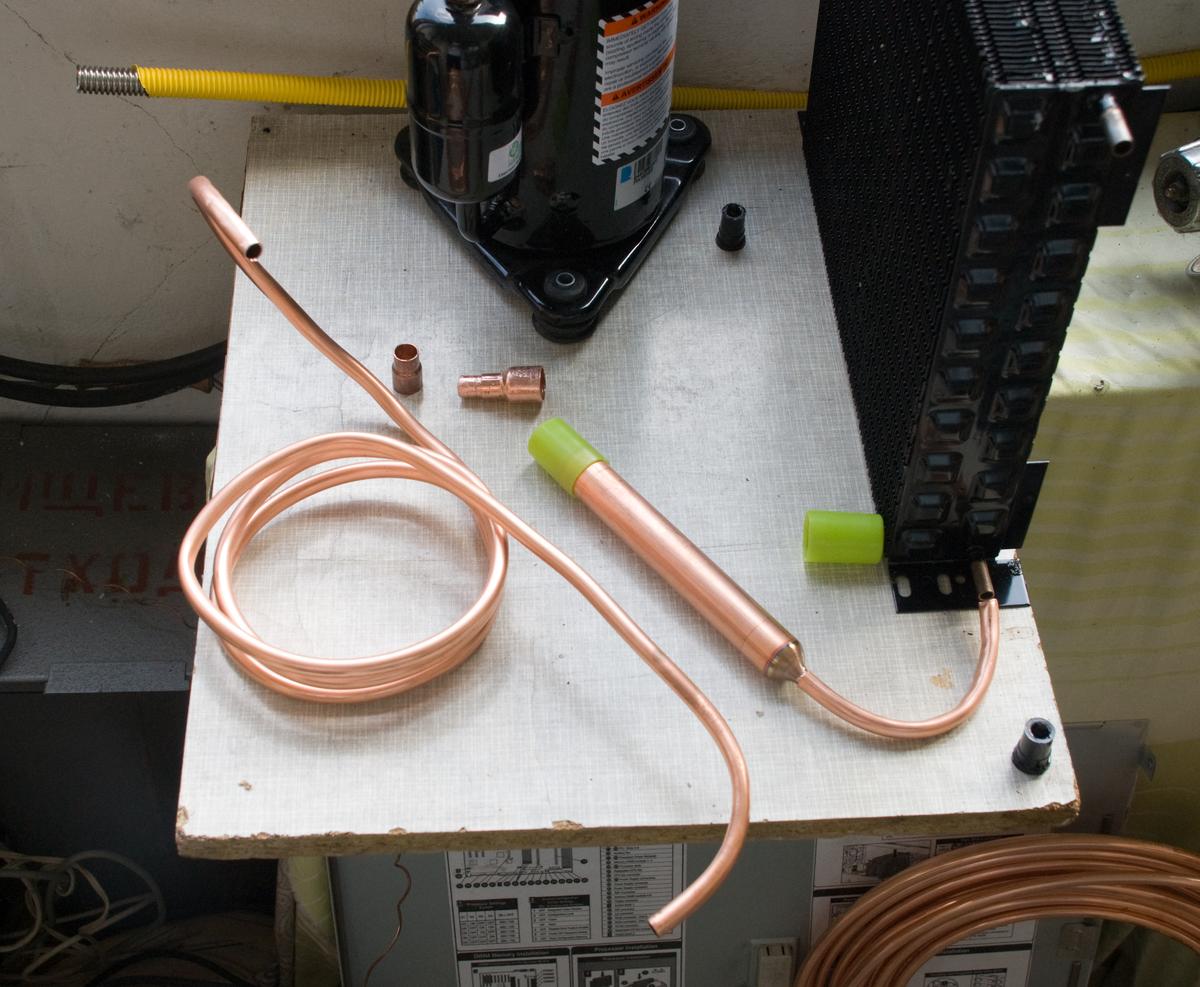
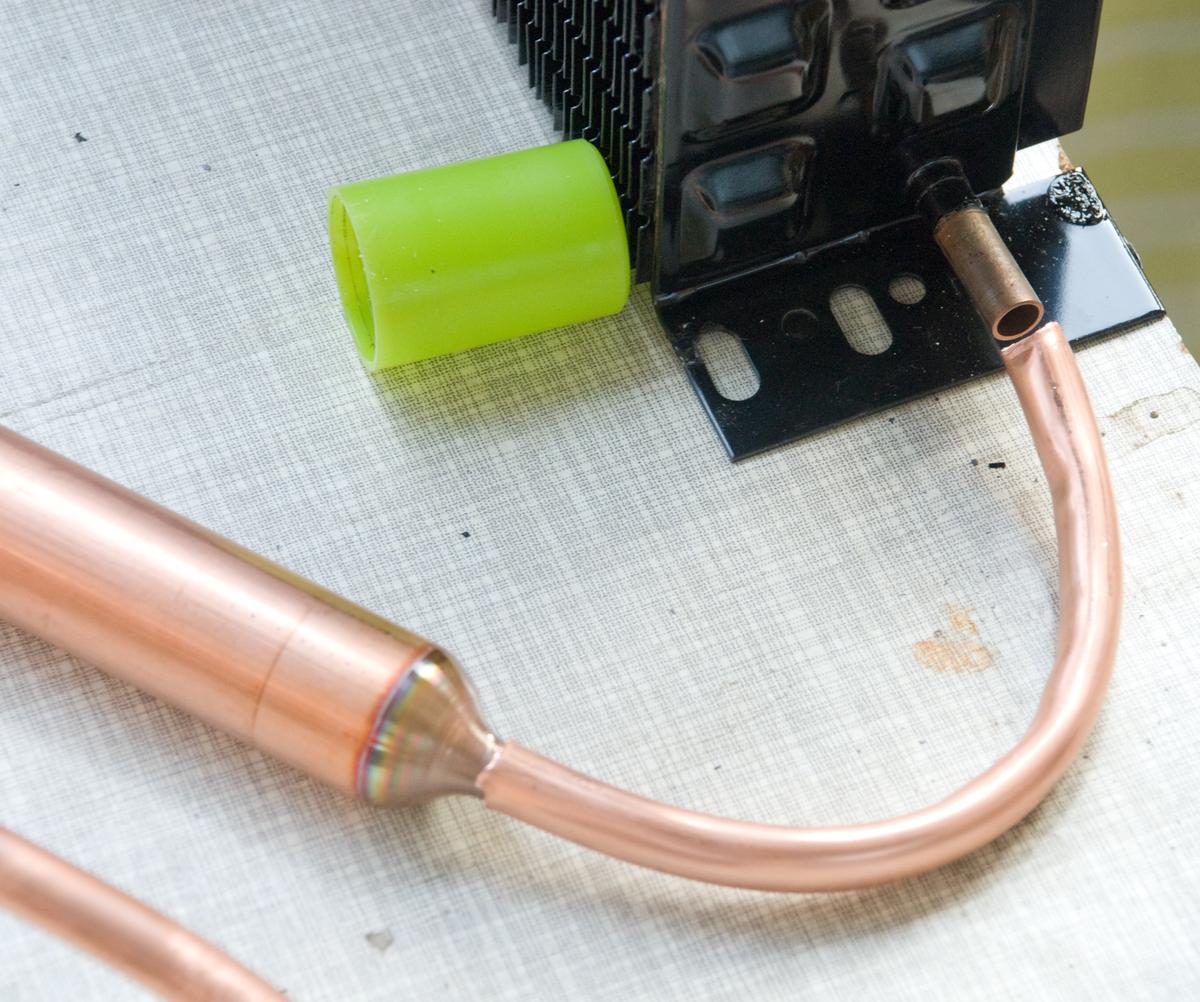
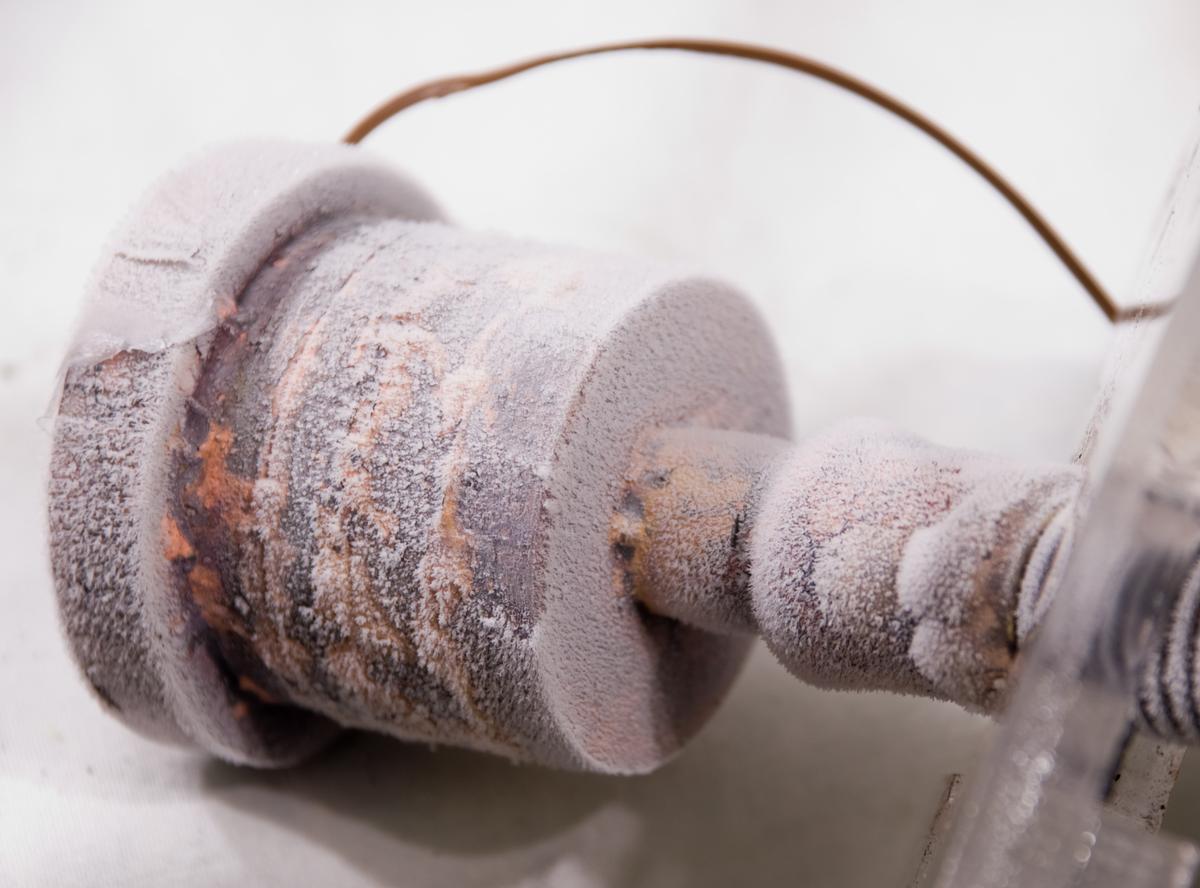
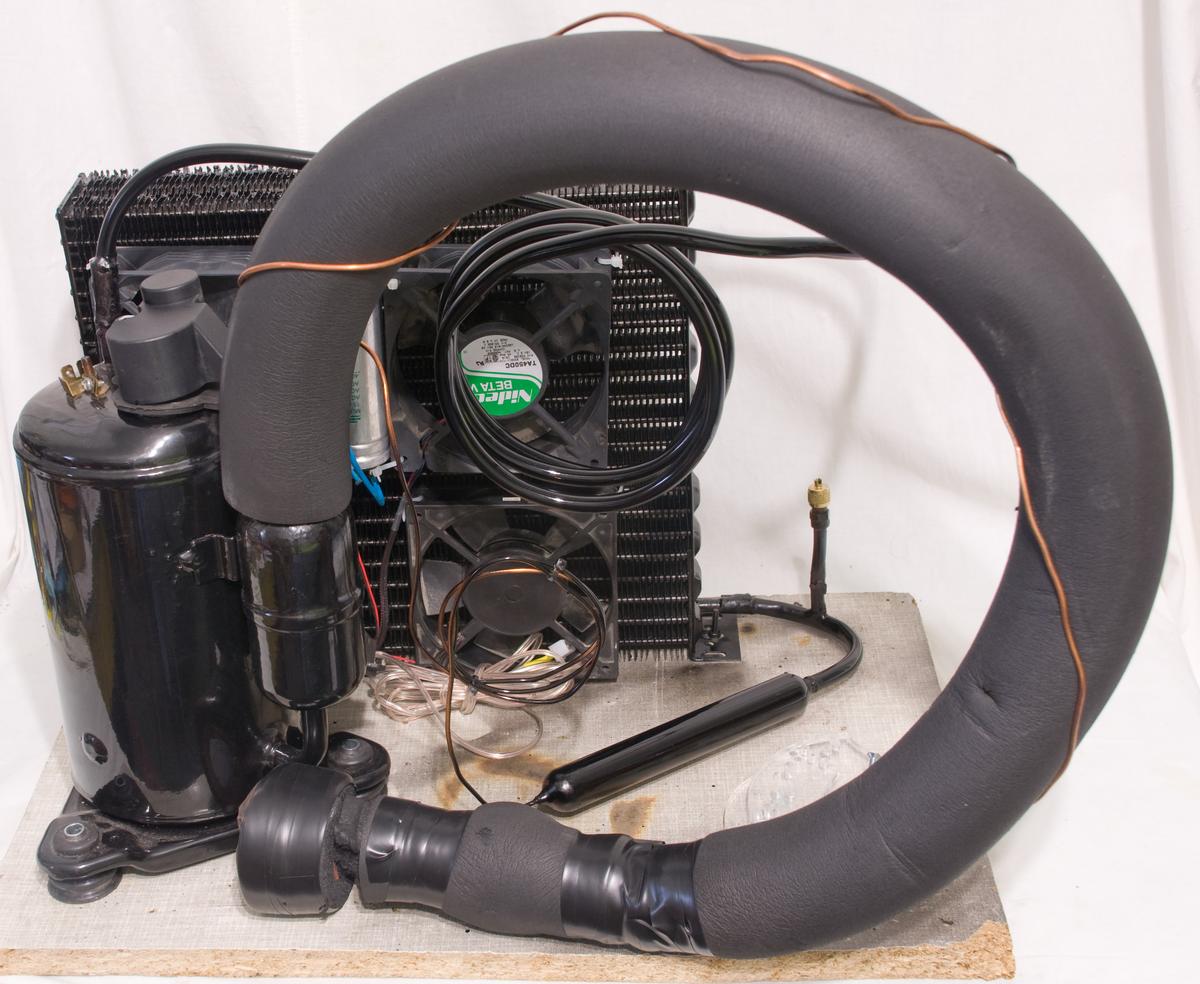
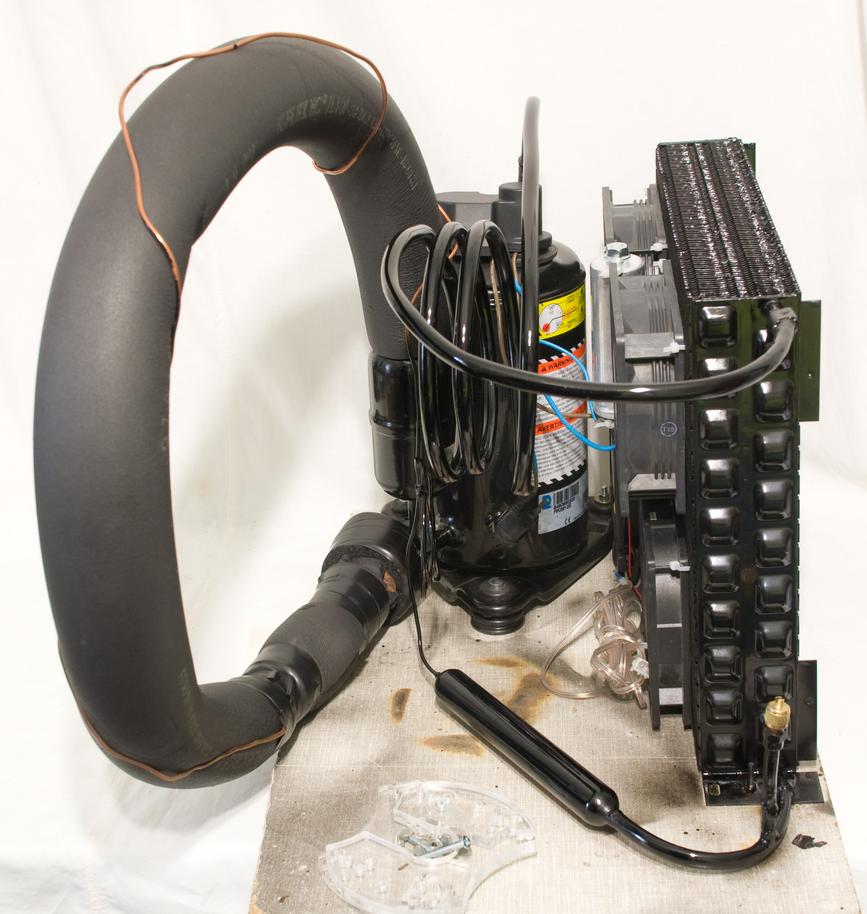
I've used DIY copper evaporator with 4 levels + copper base. It is made from round copper stock with lathe. Just a simple round channel with holes between "levels". Capillary tube injects Freon in center hole, and then larger "exhaust" hole will be connected to low pressure input of the compressor.
We also need copper hose adapters for proper diameter, filter to absorb humidity from the loop (copper cylinder thingy). Charge port valve will be useful to evacuate system to vacuum and charge with Freon gas.
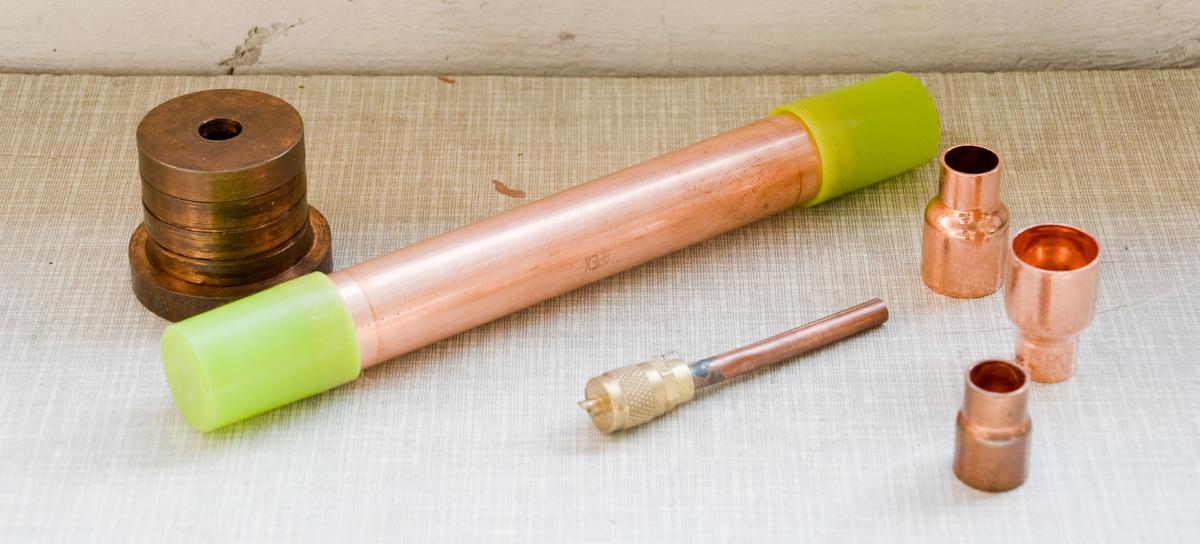
Because everything is going to be brazed, we use copper HVAC copper pipe. To braze components into a loop typically CuAg brazing rods are used. You cannot heat these to proper temperatures with soldering irons, so oxygen-propane torch is used here. Some builders use MAPP gas torches but that's expensive and very crude tool for this kind of job.
Before start doing anything, let's see other components, such as compressor:
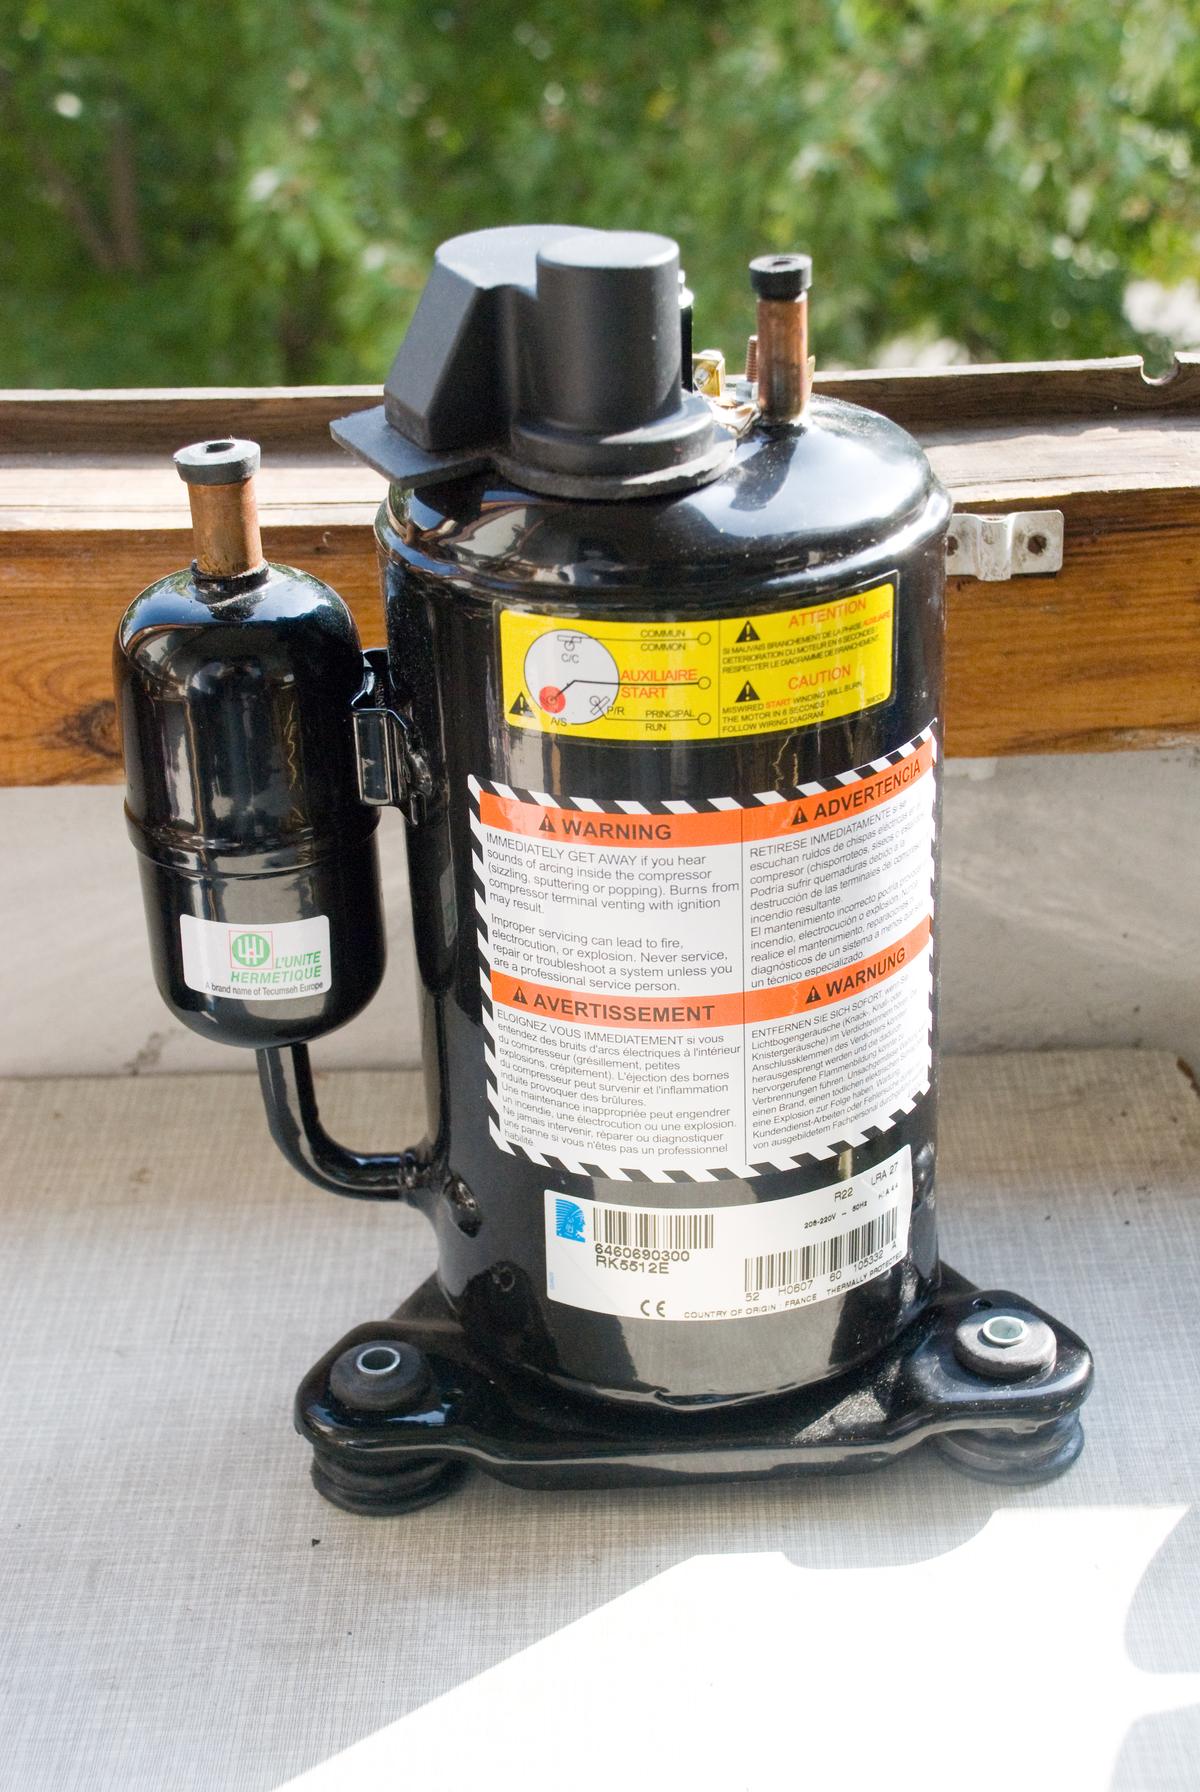
This is rotary compressor, often used in AC units, such as one we saw in DIY chiller thread.
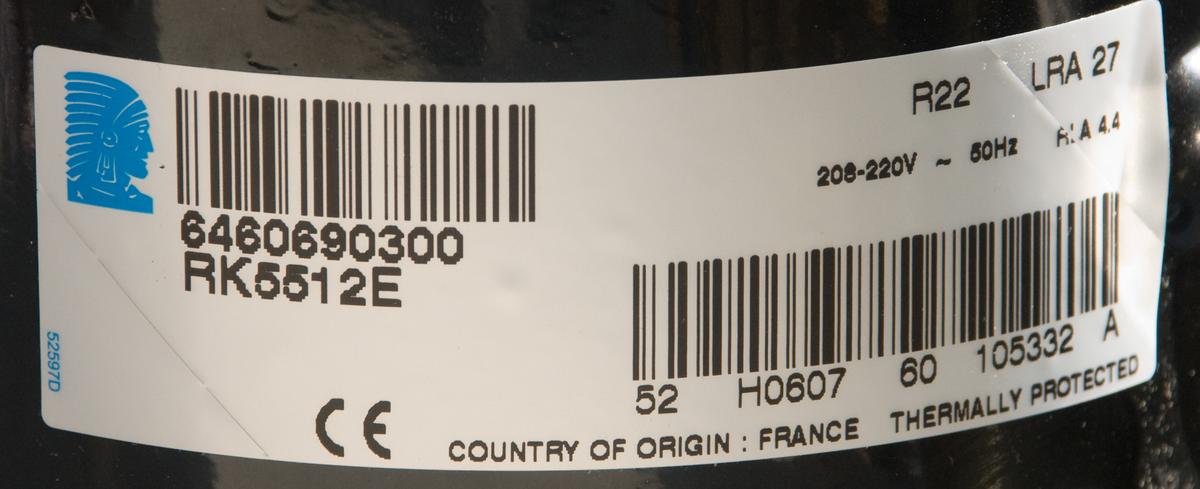
One I bought is the most expensive component of this project,
Tecumseh RKA5512E, which is 8600 BTU/h unit.
It is designed to run with R22 Freon gas (ozone-unfriendly and today phased out), charged with Synthetic oil and rated for temperature range from -15 °C to +15 °C. Modern day replacement for this compressor would be
Tecumseh RGA5512CXA for R407C agent and 10000 BTU/h.
We will overclock it bit outside of the spec to get evaporating temperature -30..-35 °C at cost of compressor life reduction due to worse operation mode and less optimal lubrication.
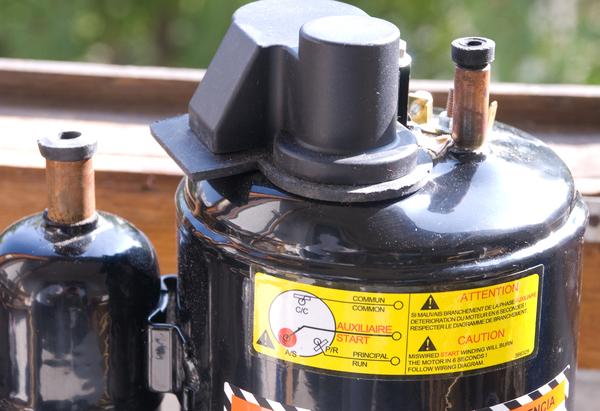

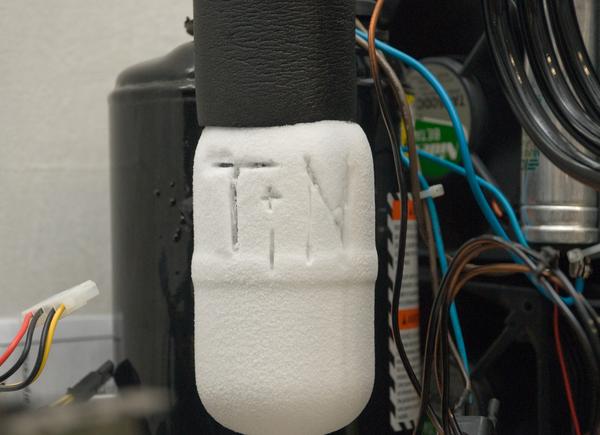
Lubricant oil is cycled thru the system together with the Freon. This is what cools compressor itself, because motor inside is hermetically sealed just like everything else in the system. It is important to have correct oil and correct Freon gas type, so they mix well together and don't chemically react, but that is topic outside of this thread.
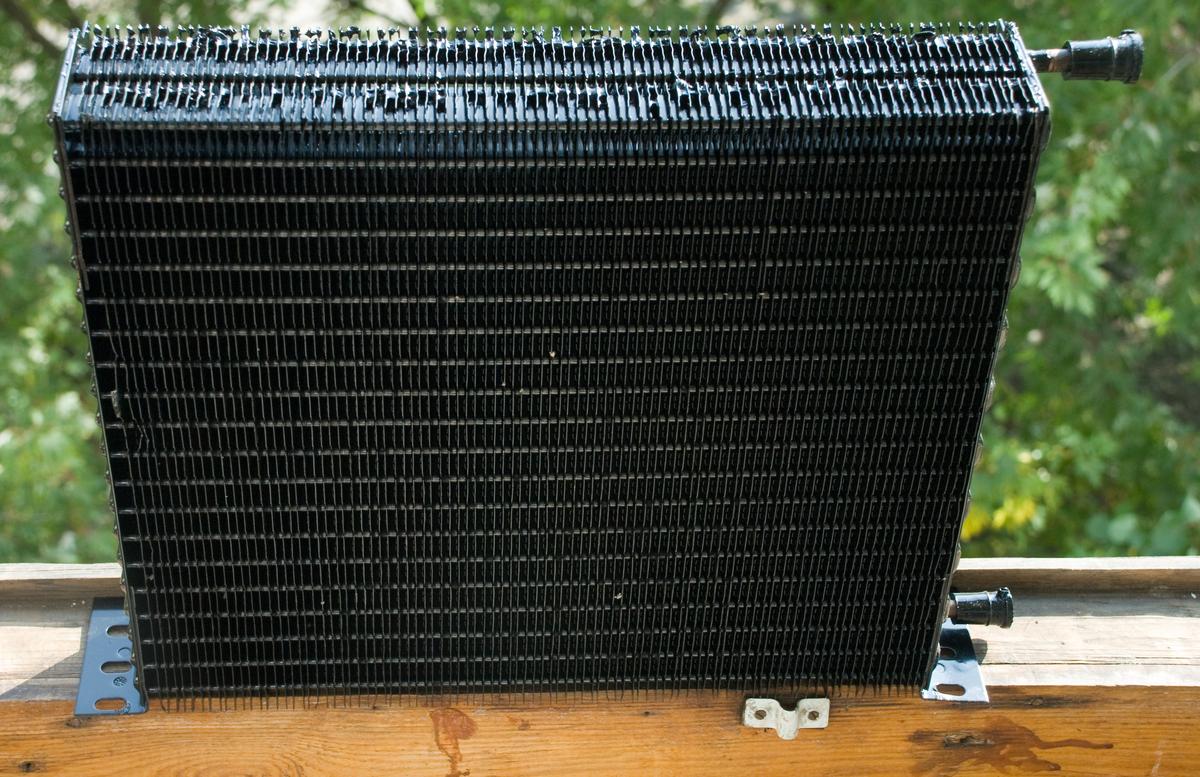
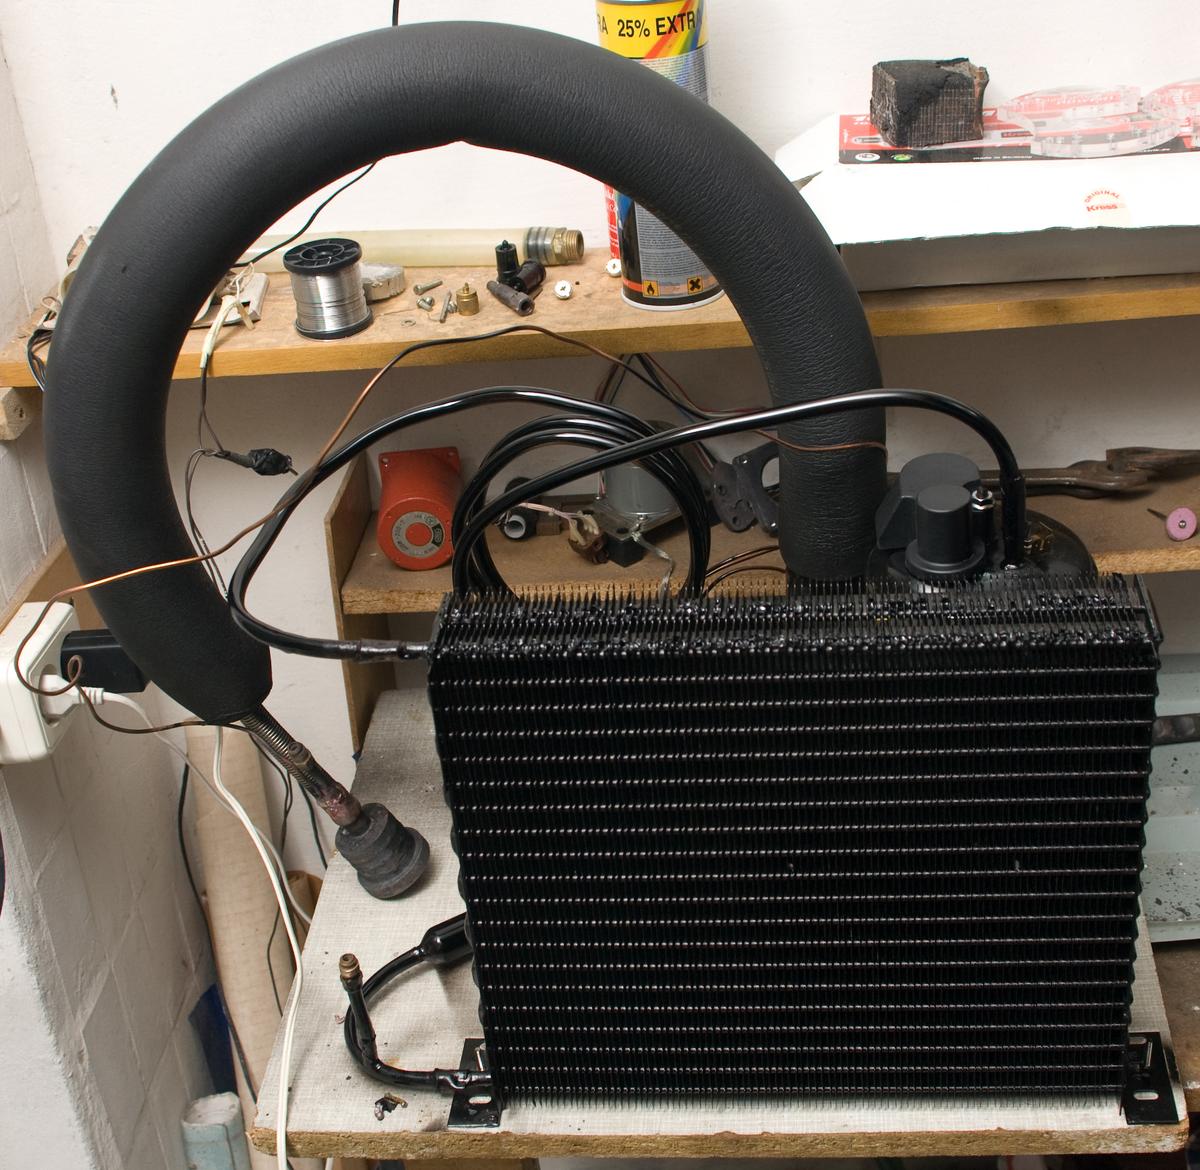
I've used cooling condenser, which looks like usual watercooling radiator, but unlike watercooling loop this one all hermetically brazed and designed to sustain pressure. Hot Freon gas will cool and condense inside of this thing before it is injected into evaporator block on CPU.
Now let's put things together, how they will be assembled:
Place all components like they would go after assembly. Bend pipes so everything will stay in place when brazing commence.
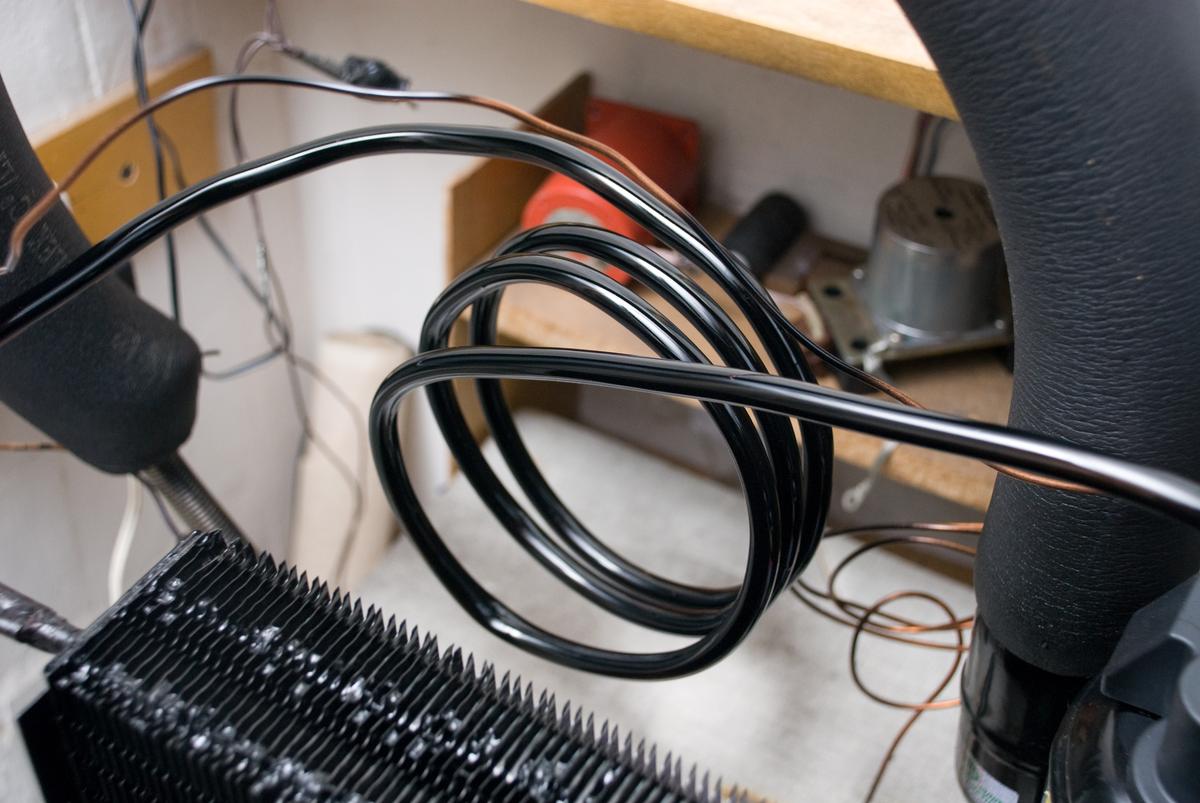
Yellow hose in background is stainless steel tube, that can bend and flex. This is important if you want to have flexibility on CPU/GPU location.
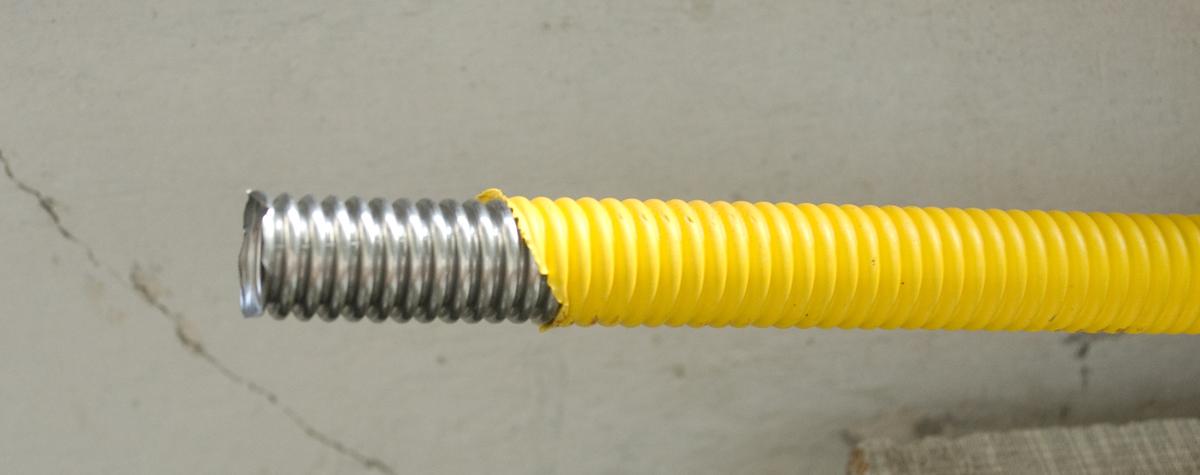
I've used a hole with silicone plastic foam purposed for stove gas lines. Stainless steel is hard to braze/solder so flux is required to braze it with copper tubes.
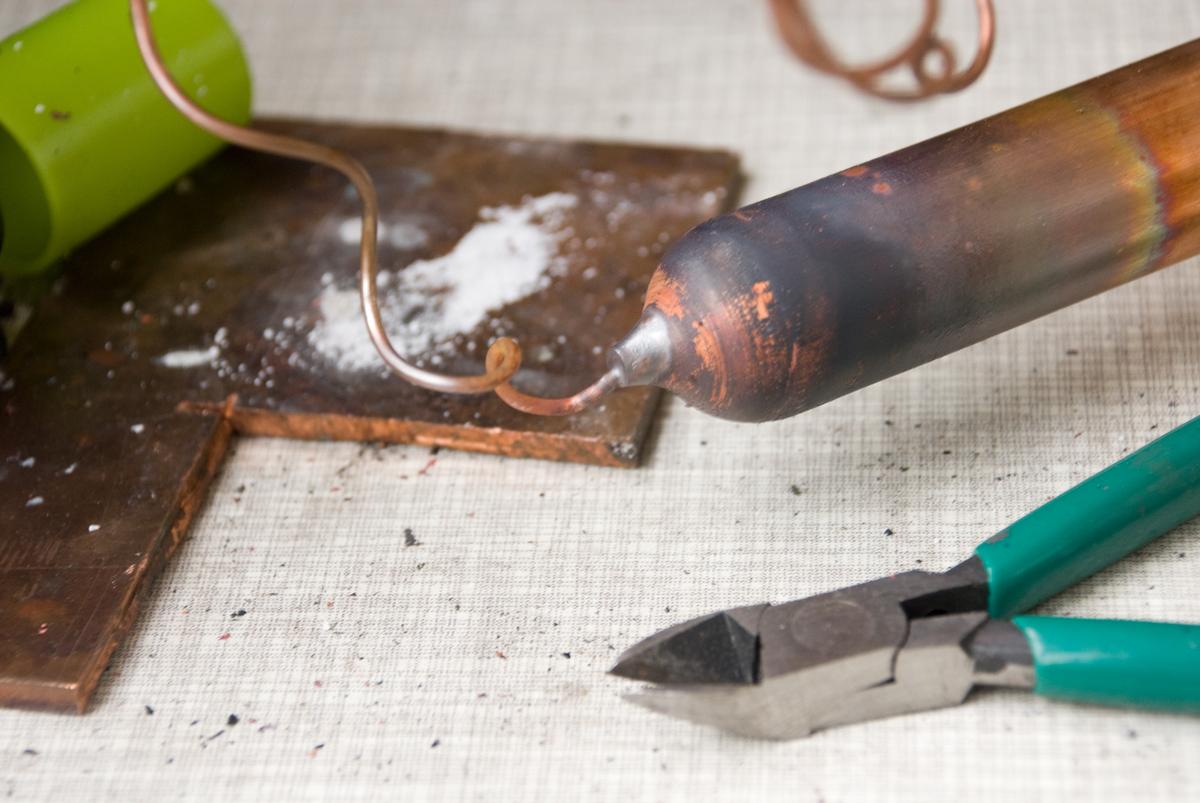
Now let's assemble evaporator block.
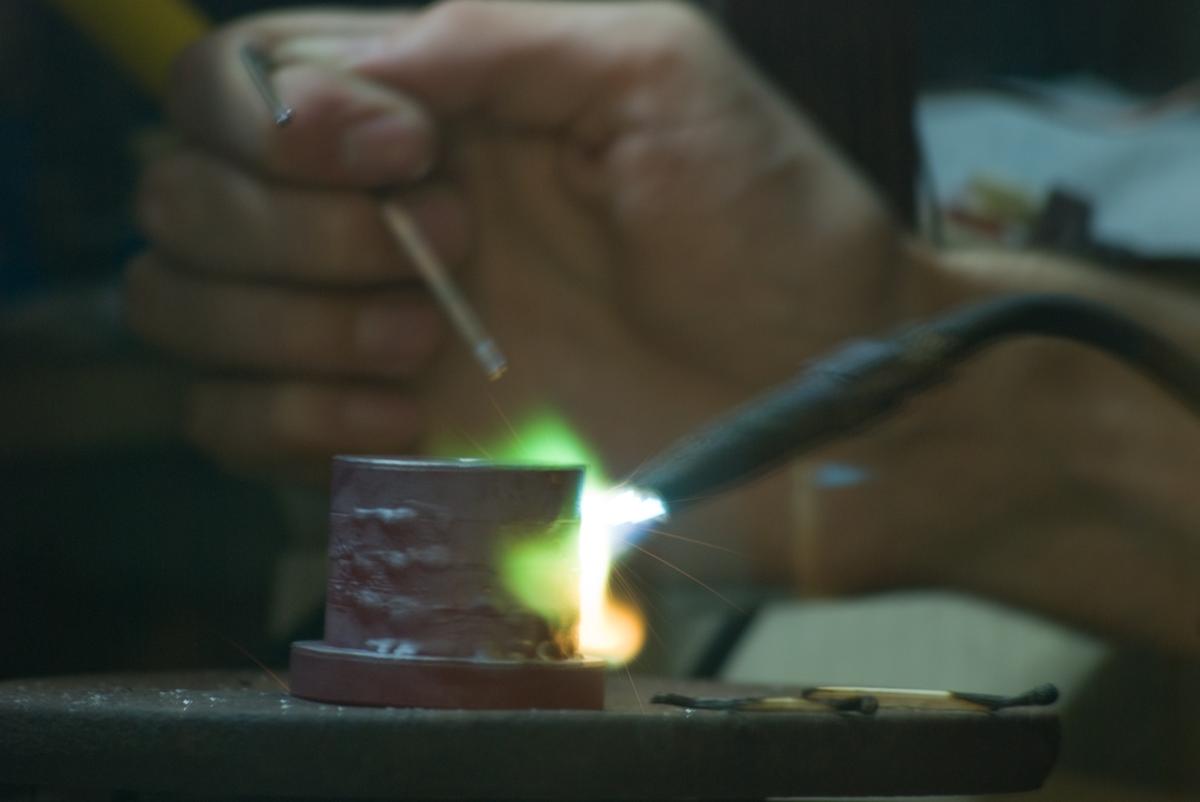
After few attempts block was brazed together, with all layers stacked on top.
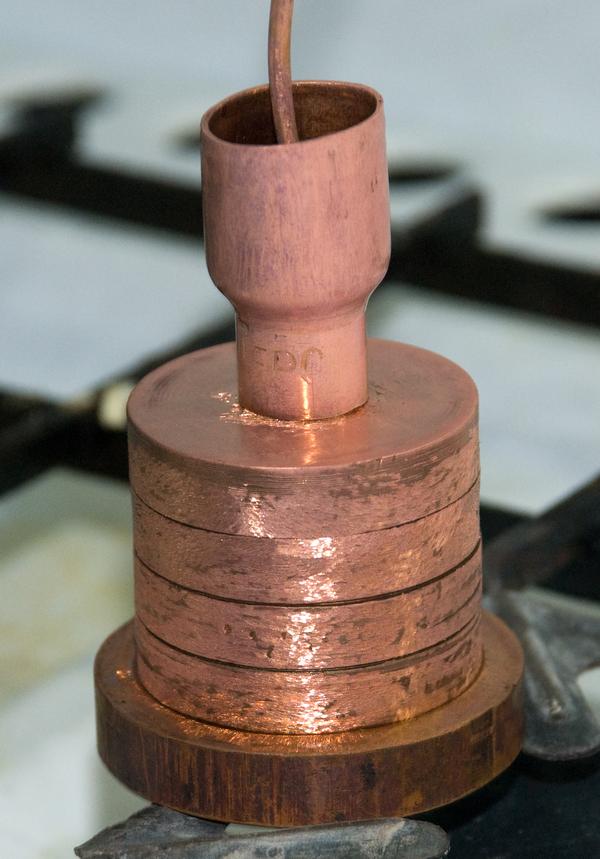
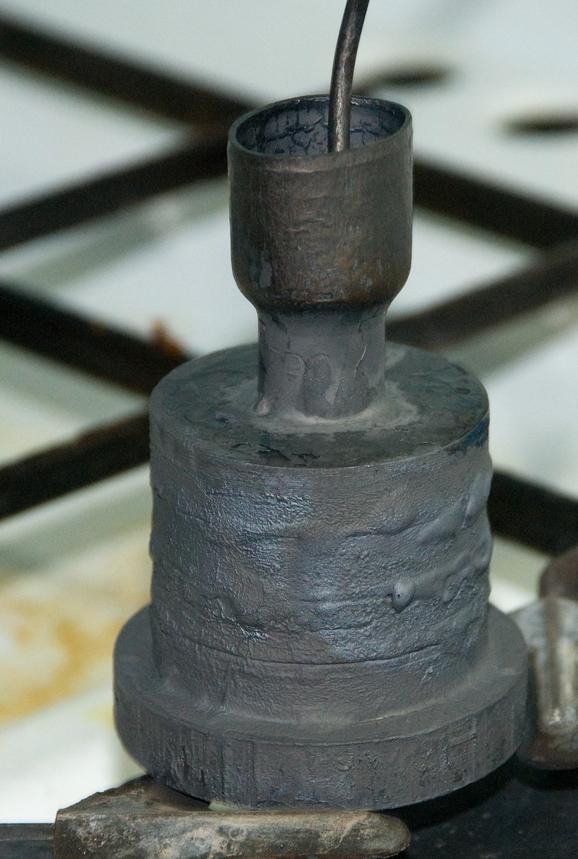
Because hot copper metal oxidizes very well in ambient air, forming black copper oxide, cleaning is mandatory. Professional phase-change system builders feed propane gas or argon thru the pipes when brazing, so oxidation does not occur on inside surfaces. On my end, I've just spend a lot of time trying to get most of oxide chips and particles out, also boiling block in acidic bath. Tiny particles can be caught by humidity filter as well, so she'll be alright.

Now we have things assembled, it's time to check for leaks. Pressurize system with Freon or dry nitrogen to few bars, and leave it overnight with manometer connected to the loop. Pressure next day should be same as before. If there is a leak - use soapy water to find bubbles and fix the leak. Even tiny leak will result system to lose a charge and failure.
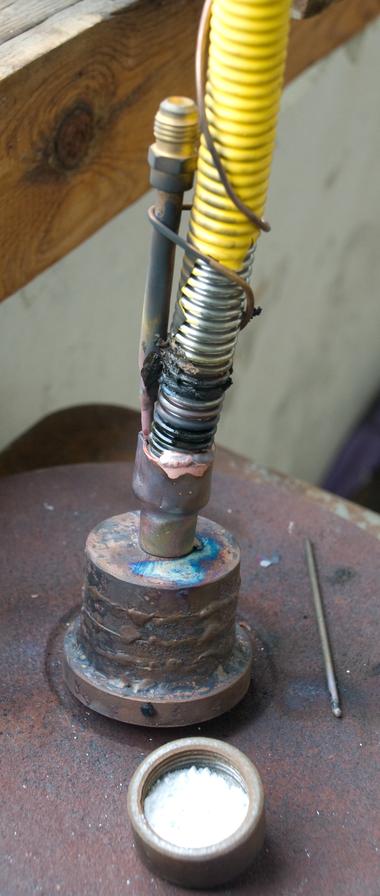
Whole rig assembled and ready for gas charge:
Here's close-up shot on that capillary from condenser and filter to evaporator:
After leak confirm we need to evacuate all gas from loop, using vacuum pump or another compressor (which we don't need, because running compressor into open air will ruin it due to lack of lubrication oil flow).
Now if everything checks out, time to get camera out and prepare for first frost.
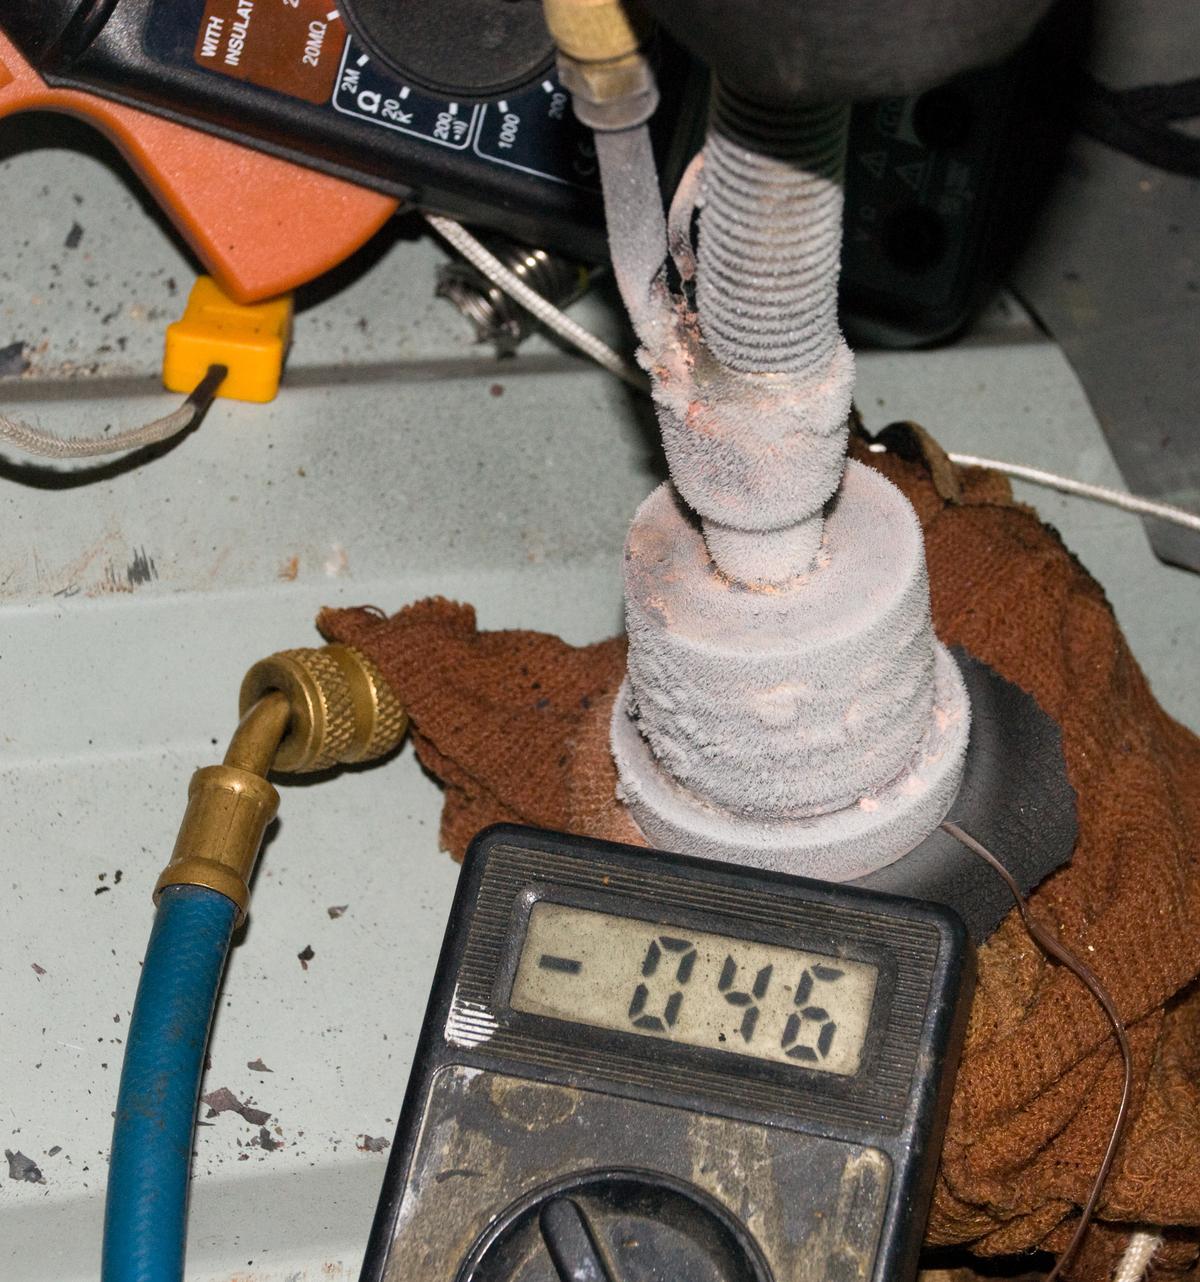
Why camera? Because during charge you will see lowest possible temperatures, that will never be this low when system is in normal charged/operation state. Mount thermocouple probe at the base of evaporator and start to add Freon with little portions till you see temperatures drop. Now stop adding gas and let's see -50...-55 °C. These low temperatures mean nothing however, because there is not enough gas to do real work transferring heat.
My super-advanced thermometer show -46 °C at this step. Now we add heat load (like 200-300W power resistor, powered by power supply) to simulate "CPU" and keep adding in portions Freon till 20-40% of suction line is frosted. This will mean that system is close to saturated state for desired heat load point. Let it run for few hours to make sure temperatures are settled.
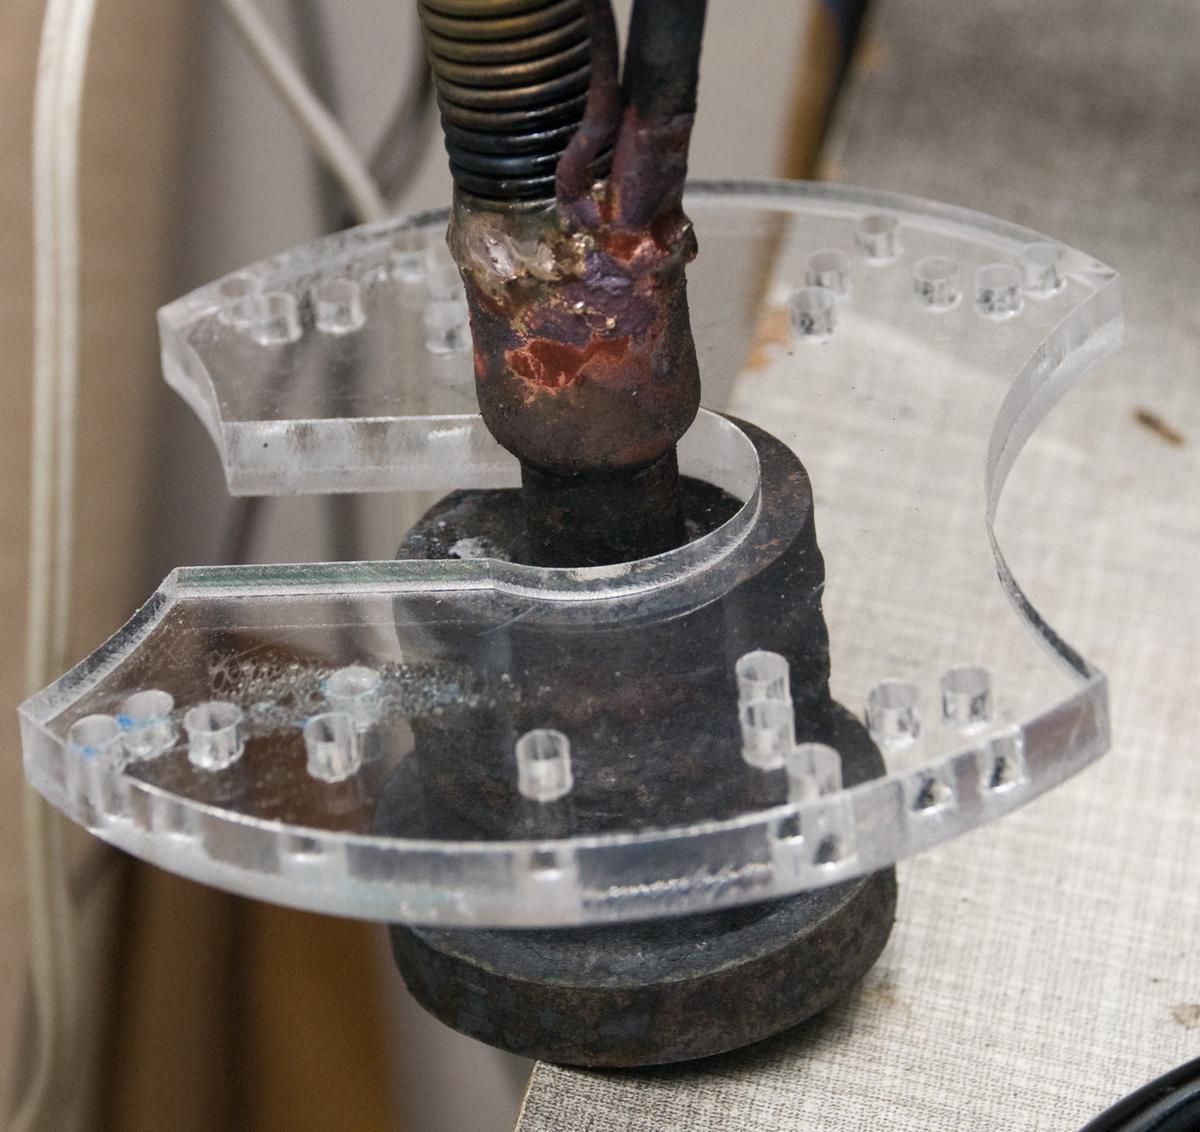
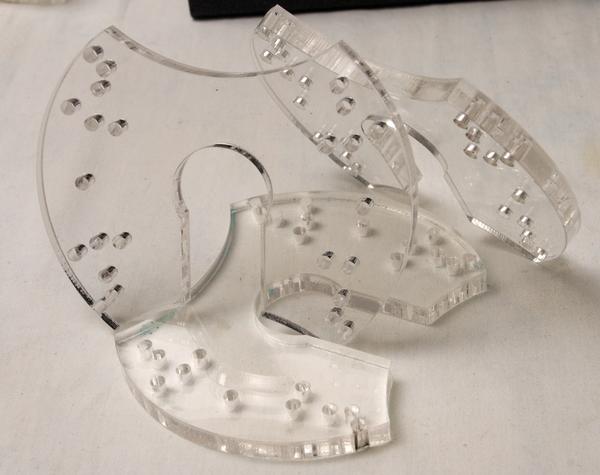
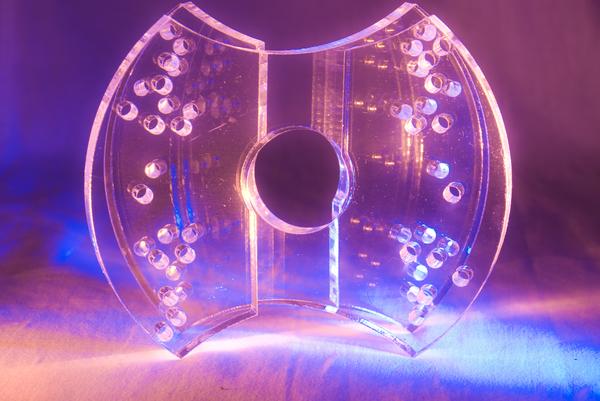
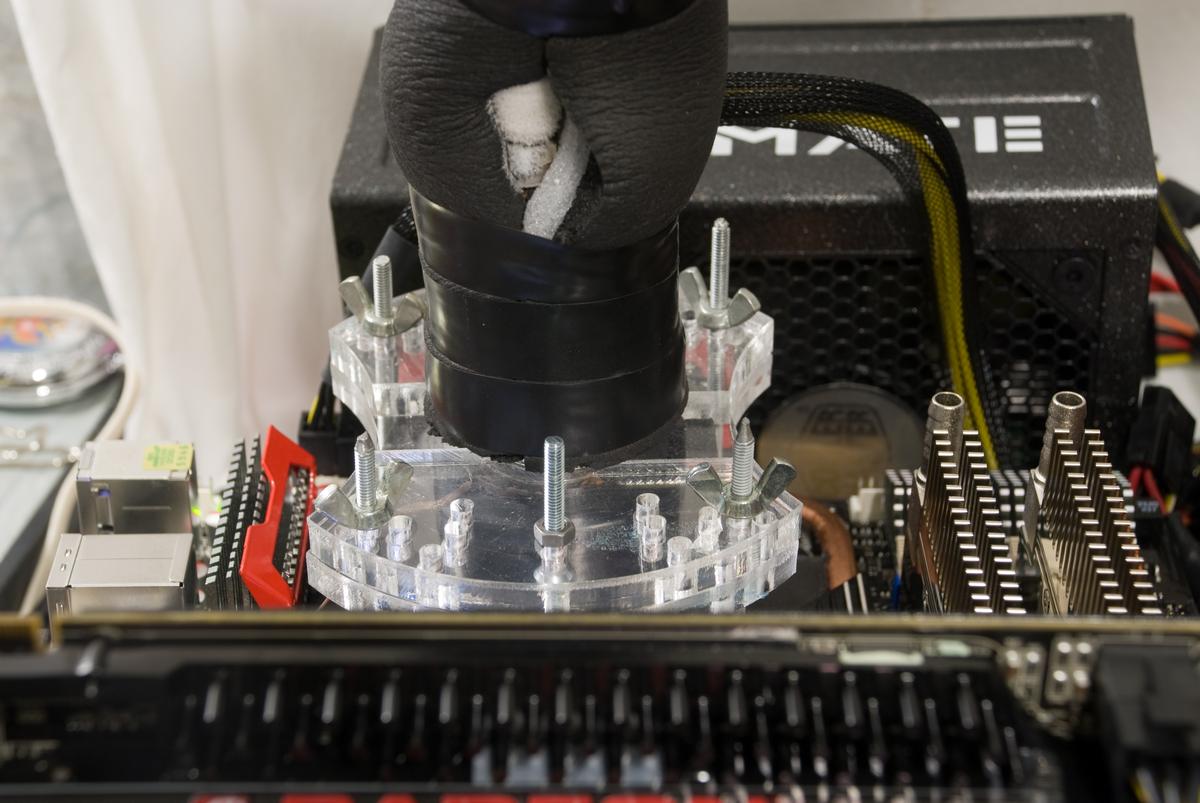
Fancy (ugly) mount hardware was laser cut from Plexiglas to allow evaporator mount on different CPU sockets. Because I've failed make mount plate BEFORE soldering the evaporator to the suction hose, I've had to hack mounting plate into two pieces that "interlock" on top of evaporator. Woops :)
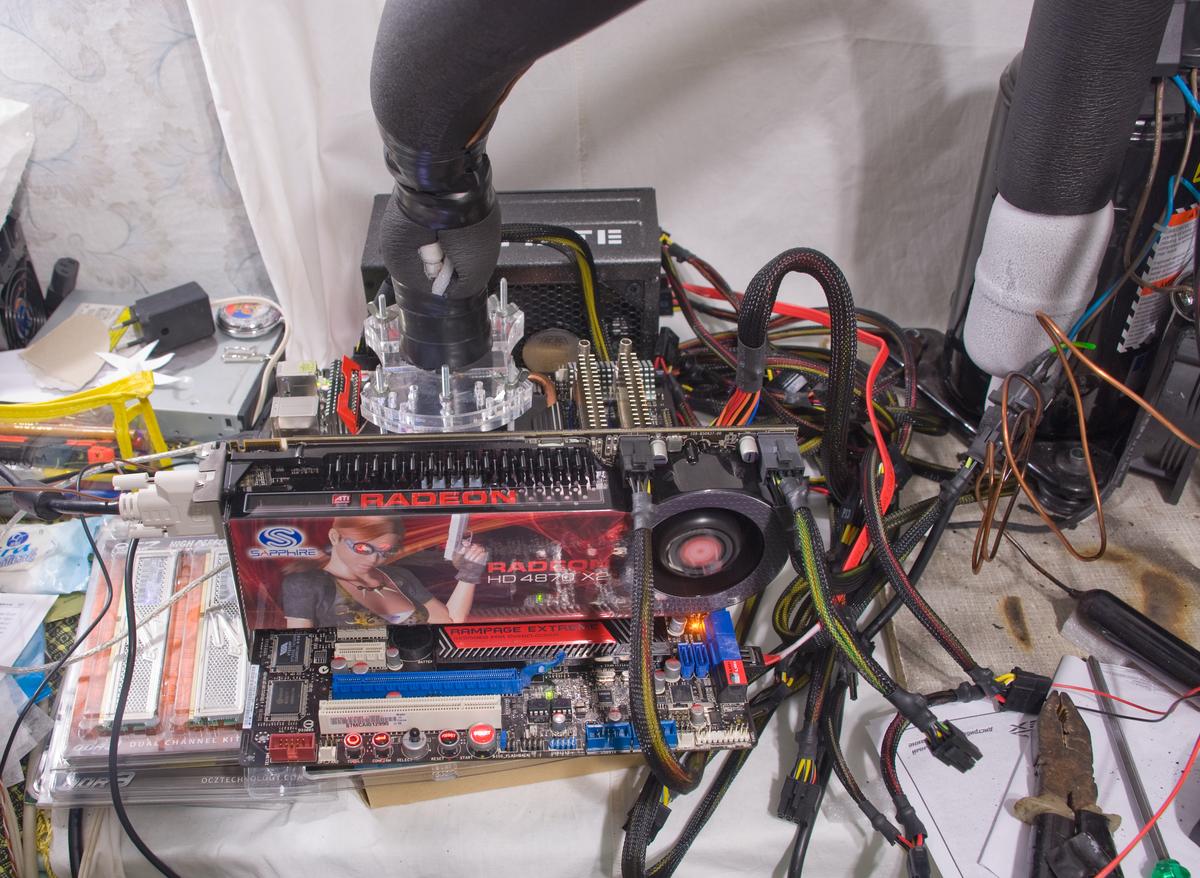
This system worked well with set point around -35 °C at 350-450W heat load (such as overvoltaged QX9650 CPU).
Copper pipes and stuff were painted just for looks, there is no functional purpose in that. It looks somewhat DIY, but I didn't care about looks, this is overclocking after all, not a beauty contest.

Frosty evaporator mounted on motherboard (LGA775, QX9650 processor):
Testing system with real CPU:
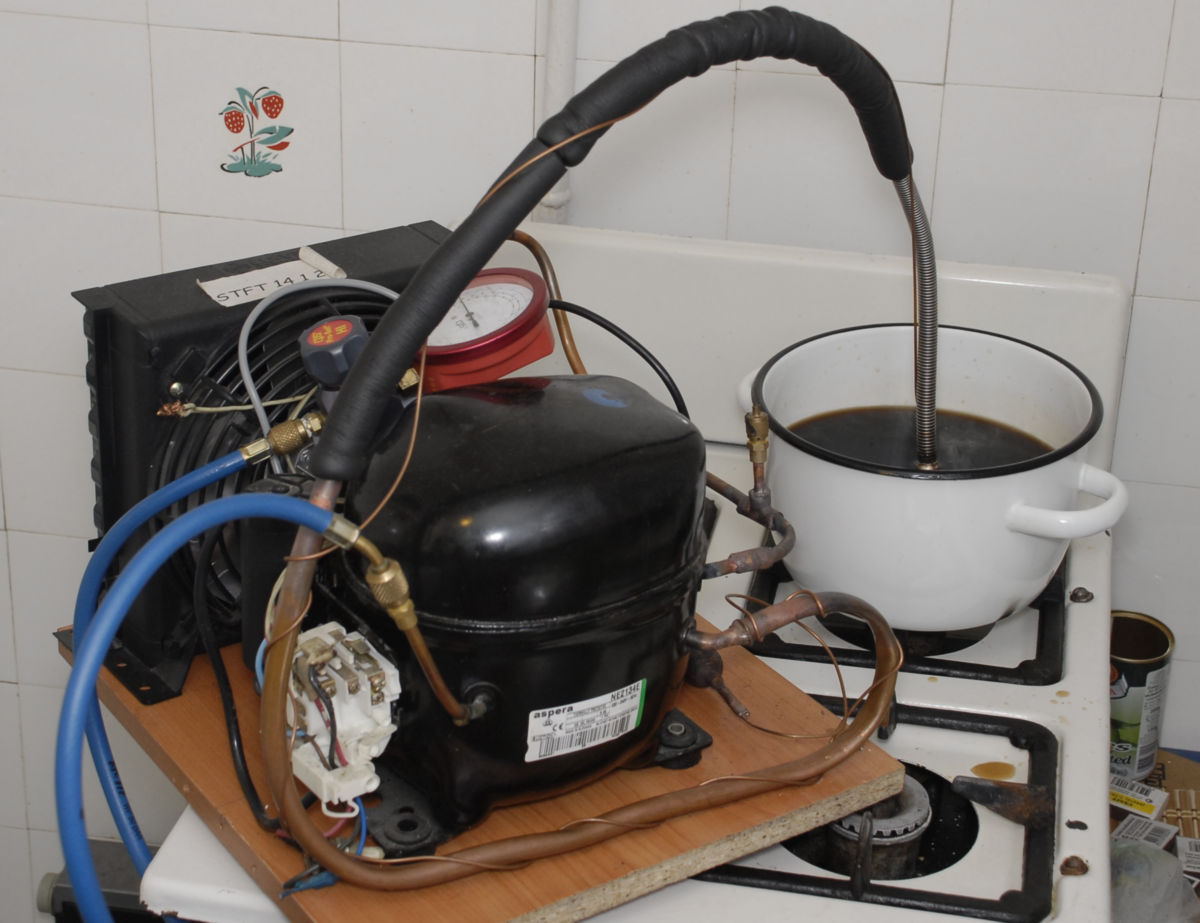
Also worked on more compact system with weaker cooling might, using more traditional compressor from the regular kitchen refrigerator. This system was able to handle 200-250W load at -30 °C. Perhaps in modern days that would be enough to push i9-9900K to about 5.6-5.7 GHz for 24/7 operation with around zero temperatures.
Keep in mind that because of evaporation process, heat power is directly related to pressure and selected operation temperature. It's possible to tune this same hardware to provide 800-1000W of cooling power if temperatures are conservative +10...+20 °C. Cooling capacity almost double on every 10°C of temperature increase.
Jumping ahead, some extreme overclockers used to build complex multi-gas cascade phase-change systems, cooling 200-300 W of heat flux at -100 °C, while dissipating few kW into ambient air. In these expensive systems big phase-change system (with working temperature -30..-40 °C) is cooling smaller phase-change (with different gas and temperature -70..-90°C) and sometimes that one even cool third phase-change system (different again gas, temperature -110...-130°C) that finally cools CPU or GPU. However for hobby benchmarking it is usually cheaper to rent 30-50 liter dewar and buy LN2 for ocassional session, than maintain multi-kilowatt noisy and heavy complex system like this.
In the very end, liquid nitrogen is made on factory using similar process with large cryocoolers. These condense air into liquid and separate nitrogen from oxygen/argon and other gases. But that's a story for another day, if you guys not scared already.
Building phase-change systems is lots of fun on its own, irrelevant to overclocking. These type of systems are widely used in industry, food storage, scientific and medical applications and so on. It is also possible to get pre-assembled compressor-condenser units with frame , such as this
Tekumseh AE2415Z-AA1AXM. This assembly is low-power , providing only 260 W of cooling power at -40 °C, but there are many like it with different specs/power ratings. Sky is the limit. ;)

Total my project took about $600 USD back in October 2008 and few weekends to complete and test.