2017/06/04 06:51:15
Quad5Ny
 
---Edit: Oct. 15, 2018---
Heads up to anyone using BattlEye, it can kill SpeedFan until you restart Windows.
See This Post by brian91292
Fixed the Font, not sure what happened, it looked fine in Firefox.
 
 
This step-by-step guide will show you how to install NSSM and SpeedFan, Configure SpeedFan and finally set SpeedFan to run as a System Service that automatically launches and restarts if it crashes.
 
The first post will be a Hybrid guide; part Video and Part Text.  The Second post will be a all text version.  Regardless of which version you use make sure not to include the ' ' when Copy+Pasting!
 
P.S. As far as I know this is the only tutorial on the internet that has a set of instructions for setting up SpeedFan and then installing it as a Windows Service.  That said I won't be providing support for this tutorial if it becomes popular (it's just too much effort, heh).  Lets get started.
 
---
 
How to: Create a temperature controlled GPU Radiator fan curve in SpeedFan & Register SpeedFan as a Windows Service
by Quad5Ny                                                                                                                                                                               
 
Prerequisites: Radiator fan connected to a Motherboard header and no other software that can mess with fan speeds!
 
Part 1, The Programs
1. Download NSSM and Extract '\win64\nssm.exe' from the ZIP file to 'C:\Windows\System32\nssm.exe'
2. Download and Install SpeedFan
 
Part 2, SpeedFan Setup
      Basic Configuration:

Not shown: Finding your Radiator Fans name and figuring out which output from the Super I/O chip is controlling said fan (on my board the Super I/O fan outputs are called 'PWM 1-5').
      Testing:
        1. Minimize SpeedFan, Stress test your GPU and monitor temperatures until they stabilize - If the temperatures are too high adjust the Temp/Speed Curve
        2. Go back to the 'Fans' tab, uncheck your Radiator fan and click 'OK' - No need to use resources monitoring the RPM as SpeedFan will be running with no GUI
        3. Exit SpeedFan and make sure the Radiator fan goes to 100%
 
Part 3, NSSM Setup

Copy+Paste stuff: '%ProgramFiles(x86)%\SpeedFan\speedfan.exe' '/NOSMBSCAN /NONVIDIAI2C /NOSMARTSCAN /NOADVSMARTSCAN /NOSUMMARYLOGSCAN /NOSCSISCAN /NOCSMISMARTSCAN /NOARECASCAN /NO3WARESCAN'
Notes: DO NOT call the service 'SpeedFan', you will break SpeedFan!  Setting the Priority to 'High' in NSSM makes sure SpeedFan still gets priority when CPU usage is 100%
 
Warning: Do not launch SpeedFan manually if the service is running!
2 copies of SpeedFan will be running and fan control will be unpredictable!
 
 
* These switches disable SpeedFan's SMBus, NVIDIA I2C Bus and HDD/SSD S.M.A.R.T. Scanning/Monitoring.  If you're only using SpeedFan to control your Radiator Fan you can very likely use this full set of disable switches: '/NOSMBSCAN /NOSMARTSCAN /NOSCSISCAN /NOIPMISCAN /NOARECASCAN /NO3WARESCAN /NOACPISCAN /NOAMDK8SCAN /NOUGURUSCAN /NOJOYSCAN /NOTOSHIBA /NOASUSSCAN /NONVIDIAI2C /NOGEFORCEROM /NOGIVEIO /NODELLSCAN /NOSUMMARYLOGSCAN /NOADVSMARTSCAN /NOCSMISMARTSCAN /NOATK0110SCAN /NOATIADLSCAN /NOINTELQST'
 

Attached Image(s)

2017/06/04 06:54:34
Quad5Ny
Text Only Version:
 
How to: Create a temperature controlled GPU Radiator fan curve in SpeedFan & Register SpeedFan as a Windows Service
by Quad5Ny                                                                                                                                                                               
 
Prerequisites: Radiator fan connected to a Motherboard header and no other software that can mess with fan speeds!
 
 
Part 1, The Programs
1. Download NSSM and Extract '\win64\nssm.exe' from the ZIP file to 'C:\Windows\System32\nssm.exe'
2. Download and Install SpeedFan
 
Part 2, SpeedFan Setup
1. Open SpeedFan, Check the 'Do not show again' box and click 'Close' - Do this Twice
2. Check the 'Automatic fan speed' box and click 'Configure'
      Basic Configuration:
        • Temperatures tab - Uncheck everything Except 'GPU', click 'GPU' then set - Desired: '65', Warning: '85' and Uncheck 'Show in tray'
        • Fans tab - Uncheck everything Except your Radiator fan - You'll need to figure out which fan this is on your own
        • Voltages tab - Uncheck everything
        • Speeds tab - Uncheck everything Except your Radiator fan
        • Fan Control tab - Check: 'Advanced fan control'
        • Options tab - Check: 'Start minimized', 'Static icon' and 'Set fans to 100% on program exit' | Uncheck: 'Debug mode' and 'SMBus'
        • Advanced tab - Select your Super I/O chip from the drop down, Select the output that controls your Radiator Fan then set it to 'Manual' and check 'Remember it' - You'll need to figure out what output controls the Radiator fan on your own.  On my board the outputs are called 'PWM 1-5'.
       ---
      Temperature vs. Fan Speed Curve:
        1. In the Fan Control tab click 'Add', Type 'GPU Radiator Fan', click 'OK' and then click 'GPU Radiator Fan'
        2. Check 'Controlled Speed', choose your Radiator Fan from the drop down and set Method to 'MAX of speeds'
        3. Click the 'Add' button on the bottom, Select 'GPU - GPU from GeForce Video Card @ $XXXX on PCI' and click 'OK'
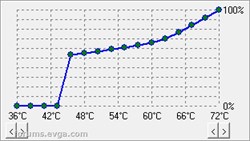
        4. Click your GPU in the Temperatures box, set Hysteresis to '4' and use the arrows to set Min/Max Temperature axis of the graph to '36°C/72°C'
        5. Change the graph to your liking or match the graph I attached below for 0 RPM mode - Note: PWM fans are able to start spinning at much lower percentages compared to Voltage controlled fans (3-pin vs 4-pin)
       ---
      Testing:
        1. Minimize SpeedFan, Stress test your GPU and monitor temperatures until they stabilize - If the temperatures are too high adjust the Temp/Speed Curve
        2. Go back to the 'Fans' tab, uncheck your Radiator fan and click 'OK' - No need to use resources monitoring the RPM as SpeedFan will be running with no GUI
        3. Exit SpeedFan and make sure the Radiator fan goes to 100%
 
Part 3, NSSM Setup
1. Press 'Win+R', type 'nssm install SpeedFanSvc', click 'OK' - DO NOT call the service 'SpeedFan', you will break SpeedFan
2. Application tab - Click the '...' next to 'Path', paste '%ProgramFiles(x86)%\SpeedFan\speedfan.exe' in the box and press 'OK'
3. Application tab (1) - Paste '/NOSMBSCAN /NONVIDIAI2C /NOSMARTSCAN /NOADVSMARTSCAN /NOSUMMARYLOGSCAN /NOSCSISCAN /NOCSMISMARTSCAN /NOARECASCAN /NO3WARESCAN' in the 'Arguments' box
4. Details tab - Display Name: 'SpeedFanSvc', Description: 'Monitors and sets custom RPM curves for system fans.'
5. Process tab - Priority: 'High' and Uncheck 'Console window' - 'High' makes sure SpeedFan still gets priority when CPU usage is near or at 100%
6. Exit actions tab - Delay restart by '3000' ms
7. Click 'Install service' and Restart Windows - If you don't want to reboot you can also manually start 'SpeedFanSvc'
 
Warning: Do not launch SpeedFan manually if the service is running!
2 copies of SpeedFan will be running and fan control will be unpredictable!
 
 
(1) These switches disable SpeedFan's SMBus, NVIDIA I2C Bus and HDD/SSD S.M.A.R.T. Scanning/Monitoring.  If you're only using SpeedFan to control your Radiator Fan you can very likely use this full set of disable switches: '/NOSMBSCAN /NOSMARTSCAN /NOSCSISCAN /NOIPMISCAN /NOARECASCAN /NO3WARESCAN /NOACPISCAN /NOAMDK8SCAN /NOUGURUSCAN /NOJOYSCAN /NOTOSHIBA /NOASUSSCAN /NONVIDIAI2C /NOGEFORCEROM /NOGIVEIO /NODELLSCAN /NOSUMMARYLOGSCAN /NOADVSMARTSCAN /NOCSMISMARTSCAN /NOATK0110SCAN /NOATIADLSCAN /NOINTELQST'

Attached Image(s)

2017/06/20 09:06:02
Cool GTX
  Thanks for the guide, BR awarded
2017/06/23 15:08:37
Jimbo2112
This is awesome!  Thank you!
2017/06/25 17:17:53
XrayMan
 
Thanks.      
2017/06/25 20:16:32
Quad5Ny
Glad to help :D

BTW guys you can add other system fans to this and have SpeedFan control everything.
---
Remember to stop the service temporarily if you need to open the SpeedFan GUI or if you need to Update SpeedFan, and if you're removing SpeedFan make sure to remove 'SpeedFanSvc'.

How to remove SpeedFanSvc: Press Win+R, type: 'nssm remove SpeedFanSvc'
How to stop/start a service: Use Services.msc or type the following in a Admin Command Prompt; 'sc stop SpeedFanSvc' / 'sc start SpeedFanSvc'
How to edit a NSSM service: Press Win+R, type: 'nssm edit SpeedFanSvc' - This is useful if you want to add/remove some of the disable switches.

Edit: And thank-you for the Ribbon @Cool GTX!! I didn't want to bump my thread but I marked your post as helpful. :)
2017/06/25 21:14:31
ty_ger07
Real nice!
 
I have had my radiator fans controlled via BIOS and a little custom circuit monitoring CPU temp only.  Now, I have added GPU temp monitoring to ramp up the radiator fan speeds for GPU intensive applications when the CPU otherwise stays cool on its own.
2017/07/27 01:08:14
akteni
In the 1070/1080 FTW hybrid kit, stock rad fan is not controllable. I can not even see RPM with corsair commander mini. Does this guide overcome this issue? Or is it just rubbish temp controlled fan? 
2017/08/01 06:50:25
Notwist
Got a quick question to throw in here since I literally cannot find an answer anywhere else on the internet:

I have an Asus motherboard with the Asus Fan Extension card connected. Have others have luck with getting the fan extension card fans to show up in SpeedFan? Figure this question might help some users, and I don't see them appearing at all for me.

Thank you to anybody who can help!
2017/08/01 12:01:47
vincinicius
akteni
In the 1070/1080 FTW hybrid kit, stock rad fan is not controllable. I can not even see RPM with corsair commander mini. Does this guide overcome this issue? Or is it just rubbish temp controlled fan? 


If they are the same as the fans shipped with the GTX 1080 ti SC2 Hybrid, then they are only voltage controlled (non-PWM) and have no RPM sensor (only 2 pins used of the 3 pin connector ... but I need to double check that, since I'm not 100% sure now [Edit: confirmed!]).


Use My Existing Forum Account

Use My Social Media Account