Having issues with your new GPU? Here are some basic troubleshooting steps everyone should try before creating a new thread.
Make sure you’re powering your card with separate pci-e power cables instead of daisy chaining cables. Make sure your graphics card is fully seated and locked into your motherboard, and that the pci-e power cables going to the power supply output & gpu inputs are fully seated and not loose. Make sure you're using a high quality display cable. Non vesa certified display port cables can cause all sorts of issues. Riser cables can cause issues, try a different one if you're having a problem, or try connecting the gpu directly to the motherboard. Update your video cards firmware/vbios via the latest evga precision x1 to make sure your card will perform optimally. Make sure your motherboard bios is fully up to date as well.#1 Perform a clean boot of windows:
- Instructions on how to perform a clean boot for windows vista, 7, 8/8.1, 10 & 11 can be found here.
Clean boot notes: Leave NVIDIA Display Container LS check-marked under the services tab.
#2 Perform a clean installation of the most recent video drivers:
- Uninstall EVGA Precision/MSI Afterburner if installed, make sure to select "no" to saving profiles if asked. Reboot the PC now if you had to uninstall Precision or Afterburner.
- Use DDU (Display driver uninstaller) in safe mode to clean out all your NVIDIA drivers. Use the clean and restart (highly recommended) option.
- Download & save the most recent graphics driver to your desktop. You can find the most recent graphics driver here. Make sure you select the correct operating system you're currently running. If given the option to select "windows driver type", select DCH.
- Run the graphics installer once the download is complete.
- Select NVIDIA graphics driver, select custom advanced install, under custom installation options uncheck all options except graphics driver & physx system software, if you have a 3D capable monitor and would like to use 3D at some point please select both 3D options, check mark perform clean install, then click next to install the driver, reboot when asked.
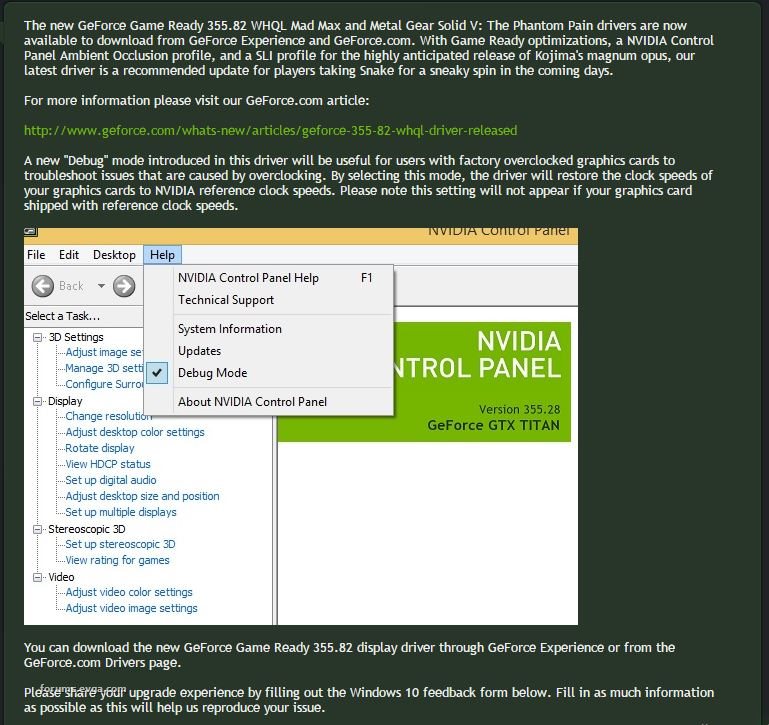
#3 NVIDIA control panel debug mode:
- This should only be attempted if windows clean boot & clean driver installation didn't resolve your issue.
- This is a great feature to help determine problems with the card. To turn on Debug Mode, open the NVIDIA Control Panel, then go to the Help menu, and check the Debug Mode option. If you have a reference model card, this option will be grayed out and you will need to use the latest version of MSI afterburner to underclock the card.
 Debug mode notes:
 If running your card in debug mode resolves your issues you will be left with three options...
- A. Leave the card running in debug mode so you're able to play without problems. Leaving the card in debug mode forces the card to run at NVIDIA reference clock speeds all the time. This option may be fine for some people, but usually it points to a bigger issue such as an unstable factory overclocked video card, or a faulty psu.
- B. Try a different PSU. Sometimes a weak power supply is to blame for gpu issues. Simply swapping in another known good psu could resolve your issues. Run the occt power supply test to see if your psu is the problem. If the psu test doesn't make your pc reset then your psu isn't the issue.
- C. RMA the card. Only do this is if running in debug mode & swapping your psu didn't help resolve your issue.
#4 How to underclock with MSI afterburner:
- Download & install latest version of msi afterburner. Latest version of msi afterburner can be found here.
- Run msi afterburner and adjust the following settings... set core clock (MHz) to as far negative as you can set it. Set memory clock (mhz) to as far negative as you can set it. Click apply (check mark button) to apply the changes.
- Retest system for issues. Leave afterburner running while retesting for problems.
Afterburner underclocking notes: If running your video card underclocked resolves your issues you will be left with the same three options as listed above in debug mode notes.
#5 Getting low fps/low GPU utilization inside your games? Here is the solution to low fps/low GPU utilization if you ever optimized your games with Geforce experience...
- Uninstall geforce experience from your computer.
- Reboot pc.
- Delete game config file from main install directory. Deleting the game config file from the main directory will force the game to rebuild a new config file on next game start which should reset all your graphics settings back to default settings for you to adjust manually.
- Config graphics settings manually.
- Should be good to go now.
#6 By default the xbox app has game dvr turned on since the windows 10 anniversary update. This is causing a mess of problems with games previously running at 90-120 FPS suddenly being capped at or below 60 FPS. It also has been known to cause microstutters.
Solution #1:Open Xbox App -> Settings (gear button) -> Game DVR (tab) -> enable/disable silder to OFF.
Soultion #2 (no microsoft account): Open Registry Editor (Run > regedit)
Go to HKEY_CURRENT_USER\System\GameConfigStore
Set the value of DWORD "GameDVR_Enabled" to 0
Go to HKEY_LOCAL_MACHINE\SOFTWARE\Policies\Microsoft\Windows\
Create key "GameDVR"
Create DWORD 32bit called "AllowgameDVR" and set to 0
Restart PC & Retest system.
#7 Having issues with jittery gameplay, or crashing to a black screen when running fullscreen applications on windows 10? If yes, try disabling fullscreen optimization for each of the affected applications. Right click the application .exe and select the compatibility tab...

#8 Having your power options setup incorrectly can cause stuttering & low performance. Make sure your windows power options are setup correctly...

#9 Experiencing black screen issues on startup, or other strange issues? Then you should disable
windows fast startup. If your motherboard supports Gen3 pci-e, but not Gen4, and you’re running a Gen4 video card make sure to set your pci-e slot to Gen3 inside the motherboard bios instead of Auto as running Auto has been known to cause black screens on some Gen3 motherboards.
#10 Got stuttering, freezing, or low performance? Try disabling game mode to see if that helps fix your problem. You could also try disabling hardware-accelerated gpu scheduling.


#11 GPU stuck at max clock on the desktop? Checkout the following thread...
https://forums.evga.com/S...top-idle-m3096373.aspx #12 Crashing to desktop? This issue could be caused by running your system memory (ram) higher then what your cpu recommends. e.g. 12900k recommends 3200MHz at max for DDR4, and 4800MHz max for DDR5. Simply lowering your ram speed down to 3200MHz if running DDR4, or 4800MHz if running DDR5 could resolve the issue. Check your cpu specs and lower accordingly.
#13 GPU fans still spinning on shutdown of pc? Could be a faulty display cable backfeeding power to the gpu. Try a different display cable. If using a displayport output make sure the cable is vesa certified. If a different cable doesn't help try enabling erp mode inside your motherboard bios if it's an avalialble option.
More advanced troubleshooting steps: #1 Reapply the thermal paste on your gpu. Sometimes the thermal paste on your gpu could be dried out, or not fully covering the die of your video card causing core instability. Temps could look normal even though part of the chip isn't being cooled properly due to thermal paste not covering part of it. Simply repasting could resolve your issue. Yes, this involves taking the card apart. If you're not comfortable doing this just rma your card, or find someone who can do it for you such as a local pc shop.
Reapplying the thermal paste on your gpu does not void your warranty as long as you don't damage the card in the process. #2 Reflash video card vbios using nvflash. e.g. If you had a EVGA RTX 3090 Kingpin Hybrid Gaming video card part #24G-P5-3998-KR you would do the following...
- Goto www.techpowerup.com/vgabios
- Refine search parameters to the cards vbios you're looking for.
- Download any vbios that is compatible with your card. You can determine compatibility by selecting a vbios that is named to work with your card, and verifying that the subsystem id matches that of your cards part #. e.g. https://www.techpowerup.c...-201110-2 clearly states subsystem id: 3842 3998 under graphics card info. 3842 being EVGA, and 3998 being the kingpin hybrid gaming video card. The subsystem id can also be seen/verified by gpu-z by looking at the last 8 digits of the device id inside gpu-z.
- Download the latest version of nvflash.
- Extract nvflash to your desktop.
- Drag and drop the .rom onto the nvflash64.exe to flash the card.
- Restart computer after the flash is complete.
Reflash Notes: If your video card is under warranty you may want to consider rma'ing the card instead of reflashing it. Reflashing the vbios does not void your warranty so long as you're using an official evga vbios, and don't end up bricking the card. All the .rom files listed on the techpowerup.com site are official evga vbios that have been dumped by gpu-z, and verified by techpowerup.com staff, so you'll be good there. There is always the potential to brick your card in the process of reflashing, but the chances are low, but just keep that in mind if you decide to reflash your card. Reflashing a card with multiple vbios chips stands a lesser chance of bricking due to being able to easily recover by switching to another vbios chip via onboard vbios switch located on the card, and simply restarting the computer. If your video card only has one vbios chip, and you end up bricking the card while flashing you may be able to recover it by doing the following... https://www.overclock.net...amd-or-nvidia.1612108/ #3 Baking the video card in an oven.
This should only be attempted if your video card is out of warranty. Make sure you bake the card with the die facing up instead of down as stated in the article.
https://www.overclockers.com/the-oven-trick-repairing-your-broken-video-card-with-an-oven/