Text Only Version:
How to: Create a temperature controlled GPU Radiator fan curve in SpeedFan & Register SpeedFan as a Windows Service
by Quad5Ny
Prerequisites: Radiator fan connected to a Motherboard header and no other software that can mess with fan speeds!
Part 1, The Programs1. Download
NSSM and Extract '\win64\nssm.exe' from the ZIP file to 'C:\Windows\System32\nssm.exe'
2. Download and Install
SpeedFan Part 2, SpeedFan Setup1. Open SpeedFan, Check the 'Do not show again' box and click 'Close' -
Do this Twice2. Check the 'Automatic fan speed' box and click 'Configure'
Basic Configuration:
• Temperatures tab - Uncheck everything
Except 'GPU', click 'GPU' then set - Desired: '65', Warning: '85' and Uncheck 'Show in tray'
• Fans tab - Uncheck everything
Except your Radiator fan -
You'll need to figure out which fan this is on your own • Voltages tab - Uncheck everything
• Speeds tab - Uncheck everything
Except your Radiator fan
• Fan Control tab - Check: 'Advanced fan control'
• Options tab - Check: 'Start minimized', 'Static icon' and 'Set fans to 100% on program exit' | Uncheck: 'Debug mode' and 'SMBus'
• Advanced tab - Select your Super I/O chip from the drop down, Select the output that controls your Radiator Fan then set it to 'Manual' and check 'Remember it' -
You'll need to figure out what output controls the Radiator fan on your own. On my board the outputs are called 'PWM 1-5'. ---
Temperature vs. Fan Speed Curve:
1. In the Fan Control tab click 'Add', Type 'GPU Radiator Fan', click 'OK' and then click 'GPU Radiator Fan'
2. Check 'Controlled Speed', choose your Radiator Fan from the drop down and set Method to 'MAX of speeds'
3. Click the 'Add' button on the bottom, Select 'GPU - GPU from GeForce Video Card @ $XXXX on PCI' and click 'OK'
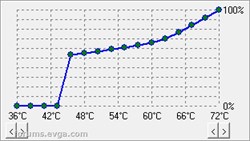
4. Click your GPU in the Temperatures box, set Hysteresis to '4' and use the arrows to set Min/Max Temperature axis of the graph to '36°C/72°C'
5. Change the graph to your liking or match the graph I
attached below for 0 RPM mode -
Note: PWM fans are able to start spinning at much lower percentages compared to Voltage controlled fans (3-pin vs 4-pin) ---
Testing:
1. Minimize SpeedFan, Stress test your GPU and monitor temperatures until they stabilize -
If the temperatures are too high adjust the Temp/Speed Curve 2. Go back to the 'Fans' tab, uncheck your Radiator fan and click 'OK' -
No need to use resources monitoring the RPM as SpeedFan will be running with no GUI 3. Exit SpeedFan and make sure the Radiator fan goes to 100%
Part 3, NSSM Setup1. Press 'Win+R', type 'nssm install SpeedFanSvc', click 'OK' -
DO NOT call the service 'SpeedFan', you will break SpeedFan2. Application tab - Click the '...' next to 'Path', paste '%ProgramFiles(x86)%\SpeedFan\speedfan.exe' in the box and press 'OK'
3. Application tab
(1) - Paste '/NOSMBSCAN /NONVIDIAI2C /NOSMARTSCAN /NOADVSMARTSCAN /NOSUMMARYLOGSCAN /NOSCSISCAN /NOCSMISMARTSCAN /NOARECASCAN /NO3WARESCAN' in the 'Arguments' box
4. Details tab - Display Name: 'SpeedFanSvc', Description: 'Monitors and sets custom RPM curves for system fans.'
5. Process tab - Priority: 'High' and Uncheck 'Console window' -
'High' makes sure SpeedFan still gets priority when CPU usage is near or at 100%6. Exit actions tab - Delay restart by '3000' ms
7. Click 'Install service' and Restart Windows -
If you don't want to reboot you can also manually start 'SpeedFanSvc' Warning: Do not launch SpeedFan manually if the service is running!
2 copies of SpeedFan will be running and fan control will be unpredictable!
(1) These switches disable SpeedFan's SMBus, NVIDIA I2C Bus and HDD/SSD S.M.A.R.T. Scanning/Monitoring. If you're only using SpeedFan to control your Radiator Fan you can very likely use this full set of disable switches: '/NOSMBSCAN /NOSMARTSCAN /NOSCSISCAN /NOIPMISCAN /NOARECASCAN /NO3WARESCAN /NOACPISCAN /NOAMDK8SCAN /NOUGURUSCAN /NOJOYSCAN /NOTOSHIBA /NOASUSSCAN /NONVIDIAI2C /NOGEFORCEROM /NOGIVEIO /NODELLSCAN /NOSUMMARYLOGSCAN /NOADVSMARTSCAN /NOCSMISMARTSCAN /NOATK0110SCAN /NOATIADLSCAN /NOINTELQST'
Attached Image(s)
