Luciel
iCX Member

- Total Posts : 327
- Reward points : 0
- Joined: 2008/06/05 08:35:02
- Location: Málaga, Spain
- Status: offline
- Ribbons : 13


Hello, The aim of this tutorial project is to put togueter a series of smaller tutorials/how to on individual things. Customizing a fan controller, painting a drive, and so on an so forth. All of these mini-tutorials will be posted as seperate threads. This thread will be the main one focusing more on the whole build. These are an initiative of the main sponsor, Lamptron.  Other sponsors that have helped out with this project are:    Thank you all, specially Chris @ Lamptron and Teseo @ Benchmark Hardware for their never ending support. We will be using a very basic case, the entry level "Isis" by B-Move: 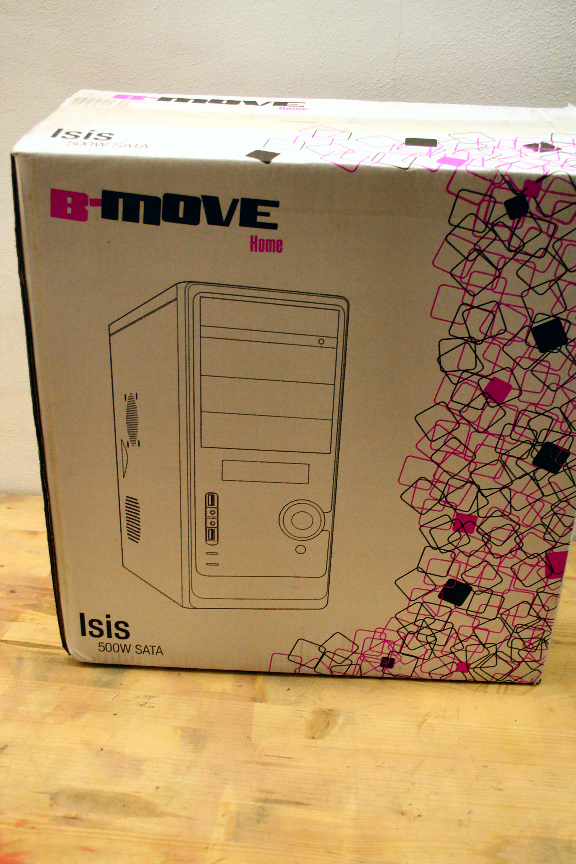 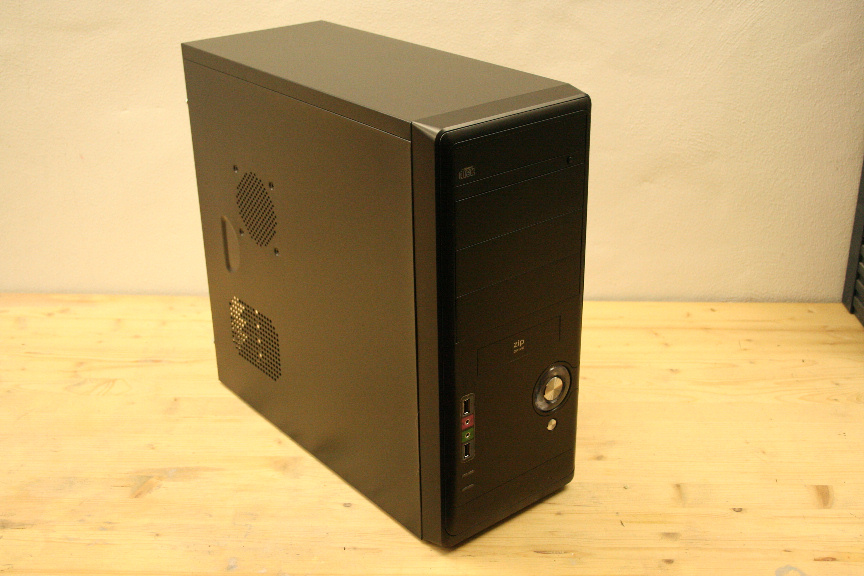 And we strip it down:
Edit (note by Burnout21 over @ Bit Tech): A good idea is de-rivetting the top side, that way we can trully get all the panels off which will make for a better finish. I didn´t on this particular case as all areas where easily accesible, but this isn´t normally what happens with most cases) Edit (note by nagyizom over @ Bit Tech): Another good idea is to remove those ugly fan grills at the back and replace them with our own. Obviously this a matter of your own personal taste, it´s easy enough to do and won´t cause you any major troubles). This may or may not give you better noise reduction and airflow (depending on the specific case of course). 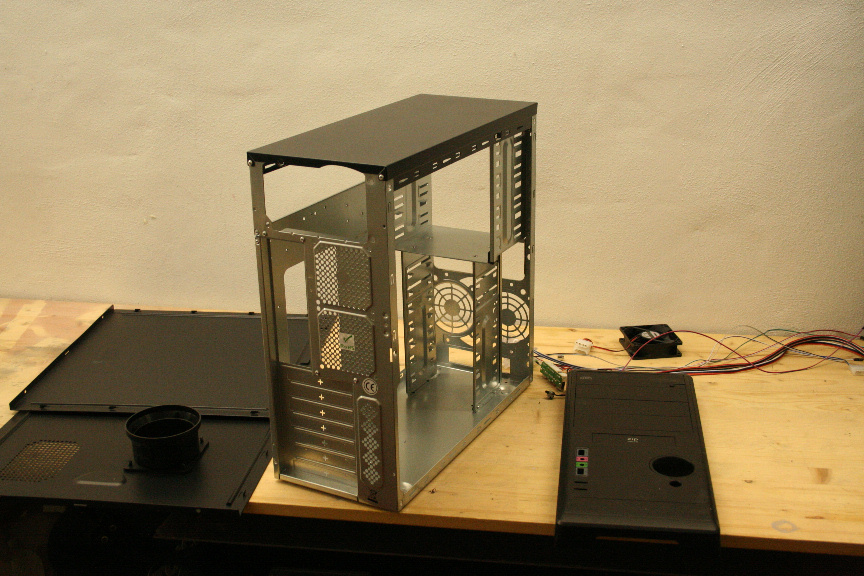 The first change I´m going to do is prepare the side for a window. If you feel you want a normal square window, there´s nothing wrong with that, go ahead, you can aply the same steps as I will be doing. Personally, I like something different, so I´m going to be doing a series of triangular shapes. There´s many ways of doing this, but I´m going to explain the way I do it. I tape out the area to cut, in order to use the tape as a guideline, you can use drawn lines if you like, personally I preffer this way as with a normal line I end up not being able to see it due to the sparks that come when cutting. Edit (note by nagyizom over @ Bit Tech): If you´ve never used a dremel, you will provably find it easier using a jigsaw, it should also give you a nice straight line. Personally I find tape for guiding and a steady dremel hand is good enough, again, it´s your choice.  Ok remember to ALWAYS use safety gogles when working with any kind of power tool. I use a dremel for this kind of modification, but really any kind of rotatory tool will do as long as it´s the right size. Edit (note by DeathPrincess over @ [H]ard Forum): Thank you very much for reminding me of this!! I forgot about mentioning it. For this specific job I use the dremel discs line number 420 (Heavy Duty Cut Off wheel), you can get 20 of these for about 7-8€ in your local hardware store. First section cut off: 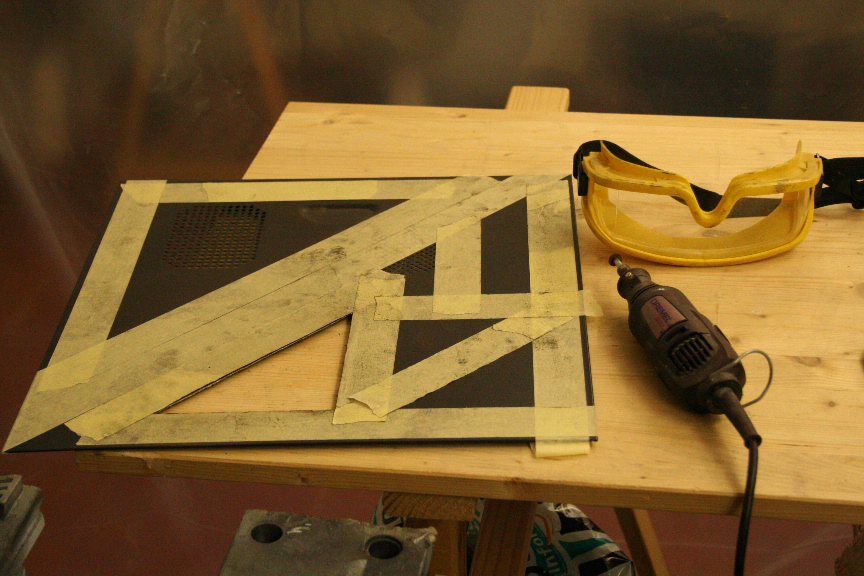 And the rest... 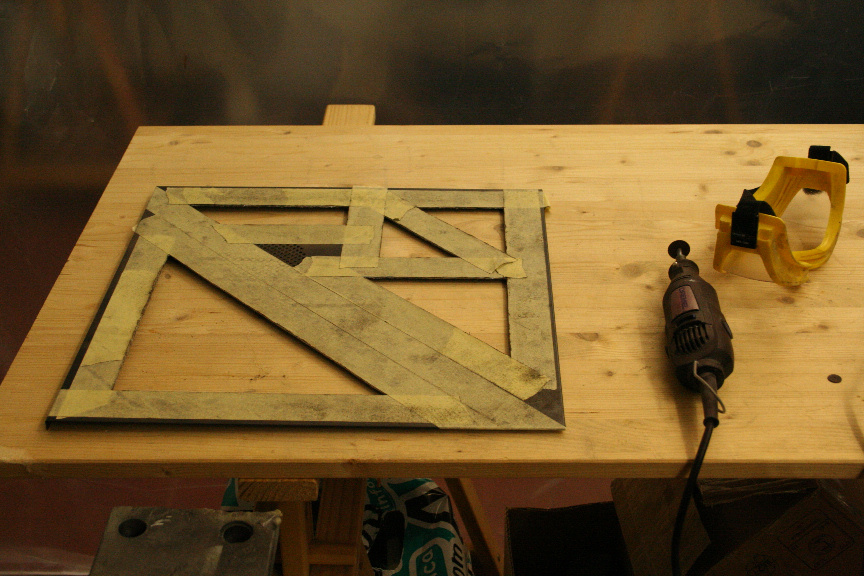 Now, it still needs to be cleaned up for smooth edges but I felt like testing it on the rest of the case to get an idea of the look: 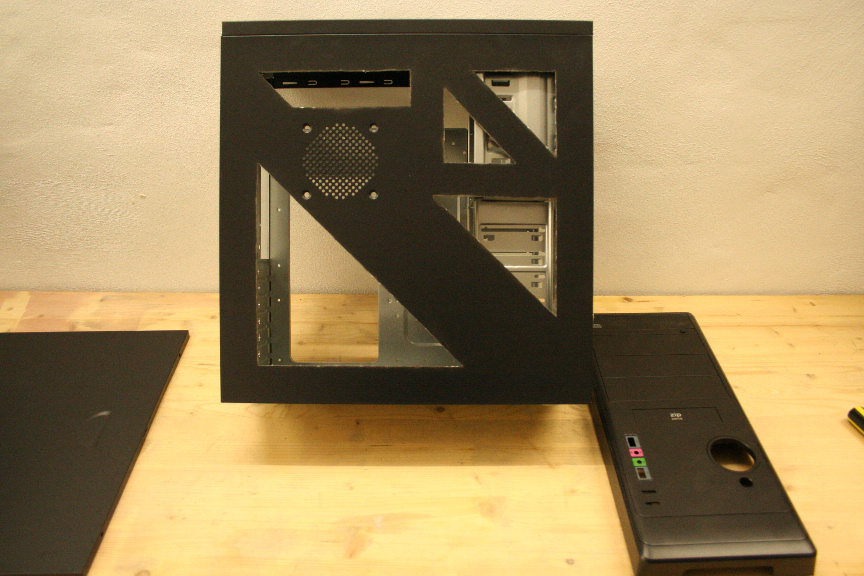 Yeah, I quite like that. Edit (note by RustyTool over @ KustomPCs): RustyTool has a decent point here. Notice how part of the triangle windows are right on top of the bays. Depending on the case and on your intentions for interior design, you may or may not choose to do these as all you can see through them are the bays. On a personal note. If you´re using older cases, make sure that you have enough space between the window and the chasis to fit the plexy. More soon : )
post edited by Luciel - 2012/02/25 02:23:29
|
Re:Tutorial Project: Nº2
2012/02/23 15:17:02
(permalink)
Nice. Dang you cut all that window with only a Dremel? I wanted to do that, but scared free-hand with a Dremel would be messy.
|
Luciel
iCX Member
- Total Posts : 327
- Reward points : 0
- Joined: 2008/06/05 08:35:02
- Location: Málaga, Spain
- Status: offline
- Ribbons : 13
Re:Tutorial Project: Nº2
2012/02/23 15:30:17
(permalink)
I find if you have a visual guideline, like that tape, makes it a lot easier to get a straight line, just really take your time and patience and you will get it right no problem : )
|
Luciel
iCX Member
- Total Posts : 327
- Reward points : 0
- Joined: 2008/06/05 08:35:02
- Location: Málaga, Spain
- Status: offline
- Ribbons : 13
Re:Tutorial Project: Nº2
2012/02/24 15:13:23
(permalink)
The front is awfully plain in this case, which really is to be expected on a low end case. I do like the start button though so I´ll leave that as it is. I won´t worry about the bays since they will be filled. But I do feel like adding some detail to it, following the rest. Remember to set your dremel to low speed when cutting plastic, as high speed will just melt it and make a right mess of things. 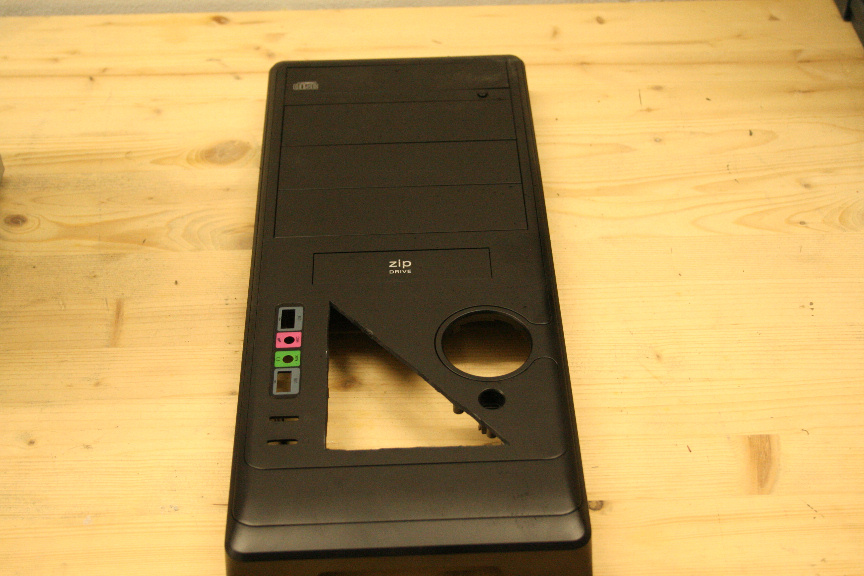 The bad thing, in my oppinion about most simple cases is that the right side tends to be awfully plain and there´s not that much you can do with aside from a nice paintjob, which won´t be seen much in most cases since the window side is the one facing you in most cases. Lucky then that this case has a modern chasis design and has the opening under the board, so hey, why not make a window? 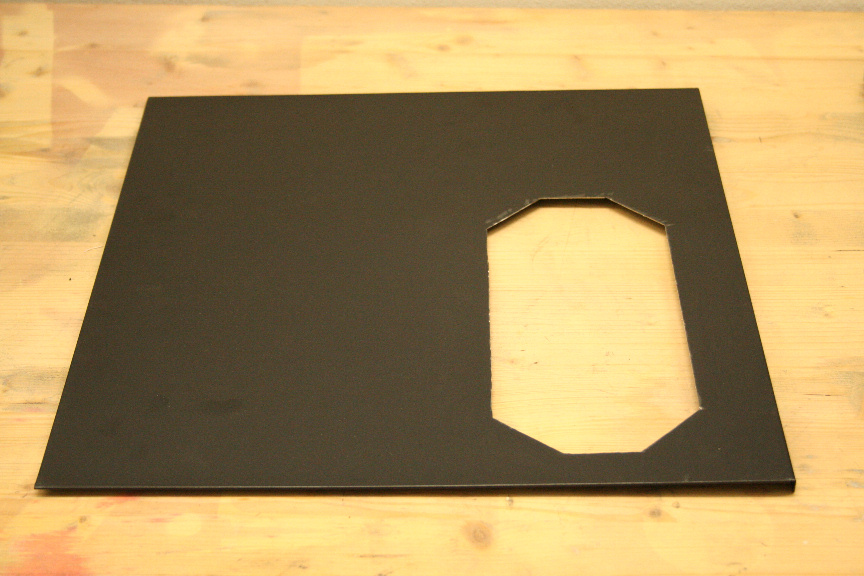 I tend to use number 420 on the dremel line of discs (Heavy Duty Cut-Off Disc). And for this thin metal sheeting, it´s like slicing through butter with a hot knive. Regardless, remember not to push the dremel or you´ll burn through discs. Right so let´s see it all put togueter with all cuts cleaned up (I don´t remember the specfic term in english, but it´s a sanding wheel for the dremel, that´s the way to go, personally I use the same cutting disc on it´s side to cut off all remnants and shave it down, and then I blunt the edges to prevent cutting). 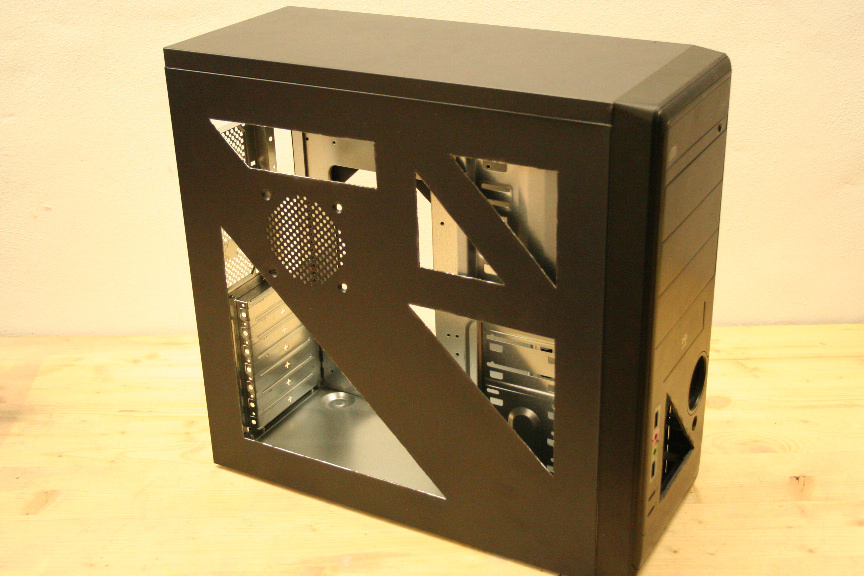 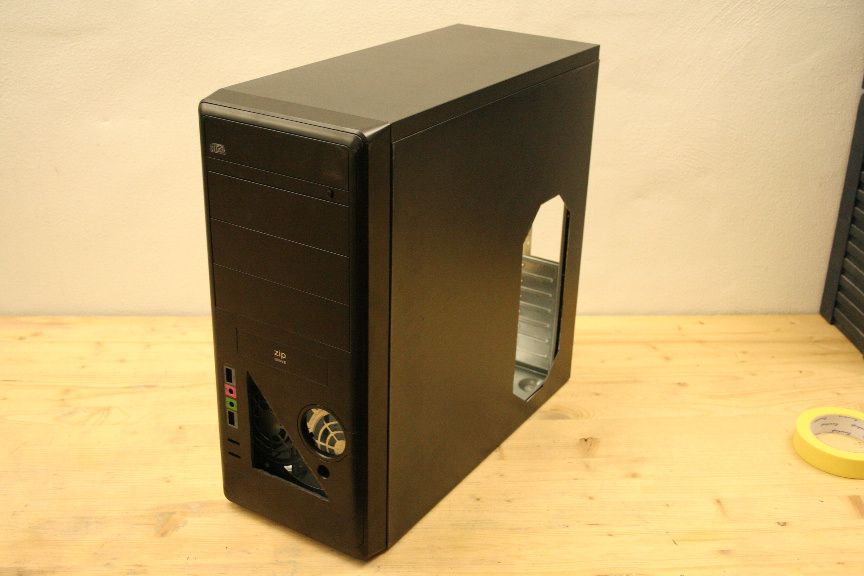 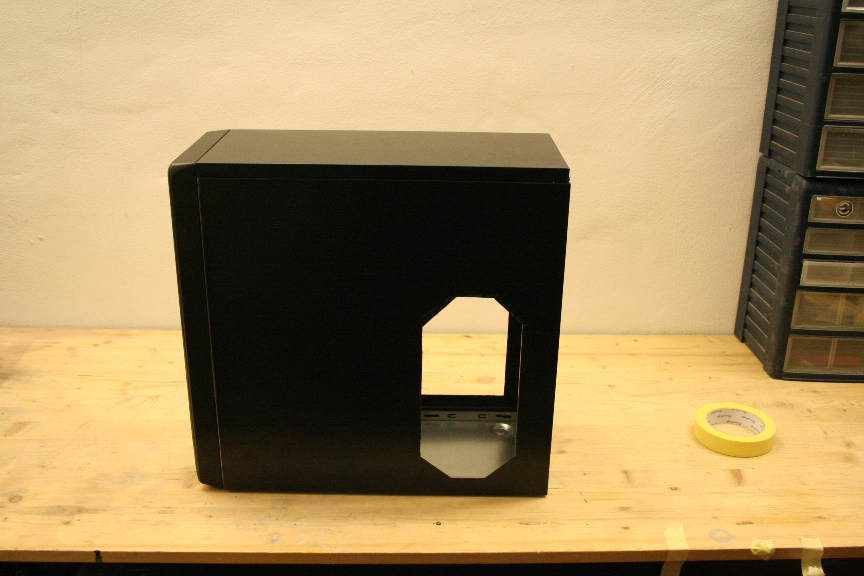 The problem with the front mini-window is that, right behind it there´s a pseudo dual-fan mount, which makes the window look ugly and a bit pointless, so let´s cut it. 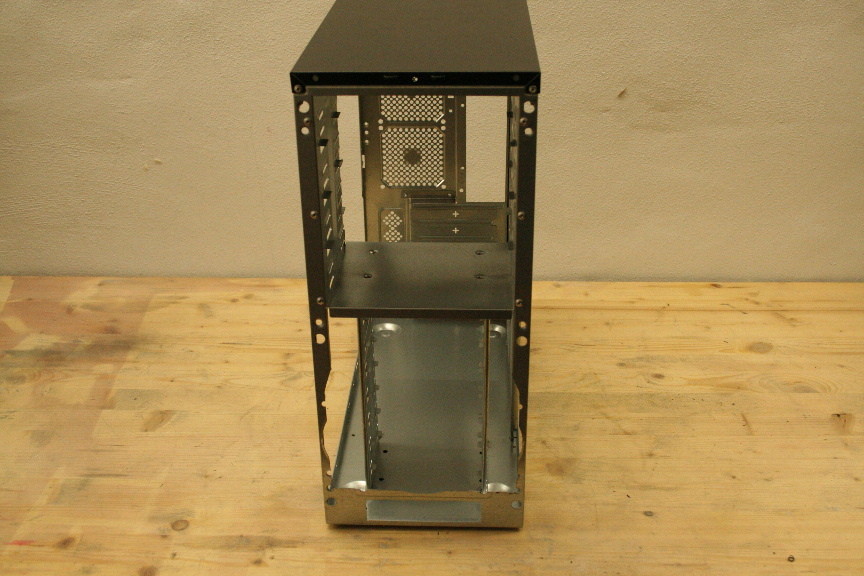 And now... 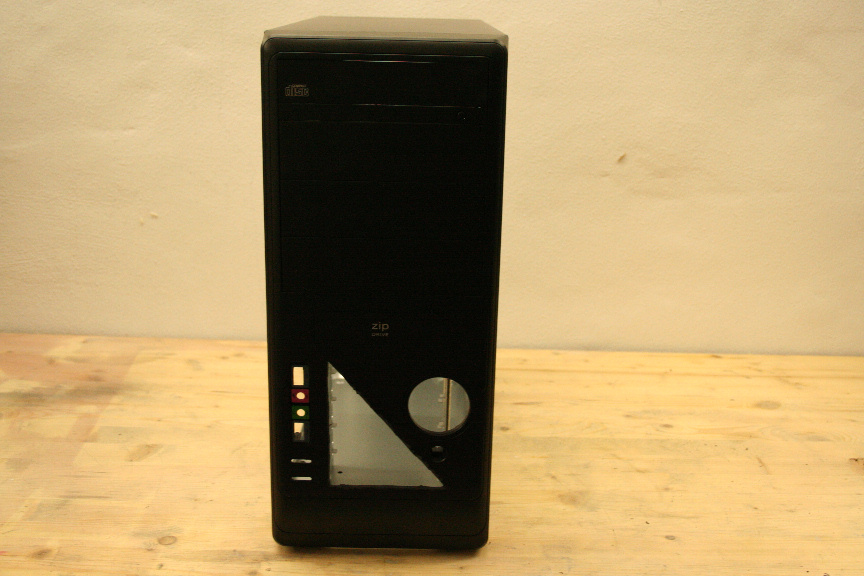 ...much better! Ok, now we´ve got to sand down everything that´s got paint in it, so in this case, all panels, as you can see the interior is bare in this case. Once done, clean it all up. I personally use distilled water, but you can use alcohol or any kind of non-corrosive cleaning product. Now wait for it to dry, specially if you´ve used any kind of chemical to clean it (i´d stay away from that option, just in case). Now that it´s prepped, it´s painting time. Remember to always use a breather, this stuff is nasty in your lungs! Not to mention a well ventilated place, but not outside as you will get crap on your fresh paint, and you don´t want that. 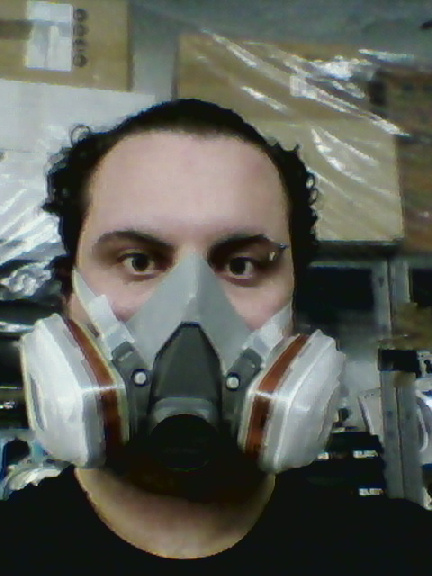 A couple of notes about paint types. I´ve had quite a few discussions about this in several forums with all sorts of people. Some use x product and works fine for them, others say don´t use x product because of x reason. Personally, I use acrylic paint, which is water based, it´s dries very quickly, so you don´t have to wait hours between coats, and it´s good for sanding down between coats to get an extra smooth finish. I stay away from sinthetic and plastic paints, for several reasons which I won´t go in to but regardless, if you want to take my advice, go for acrylic paints, be it in spray can or compressor & gun. Right, down to it. First a coat of primer: 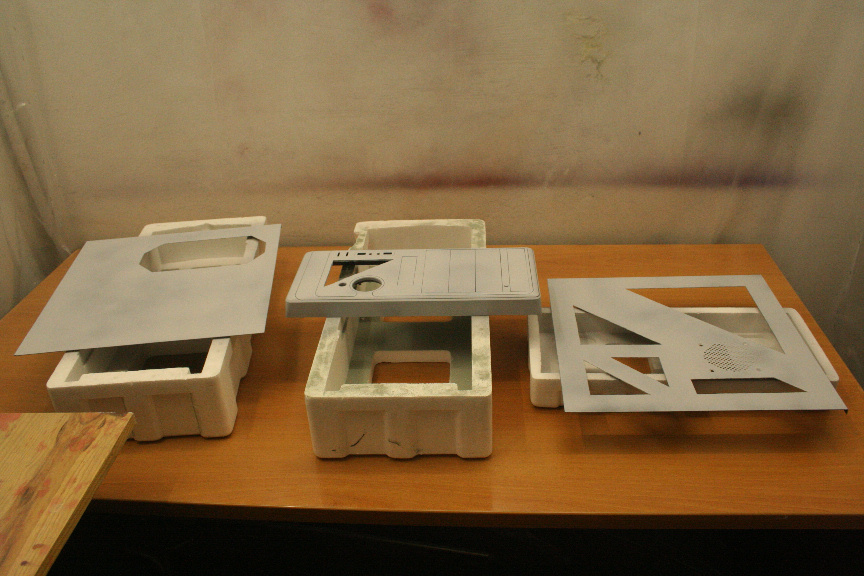 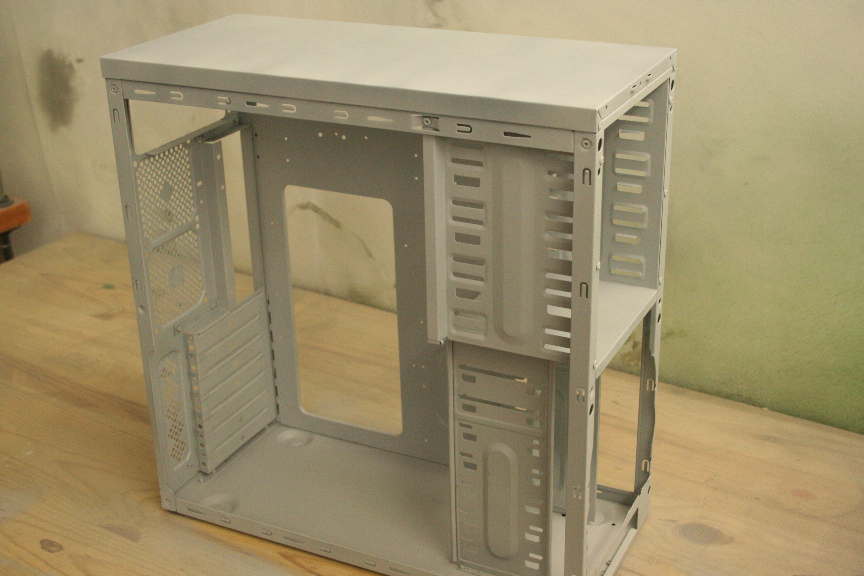  And now a base color as the effect I will be using (pearl) is almost transparent, so it needs a base color first, in this case, white. 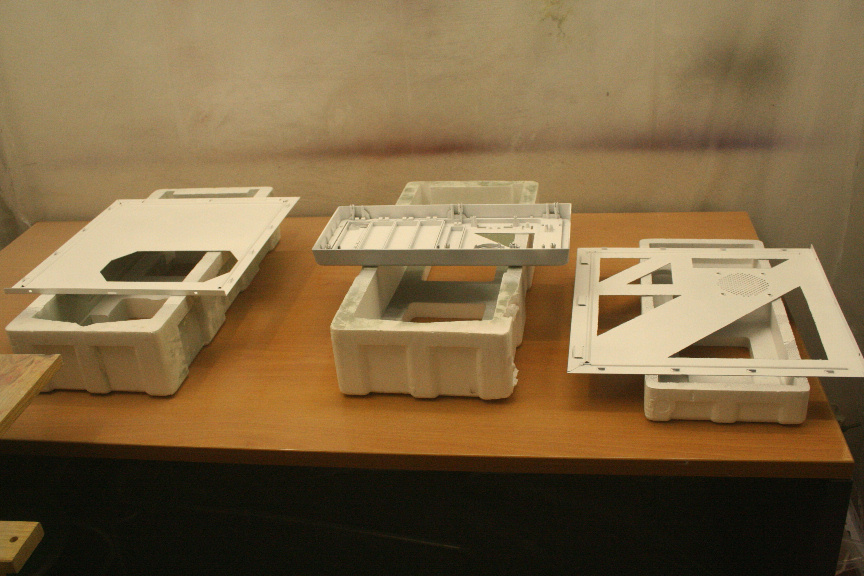 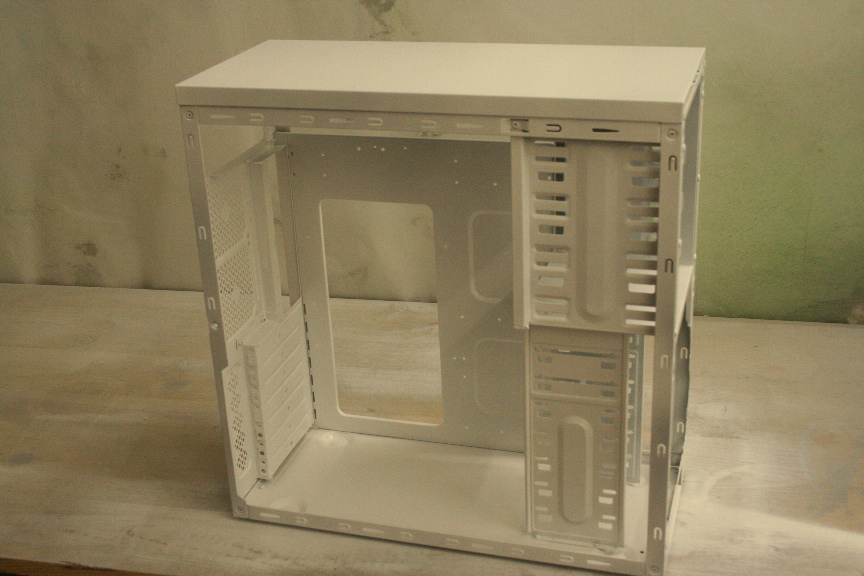 And that´s it for today, more tomorrow. As a small spoiler, no, the case won´t be all white, it´s simply easier doing it all in white and then painting on top as needed.
|
Luciel
iCX Member
- Total Posts : 327
- Reward points : 0
- Joined: 2008/06/05 08:35:02
- Location: Málaga, Spain
- Status: offline
- Ribbons : 13
Re:Tutorial Project: Nº2
2012/02/25 09:57:52
(permalink)
Edited the main post to add comments from several members of several forums, thanks for participating guys, I welcome more suggestive comments of the kind in order to add them further to the steps on this tutorial so that newcomers can use it, containing imput from more experience modders in order to create a decent first project. Right so, update:I sanded down with very fine grit and very gently the first coat of base white, this, while not entirely neccesary will give you a smoother finish on the next coat and it will make the next coat hold on tighter which in turn makes it that much resistant to scratches. Once done, I aplied the second coat of base white: 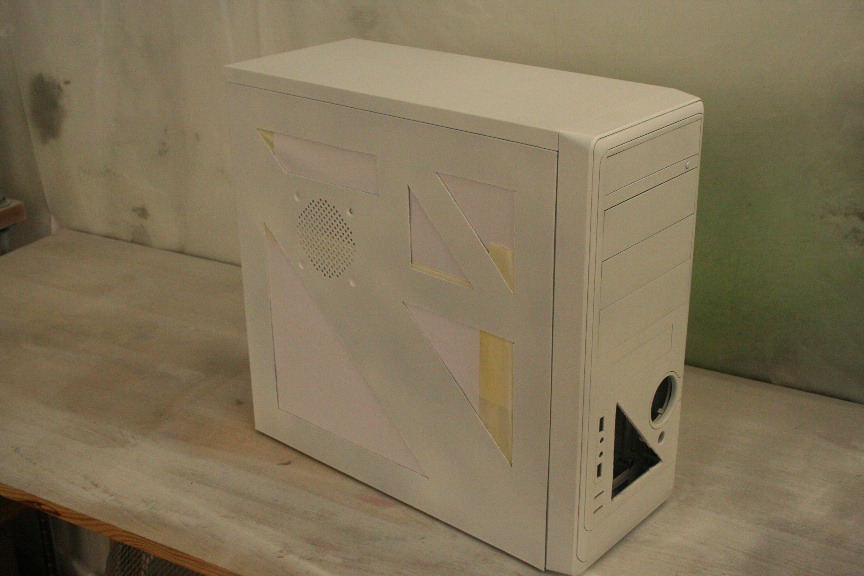 I let that to dry for about 15-20 minutes (again this only aplies to acrylic paint due to it´s quick drying properties) and sanded it down again. I then proceeded to aply the third coat, this time, of pearl white effect. It´s an almost transparent coat, like lacquer if you will, but it´s not lacquer and can be aplied to any color (of the same kind of paint). This will give a glossy pearl finish (which, while the photos don´t do it justice, it´s very different to just using glossy white which I used in the AIO AL project). 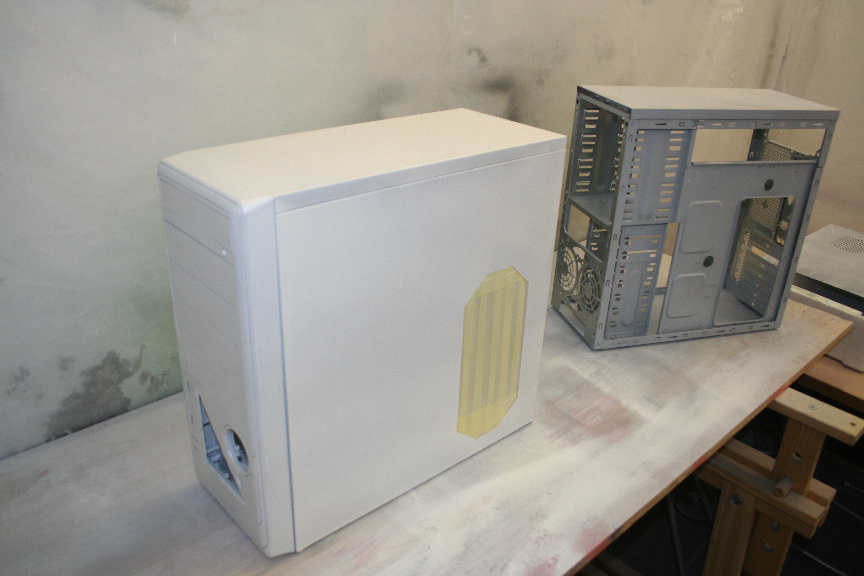 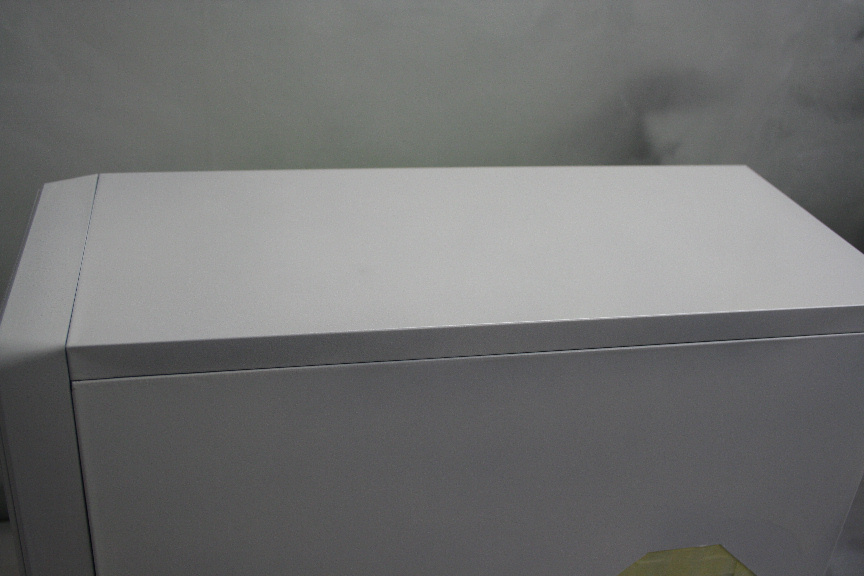  While it´s drying time is the same, I will now leave it over night to cure as I will be using tape on top of it for the next stage of color. PS: The case next to it, is another exactly the same model case I´m preparing for a client, but that can go in another mini thread.
|
Luciel
iCX Member
- Total Posts : 327
- Reward points : 0
- Joined: 2008/06/05 08:35:02
- Location: Málaga, Spain
- Status: offline
- Ribbons : 13
Re:Tutorial Project: Nº2
2012/02/26 12:58:55
(permalink)
|
letterkilled
SSC Member

- Total Posts : 632
- Reward points : 0
- Joined: 2010/09/16 02:18:06
- Location: Sacramento
- Status: offline
- Ribbons : 2
Re:Tutorial Project: Nº2
2012/02/26 14:35:11
(permalink)
I always enjoy your posts! So glad you got your work place cleaned and back on the modding.
ASUS P8Z68 GEN3| i7-2600k @4.5GHz| Corsair 16Gigs DDR3| EVGA GTX 580 3GB| Cooler Master Silent Pro 800W| Corsair Force 3 120gig SSD   
|
w4ss4b3
CLASSIFIED Member

- Total Posts : 4560
- Reward points : 0
- Joined: 2011/12/31 04:50:57
- Location: Please use MY Affiliate code: JHMQJKA3CM
- Status: offline
- Ribbons : 21
Re:Tutorial Project: Nº2
2012/02/26 15:02:57
(permalink)
That is some sick work there man! Can't wait to see more up coming projects.
|
Luciel
iCX Member
- Total Posts : 327
- Reward points : 0
- Joined: 2008/06/05 08:35:02
- Location: Málaga, Spain
- Status: offline
- Ribbons : 13
Re:Tutorial Project: Nº2
2012/02/26 15:10:48
(permalink)
Thanks guys, and esCob4r, this one isn´t finished yet, not by far :P
|
Luciel
iCX Member
- Total Posts : 327
- Reward points : 0
- Joined: 2008/06/05 08:35:02
- Location: Málaga, Spain
- Status: offline
- Ribbons : 13
Re:Tutorial Project: Nº2
2012/03/02 04:35:42
(permalink)
|
voodoo do-er 
CLASSIFIED Member
- Total Posts : 4748
- Reward points : 0
- Joined: 2011/09/02 10:20:58
- Location: 1934~2012 Eduard Khil
- Status: offline
- Ribbons : 9
Re:Tutorial Project: Nº2
2012/03/03 19:41:10
(permalink)
|
HeThing
CLASSIFIED ULTRA Member

- Total Posts : 6897
- Reward points : 0
- Joined: 2010/05/11 07:45:49
- Location: 6F4-72Y-6A8J <-- My Affiliate Code :D
- Status: offline
- Ribbons : 42
Re:Tutorial Project: Nº2
2012/03/04 08:34:23
(permalink)
|
{uZa}DOA
CLASSIFIED Member
- Total Posts : 4253
- Reward points : 0
- Joined: 2008/12/07 07:24:42
- Location: My Affiliate Code: 7B5PL3G722
- Status: offline
- Ribbons : 15
Re:Tutorial Project: Nº2
2012/03/04 12:08:29
(permalink)
WOW, nice job so far! Can't wait to see that case filled with hardware...!
|
Luciel
iCX Member
- Total Posts : 327
- Reward points : 0
- Joined: 2008/06/05 08:35:02
- Location: Málaga, Spain
- Status: offline
- Ribbons : 13
Re:Tutorial Project: Nº2
2012/03/04 23:47:30
(permalink)
Thanks a bunch guys, it will be basic hardware though as it aint my main rig but oh well : )
|
Luciel
iCX Member
- Total Posts : 327
- Reward points : 0
- Joined: 2008/06/05 08:35:02
- Location: Málaga, Spain
- Status: offline
- Ribbons : 13
Re:Tutorial Project: Nº2
2012/03/18 07:50:32
(permalink)
|
Luciel
iCX Member
- Total Posts : 327
- Reward points : 0
- Joined: 2008/06/05 08:35:02
- Location: Málaga, Spain
- Status: offline
- Ribbons : 13
Re:Tutorial Project: Nº2
2012/03/23 02:49:10
(permalink)
|
Luciel
iCX Member
- Total Posts : 327
- Reward points : 0
- Joined: 2008/06/05 08:35:02
- Location: Málaga, Spain
- Status: offline
- Ribbons : 13
Re:Tutorial Project: Nº2
2012/05/02 10:22:44
(permalink)
|
Luciel
iCX Member
- Total Posts : 327
- Reward points : 0
- Joined: 2008/06/05 08:35:02
- Location: Málaga, Spain
- Status: offline
- Ribbons : 13
Re:Tutorial Project: Nº2
2012/05/05 01:57:47
(permalink)
|
Luciel
iCX Member
- Total Posts : 327
- Reward points : 0
- Joined: 2008/06/05 08:35:02
- Location: Málaga, Spain
- Status: offline
- Ribbons : 13
Re:Tutorial Project: Nº2
2012/05/05 01:58:52
(permalink)
* RESERVED FOR PSU GUIDE TUTORIAL *
-----------------------------------------
With this we finalize the how to paint components thread and we continue here on the main thread with the build.
|
jeffgoatley
iCX Member
- Total Posts : 280
- Reward points : 0
- Joined: 2011/01/16 18:31:48
- Location: Louisville, KY
- Status: offline
- Ribbons : 1
Re:Tutorial Project: Nº2
2012/05/05 09:10:05
(permalink)
Great new paint job...Love the way you hacked it all up like you did!!! +1
Win 7 64-bit - Corsair Obsidian Series 800D with Extended Water Cooling Case - Intel Core I7 2700k @ 4.40GHz - Asus Maximus IV Extreme-Z - 16G's G.Skill DDR3-2133 11-11-11-13 1.6v - Corsair HX1000i 80+ Platinum PSU - 2 EVGA GTX 780's in SLI with Hydro Copper-1 Quad & 1 Triple Rad with 2 Swiftech - MCP655 Pumps 1 Bitpower 150 Reservoir - 1 Bitpower 250 Reservoir - 1 Swiftech Apogee for CPU - 4 Intel SSD 320 Sata II 120Gb in Raid 0 - 3 Acer G235h Monitors - 1 Asus VG248QE Logitech G910 Keyboard - Logitech G502 Laser Mouse - Creative Sound Blaster Z & Sennheiser PC Headset 350 SE - 5.1 Panasonic A/V Receiver - Polk Audio Speakers & Sub Woofer www.jeffgoatley.com/mymodrig
|
Luciel
iCX Member
- Total Posts : 327
- Reward points : 0
- Joined: 2008/06/05 08:35:02
- Location: Málaga, Spain
- Status: offline
- Ribbons : 13
Re:Tutorial Project: Nº2
2012/05/05 15:40:36
(permalink)
|
Luciel
iCX Member
- Total Posts : 327
- Reward points : 0
- Joined: 2008/06/05 08:35:02
- Location: Málaga, Spain
- Status: offline
- Ribbons : 13
Re:Tutorial Project: Nº2
2012/05/11 01:23:44
(permalink)
Final post before the end result : ) Today we´re going to do the windows. The material you need to use is plexyglass, it´s cheap enough to buy and you can normally find it in any building supplies or DIY store, I payed for a piece big enough to do 3 side windows on this case 12€ Have in mind there are two types, the normal one and the one prepared for exterior which is a lot more expensive and we don´t need so go for the first one. Do not cut it with any sort of power tool as it will melt like plastic and make an awfull mess and you´ll find you will spend more time cleaning the piece up than if you cut it using a different method. A cutter for example (a decent one) will do the job. I find that to get a straight line, a metallic ruler does the job but of course feel free to use anything you feel comftable with to get a straight line. So yeah, do a few runs with the cutter until you can see from the plexy border that you´re about at least half way there. Then you can bend it both ways (with care) until it snaps and you will have a clean cut. If need me you can sand the border down. It goes without saying that you will have to measure the piece before you cut it so you know how big it needs to be. Have in mind to leave a decent space on each side if you´re going for as big a window as possible or you´ll find it prevents the side from closing on the case.  Once we have our piece ready we need to attach it from the inside side of the side panel. There´s several ways of doing this but I find the cleanest way is using decent double sided tape, for example, the 3M one is extremely strong and will do the job just find. 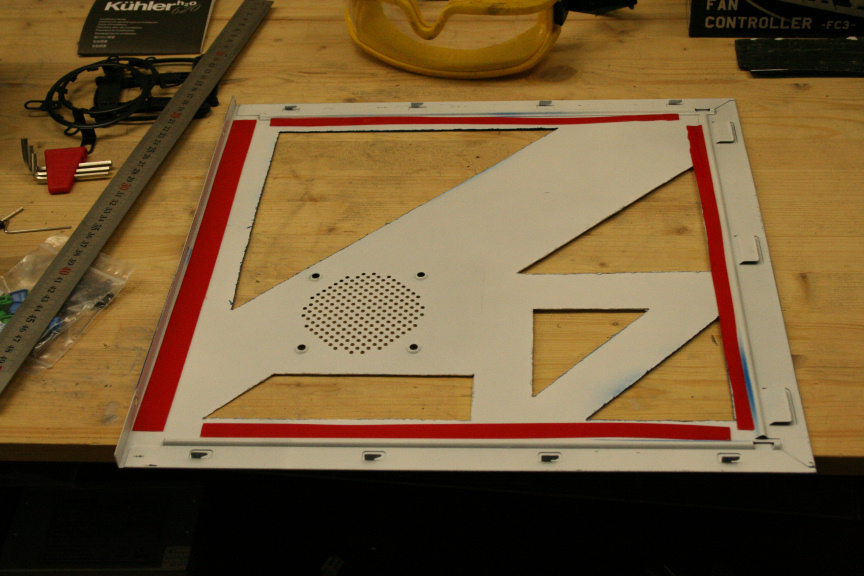 And we´re done, we can repeat the process for any and all windows on our case. On a final note, if you decide you want to mount a fan if your sidepanel has the grill to do so, I would suggest you fit the window first (without the tape) and then measure where you need to cut to fit the fan. Personally I won´t be fitting a fan, I checked I didn´t need to temps wise and as a personal taste decision, I preffer it without one.
|
Luciel
iCX Member
- Total Posts : 327
- Reward points : 0
- Joined: 2008/06/05 08:35:02
- Location: Málaga, Spain
- Status: offline
- Ribbons : 13
Re:Tutorial Project: Nº2
2012/05/11 01:25:35
(permalink)
|
BigH3017
FTW Member
- Total Posts : 1243
- Reward points : 0
- Joined: 2011/06/22 18:52:26
- Status: offline
- Ribbons : 3
Re:Tutorial Project: Nº2
2012/05/11 03:54:14
(permalink)
WOW looks great! Someone donate some blue extensions for this build! It would be amazing with them.
|
Luciel
iCX Member
- Total Posts : 327
- Reward points : 0
- Joined: 2008/06/05 08:35:02
- Location: Málaga, Spain
- Status: offline
- Ribbons : 13
Re:Tutorial Project: Nº2
2012/05/11 05:35:17
(permalink)
Sure would, the budget was limited which is why I didn´t get any : )
|
aozborne218
Superclocked Member

- Total Posts : 168
- Reward points : 0
- Joined: 2011/08/10 19:55:18
- Location: Bovey, Minnesota
- Status: offline
- Ribbons : 0
Re:Tutorial Project: Nº2
2012/06/18 10:46:50
(permalink)
You Like Hardcore/Metalcore? Check out my brother in laws band: LESSONS USE MY Affiliate Code: R7MLUHI17E
|
Bauhaus666
New Member

- Total Posts : 9
- Reward points : 0
- Joined: 2012/06/15 09:32:16
- Location: Germany - Hamburg
- Status: offline
- Ribbons : 0
Re:Tutorial Project: Nº2
2012/06/18 11:06:53
(permalink)
very cool project. thanx for those tutorials :)
AMD Phenom II X6 1100T ~ 4100MHz ~ 1,45V ASUS Crosshair V Formula 990FX ~ R.O.G EVGA GeForce GTX 580 Reference ~ 1536MB ~ 800MHz Corsair Vengeance High Profile ~ 8192MB ~ DC 1470MHz Corsair AX850 Professional ~ 80+ Gold ~ modular Samsung 830 SSD Series ~ 64GB Samsung HD204UI ~ 2000GB Western Digital WD640AAKS ~ 640GB Corsair H80 Liquid CPU ~ 2x Enermax Apollish BitFenix Alchemy & NZXT. Sleeves ~ Black & Red LG DVD-R SuperMulti Cooler Master HAF-X BigTower
|
uncle poop
SSC Member
- Total Posts : 576
- Reward points : 0
- Joined: 2012/01/11 09:56:18
- Location: dirty jerzey
- Status: offline
- Ribbons : 0
Re:Tutorial Project: Nº2
2012/06/18 12:15:13
(permalink)
awesome job love the tutorials.
|
Luciel
iCX Member
- Total Posts : 327
- Reward points : 0
- Joined: 2008/06/05 08:35:02
- Location: Málaga, Spain
- Status: offline
- Ribbons : 13
Re:Tutorial Project: Nº2
2012/06/18 13:22:26
(permalink)
My pleasure guys, hope they help! : )
|
NeoMuse
New Member
- Total Posts : 11
- Reward points : 0
- Joined: 2012/01/17 19:20:37
- Location: U.S.A.
- Status: offline
- Ribbons : 0
Re:Tutorial Project: Nº2
2013/02/13 01:22:09
(permalink)
Thx for all the tips. Great stuff! 
|