EVGA

Project: Stryker (Build in Process)

Author
EastCoastMods
New Member
  • Total Posts : 9
  • Reward points : 0
  • Joined: 2017/04/24 23:56:52
  • Location: US
  • Status: offline
  • Ribbons : 0
2017/04/25 00:28:10 (permalink)
Hi all.
 
I'm new to the EVGA forums and community and just thought as my first post I would share my upcoming build for my daughter.
 
She chose a Black/Orange Theme'd build and so the project began.
Below is a list of 'system specs' of what I currently have and what will be included in the build.
 
I am open to suggestions, comments and ideas (full credit to the author).
Thanks everyone!
 
System Specs:
Case:  BeQuiet Dark Base Pro 900
Motherboard: Gigabyte AORUS GA-Z270X K7 or Gigabyte AMD AM4 K7*
Processor: Intel Quad-Core i7 7700K or AMD Ryzen 1700*
PSU: Seasonic Flagship Prime Series 1000W
GPU: TBA
Memory: Ballistix Elite 16GB Kit (4GB x 4) DDR4 3200
Monitor: Asus VC279H Slim Bezel Black 27" 5ms x3
Case fans: Cougar Vortex 140mm
Watercooled GPU and CPU (Separate Loops)
 
Build Log:
 
This is the logo that will be seen on the door of the case:

 
The case below in it's 'stock' version
 
Getting the case ready for VR I decided to remove the fan control slider switch and on/off button that controls included LED Strips.
These are located under the I/O front panel and when the door is closed you don't see them.
 
I will be using a HDMI pass through cable (seen below) where the slider and on/off button was originally.

 
But first I had to make a template so I could drill holes for the mounting screws and also widen (slightly) the hole to allow the port fit properly.
Using some small files and a small drill bit the port fit perfectly in place.

 
Then I realized that the port itself would not fit when placing back on the I/O part. So out came the Dremel to make a cut in the case to allow it to fit correctly.


Now to check to see if the cuts  were decent... 90* 


Now to check to see if the I/O will fit correctly... PERFECT!


post edited by EastCoastMods - 2017/04/25 00:55:28

Attached Image(s)


EastCoastMods - Yah! We can MOD That!
#1

15 Replies Related Threads

    EastCoastMods
    New Member
    • Total Posts : 9
    • Reward points : 0
    • Joined: 2017/04/24 23:56:52
    • Location: US
    • Status: offline
    • Ribbons : 0
    Re: Project: Stryker (Build in Process) 2017/04/25 01:08:34 (permalink)
    So to continue on...
    I needed to check the fit for a HDMI cable just to be sure it will connect correctly.

    Sure does!
     
    Now what to do with that 'hole' to the right?
    I went on searching 'Google' for mini on/off switches that I could use as a 'reset' switch or for use in other applications (TBA).
    I found some mini-on/off switches on Ebay and for a pack of 5 the cost was less than $9.90 USD and free shipping. They come in red or green.


    Now with that complete... I went onto a "Side Mod" if you will. 
    Since she will be playing games on the PC of course she will need a controller if she doesn't use the keyboard/mouse combo.
     
    So I came up with modding an Xbox 360 controller to match the build.
    Sorry if the lighting is off... but the orange does match the case perfectly.


    Okay Xbox Controller mod done... Now on to more modding of the BeQuiet Dark Base Pro Case.

    Attached Image(s)


    EastCoastMods - Yah! We can MOD That!
    #2
    EastCoastMods
    New Member
    • Total Posts : 9
    • Reward points : 0
    • Joined: 2017/04/24 23:56:52
    • Location: US
    • Status: offline
    • Ribbons : 0
    Re: Project: Stryker (Build in Process) 2017/04/25 01:20:47 (permalink)
    So now for some 'internal' mods...
     
    As we know the BeQuiet Dark Base Pro can have it's motherboard 'flipped' 180*.
    So as I was looking at it's mounting options I found that it still was 'loose'? or did not feel like it would keep vibration down with fans installed on the rear of the case.
     
    So to fix the issue and reduce vibrations I used some 1/8" U channel and a regular size hole punch to do some modifications.
    Here is the end results.
     
    First had to determine where the screws would hold the motherboard onto the case then I made my cuts into the U-Channel.

     
    This is the left side of the case and where the motherboard mounts.


    And this is the right side of the case where the motherboard mounts:


    Perfect! Now the motherboard feels and is more securely mounted.
     
    Now to work on creating a new water cooling design inside the case... Stay tuned.
     

    Attached Image(s)


    EastCoastMods - Yah! We can MOD That!
    #3
    EastCoastMods
    New Member
    • Total Posts : 9
    • Reward points : 0
    • Joined: 2017/04/24 23:56:52
    • Location: US
    • Status: offline
    • Ribbons : 0
    Re: Project: Stryker (Build in Process) 2017/04/25 01:43:07 (permalink)
    As for the 'stock' version of the case. You have mounting options to mount a pump/res combo with the included hardware.
    But where is the fun in that??
     
    So I decided to do a 'mock up' version of a water cooling loop for the case in 3D using Google Sketchup.

     
    So I decided to create two 'rails' on either side with a acrylic panel to mount the reservoirs to (orange tubes) and below that two EK water pumps (grey squares).
    One loop for the CPU and one for the GPU.
     
    SO just how to add these rails to the case. Well close examination shows that there were already 'holes' for mounting. The holes were there for the original HDD mounting bracket that can be
    switched to ether side of the case.
     
    We are going to use them for our rails. So to mount the rails I found a person online who makes 3D printed cubes and ordered up some 1/2" ones with M4 threads.
    These cubes will be installed inside the aluminum rails to provide support and mounting options.

     
    I will also be using some 'counter-sunk' M4 6mm screws so that I can easily mount my full size window mod without the screws getting in the way. (M4 6mm show as an example of mounting).
     
    So to make sure I have a side and 'top' mounting screw I had to drill some new holes.

    And to keep it 'low profile' so I can put back on the top bezel I need some low profile M4 6mm screws.
    Which I found a company online that makes them.

     
    Now to cut and paint the first rail... Located on the left side of the case.

    All set and prepped for a nice matte black paint job.
     

    First coat applied, let dry, add two more coats.
     

    Final coat. Now to let dry over the heater overnight.
     

    First support rail in. Now onto the right side and add support for the motherboard tray.


    Attached Image(s)


    EastCoastMods - Yah! We can MOD That!
    #4
    EastCoastMods
    New Member
    • Total Posts : 9
    • Reward points : 0
    • Joined: 2017/04/24 23:56:52
    • Location: US
    • Status: offline
    • Ribbons : 0
    Re: Project: Stryker (Build in Process) 2017/04/25 01:55:28 (permalink)
    Now the area where the motherboard is there was a support. That support was the HDD rail that allowed you to add HDD's and pump/res combo.
    But now that is removed we need something to support the motherboard from just 'hanging'...
     
    The solution was to use some flat 1/8" aluminum bar and a 1/2" aluminum tube (like the left side).
    I did a test fit first then using a drill I mounted the flat bar to the tube and it worked perfectly.

     
    Test fit to line up the two pieces...


    The end result is:

    More updates to follow soon!
     

    Attached Image(s)


    EastCoastMods - Yah! We can MOD That!
    #5
    rjohnson11
    EVGA Forum Moderator
    • Total Posts : 102300
    • Reward points : 0
    • Joined: 2004/10/05 12:44:35
    • Location: Netherlands
    • Status: offline
    • Ribbons : 84
    Re: Project: Stryker (Build in Process) 2017/04/25 10:15:36 (permalink)
    Some really good innovative work here.

    AMD Ryzen 9 7950X,  Corsair Mp700 Pro M.2, 64GB Corsair Dominator Titanium DDR5  X670E Steel Legend, MSI RTX 4090 Associate Code: H5U80QBH6BH0AXF. I am NOT an employee of EVGA

    #6
    Tech_RayH
    SSC Member
    • Total Posts : 834
    • Reward points : 0
    • Joined: 2016/05/13 10:03:33
    • Status: offline
    • Ribbons : 7
    Re: Project: Stryker (Build in Process) 2017/04/25 10:26:09 (permalink)
    Very interesting so far, look forward to seeing more updates 

    ...an untrammeled flow of words in an open forum.
    - Adlai E. Stevenson
     
    #7
    XrayMan
    Insert Custom Title Here
    • Total Posts : 73000
    • Reward points : 0
    • Joined: 2006/12/14 22:10:06
    • Location: Santa Clarita, Ca.
    • Status: offline
    • Ribbons : 115
    Re: Project: Stryker (Build in Process) 2017/04/25 22:06:22 (permalink)
     
    Looks good so far.      

                My Affiliate Code: 8WEQVXMCJL
     
            Associate Code: VHKH33QN4W77V6A


     &nbsp
    #8
    EastCoastMods
    New Member
    • Total Posts : 9
    • Reward points : 0
    • Joined: 2017/04/24 23:56:52
    • Location: US
    • Status: offline
    • Ribbons : 0
    Re: Project: Stryker (Build in Process) 2017/04/26 21:38:05 (permalink)
    Thanks everyone!
     
    So to continue with the mods... Onto the window panel mods.
     
    As we know BeQuiet DB Pro 900 has a great tempered glass window.
    I do like it but was looking for something 'clear' and not 'tinted'.
     
    So using Googel Sketchup I did a mock version of an acrylic window.
    The same guy who made the 3D printed mod blocks also has a CNC machine and thus can cut out the acrylic for me.
    I also wanted two. One for each side.
     

    I also wanted handles so I can easily remove the panel(s) when I needed to.
     
    After looking at how BeQuiet held on the tempered glass panel I went searching for my own type of fasteners to hold on the acrylic panels.

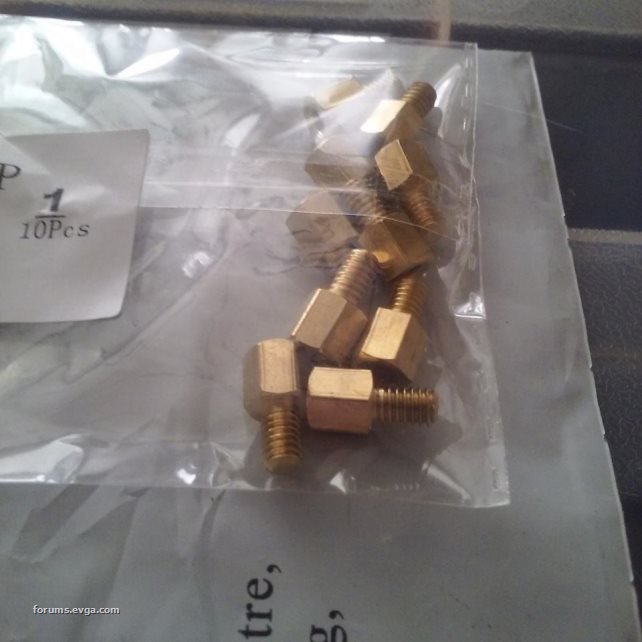
    I found these M4 6mm standoff for a pack of 10 at a cost of $3.89 USD.
    They were shipped from China which took about two weeks to arrive. But worth it.
     

    By luck or chance... The standoffs had the same thread type (M4) as the original ones used by BeQuiet.
    I also found on Ebay some M4 lock nuts (not shown) which I used to keep the standoffs from coming loose when removing just the thumb screw.
    I found them also on Ebay for a pack of 50 at a cost of $5.85 USD.
     

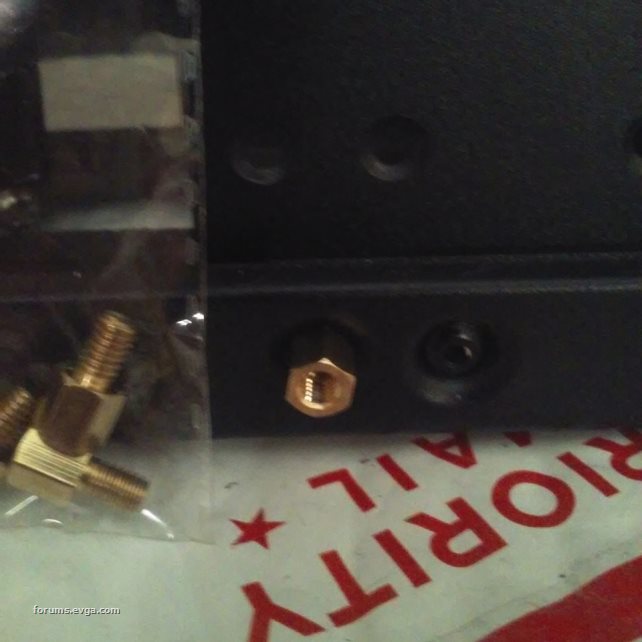
    I also need to keep the acrylic in place 'tightly' and like the ones used by BeQuiet they had a rubber like grommet over their standoff.
    I found these "Rubber Strain Relief Cord Boot Protector Wire Sleeve" on Amazon for a pack of 10 at a cost of $4.75 + free shipping.
    I cut them to the height I needed for the standoff thus my 'anti-vibration' mount was complete. They fit snug over the standoffs.
     

    Seen here is a M4 6mm thumb screw and how it looks when used with the standoffs.
     

    I also found a person in the US that makes anodized washers on Ebay. They cost $9.39 for a pack of ten.


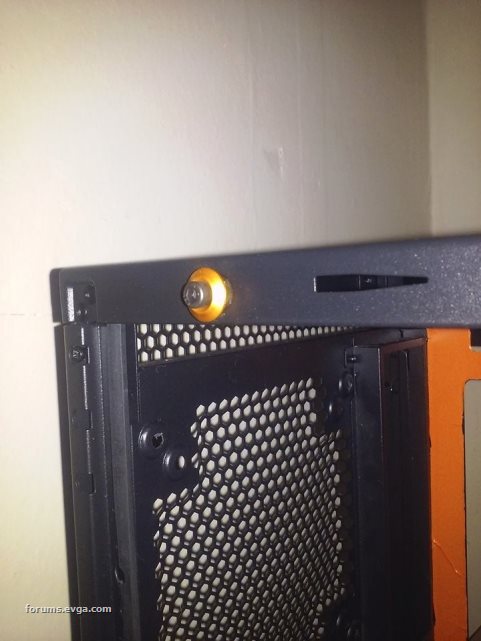
    Here you can see how the washers will look if used with the thumb scew.
    The space between washer and case is approx. 1/8" thick or roughly just 6mm... Perfect!
     

    I will be using 3/4" magnetic tape also found on Ebay at a reasonable price to help keep the acrylic in place after the thumb screws are removed. This way the panels don't just 'fall off'...
     
    More updates coming soon.
     
     
    post edited by EastCoastMods - 2017/04/26 21:42:37

    Attached Image(s)


    EastCoastMods - Yah! We can MOD That!
    #9
    EastCoastMods
    New Member
    • Total Posts : 9
    • Reward points : 0
    • Joined: 2017/04/24 23:56:52
    • Location: US
    • Status: offline
    • Ribbons : 0
    Re: Project: Stryker (Build in Process) 2017/04/29 19:06:25 (permalink)
    So after my first attempt to use 'orange vinyl film' to cover the motherboard tray... I decided to 'paint' it instead.
    For me it looked more 'professional' than just using the vinyl film.
     

    I didn't want the whole part orange just the tray where the motherboard will be mounted to be orange.
     

    So I taped and masked off the areas I didn't want to paint orange. 

     
    I also masked off the back of the tray to keep it the original black.

     
    The paint job came out perfect. No errors, runs, or onion peel.

    The paint used was by Krylon. A paint/primer for metal, wood and plastic. The color was pumpkin orange.
    Sorry that my smart phone camera doesn't do the paint job justice but it looks great in person!
     
    Now onto getting some of the water cooling parts and start with those mods.
    Stay tuned!


    Attached Image(s)


    EastCoastMods - Yah! We can MOD That!
    #10
    rjohnson11
    EVGA Forum Moderator
    • Total Posts : 102300
    • Reward points : 0
    • Joined: 2004/10/05 12:44:35
    • Location: Netherlands
    • Status: offline
    • Ribbons : 84
    Re: Project: Stryker (Build in Process) 2017/04/30 00:58:40 (permalink)
    Looking better and better with every update

    AMD Ryzen 9 7950X,  Corsair Mp700 Pro M.2, 64GB Corsair Dominator Titanium DDR5  X670E Steel Legend, MSI RTX 4090 Associate Code: H5U80QBH6BH0AXF. I am NOT an employee of EVGA

    #11
    EastCoastMods
    New Member
    • Total Posts : 9
    • Reward points : 0
    • Joined: 2017/04/24 23:56:52
    • Location: US
    • Status: offline
    • Ribbons : 0
    Re: Project: Stryker (Build in Process) 2017/05/06 17:08:03 (permalink)
    Thanks!
     
    Just showing how the motherboard tray will look as it is installed in the case.


    I had used what is called "Frog Tape". It really keeps the paint from seeping into areas you don't want painted.
    Like in the example above I just wanted the 'lip' of the motherboard tray painted not the back section.
     
    Frog tape worked perfectly there and where the PCI slots were.
     
    More updates soon!
     

    Attached Image(s)


    EastCoastMods - Yah! We can MOD That!
    #12
    K1LL3RSGA
    New Member
    • Total Posts : 30
    • Reward points : 0
    • Joined: 2014/09/23 18:40:42
    • Status: offline
    • Ribbons : 0
    Re: Project: Stryker (Build in Process) 2017/05/08 23:02:02 (permalink)
    nice
    #13
    Sleinous
    EVGA Forum Moderator
    • Total Posts : 7663
    • Reward points : 0
    • Joined: 2010/06/12 12:22:01
    • Location: France
    • Status: offline
    • Ribbons : 32
    Re: Project: Stryker (Build in Process) 2017/05/26 14:16:20 (permalink)
    Case is shaping up nicely! Subbed for the rest!

    My Affiliate Code: GL1IAAFWJF
    #14
    rjohnson11
    EVGA Forum Moderator
    • Total Posts : 102300
    • Reward points : 0
    • Joined: 2004/10/05 12:44:35
    • Location: Netherlands
    • Status: offline
    • Ribbons : 84
    Re: Project: Stryker (Build in Process) 2017/05/26 23:44:17 (permalink)
    Looking forward to the next update.

    AMD Ryzen 9 7950X,  Corsair Mp700 Pro M.2, 64GB Corsair Dominator Titanium DDR5  X670E Steel Legend, MSI RTX 4090 Associate Code: H5U80QBH6BH0AXF. I am NOT an employee of EVGA

    #15
    rightwingpsycho
    Superclocked Member
    • Total Posts : 120
    • Reward points : 0
    • Joined: 2017/05/26 21:14:00
    • Status: offline
    • Ribbons : 0
    Re: Project: Stryker (Build in Process) 2017/05/31 18:22:15 (permalink)
    Great looking build

    My Affiliate Code: RQRXYON95O EVGA Z270 Classified, Silicone Valley delidded 7700K 5.2ghz, EVGA 64gb (4x16) 3200mhz ram (from Micro Center, Atl.), EVGA 1600 T2 power supply, 1tb 960 pro ssd, 1tb 850 pro ssd (storage), WD Red 4tb HDD (storage), EVGA CLC 280 CPU water cooler, two EVGA GTX 1080 Ti FTW3 Hybrid Gaming in SLI, EVGA DG-87 Case, Windows 10 Pro
    #16
    Jump to:
  • Back to Mobile