Webmail242
New Member

- Total Posts : 9
- Reward points : 0
- Joined: 2020/07/25 23:43:59
- Status: offline
- Ribbons : 1

 I started in February and finished in June. A major issue was ordering parts (and more parts, and even more parts) as the build progressed. Shipping during COVID-19 resulted in some parts taking a month to arrive. The build process was awesome and it came out great. There were a number of things I did that were unique / different: - The pump/reservoir location - there is no mount where I wanted to put the pump/reservoir. Wires would be in the way for both the MB and 2080Ti. To get the effect and location I wanted, I had to drill new holes in the case, use extra long screws with washers and nuts - ensure each screw was aligned with the board and components all while 'floating' 3" from the case and keeping the reservoir square. Cutting screws with a hacksaw to a 2mm tolerance took a lot of patience and probably took me 5 or 6 tries (trimming a bit each time) for each screw to get it right. It is solid and very firmly mounted with plenty of space on all sides for air flow and looks great.
- The 2nd large hard drive on the back of the case. The Torque case has a HD mount position on the back but the holes are for a 2.5" drive. I had to drill new holes and use a full size hard drive bracket adapter to make it work. The holes had to go through the frame in different positions to ensure it was properly spaced on the back side and centered. The holes for 2 of the screws that hold the pump/reservoir also go through the HD bracket, so I had to add the additional thickness of the metal to the length of the screws, install the bracket, then the screws and the reservoir, then the motherboard and 2nd hard drive last.
- The Barrow CPU block did not come with the correct adapter to plug into the motherboard. I had to re-purpose an old 4 pin cable head and redo the wiring to match ASUS's pin out. I think it is very cool to see the coolant temp in the block in the large clear display. Yes, I know the flow is backwards through the CPU block - I have low temps already and the few degrees penalty of running a block backwards is ok with me. Flipping the flow around would have been much more complicated with a few extra bends and did not look at nice as the final setup.
- The water loop took lots of patience to ensure I had consistent bends of the same radius. It was not hard, it just took a long time of measuring, warming, bending, placing, and then checking. The placement of the pump next to the 2080Ti gave me a tough choice because the RAM is so tall it blocked the port on the top of the 2080Ti - I had to use the side port. I came up with the unique loop segment from the pump to the video card to keep the theme of flowing bends (no elbows) - it ended up being one of the most awesome parts of the build. The hardest segment to get right was the long return from the CPU to the 2nd reservoir - 5 bends in a single run. I wanted to have both fill and drain ports to help with flushing. The top fill port is on a swivel so I can connect a fill tube, open the valve, and top up/fill. Once the reservoir is full, I can swivel the fill port out of the way if needed. I did find that because the angle of the Torque case forward about 30 degrees, it may be necessary to tilt the case towards the rear so the MB is parallel w/ the floor to ensure the top of the reservoir can be filled w/o leaving an air bubble in it when the case is put back down in its normal angled position. Putting the 2nd radiator mid loop also ended up working out well since the Crosshair Formula VIII motherboard water loop segment for the VRMs was close to the end of the mid loop radiator position. I used ideas from a few other Torque builds to end up what I created and in the parts photo there is one of 3 design ideas I started out with.
- Initially I started with XSPC Blood Red coolant. The see through red was quite bright and had an awesome look. I wanted something a bit different and when I did the flush of the XSPC fluid, I was seeing red residue all over the loop after only 1 month (yikes!). I switched to PrimoChill Vue in Crimson. Yes I had the 'foaming' issue some people have experienced at the beginning of the fill process and after the 24hour loop test, the foam was gone. The Vue swirl effect in the coolant is memorizing. It is very easy to see the coolant swirling through all the segments, in the 2080Ti waterblock, CPU block, and reservoir. I did notice that the case and ram RGB lights should be set to white to see the swirls and for photos. If the RGB lights are set to red on the red fluid, it makes the swirl easier to see, but it looks like black swirls vice red (very odd color effects of red on red). // Update Oct // I now use EKWB Blood Red and it is the best coolant I have used thus far. // see below about VUE
- The fittings and tubing are UV reactive and of all the things in the build, this has been the one item that has been a bit hard to get to 'show' at times. I have experimented with some UV lights and even a flashlight - and it remains a work in progress.
- The mount of the 2080Ti card is on a Cooler Master video card side mount, but the included CM riser cable was too short. I ended up ordering a Thermaltake riser cable extension cord that was the proper length. It is almost impossible to see, but there is a stress relief screw I put under the video card to help hold it in position and prevent sag. The relief screw end can be seen in the day image just under the clear part of the video card with a bit of the blue color splashing over the screw.
- The cables coming off the rear of the Torque case seemed to be a bit disorganized for such a great build. I ended up buying 90 deg bend adapters for the USB and Ethernet ports to keep the look clean. The only exception is the S/PDIF cable to connect to my audio system.
- The power cables for the graphics and motherboard are Mod-One / Titan Rig since the stock cables with the PSU were not sleeved, and the Corsair sleeved kit that you can buy - had cables that were far too long. I did keep the sleeved Corsair 8 pin MB cable, but given its the only cable I ended up using from the kit, it is probably better to just go with all custom power cables for the MB and Video card.
- The MP600 Gen 4 PCIe drive comes with a heat sink on it. The ASUS Crosshair VIII Formula has a heat sink for NVMe drives that does not play nice w/ the MP600. I ended up having to remove a thermal pad from the ASUS board and not installing the ASUS heatsink for the NVMe drive to make it fit since the MP600 already has its own heat sink.
- The Torque case is amazing to look at yet having the tilt like it is means that you cannot set something like a USB hard drive or cellphone on the top. There is a small slot just above the power button area that you can prop a phone or HD into and connect to the USB 3 ports / USB-C port.
- The staff at EKWB were awesome to help me with my orders. My initial order was mis-routed in the mail (DHL thought it was Sierra Leone vs Slovenia) and the customs office at DHL got confused when trying to track the radiator(s). EKWB was awesome and set up a return for me and I re-ordered the items. DHL eventually found the package, returned it to EKWB, and the reset was history. How DHL didn't know the difference from Europe vs Africa is hard to understand - especially since I was not sending 'to' either of those places.
- I leave the glass off the Torque case. The glass is semi non clear, like 10% tinted. It would be nice if Antech had a clear glass option.
Parts list: Antec Torque case / white ASUS X-570 Crosshair VIII Formula AMD Ryzen 9 3950x Kryonaut Thermal Grizzly paste BarrowCH RGB Digital Display CPU Waterblock for Ryzen AM4/AM3+/FM2+ // Part : FBLTFHA-04N V2 Corsair DDR4 4x8Gb 32Gb 3600Mhz RGB RAM // Part: CMW32GX4M4C3600C18 Corsair MP600 NVMe 2Tb // Part : CSSD-F2000GBMP600 Seagate 16TB Exos X16 drive // Part : ST16000NM001G EVGA GeForce RTX 2080 Ti FTW3 Ultra Hydro Copper // Part: 11G-P4-2489-KR Thermaltake PCI-E Riser cable // Part : AC-053-CN1OTN-C1 2x EKWB EK-CoolStream XE 360 Radiators // Part: 3830046995223 6x Corsair LL120 RGB 120mm Dual Light Loop RGB LED PWM Fans (white) // Part: CO-9050072-WW 1x Corsair Commander PRO (yes you need this) // Part: CL-9011110-WW Corsair RM850x Power Supply // Part: CP-9020188-NA Corsair Sleeved cable kit // Part: CP8920224 Mod-One / TitanRig Icemodz Cable 24 pin Custom 45cm length // Part: W16-60 Mod-One / TitanRig Icemodz Cable 16 pin Custom 40cm length // Part: W16-88 Byski Hard Drive Bracket // Part: B-ST-HPP Primochill Vue Premix Crimson (2x) // See below why this was removed EKWB Blood Red (2x) Primochill Rigid Acrylic Bending Kit Primochill Rigit Tubing 45/90/180 Degree bending kit 1/2in OD Primochill RFB Rigid Tubing Finishing Bit 10mm ID/12mm OD Primochill 1/2in OD Reigit PETG Tub 6x30 UV Blue (2x) // Part: 8286997264_3938 Primochill CTR Hard Mount Phase II High Flow D5 Enabled Reservoir - Clear PMMA 120mm UV Red // Part 917004308, 860125440 Primochill Enhanced D5 Liquid Cooling 12v Pump Motor PWM Enabled // Part: 917004308 Primochill SX fittings (14), 90 deg Elbows (3), 30 deg Couplers (2), Ball drain valves (2), T adapter (1), extension (2), mini extension (1), End cap (4) - all UV Red Qaoduda CAT6 Network Extension Cable 90 deg bend (1) Kework DisplayPort Extension cable 90 deg bend (1) Oxsubor Superspeed USB 3 extension cable 90 deg bend (3) Razer Mamba + Firefly (Mouse pad and Mouse) Razer Ornata Chroma Keyboard Logitech G5 Laser Gaming Mouse (old school) Logitech Z-5450 Speakers (really old school) Samsung 49" CRG9 // Part: LC49RG90SSNXZA Ergotron 45-475-026 HX Desk Mount Single Monitor Arm APC Smart-UPS C 1500 (this is excellent to tell me exactly the amount of power the system uses and when) Win 10 Pro
post edited by Webmail242 - 2020/11/09 03:56:19
Attached Image(s)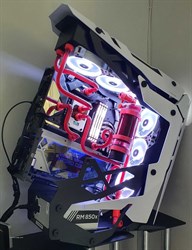 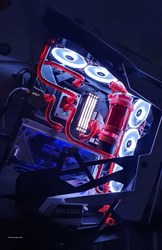
|
rjohnson11
EVGA Forum Moderator

- Total Posts : 102260
- Reward points : 0
- Joined: 2004/10/05 12:44:35
- Location: Netherlands
- Status: offline
- Ribbons : 84

Re: New Computer : Torque build w/ EVGA 2080ti Hydrocopper and 3950x
2020/07/26 08:50:10
(permalink)
Your post was stuck in the spam filter. Sorry for the delay.
|
Webmail242
New Member
- Total Posts : 9
- Reward points : 0
- Joined: 2020/07/25 23:43:59
- Status: offline
- Ribbons : 1
Re: New Computer : Torque build w/ EVGA 2080ti Hydrocopper and 3950x
2020/07/26 16:14:17
(permalink)
Thanks for getting it unstuck. I put in the photos too since they also got blocked out for some reason.
|
fergusonll
FTW Member

- Total Posts : 1686
- Reward points : 0
- Joined: 2013/02/21 09:49:10
- Status: offline
- Ribbons : 3
Re: New Computer : Torque build w/ EVGA 2080ti Hydrocopper and 3950x
2020/07/27 18:05:07
(permalink)
Something you don't see everyday, Nice! 
|
aka_STEVE_b
EGC Admin

- Total Posts : 17692
- Reward points : 0
- Joined: 2006/02/26 06:45:46
- Location: OH
- Status: offline
- Ribbons : 69
Re: New Computer : Torque build w/ EVGA 2080ti Hydrocopper and 3950x
2020/07/28 08:04:21
(permalink)
wild looking... great job
AMD RYZEN 9 5900X 12-core cpu~ ASUS ROG Crosshair VIII Dark Hero ~ EVGA RTX 3080 Ti FTW3~ G.SKILL Trident Z NEO 32GB DDR4-3600 ~ Phanteks Eclipse P400s red case ~ EVGA SuperNOVA 1000 G+ PSU ~ Intel 660p M.2 drive~ Crucial MX300 275 GB SSD ~WD 2TB SSD ~CORSAIR H115i RGB Pro XT 280mm cooler ~ CORSAIR Dark Core RGB Pro mouse ~ CORSAIR K68 Mech keyboard ~ HGST 4TB Hd.~ AOC AGON 32" monitor 1440p @ 144Hz ~ Win 10 x64
|
rlb9682
FTW Member
- Total Posts : 1049
- Reward points : 0
- Joined: 2009/02/26 08:23:20
- Status: offline
- Ribbons : 11
Re: New Computer : Torque build w/ EVGA 2080ti Hydrocopper and 3950x
2020/07/28 11:48:56
(permalink)
I'm still drooling over those tubing bends! How did you get the half loop done? That is just beautiful overall but I need a napkin to wipe up all my drool from looking at that tubing. Fantastic work there!
Affiliate Code: PD1HHD50JK
|
Webmail242
New Member
- Total Posts : 9
- Reward points : 0
- Joined: 2020/07/25 23:43:59
- Status: offline
- Ribbons : 1
Re: New Computer : Torque build w/ EVGA 2080ti Hydrocopper and 3950x
2020/07/28 20:23:02
(permalink)
Thanks!  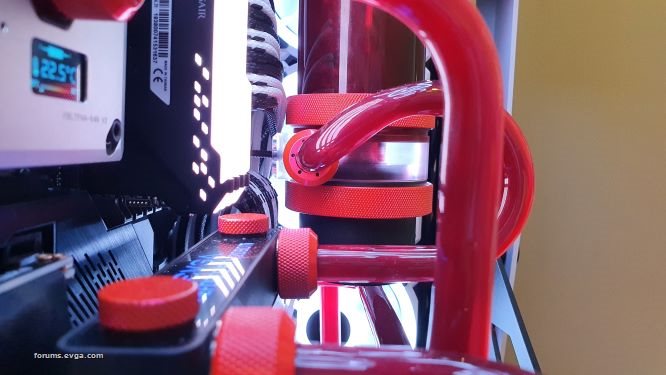 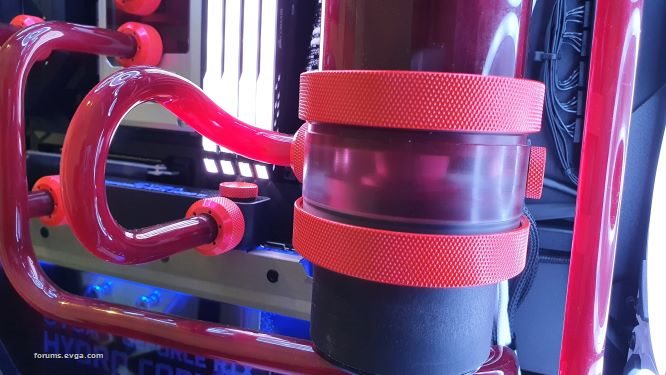 It took some planning. I used a Bosch 18-60 heat gun set to level 3, a Primochill bending kit with the 180 degree form, and the hollow bending insert that came in the Primochill kit. I tried using a solid insert but it was too thick and too stiff. I used water and a bit of soap to ensure the insert was able to slide into the PTEG tubing and started out with a 180 degree bend (remove the 180 degree form) then I kept going a bit more to get about the correct angle. Next was the 2nd bend towards the pump. A lot of times the bending forms/guides dont always fit into position and you end up having to do it by hand. The key was to keep the pipe length on the pump end much longer than what you see here and cut/file the end down to fit so the pipe remains straight at the end. Once I had what I thought would fit right, I cut/filed it down to about right. It took about 3 or 4 very small cuts to get about right but it did not want to fit perfectly. I ended up doing one more time of heating up the entire loop *without the insert* then put it into place and held the ends straight as it cooled. The key part was to already have it about 95% right so any last few degrees of an adjustment would not make a flat spot or kink or fold. I watched probably 5 or 6 videos on YouTube about people's different methods for bending PTEG, and the key to all of it is to just go slow. Use an insert, Slowly warm it up, slowly bend it, be patient as it starts to cool and hold it in the same position as it cools. It was very hard to get the loop to be vertical and square since it is turning in 3 different axis directions in various parts between the pump and video card. 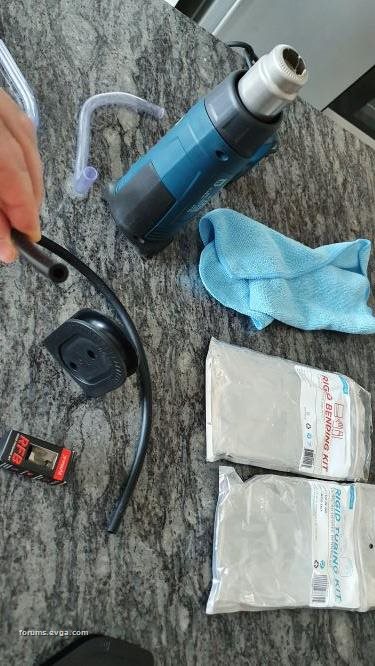 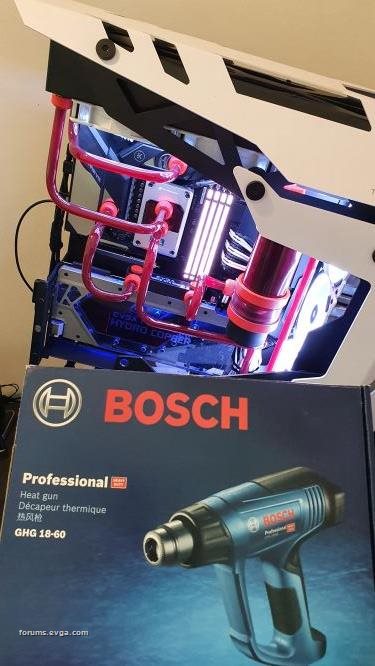 It was a fun project to do and I thank many of the people who post for their experiences that I used as a baseline to make this system. I want to give back to the community by sharing how I was able to get the system built and to include the parts and methods used to make it. Maybe someone can use this as a guide or inspiration for their future system. 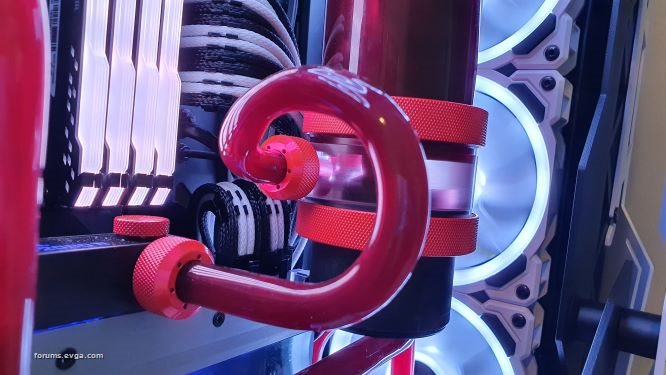
|
XrayMan
Insert Custom Title Here
- Total Posts : 73000
- Reward points : 0
- Joined: 2006/12/14 22:10:06
- Location: Santa Clarita, Ca.
- Status: offline
- Ribbons : 115
Re: New Computer : Torque build w/ EVGA 2080ti Hydrocopper and 3950x
2020/07/28 20:43:19
(permalink)
Approved the first post again.
My Affiliate Code: 8WEQVXMCJL Associate Code: VHKH33QN4W77V6A   
|
Cool GTX
EVGA Forum Moderator
- Total Posts : 30975
- Reward points : 0
- Joined: 2010/12/12 14:22:25
- Location: Folding for the Greater Good
- Status: offline
- Ribbons : 122
Re: New Computer : Torque build w/ EVGA 2080ti Hydrocopper and 3950x
2020/07/30 10:37:54
(permalink)
Welcome to the EVGA Forums Nice Rig  thanks for sharing your tube bending technique I saw your benchmark runs are listed on your Mods Rigs page, might want to add them here also learn your way around the Forums & the limits for new members: Ultimate Self-Starter Thread For New Members
|
Nereus
Captain Goodvibes
- Total Posts : 18916
- Reward points : 0
- Joined: 2009/04/09 20:05:53
- Location: Brooklyn, NYC.
- Status: offline
- Ribbons : 58
Re: New Computer : Torque build w/ EVGA 2080ti Hydrocopper and 3950x
2020/08/18 17:05:07
(permalink)
There are some amazing rigs posted on this forum, and this is one of them! Nice job.
|
Webmail242
New Member
- Total Posts : 9
- Reward points : 0
- Joined: 2020/07/25 23:43:59
- Status: offline
- Ribbons : 1
Re: New Computer : Torque build w/ EVGA 2080ti Hydrocopper and 3950x
2020/09/07 22:01:13
(permalink)
I wanted to provide a bit of an update since some of the photos showed me using Primo Chill's VUE and what ended up happening. VUE looks awesome with its swirling effect. I went with Crimson Red to make it look like some type of robotic blood inside a Gundam or Robot. I flushed my system and filled it with VUE on 20 June. I emptied the VUE out on Aug 30. This is what I got to discover after 71 days. There were a few things that I started to notice that were a bit odd. When I first built my system I was having idle liquid temps around 22-24C (this was also affected by the A/C ) and the motherboard/CPU would float around with its random temp reads anywhere from 28-35C. After 2 months I was seeing liquid sitting at 25-27C and the motherboard/CPU in the 32-40 range. The fluid started to look a bit darker for some reason, so I decided to let some out a bit to see what was up and maybe put some newer in. I had no idea the mess I would find. The first thing I noticed was when I started to drain the system, that all the pipes were pretty stained with a Maroon color. This looked darker than the fluid (so I thought) and I was confused. I thought I could drain a bit and put in some fresh VUE.  I decided to do a good and very thorough flush. I would refill with distilled water, run the system for 30 min, drain, and repeat. My loop is about 1.2 L and each of the larger bottles is 2L. This ended up being a very long day. From right to left is: A new/unused bottle of Crimson Red Vue, Drain of loop in an Vue bottle), Rinse #1 (still looks almost purple), Rinse #2 & 3 (red), Rinse # 4 & 5 (cherry), Rinse # 6 & 7 (lighter), and the far left bottle is the left over from rinse 7 that did not fit in the 2 L bottle. 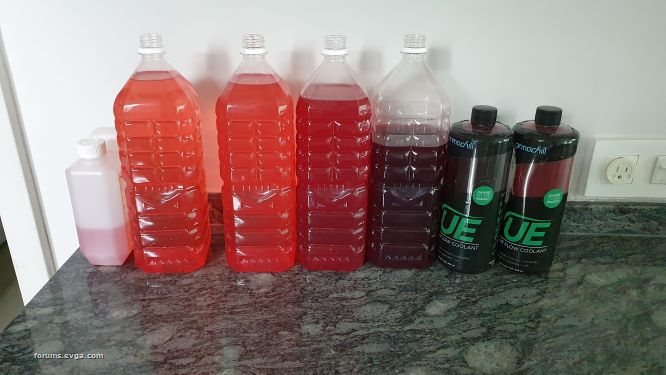 The process to get to this point was about 5 hours of looking, draining, refilling, running, looking and repeating. How was I still seeing so much red?!?! I decided to look deeper. I did a full drain and removed one of the pipes. 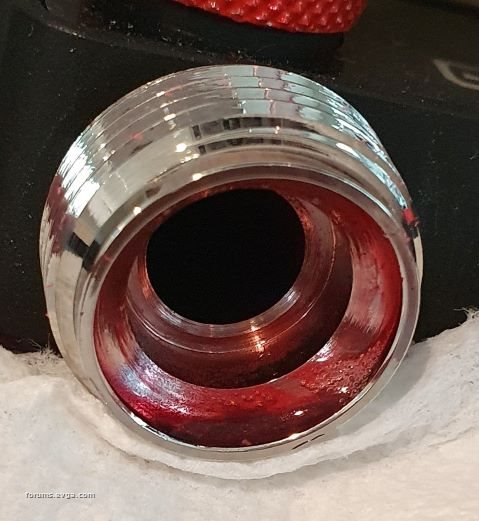 This is caked on Crimson Red inside a fitting. "Ok, no problem", I thought, I will clean it with a cotton swap. Its just a bit of dye - 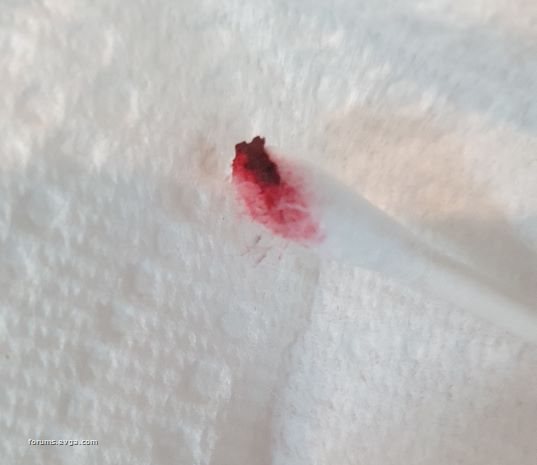 No. This is not just dye. Its the VUE particles in a blob. It was everywhere. There was dye sure, but what was surprising was that the VUE particles seemed to be almost like drying out, clumping, or forming a crusty like buildup on any edge or surface. This is not bubbles or foam or liquid. It is a solid clump. The Crimson VUE stained the metal in the CPU block to a rose gold like color. I run the CPU block 'backwards' and the buildup on the sides is the flow entering the block as the fluid moves towards the middle and out. 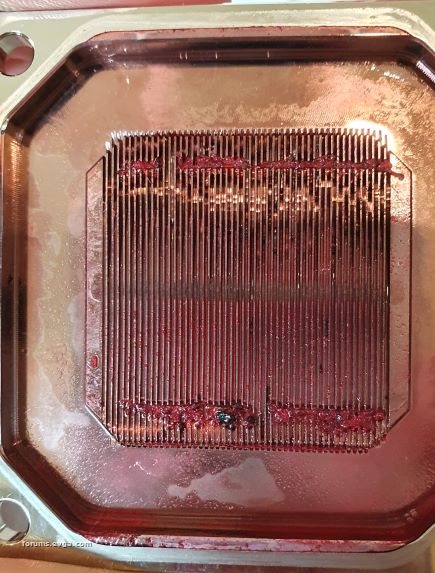 I removed all the pipes and started to clean the loop segment and decided to photo it (the bottom pipe is used for filling and is clear). Rinsing with soap/water did not clean it off. 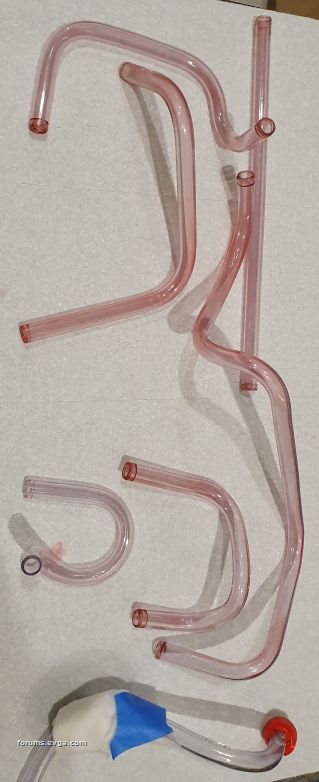 There is no fluid in the video card. I removed the smoke color plastic color and saw the same stain from the CPU block. The color is the stain on the metal (mostly) and a bit on the plastic. 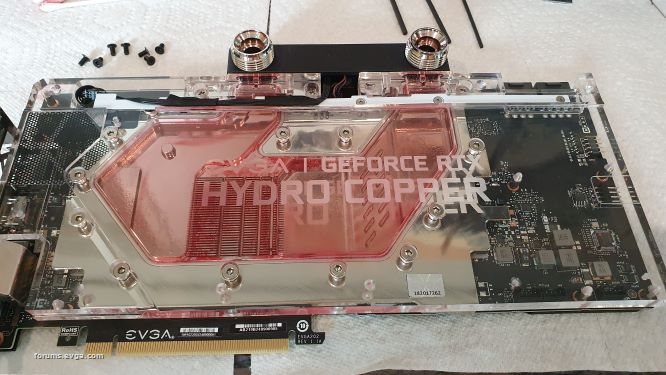 and inside 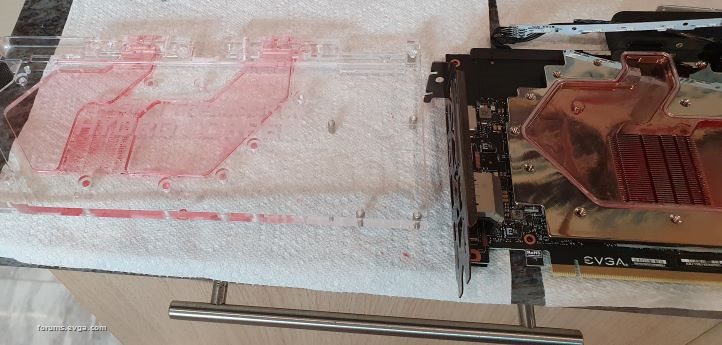 The pump had this special gift - full up blob of the Crimson Vue dye and effect particles piled up inside the pump. 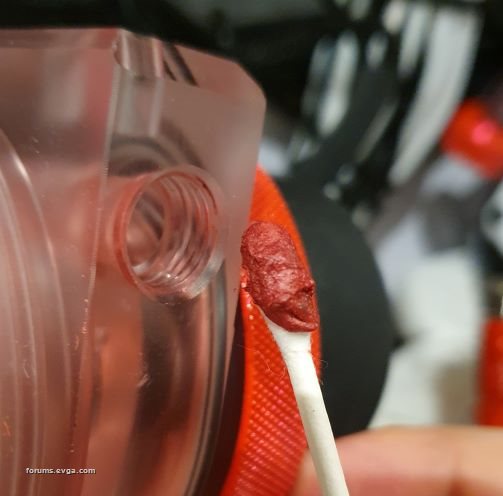 I will be posting part 2 below. I wanted to give a full and detailed accounting of what I saw after using VUE for 71 Days. I had no intention of changing out, but once I saw this residue buildup, the blobs of particles, the staining of the metal, the deeper color than what I started with, the residue around the CPU block - it was time to remove VUE from every part of my system.
post edited by Webmail242 - 2020/11/10 04:53:14
|
Webmail242
New Member
- Total Posts : 9
- Reward points : 0
- Joined: 2020/07/25 23:43:59
- Status: offline
- Ribbons : 1
Re: New Computer : Torque build w/ EVGA 2080ti Hydrocopper and 3950x
2020/09/07 22:51:23
(permalink)
The cleaning process took 2 days. The CPU block stained 'rose gold' with a pin to show the size of the fins. 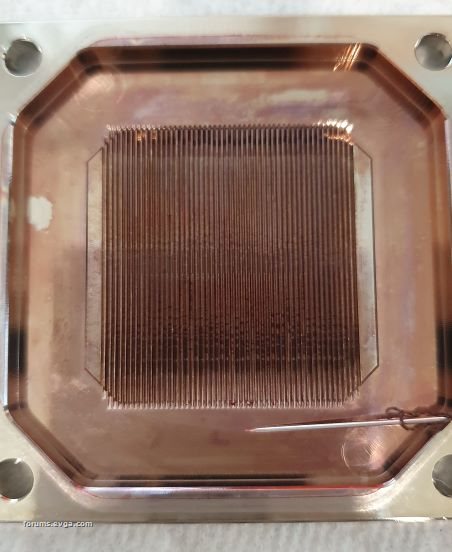 Block cleaned  CPU Acrylic cleaned 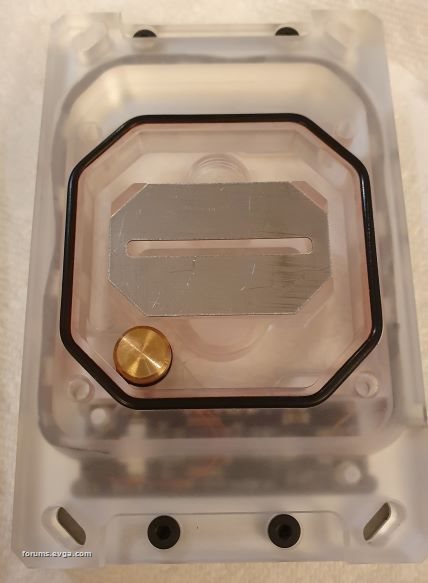 All the pipes had to be cleaned. What I found worked was rolling up paper towels, then using water / soap / and a cleaner while pushing the towels through. It took hours. I left one segment to show how stained Crimson / Maroon things looked. 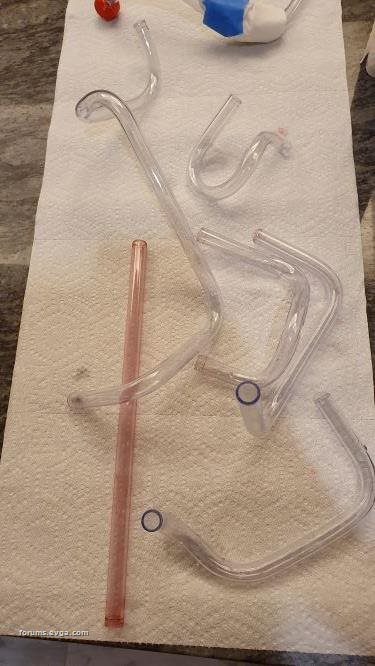 All the fittings, rings, reservoir - everything had to be removed, cleaned, and wiped down. 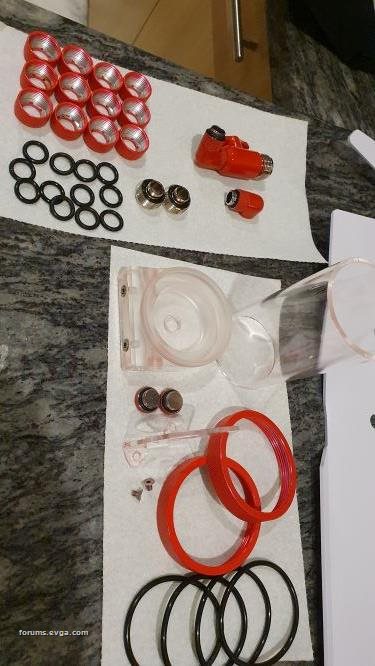 I re-assembled the setup with a modification. I changed the 2nd radiator return flow from the top of the reservoir to the bottom next to the pump. The bottom of the reservoir is where the VUE particles built up and was probably a dead space where fluid was stagnant. I also put in a 3rd ball valve so in the future if I wanted to rinse my system again, I could block the return path and force a complete 1 way path of new fluid: into the reservoir, through the pump, video card, vrm/mb, 1st rad, cpu, 2nd rad and out the bottom - while blocking off the return to the reservoir. This was a good 'ah ha' moment that made the entire VUE tear down / rebuild process all the much better. 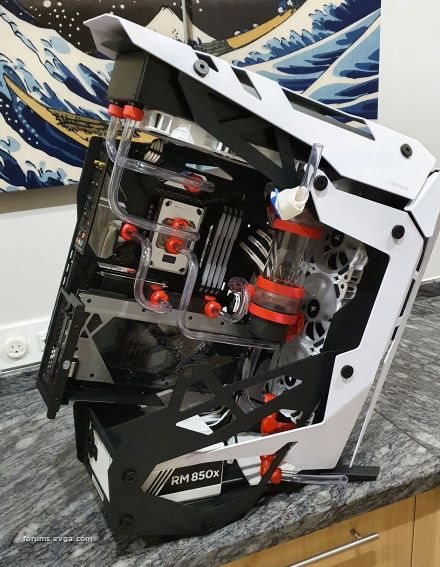 Next was the 24 hr loop leak test, and about 3 days for all the bubbles to fully get removed from the loop. Due to the angle of the Torque case, I had to tilt it 'forward' a few times so it was fully face down to allow some of the bubbles in odd places to come out. The same process was done to go 'level' and 'backwards' to rotate the case around. I am still waiting for one more ball value to go on the top of the reservoir for proper sealing. In 2-3 weeks I will have the additional parts and post another update. I also noticed (after I filled) I re-installed the Primochill P backwards in the reservoir. I think it will stay that way till the next servicing as a reminder of what VUE did to my system. Primochill makes good parts and items, but for me and this system the VUE did not work out.
post edited by Webmail242 - 2020/11/09 03:45:51
|
rjohnson11
EVGA Forum Moderator
- Total Posts : 102260
- Reward points : 0
- Joined: 2004/10/05 12:44:35
- Location: Netherlands
- Status: offline
- Ribbons : 84
Re: New Computer : Torque build w/ EVGA 2080ti Hydrocopper and 3950x
2020/09/07 23:02:40
(permalink)
That was a lot of cleaning work but I wanted to thank you for all of the pictures and the steps you took in the cleaning process.
|
Webmail242
New Member
- Total Posts : 9
- Reward points : 0
- Joined: 2020/07/25 23:43:59
- Status: offline
- Ribbons : 1
Re: New Computer : Torque build w/ EVGA 2080ti Hydrocopper and 3950x
2020/09/07 23:17:52
(permalink)
While the VUE fluid effect looked cool, it was not as long lasting, left residue & clumps everywhere, dyed everything, made for some temp increases, and just did not look as sparkling cool as the clear does. It was a good lesson to see how it looked in my system and how clear just looked better. To VUE's credit, I had zero corrosion, or permanent damage. The loop is red so the few parts that did not fully go back to clear and have a tint of red, cant be seen as dyed b/c it was very faint after the multiple cleaning sessions. It has been about a week since the draining and I decided to look closer at what I drained out. This is the first 'rinse' and at the bottom was a settled film of the VUE particles. If I swirl the bottle, the View particles will get mixed up again and the swirl effect re-starts. The fluid color is maroon at the top and red at the bottom. There was a small amount of me moving the bottle around for the photo and that stirred up the fluid a bit making a small upward streak of moving fluid (colors/VUE swirl) extending from the bottom.  As for the new fluid - I ended up going with EKWB Blood Red. The clear looks so much crisper and better. I was finally able to get some photos of the effectiveness and how clear the tubes are, and how much the blood red 'pops'. 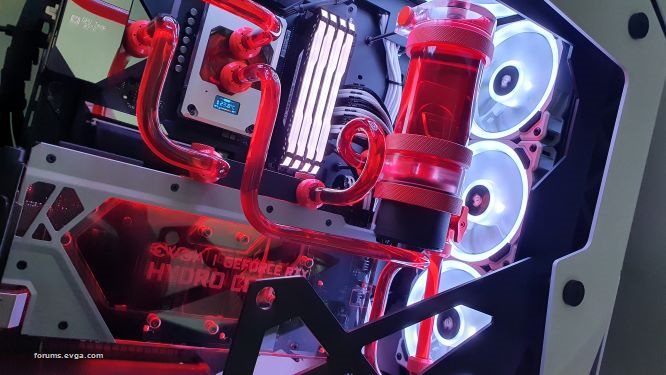 and closer 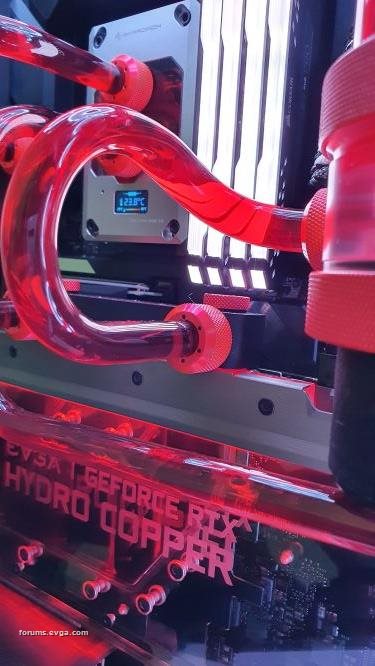 and 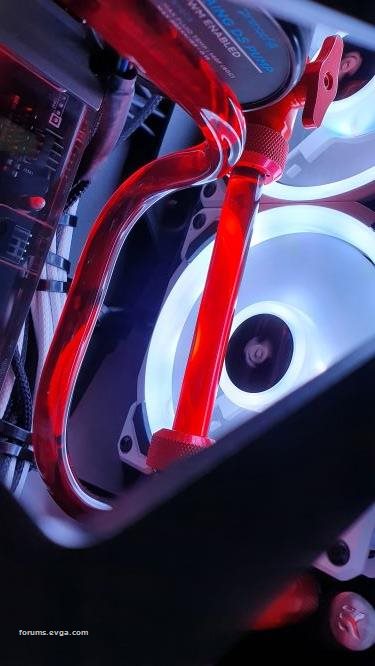
post edited by Webmail242 - 2020/11/10 04:58:17
|
notfordman
Omnipotent Enthusiast

- Total Posts : 10345
- Reward points : 0
- Joined: 2007/08/09 23:52:23
- Location: In a van, down by the
- Status: offline
- Ribbons : 28
Re: New Computer : Torque build w/ EVGA 2080ti Hydrocopper and 3950x
2020/09/08 02:58:32
(permalink)
|
Nereus
Captain Goodvibes
- Total Posts : 18916
- Reward points : 0
- Joined: 2009/04/09 20:05:53
- Location: Brooklyn, NYC.
- Status: offline
- Ribbons : 58
Re: New Computer : Torque build w/ EVGA 2080ti Hydrocopper and 3950x
2020/09/08 03:41:54
(permalink)
Wow. And what's frustrating is that they are still selling this crap. I hope you point Primochill to this thread. Who knows what gunk is still trapped in your radiators, they should replace those at the very least. Thanks for posting this. Awesome build btw, sorry you had to go through all this.
post edited by Nereus - 2020/09/08 03:44:14
|
AngryAce
SSC Member

- Total Posts : 867
- Reward points : 0
- Joined: 2010/03/27 20:40:35
- Location: Nebraska
- Status: offline
- Ribbons : 3
Re: New Computer : Torque build w/ EVGA 2080ti Hydrocopper and 3950x
2020/09/08 03:50:53
(permalink)
My main rig is water cooled and particle separation is the reason I am running clear now. Every colored fluid I have used EK, Promochill, Mayhems and thermaltake have all broken down within 3-months coating everything. Its a nice looking rig!! I always look and my tube runs and think they look pretty good until I see someone else's that knows what they are doing.... Perhaps you can come over for a day of beer, BBQ and tube bending after I get a hold of a 3080..... 
|
castrator86
SSC Member
- Total Posts : 816
- Reward points : 0
- Joined: 2010/07/24 09:33:21
- Status: offline
- Ribbons : 2
Re: New Computer : Torque build w/ EVGA 2080ti Hydrocopper and 3950x
2020/09/08 10:50:32
(permalink)
Awesomely detailed breakdown; but this is exactly why I've avoided a custom loop these days. I don't have the time to break it down and rebuild it if there's issues like this.
|
CraptacularOne
Omnipotent Enthusiast
- Total Posts : 14533
- Reward points : 0
- Joined: 2006/06/12 17:20:44
- Location: Florida
- Status: offline
- Ribbons : 222
Re: New Computer : Torque build w/ EVGA 2080ti Hydrocopper and 3950x
2020/09/08 15:01:38
(permalink)
Any colored dye also has particles suspended in the fluid and it will eventually separate. It’s for this reason I stopped using any colored or “effects” coolants in any of my loops and only ever run distilled water with a few drops of growth inhibitor. That’s it and it keeps the plates and tubes from getting gunked up. At most just a flush every 6 months or so, no huge disassembly project with lots of scrubbing needed.
Build looks great though all things considered.
Intel i9 14900K ...............................Ryzen 9 7950X3D MSI RTX 4090 Gaming Trio................ASRock Phantom RX 7900 XTX Samsung Odyssey G9.......................PiMax 5K Super/Meta Quest 3 ASUS ROG Strix Z690-F Gaming........ASUS TUF Gaming X670E Plus WiFi 64GB G.Skill Trident Z5 6800Mhz.......64GB Kingston Fury RGB 6000Mhz MSI MPG A1000G 1000w..................EVGA G3 SuperNova 1000w
|
Systom
iCX Member

- Total Posts : 289
- Reward points : 0
- Joined: 2015/04/28 18:14:55
- Status: offline
- Ribbons : 4
Re: New Computer : Torque build w/ EVGA 2080ti Hydrocopper and 3950x
2020/09/15 15:45:28
(permalink)
Nice build.
I went through the same VUE woes on my Leviathan build, along with other liquids from XSPC and Mayhems Pastel even.
This was earlier on when they said VUE wouldn't gunk up the way Mayhems Aurora does, even though that's clearly stated as showcase only fluid.
But, live and learn, and since then, I stick to clear based fluids only from now on and have not had any problems.
I'm using the same blood red fluid in my current Nightmare build, but haven't shared that one on here yet...perhaps I will once it hits it's 2.0 phase soon.
CPU & GPU: AMD Ryzen 9 5900X / Nvidia RTX 3080 FE (Both EK Water Blocks)MB & PSU: ROG Crosshair VIII Formula X570 / EVGA T2 Titanium 1000wSSD & RAM: Samsung 980 Pro 1TB & Western Digital Black SN850 1TB / G.Skill Trident Z Neo C14 3600MHz 4x8GB (32GB) Case & Fans: Lian Li O11 Dynamic / x9 EK-Vardar X3MRads: Black Ice Nemesis 360GTX 360mm x 54mm / Magicool 360S G2 Ultra 360mm x 45mm
|
omenlw
New Member
- Total Posts : 100
- Reward points : 0
- Joined: 2010/03/30 14:44:29
- Status: offline
- Ribbons : 0
Re: New Computer : Torque build w/ EVGA 2080ti Hydrocopper and 3950x
2020/10/08 11:53:52
(permalink)
Hardline water cooling was always so intimidating to me. This looks awesome and also looks like a lot of work. I'm heading off to go watch some how-to videos and maybe try my hand at it eventually.
|
Webmail242
New Member
- Total Posts : 9
- Reward points : 0
- Joined: 2020/07/25 23:43:59
- Status: offline
- Ribbons : 1
Update #3 // New Computer : Torque build w/ EVGA 2080ti Hydrocopper and 3950x
2020/10/19 19:03:52
(permalink)
I decided to use the same 71 days to re-check how my water loop was doing after the issues I experienced with PrimoChill VUE. I set up the computer to be drained and noticed how clear the EKWB coolant remained and that the only major item I wanted to fix was to reverse the P inside the reservoir (oops from the last episode). I drained the coolant into an empty EK Blood Red bottle I had and got to use the new in-line ball valve to block the draining from going ‘backwards’. By putting an extra inline ball valve - the loop can be partially blocked, forcing the coolant to draining the same way it flows from the pump and there will be no back-flow going on. I am aiming for a long term build to have easy servicing or a fluid flush/change. Before I put in the ball valve between the reservoir and the 2nd radiator, coolant would drain from the reservoir (going backwards) while the rest of the fluid from the upper radiator though the CPU would go forward. I would end up with fluid stuck in the loop and especially in the GPU. Now the fluid can only drain the same way it flows through the loop. Almost all the fluid flows out via gravity & suction to empty the loop. I started the drain I saw no staining in the reservoir. The 71 day old EKBW coolant looked very clear, no loss in color or issues of staining the pipes or blocks.  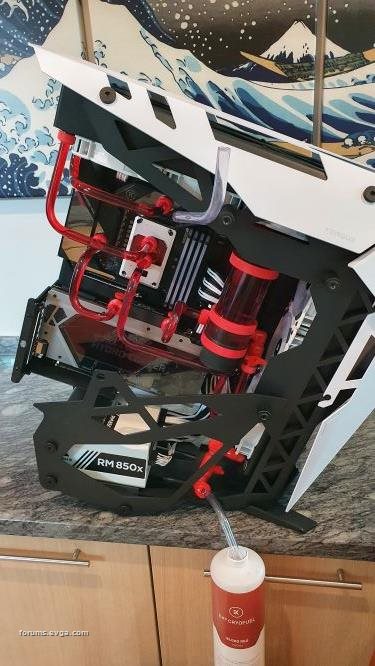  This is a close up of the fitting on the top of the GPU Water block right as I removed one of the pipes. There were a few drops of coolant but once removed, the fitting was essentially clean. There was a small ring of dried fluid where the rubber grommet sat and it came off easily. Maybe it was some particles of left over VUE? Whatever it was, it cleaned up quickly and without the issues from before. 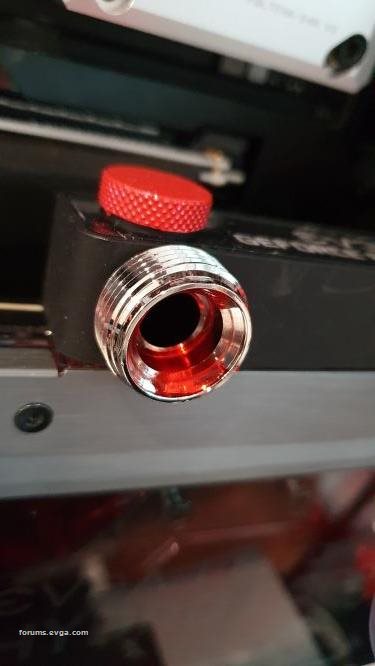 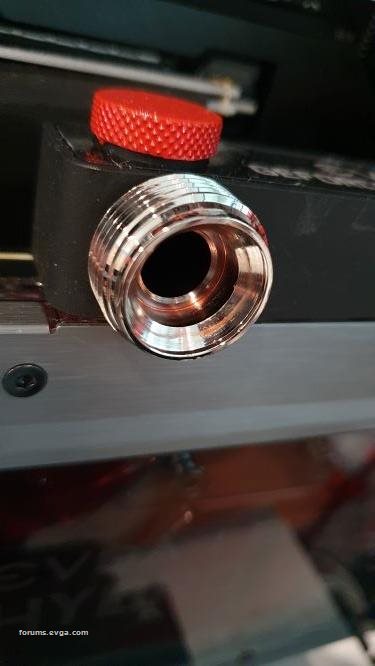 I removed all the pipes and I wanted to let people guess - which ones were cleaned and which ones not? (3clean and 3not) This is what it should be like to have a good system coolant. There was basically no staining in the same 71 day timeframe vs VUE. I did a rinse & cleaning and there was only a small bit of residue at the ends of the pipes where the fittings go. No staining, no residue, nothing. I liked the EKWB fluid before with how clear it is. Now I can see firsthand, it did not stain, did not leave residue, or did not break down. The EKWB Blood Red works for this system quite well.  I decided to do a side by side test of what I drained versus what is new fluid in a bottle. The new is on the right, and old is on the left. Only with a white background and looking at the right angle can you see a shade of a difference. Looking from top down, the fluids look the same. With the fluid out I also disassembled the reservoir and flipped the P around to the correct position. 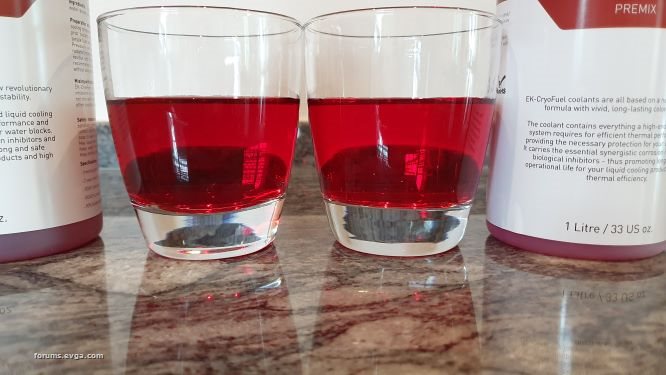  Seeing how minimal the staining was, I saw no need to disassemble the water block or video card. I could see in both and they were clear with no red inside. I refilled the system, did my 24h loop leak test, let the bubbles go away, and the system is back in action. 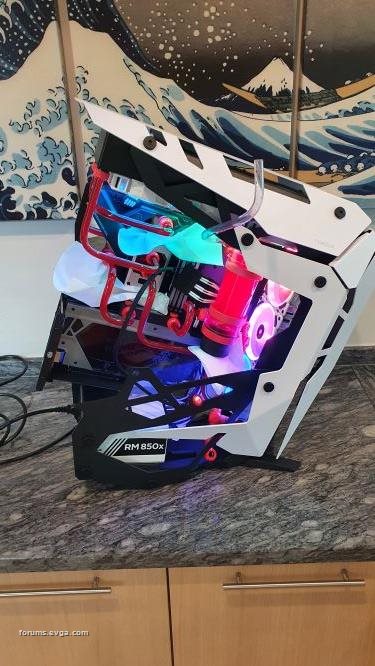 I took the down time to update the BIOS, AMD Drivers, and a few other updates and the computer was back in action. CPU temp sits at 32C and the fluid temp is 22-25C (the A/c and the ambient air has a big impact on the lowest temp ranges will be). One final note is that the ASUS CPU Temp measurement displayed on the motherboard often bounces around from 32-42C. Many forum pages later ... the reason for the variance is how AMD measures temperature on the CPU vs 3 items that affect it: (1) the Power Options in Windows, (2) how many cores are being used to do what and how hard they are working, and (3) during what part of the measurement process was which core being used or idle during the instant the measurement was taken. The whole CPU die is not the same temp all the time. Previously (1year ? ago) ASUS used to have a program called LiveDash that let you change the icons and what was displayed on the MB small display window. I was able to find LifeDash 1.5.6.0 and it still works despite ASUS removing it from official support and rolling parts of LiveDash into AsusAura (that does not have the same functions and lacks some of the options that LiveView has). If you wanted to stop the temp display and put something else in the window, LiveDash is how you can do it. I did a bit of testing with power options (all Bios settings to stock) - if I only adjusted the power settings and using the temp measurement on the ASUS MB and the CPU speed from Task Manager I found the following ranges: Power saver = 32C all the time // 2.17Ghz Balanced = 30C-41C changing temp readings all the time // 2.98Ghz - 4.02Ghz High Performance = 31C-42C changing temp readings all the time // 3.88Ghz - 4.12Ghz AMD Ryzen Balanced = 30C-39C changing temp readings all the time // 3.59Ghz - 4.08Ghz AMD Ryzen High Performance = 31C-43C changing temp readings all the time // 3.92Ghz - 4.11Ghz Why? When adjusting my iCUE fan speeds based on CPU temp, I was having all sorts of random fan speed changes due to the CPU temp readings bouncing. I decided to use the GPU temp which was much more stable and let me set more realistic fan speed curves vice seeing a 12C jump at random making my computer go from silent to a bit noisy. My final word about VUE: Primochill makes a ton of great products. I use their pump, reservoir, fittings, connectors, and tubing. I went with VUE to see how it looked and it looks awesome - for a short while. If you want a 'wow' look in your system it is hard to beat the VUE swirling effect for about 2 weeks. If you were making a computer for a show or demonstration event the VUE swirling is almost hypnotic to look at. I would *not* recommend VUE for anything else other than a 2 week and even for 2 weeks it is going to be a ton of work to deal with. The residue and VUE particles were difficult to fully remove and took several (8) flushes of my entire loop, a full disassembly & cleaning, and several days of work to remove about 99.9% of VUE and the VUE particles. I do not think VUE will ever be fully gone since there seems to be a small amount of VUE particles hiding in low flow coolant parts of the loop. For any gamer or home user or power user or super geek - I would not use VUE unless you like: staining in your coolant lines / components / blocks, degraded particle effect after a month, clogging / clumping of VUE particles in your blocks, reduced temperature transfer from hot components to your radiators, and a breakdown of the fluid in your loop. Maybe there are people who so like the optical effects they are willing to put up with the challenges of having VUE in their loop. As for me, my 2 bottles of VUE went in the trash. My Primochill VUE experience has me using EKWB's Blood Red fluid with much less maintenance issues and now confirmed zero concerns.
post edited by Webmail242 - 2020/11/09 03:48:17
|
Webmail242
New Member
- Total Posts : 9
- Reward points : 0
- Joined: 2020/07/25 23:43:59
- Status: offline
- Ribbons : 1
Re: New Computer : Torque build w/ EVGA 2080ti Hydrocopper and 3950x
2020/10/19 19:12:19
(permalink)
Final hi-res photo for the finished product (click to enlarge) 
Attached Image(s)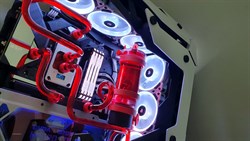
|
castrator86
SSC Member
- Total Posts : 816
- Reward points : 0
- Joined: 2010/07/24 09:33:21
- Status: offline
- Ribbons : 2
Re: New Computer : Torque build w/ EVGA 2080ti Hydrocopper and 3950x
2020/10/20 06:16:57
(permalink)
|
antarious
New Member
- Total Posts : 87
- Reward points : 0
- Joined: 2007/06/03 19:12:25
- Status: offline
- Ribbons : 0
Re: New Computer : Torque build w/ EVGA 2080ti Hydrocopper and 3950x
2020/10/20 06:39:29
(permalink)
Super nice build. To be honest I forgot there was a Torque case but I have Torque compression fittings so I had to see (lol).
I had that same build up/gunk with a different brand of fluid. Currently using EK CryoFuel and when I removed my gpu from the loop after 65 days for a step up... no gunk, no stains. My Hydro Copper card looked brand new when I sent it out.
|
Turbo-12R
Superclocked Member

- Total Posts : 130
- Reward points : 0
- Joined: 2020/04/30 14:52:07
- Status: offline
- Ribbons : 0
Re: New Computer : Torque build w/ EVGA 2080ti Hydrocopper and 3950x
2020/11/01 04:25:32
(permalink)
Looks great!
Thermaltake Level 20HT AMD Ryzen 9 5950X 16 Core Thermaltake Pacific MX1 Plus Water Block Gigabyte Aorus Master X570 32 GB G.SKILL Trident Z Royal Series DDR4 3600 2x Samsung 980 Pro 1TB NVMe 1x Seagate Firecuda 520 2TB NVMe TEAMGROUP T-Force Delta MAX RGB SSD 1TB EVGA RTX 3090 FTW3 ULTRA w/EKWB Dual Thermaltake PR22-D5 Pumps Dual Thermaltake Pacific CL360 64mm Rads EVGA SuperNOVA 1200 P2, 80+ PLATINUM 1200W MSI OPTIX MPG341CQR
|
rjohnson11
EVGA Forum Moderator
- Total Posts : 102260
- Reward points : 0
- Joined: 2004/10/05 12:44:35
- Location: Netherlands
- Status: offline
- Ribbons : 84
Re: New Computer : Torque build w/ EVGA 2080ti Hydrocopper and 3950x
2020/11/08 02:44:42
(permalink)
A fantastic build. Congrats!
|
thunder-93
iCX Member
- Total Posts : 342
- Reward points : 0
- Joined: 2018/02/03 05:08:23
- Location: Hawaii
- Status: offline
- Ribbons : 4
|