vlad01
CLASSIFIED Member

- Total Posts : 3495
- Reward points : 0
- Joined: 2008/04/19 16:55:43
- Location: Australia, Victoria
- Status: offline
- Ribbons : 6

After seeing what happen to Lonelystoner's mobo, I though I might write a guide on how to repair tracks on PCBs. When repairing tracks on something like a gfx, hdd or a mobo, it isn't as simple as just soldering a jumper wire to bypass the break. Why? Well it comes down to physics and the way electrons behave at high frequencies. When a computer or any high speed circuit is designed all track positions, spacing, thickness and length are factored in to suit the particular signal. The physical layout affects: resistance, capacitance, inductance and propagation speed of the electrons them selves. Change these properties and the signals: distort/delay/advance/ lost/cross talk etc... Therefore it is crucial that when repairing tracks that we maintain it to spec as close as possible. Ok here is my technique. Today I used this old 3GB quantum hdd and punch a track with a knife for this demo. 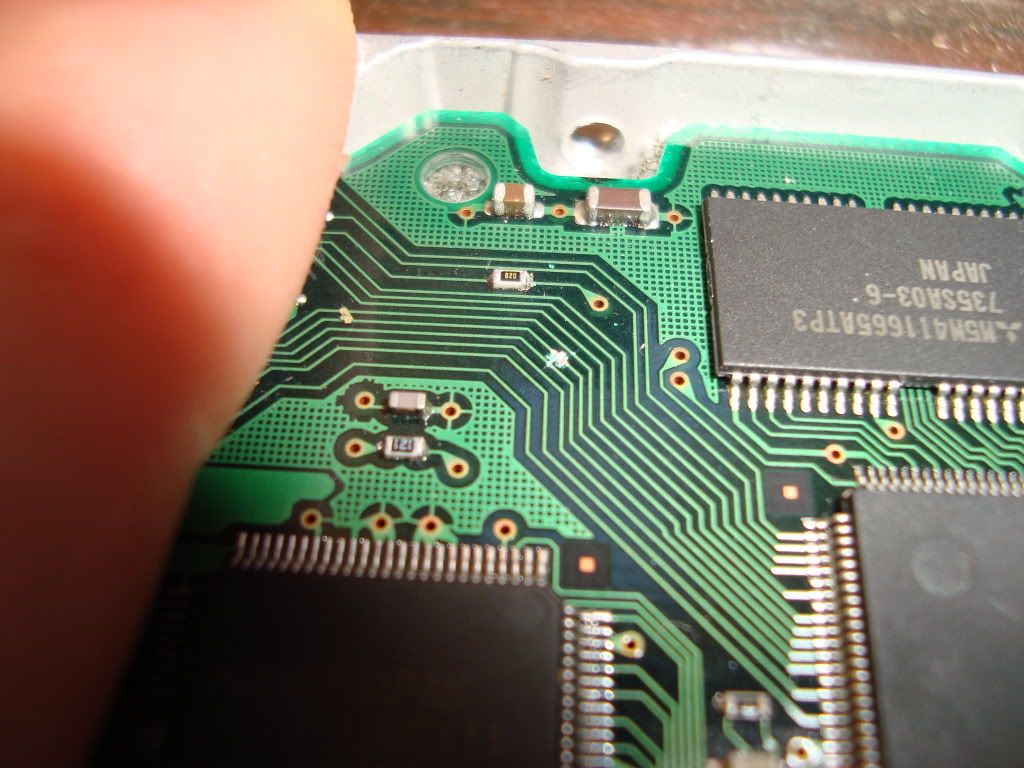 Ok thats is cut through. I start by using a jeweler's flat head screw driver and gently scrape the lacquer off a few mills down either side of the break until I see bare copper. 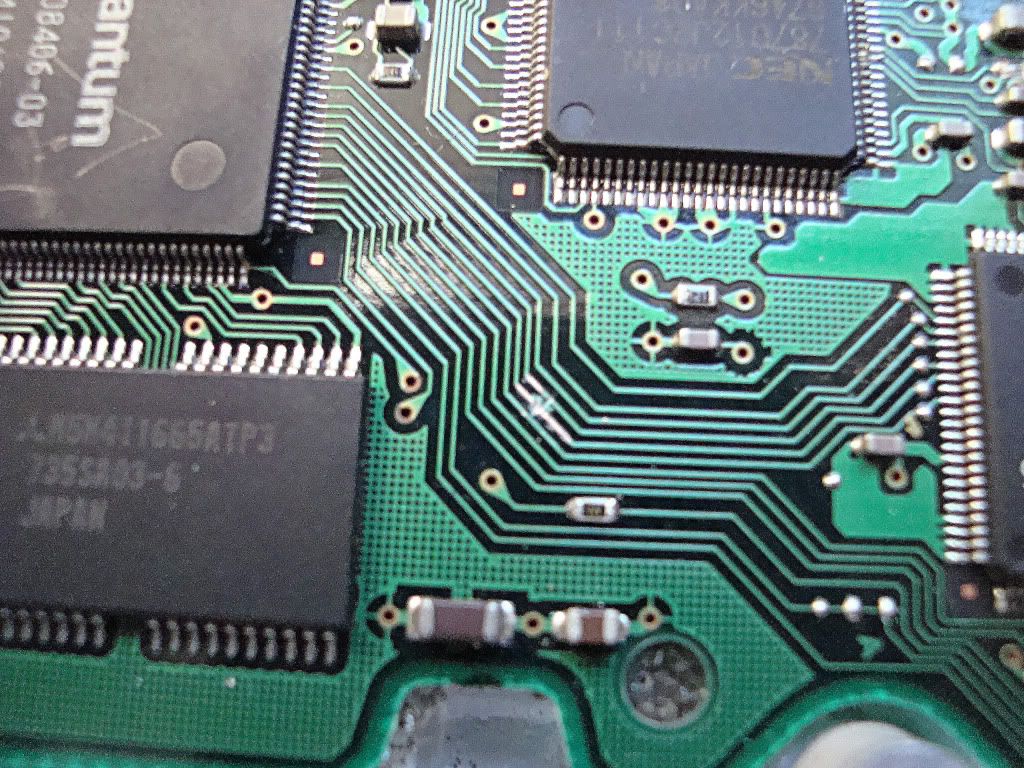 Next I get a good soldering iron, you can get Anti static ones or you can ground a normal one with a wire/aligator clip lead from the iron body to say? you computer case. This will ensure you dont kill what you are soldering. Also ASD mat or the bag the board came in to lay your work on. Ok in the pic below you melt a blob of solder across the bare copper to tin it like so. then just lift it off after few sec. The blob will stay with the iron tip and leave it all tinned. 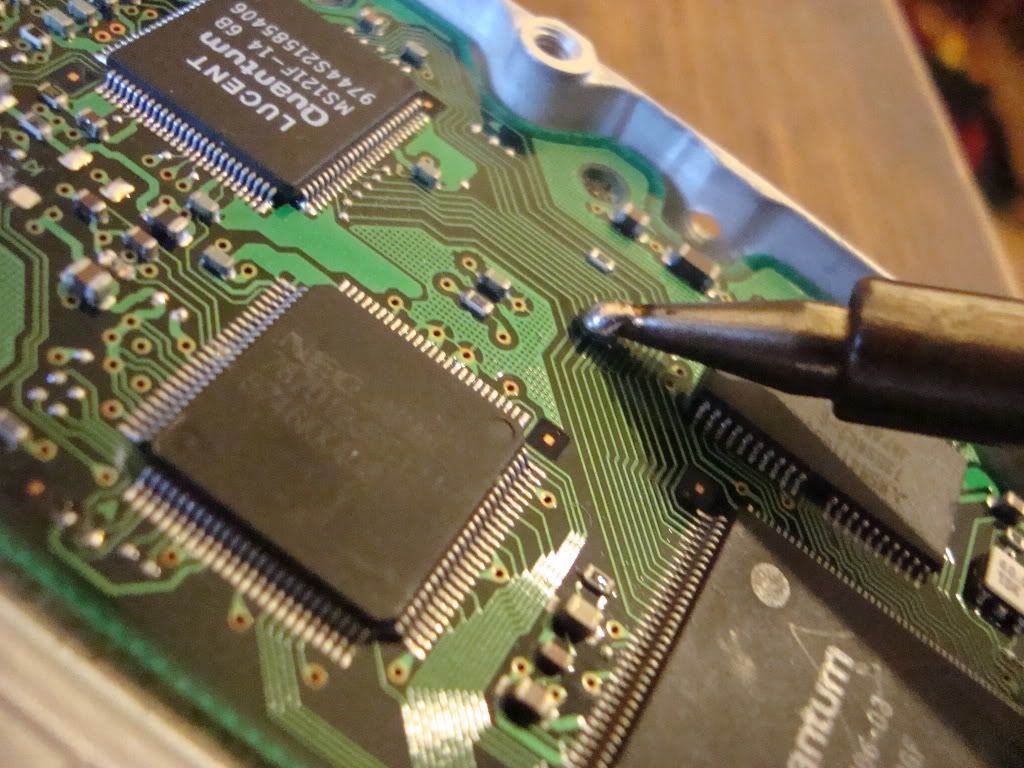 Now its all tinned. mmm looks nice  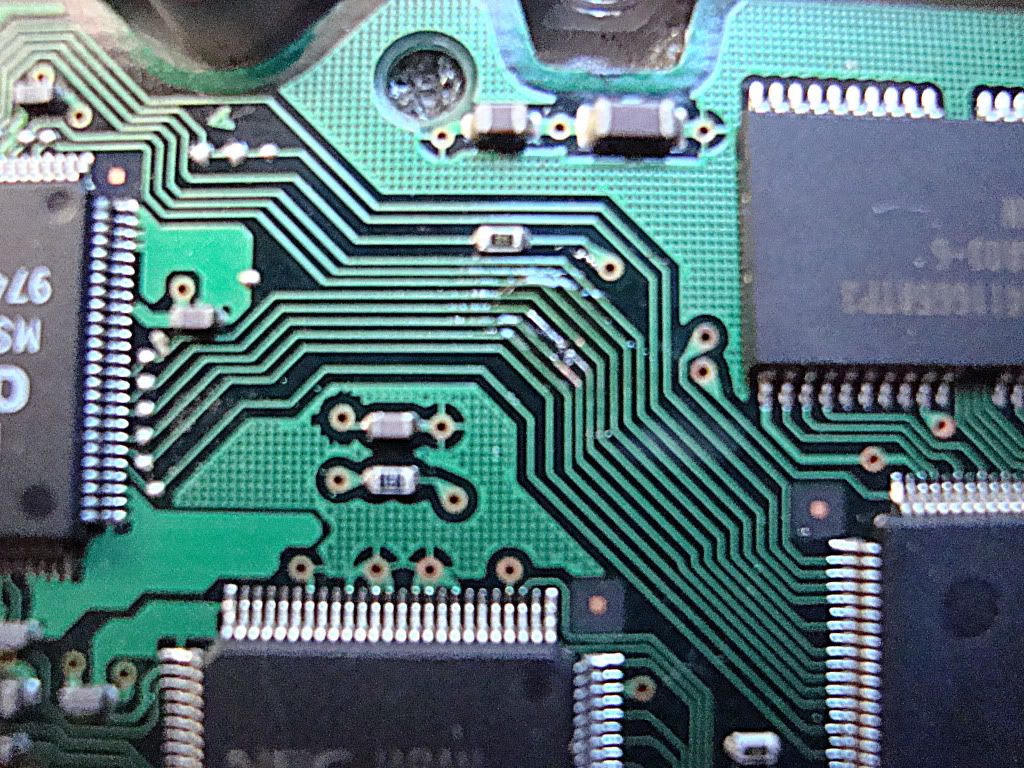 Now I get a wire and strip it until all the strands are out like this, then I tin one single strand. This will make it easy to solder it to the tracks. Note! that was one rough looking tinning on that wire, it was for the purpose of the pic as I was holding the cam in one hand so I did it again after.  Then I cut the length needed, that was too much for this job in the pic. I ended halving it. If the track you are fixing goes around a bend shape this tinny wire to match. 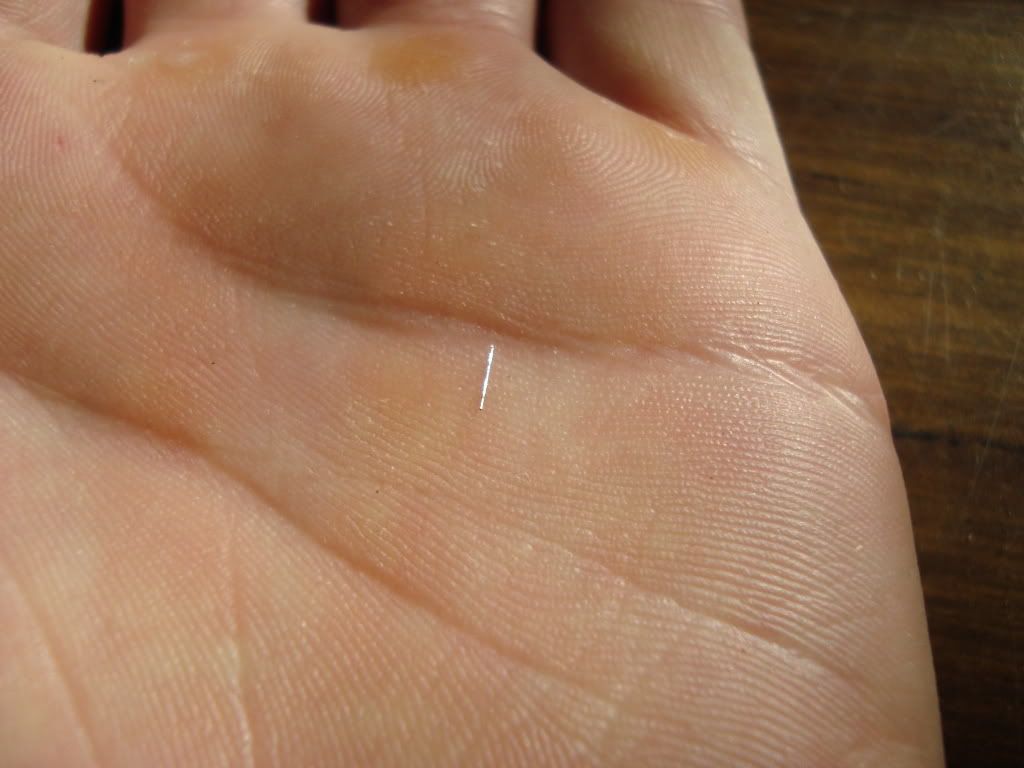 Now I placed the wire on top of the break and heated one end then the other. Now it is soldered on. But wait! this is the hard part. To make sure you solder it on proper and good, I run a clean blob of solder across the whole lot, this also makes it very clean, neat and a strong connection. Here is the finished job  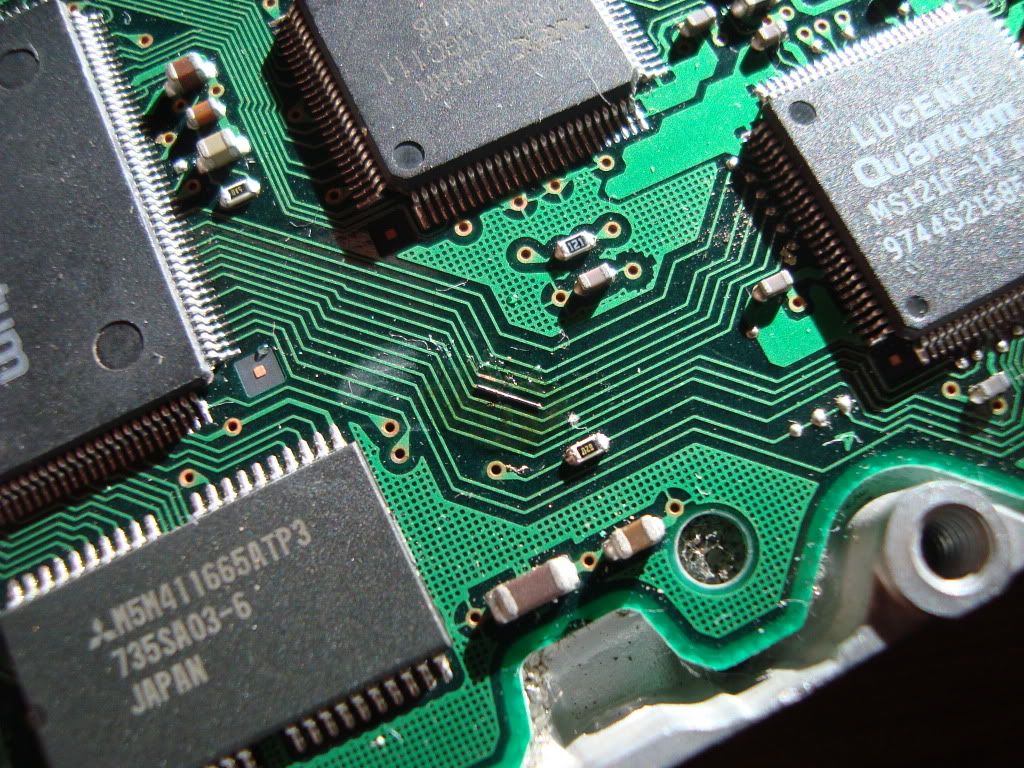 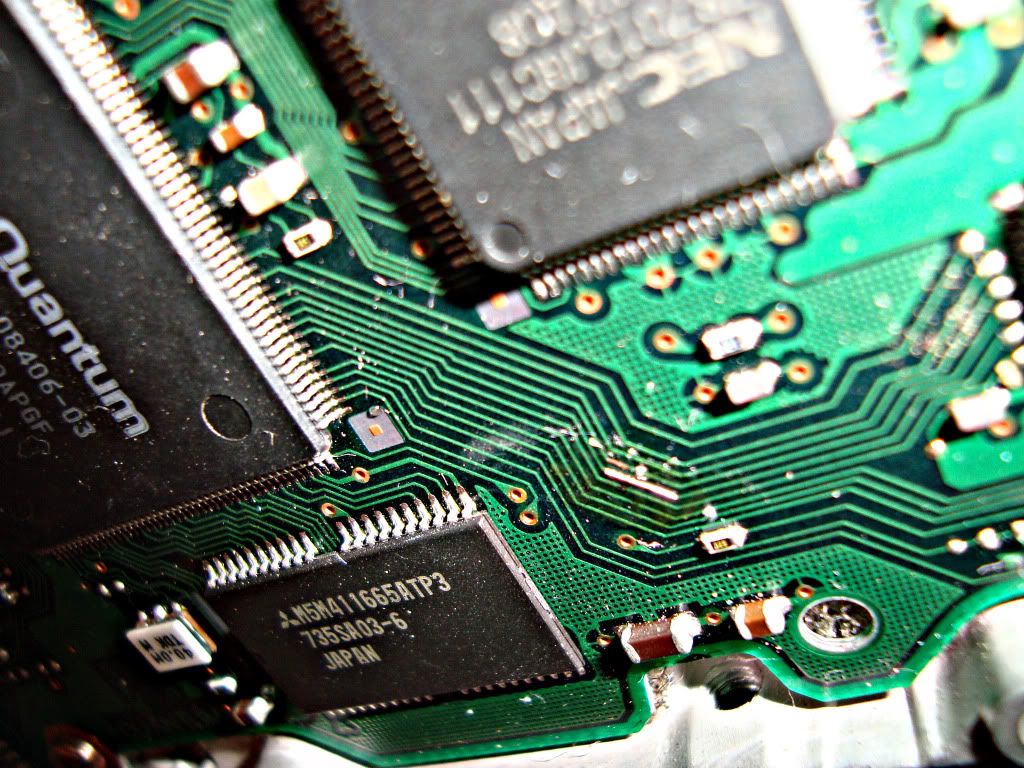 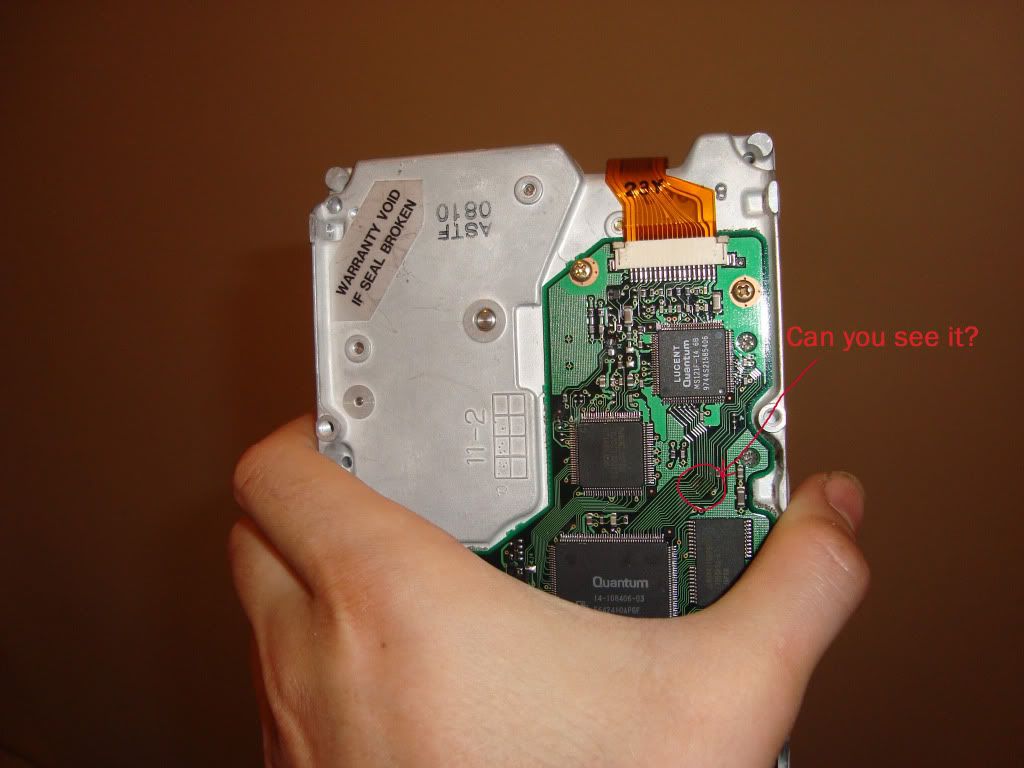 Use a multi meter to test connectivity by testing at the end points of the track, ie. at IC pins or PCI slot or what ever they lead to. You can finish off the whole lot by insulating with some kind of adhesive, I like to use silicon sealant. This will protect against shorts against other objects ( back plates,screws, case blah blah) and also prevent the bridge from being knocked of if you accidentally knock it on something. There! I hope that helps some one for future reference. I recommend doing this only if you can solder well if not get someone who can to help.
post edited by vlad01 - 2010/02/17 15:42:13
My computers are liquid cooled while my vehicles are air cooled.  
|
stephen92
CLASSIFIED Member
- Total Posts : 4104
- Reward points : 0
- Joined: 2007/12/10 13:36:38
- Location: North Carolina
- Status: offline
- Ribbons : 6


Re:Guide to repairing damaged PCB tracks.
2010/02/17 15:20:29
(permalink)
I'm a little lost on the transition between the 3rd and 4th picture. You have a glob of solder on the PCB, did you take it off after transferring some of it into the lane? Other than that, awesome (and quick) guide. I've been teaching myself some stuff do do with a soldering iron, I can add this one to the list. BR him
post edited by drdoomuzi4u - 2010/02/17 15:22:04
CPU:Q6600 @ 3.15Ghz Coolermaster V6 GPU: EVGA 560 Ti RAM: 4GB G.Skill PI Black Mobo: EVGA 680i LT SLI HD: 1TB WD Caviar Black, 150Gb WD Velociraptor Win 7 Professional 64, 2x1TB Seagate Barracudas in RAID 1 Case: HAF-X PSU: Coolermaster Silent Pro Gold 1200W
|
Tweaked
Omnipotent Enthusiast

- Total Posts : 10630
- Reward points : 0
- Joined: 2006/08/12 12:24:15
- Location: Texas
- Status: offline
- Ribbons : 29
Re:Guide to repairing damaged PCB tracks.
2010/02/17 15:27:18
(permalink)
If your warranty is still intact, do not attempt repair yourself. Send product in to EVGA. Very nice Vlad. This should be very useful for those who are out of warranty or have voided their warranty. Def BR worthy. I'll leave it in General Discussion for a little while, but then I think I'll sticky it in the General Hardware section. One thing, could you please add more pics to clear up some of the details mentioned by Drdoomuzi4u?
post edited by Tweaked - 2010/02/17 16:47:07

 EVGA DG-77/ EVGA 750 G2/ Gigabyte B450/ AMD Ryzen 5 3600/ 16gb Crucial Ballistix DDR4-3600/ RTX-2080 XC/ Dell S2716DG / Windows 11 64
|
vlad01
CLASSIFIED Member
- Total Posts : 3495
- Reward points : 0
- Joined: 2008/04/19 16:55:43
- Location: Australia, Victoria
- Status: offline
- Ribbons : 6
Re:Guide to repairing damaged PCB tracks.
2010/02/17 15:28:36
(permalink)
Yes i did. the blob doesn't stick to the tracks, it stays on the end of the iron. It only coats the tracks.
My computers are liquid cooled while my vehicles are air cooled.
|
LonelyStoner
FTW Member
- Total Posts : 1551
- Reward points : 0
- Joined: 2009/10/22 05:19:30
- Location: Have A Nice Day :-)
- Status: offline
- Ribbons : 1
Re:Guide to repairing damaged PCB tracks.
2010/02/17 18:53:16
(permalink)
Oh well.
Luckily i didnt do any repairs on my own. I thought i would just use my $5 solder and $1 soldering iron and just patch it over the marks. That would get the job done.
If my dad ought to do it? He'll just bring the welder's 'firegun with blue flame' and roast the board to a nice, soft and tender state. He'll go 'There, we are finished.' And he'll give me that cute smile.
|
TheCrazyCanuck
CLASSIFIED Member
- Total Posts : 2194
- Reward points : 0
- Joined: 2006/04/16 12:54:44
- Location: Texas Yee-Haw!
- Status: offline
- Ribbons : 4
Re:Guide to repairing damaged PCB tracks.
2010/02/21 12:59:57
(permalink)
Good guide, I would also add that flux can be your best friend when soldering fine points like these. The solder you use on electronics comes with flux at the core (don't use acid core solder!!!) but you'll find that the melted solder will flow to the traces better if you apply some manually as well. To remove the solder use a thick brush (like you would use for painting) and isopropyl alcohol.
|
jcitron
New Member

- Total Posts : 76
- Reward points : 0
- Joined: 2007/12/27 08:36:23
- Location: Haverhill, MA
- Status: offline
- Ribbons : 0
Re:Guide to repairing damaged PCB tracks.
2010/03/27 16:00:22
(permalink)
This is an excellent guide, Vlad.
Way back in my younger days, about 30 years or so ago, I used to do this for a living. The only suggestion I'd make is to remove the extra flux and any solder beads that end up on the circuit board. The little beads can end up falling down on some leads and shorting them out. Also the old flux will attract dirt, which can sometimes be conductive. To clean the flux, use alcohol, or if you can find it around anymore De-Sol which disolves the flux completely.
At this point in the game, the trackwork has gotten too small for my eyes even with a magnifyer. When etches break now, I throw the part away and buy another one. It's less frustrating that way.
John
System Specs: Corsair Obsidian Series 800D CC800DW Black Aluminum / Steel ATX Full Tower Computer Case EVGA 1600W ATX12V/EPS1V SLI Ready 80 PLUS GOLD Power Supply Intel DZ77REK Motherboard Intel I7-3770 3.5GHZ running at 3.8GHZ 32 GB RAM G.SKILL Ares Series (4x 8G) Desktop Series RAM EVGA GTX780Ti Classified K/NGP/N Edition video card 3x Seagate 2-TB hard drives DVD/R/W drive
|
quadlatte
CLASSIFIED ULTRA Member

- Total Posts : 7191
- Reward points : 0
- Joined: 2006/09/14 16:52:58
- Location: Greensboro, NC
- Status: offline
- Ribbons : 56
Re:Guide to repairing damaged PCB tracks.
2010/05/26 14:14:15
(permalink)
Remember also that this will only work on surface traces, if the pcb is cracked then and hidden trace can also be damaged as most pcb's now are multi layer.
|
4thofjuly
New Member
- Total Posts : 3
- Reward points : 0
- Joined: 2007/07/03 23:10:44
- Status: offline
- Ribbons : 3
Re:Guide to repairing damaged PCB tracks.
2010/10/14 00:31:14
(permalink)
Hmm... my quick fix used to be simply grab small aluminium foil make a tiny strip of it to match the track etc, and simply tape it to the board :). Or better super glue the ends if tape seemed to be not working great.
|
simonetti
Superclocked Member

- Total Posts : 115
- Reward points : 0
- Joined: 2010/08/02 04:39:07
- Location: BH / MG / Brazil
- Status: offline
- Ribbons : 0
Re:Guide to repairing damaged PCB tracks.
2010/11/05 06:48:51
(permalink)
Well done! Nice job, and nice pics.
I am the kind guy who hates to throw away stuff without first giving it a shot of fixing it myself.
Thanks!
|
pyrebuilder
SSC Member

- Total Posts : 544
- Reward points : 0
- Joined: 2010/03/06 14:02:36
- Location: South Lake Tahoe, CA
- Status: offline
- Ribbons : 5
Re:Guide to repairing damaged PCB tracks.
2011/02/09 07:58:23
(permalink)
just a thought, perhaps this technique could be used in combination with the "oven" method? after soldering it into place, putting the piece into a warm oven, grounded, and heating it over 10-15 min at 300 degrees could also sort out internal cracks if nothing else has worked, as a last resort.
Computer builder, rocket flier, D&D player. EVGA SR-X, 2x Xeon E5-2687W 64 GB ECC RAM 1600Mhz
|
hvymetal86
New Member
- Total Posts : 61
- Reward points : 0
- Joined: 2009/02/14 02:08:47
- Status: offline
- Ribbons : 1
Re:Guide to repairing damaged PCB tracks.
2011/11/07 14:21:17
(permalink)
Wow, nice writeup. I hope I never have to repair something like this, but if I do I now have some hope of not having a foreverbroken circuit board.
|
killerjas
FTW Member
- Total Posts : 1274
- Reward points : 0
- Joined: 2011/10/06 20:13:36
- Location: Pierceton, IN
- Status: offline
- Ribbons : 4
Re:Guide to repairing damaged PCB tracks.
2012/04/12 12:10:57
(permalink)
vlad01
After seeing what happen to Lonelystoner's mobo, I though I might write a guide on how to repair tracks on PCBs.
When repairing tracks on something like a gfx, hdd or a mobo, it isn't as simple as just soldering a jumper wire to bypass the break. Why?
Well it comes down to physics and the way electrons behave at high frequencies. When a computer or any high speed circuit is designed all track positions, spacing, thickness and length are factored in to suit the particular signal. The physical layout affects: resistance, capacitance, inductance and propagation speed of the electrons them selves. Change these properties and the signals: distort/delay/advance/ lost/cross talk etc...
Therefore it is crucial that when repairing tracks that we maintain it to spec as close as possible. Ok here is my technique.
Today I used this old 3GB quantum hdd and punch a track with a knife for this demo.
Ok thats is cut through. I start by using a jeweler's flat head screw driver and gently scrape the lacquer off a few mills down either side of the break until I see bare copper.
Next I get a good soldering iron, you can get Anti static ones or you can ground a normal one with a wire/aligator clip lead from the iron body to say? you computer case. This will ensure you dont kill what you are soldering. Also ASD mat or the bag the board came in to lay your work on.
Ok in the pic below you melt a blob of solder across the bare copper to tin it like so. then just lift it off after few sec. The blob will stay with the iron tip and leave it all tinned.
Now its all tinned. mmm looks nice
Now I get a wire and strip it until all the strands are out like this, then I tin one single strand. This will make it easy to solder it to the tracks.
Note! that was one rough looking tinning on that wire, it was for the purpose of the pic as I was holding the cam in one hand so I did it again after.
Then I cut the length needed, that was too much for this job in the pic. I ended halving it. If the track you are fixing goes around a bend shape this tinny wire to match.
Now I placed the wire on top of the break and heated one end then the other. Now it is soldered on. But wait! this is the hard part. To make sure you solder it on proper and good, I run a clean blob of solder across the whole lot, this also makes it very clean, neat and a strong connection. Here is the finished job
Use a multi meter to test connectivity by testing at the end points of the track, ie. at IC pins or PCI slot or what ever they lead to.
You can finish off the whole lot by insulating with some kind of adhesive, I like to use silicon sealant. This will protect against shorts against other objects ( back plates,screws, case blah blah) and also prevent the bridge from being knocked of if you accidentally knock it on something.
There! I hope that helps some one for future reference. I recommend doing this only if you can solder well if not get someone who can to help.
What I do when there like that (mostly car audio stuff) I just put a constant bead of soder in where it needs to be and cut away the excess.
|
whitnasty1
CLASSIFIED Member
- Total Posts : 2440
- Reward points : 0
- Joined: 2010/12/26 17:36:08
- Location: North Carolina
- Status: offline
- Ribbons : 5
Re:Guide to repairing damaged PCB tracks.
2012/04/19 15:15:43
(permalink)
Add a little bit of flux to clean things up as well and help the solder to stick where you want it to go, and using the correct tip is also important. You don't want some huge rounded soldering tip trying to repair some traces. Use some rosin wick to get rid of anything left over and then check continuity like stated above, I prefer Fluke meters, but I'm a bit partial to them.
Project Name: "Dragon Slayer" /Case: Cooler Master HAF-X /CPU: Intel i7-2600k @ 4.8Ghz /MoBo: EVGA P67 FTW E679 w/ ECP /CPU Cooling: Corsair H70 w/ Gentle Typhoon AP-15's /RAM: 8GB G.Skill RipJaws @1600Mhz (Red) /GPU: 2xEVGA GTX 660ti FTW Signature 2 SLI /GPU Cooling: Additional 120mm EverMax fan /Sound Card: Creative SB X-Fi Titanium /PSU: Corsair AX1200 /Optical Drive: ASUS DVD/CD R/RW; Samsung Blu Ray Drive /SSD: Intel 520 Series 120GB SSD SATA III (OS) / Intel 320-series 40GB (Data) / HDD: 1TB Samsung SpinPoint F3 7200kRPM /Monitor: Acer P236H (1920x1080)
|
ryandigweed
iCX Member

- Total Posts : 291
- Reward points : 0
- Joined: 2011/06/09 09:47:51
- Status: offline
- Ribbons : 0
Re:Guide to repairing damaged PCB tracks.
2012/06/08 01:18:03
(permalink)
Great Guide, but I dont think i have good enough soldering skills to do this :(
|
dave0w
New Member
- Total Posts : 9
- Reward points : 0
- Joined: 2013/09/26 18:05:12
- Status: offline
- Ribbons : 0
Re:Guide to repairing damaged PCB tracks.
2013/10/08 14:40:11
(permalink)
|
svetlanaystugova
New Member
- Total Posts : 1
- Reward points : 0
- Joined: 2014/04/30 00:30:02
- Status: offline
- Ribbons : 0
Re: Guide to repairing damaged PCB tracks.
2014/04/30 00:30:47
(permalink)
You may try pcbmaking.com to get your job done quickly and effectively. It gives big discount on various and also FREE shipping.
|
XrayMan
Insert Custom Title Here

- Total Posts : 73000
- Reward points : 0
- Joined: 2006/12/14 22:10:06
- Location: Santa Clarita, Ca.
- Status: offline
- Ribbons : 115
Re: Guide to repairing damaged PCB tracks.
2014/05/01 00:02:06
(permalink)
svetlanaystugova
You may try pcbmaking.com to get your job done quickly and effectively. It gives big discount on various and also FREE shipping.
Hmmm. Based in China. 
My Affiliate Code: 8WEQVXMCJL Associate Code: VHKH33QN4W77V6A   
|
Gomez99
CLASSIFIED Member
- Total Posts : 2637
- Reward points : 0
- Joined: 2013/03/28 16:53:08
- Location: L.A.
- Status: offline
- Ribbons : 14
Re: Guide to repairing damaged PCB tracks.
2014/05/24 17:06:57
(permalink)
XrayMan
svetlanaystugova
You may try pcbmaking.com to get your job done quickly and effectively. It gives big discount on various and also FREE shipping.
Hmmm. Based in China.
Dat website do
|
XrayMan
Insert Custom Title Here
- Total Posts : 73000
- Reward points : 0
- Joined: 2006/12/14 22:10:06
- Location: Santa Clarita, Ca.
- Status: offline
- Ribbons : 115
|
FR3D1
Superclocked Member
- Total Posts : 127
- Reward points : 0
- Joined: 2012/01/21 15:00:47
- Status: offline
- Ribbons : 0
Re: Guide to repairing damaged PCB tracks.
2014/08/18 01:20:38
(permalink)
does it only work with hdds?
|
hamppcb
New Member
- Total Posts : 1
- Reward points : 0
- Joined: 2014/12/15 00:13:40
- Status: offline
- Ribbons : 0

Re: Guide to repairing damaged PCB tracks.
2014/12/15 00:30:59
(permalink)
|
Anuextreme117
New Member
- Total Posts : 3
- Reward points : 0
- Joined: 2014/12/28 08:54:05
- Location: Unknown
- Status: offline
- Ribbons : 0
Re: Guide to repairing damaged PCB tracks.
2015/01/19 15:53:18
(permalink)
Thanks, I fixed my Quantum Fireball using a similar method.
|
UnReal-4-Life
iCX Member
- Total Posts : 353
- Reward points : 0
- Joined: 2013/08/09 04:58:14
- Location: California
- Status: offline
- Ribbons : 2
Re: Guide to repairing damaged PCB tracks.
2015/04/20 00:18:49
(permalink)
wow that's nice job. the only thing id that is diff. is trench. I use elec tape on the good tracks to cover and the space between the electape makes it easy to drop the wire and on it.
|
MattyMattMatt
Superclocked Member
- Total Posts : 112
- Reward points : 0
- Joined: 2015/07/28 13:50:17
- Location: Edmonton Area, AB
- Status: offline
- Ribbons : 0
Re: Guide to repairing damaged PCB tracks.
2015/08/03 15:47:04
(permalink)
Fantastically useful resource!
 Associate Code: C0RZOAF57R3JE6B Elite Member ID: MXFACO40E1XPINUAY3X
|
Wehlenjainoe
New Member
- Total Posts : 2
- Reward points : 0
- Joined: 2017/04/25 22:16:29
- Status: offline
- Ribbons : 0
Re: Guide to repairing damaged PCB tracks.
2017/04/25 22:23:49
(permalink)
There are four techniques used to repair cracks in printed circuit board: The first one is to flow solder across the crack to form a solder bridge.The second method is to lap-a piece of wire across the crack. A third repair technique is to drill a hole through the board where the crack is located and then to install an eyelet in the hole and solder it into place. And the fourth method is to use the clinched staple method. It is the most reliable method and is recommended in nearly all cases.
|
Gam3r26
Superclocked Member
- Total Posts : 111
- Reward points : 0
- Joined: 2012/09/03 10:53:06
- Status: offline
- Ribbons : 0
Re: Guide to repairing damaged PCB tracks.
2017/04/28 15:25:02
(permalink)
hmmm very intriguing info, you learn something new every day I guess. And this is coming from a man in IT field xD
|
Cidpineda
New Member
- Total Posts : 100
- Reward points : 0
- Joined: 2018/02/20 09:18:29
- Status: offline
- Ribbons : 0
Re:Guide to repairing damaged PCB tracks.
2018/03/09 10:35:36
(permalink)
Any code 43 on a 970 fix?
|
MaxPower4U
New Member
- Total Posts : 4
- Reward points : 0
- Joined: 2019/02/27 00:29:55
- Status: offline
- Ribbons : 0
Re:Guide to repairing damaged PCB tracks.
2019/03/13 00:35:26
(permalink)
Very helpful guide Vlad with very nice photos.
As whitnasty said in these cases FLUX is necessary.Personally I use CS FLUX and I am very satisfied with this product.For those that want to give a try there are some very helpful tutorials in youtube such as one named ''CS FLUX application instructions for GPU removal''
|
aka_STEVE_b
EGC Admin
- Total Posts : 17692
- Reward points : 0
- Joined: 2006/02/26 06:45:46
- Location: OH
- Status: offline
- Ribbons : 69
Re: Guide to repairing damaged PCB tracks.
2021/02/01 07:15:01
(permalink)
AMD RYZEN 9 5900X 12-core cpu~ ASUS ROG Crosshair VIII Dark Hero ~ EVGA RTX 3080 Ti FTW3~ G.SKILL Trident Z NEO 32GB DDR4-3600 ~ Phanteks Eclipse P400s red case ~ EVGA SuperNOVA 1000 G+ PSU ~ Intel 660p M.2 drive~ Crucial MX300 275 GB SSD ~WD 2TB SSD ~CORSAIR H115i RGB Pro XT 280mm cooler ~ CORSAIR Dark Core RGB Pro mouse ~ CORSAIR K68 Mech keyboard ~ HGST 4TB Hd.~ AOC AGON 32" monitor 1440p @ 144Hz ~ Win 10 x64
|