EVGA

Sleepee's GTX 460 TIM Change/VRM Heatsink/High Flow Bracket Guide

Author
Sleepee
CLASSIFIED Member
  • Total Posts : 4965
  • Reward points : 0
  • Joined: 2009/07/15 20:00:39
  • Location: Philadelphia
  • Status: offline
  • Ribbons : 39
2010/11/07 09:22:30 (permalink)
Updated 1/22/11
 
Heya guys. Sleepee here! I just got done re-TIMing my 3 460s that I have around. Since I wasn't able to locate a guide beforehand, I decided to just do this myself for future reference around these forums.
 
Before we start I'll be referring to my cards as such. Temperatures are at stock TIM at folding GPU3 work units.
GPU1: Top GTX 460 SC in an SLI configuration; 1.050 850/1700/2000; Runs hot! 81C when I pulled it out this morning, and up to 91C on Project 10632 WUs.
GPU2: Bottom GTX 460 SC in an SLI configuration; 1.050 850/1700/2000; 71C
GPU3: Lone GTX 460 Vanilla; 1.087 925/1850/2000; 71C
 
Things you will need: A non static area, your GTX 460(s), a #0 or #1 screwdriver, Arcticlean/Isopropyl Alcohol 91%+, VRM Heatsinks, your hands. (You don't need those Ritz!)

Heatsink + Shroud Removal
The quick guide for adding the VRM heatsink states that on the reference cards, you only need to remove the 4 screws surrounding the GPU core. It does not specify what to do for the EE cards. You'll need to remove all 8 screws on the back of the PCB.

The reason why I stated #0 or #1 screwdriver before is because you can likely get away with using a #1 on these screws. I was able to use my #1 to take out all screws. I'm happy to report that on all 3 of my 460s, every screw came out very easily. We'll have none of those horror stories about stripping screws and having to break out a drill. However, if you do end up starting to strip with a #1, stop immediately, and go find a #0 to use. You won't need to disconnect the fan, as it doesn't get in the way.
Following screws removal, put one hand on the bottom on the shroud, and put another on top on the PCB. Turn your hands in opposite directions and pull gently, and they'll come apart.
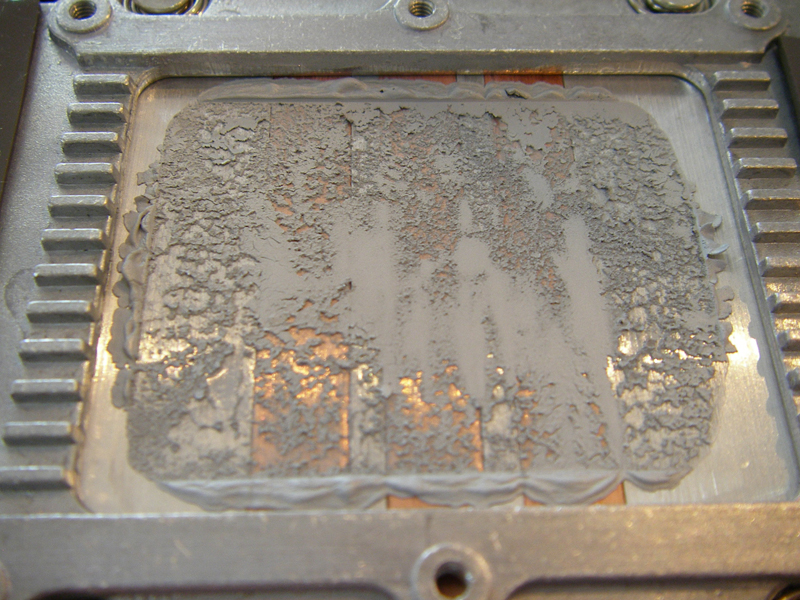
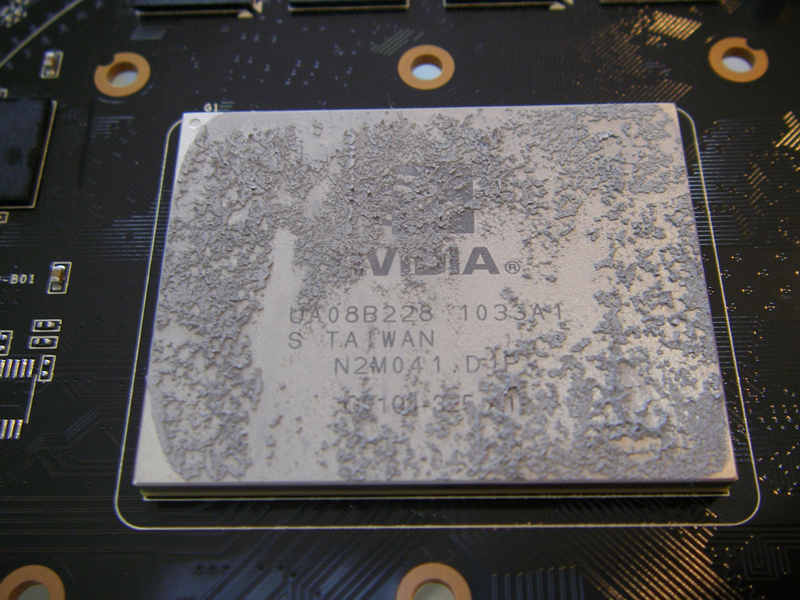
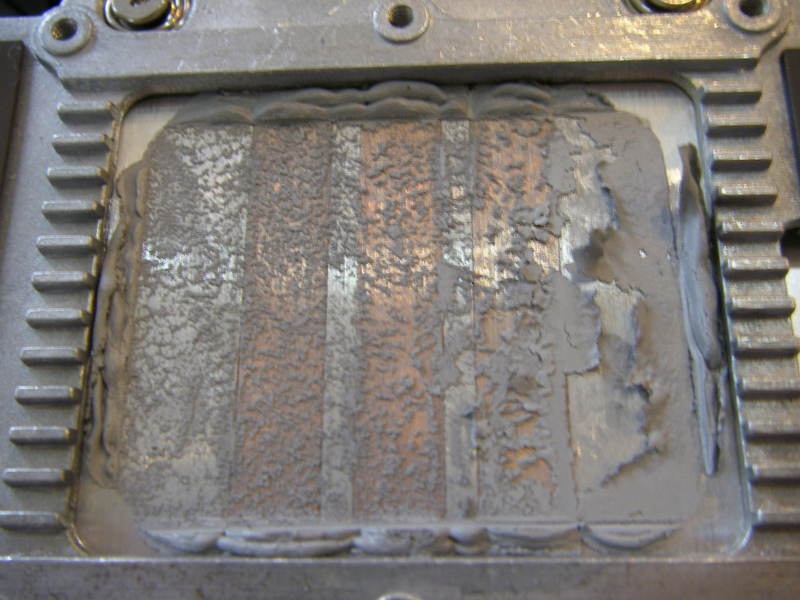
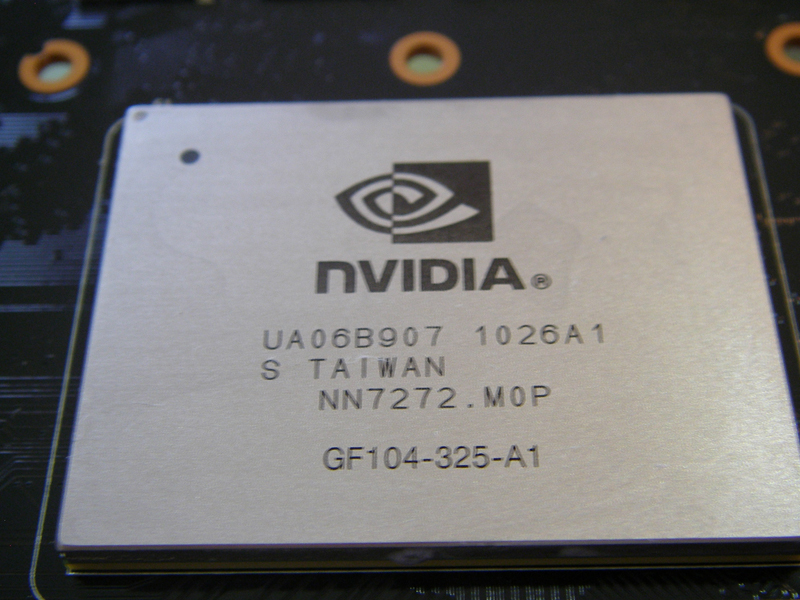
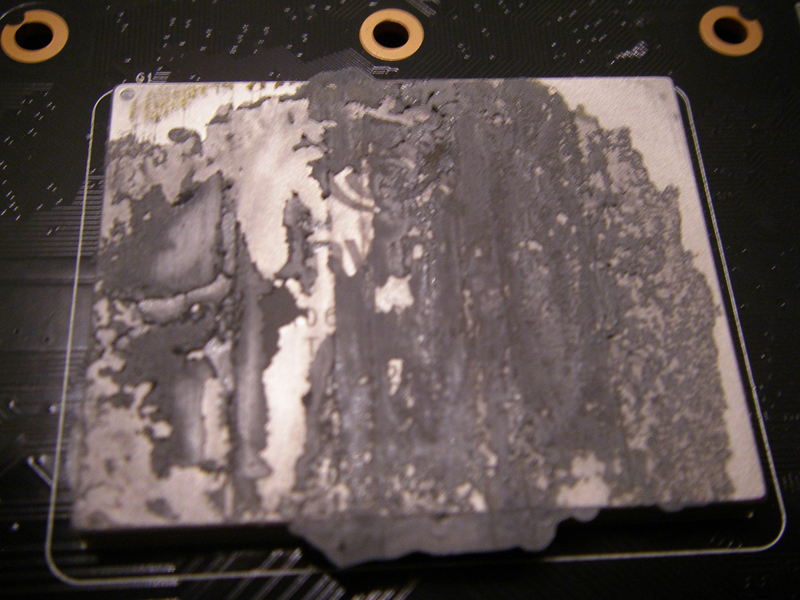
Yuck! Look at that nasty stock TIM!
GPU2:


GPU3: 


This one IMO, looked the best and had the most even coverage. 


GPU1:


Take your favorite TIM remover, be it Arcticlean or Isopropyl Alcohol, and go nuts. I also cleaned up the memory chips that are under thermal tape on each card. They looked kind of oily when I pulled the fans off.


When you're done cleaning, you should have something that looks like the following.
GPU2:


GPU3: 


GPU1:


Nice!  
VRM Heatsinks
If you aren't putting these on, feel free to skip ahead.
For the VRM Heatsinks, follow the instructions that came with your envelope. Or, go to: http://www.evga.com/products/pdf/M020-00-000205.pdf
Remember that the lower fins should point down towards the PCI-E connector. It should look like this.

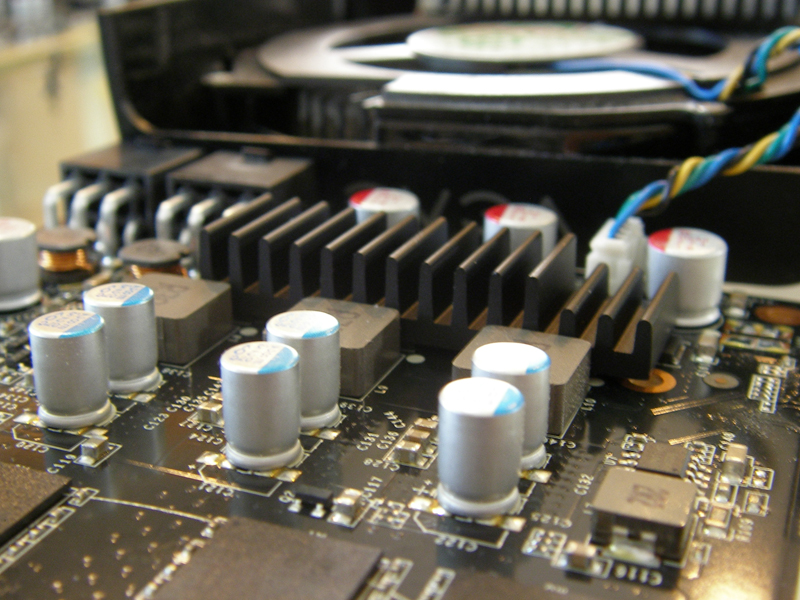
Note that it will not cover all of the chips completely. There was about a millimeter on the top and bottom ones not covered by the heatsink.


High Flow Brackets
To remove your stock bracket, you will need to have the heatsink/shroud combo off (sorry for those who have already changed their thermal paste; you'll have to do it again).
 
Looking at the PCB, head over to the top left and take off the single screw securing the bracket to the PCB.

Now come down over the side and spot the four hexagonal screws holding the bracket to the DVI out ports. If you're super special awesome and happen to have a screwdriver that can take these off, feel free to do so! Otherwise, using a pair of long-nose pliers, grab the heads and turn to loosen them up, and then unscrew them by hand. There are four in total to remove. In this picture, I've already removed one.

Take your high flow bracket out, and place it back where the stock one was. Screw in the hexagonal screws again. I put them in again by hand, because four screws will definitely hold that bracket in place.
 
But what about the first screw that we took off in this section? The one holding the bracket to the PCB? You say.
Well, the HF brackets were technically designed for the GTX 470/480, which use bigger screws. The one that comes with the GTX 460 is simply too small to even thread that hole on the high flow bracket. But don't worry about it. The DVI screws will hold the bracket securely in place. 
 
Now that your HF bracket is successfully in place, take your stock bracket, and thread the screw to it so that you don't lose it. Keep both the bracket and screw in your GTX 460's box, because if you ever need to RMA, you'll need to have the stock bracket on.

 
TIM Reapplication
Now for the TIM application. I used IC Diamond. As per their instructions, I used a single blob that would be spread by the pressure from the heatsink pushing down on it. Try to get your blob to be the size and width of the Nvidia logo. It's a good reference for the size that you need.     


3 months later, this is what the spread looks like on two of the cards with that much IC Diamond. To avoid the paste running off like that on the top and bottom, try to get your blob to be more wide than tall. But if it ends up coming off of the edges, don't worry about; because the PCB always points down towards the bottom of your case, there is no way that any thermal paste will get onto the PCB's circuit traces.


Finally, take your PCB, and mount that to the fan shroud/heatsink. It is much easier this way, as you can see where the screws are supposed to line up and you're not just guesstimating where they would be. Thread the 4 diagonal screws in first, and then tighten in an X formation like so.

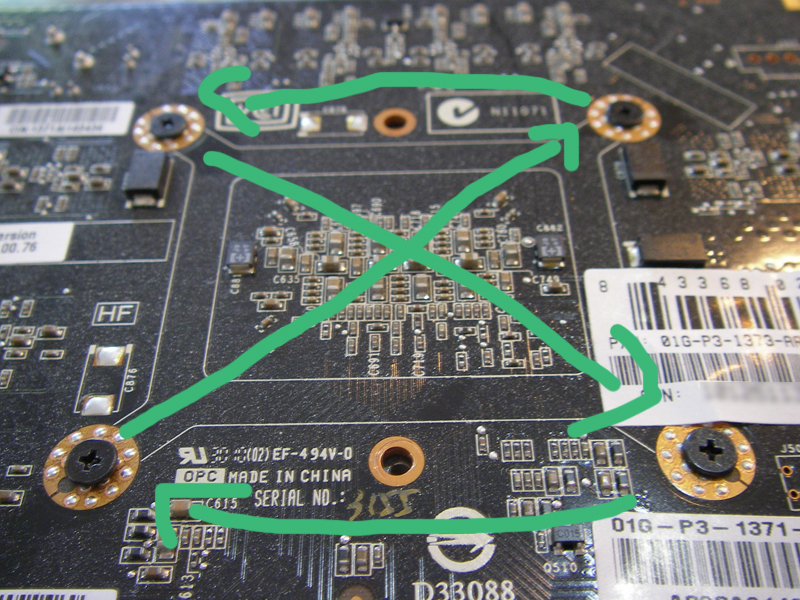
When those are tightened down, screw in the last four to their original places. Then put your card back into your system and you're good to go!
 
IC Diamond Results
Roughly 3C drops on each card in my SLI configuration. The lone 460 had no temperature change.    
 
High Flow Bracket Results  
Another 3C drop on each card in my SLI configuration with the high flow brackets installed. That's right off the bat readings, it may go down as the IC Diamond spreads and burns in. 
 
Will the VRM heatsink improve my overclock?
Probably not. I couldn't crank my third 460 from 925 core to 950 core, both with and without the VRM heatsink. It failed the work unit it was working on within seconds of starting it. For my two in SLI, even at 1.087V, I couldn't push them both to 900 mhz. The bottom card kept failing work units.
 
Any questions, I will answer to the best of my ability, or another forumite will hopefully help me out.
 
Cheers!
post edited by Sleepee - 2011/01/22 19:06:39

i7-4770K @ 4.0 / Gigabyte Z87X-UD4H / 8GB DDR3-1600 G.SKILL Ripjaws X
EVGA GTX 780 Ti SC / Silverstone Strider Plus 1000W
Corsair H110 / CM Storm Stryker
CM Storm Trigger / CM Sentinel Advanced
---
AMD Sempron 145 / ECS A990FXM-A / 8GB DDR3-1600 G.SKILL Ripjaws X
(3) ASUS R9-280X DirectCUII / EVGA SuperNOVA 1000P2
Red Milk Crate
---
Epiphone Sheraton R62 / Vox AC15C1
MXR Carbon Copy / ZVEX Vextron
#1

29 Replies Related Threads

    SirWaWa
    FTW Member
    • Total Posts : 1398
    • Reward points : 0
    • Joined: 2010/08/04 07:55:54
    • Status: offline
    • Ribbons : 0
    Re:Sleepee's Pull-Apart 460/TIM Change/VRM Heatsink Guide 2010/11/07 09:43:15 (permalink)
    should of ordered/installed the high flow brackets at the sametime
    i did it on my 460 FTW's and got a 4 degree drop on load
    this time evga decided to put the screw that holds the bracket to the corner of the PCB on the underside so i had to take off the shroud
    i watched a video of guy installing it on his 470 and he didn't have do it this way as the screw was on top
    anyways the stock bracket is slightly threaded so it can hold the screw in
    the high flows are not threaded so there's nothing to keep it in place and i had no nuts so i just left it out

    Intel i7 960 @ 3.2GHz with Intel EE Heatsink/Fan Delta DBX-A
    Asus P6T6 WS Revolution X58 LGA 1366
    Asus BW-12B1ST CD-RW/DVD-RW/BD-R (x2)
    Corsair Obsidian 800D
    Corsair HX850W Professional Series
    Corsair Dominator GT DDR3 1600 6GB 7-7-7-20
    eVGA Nvidia GeForce GTX 780 Ti SC 3.0GB DDR5 ACX
    WD VelociRaptor 300GB 10,000 RPM SATAII
    WD Caviar Black 2TB/1TB/1TB 7,200 RPM SATAII
    Razer Megalodon 7.1 Headset
    Logitech G502 Proteus Spectrum
    Razer Onza Tournament Edition Xbox 360/PC Controller
    Logitech G810 Orion Spectrum
    Logitech X-540 5.1 Speaker System
    LG M2362D 1920 x 1080 23" 60Hz (x2)
    Windows 7 Ultimate 64-bit
    #2
    coolhand5150
    Superclocked Member
    • Total Posts : 150
    • Reward points : 0
    • Joined: 2008/03/23 21:00:56
    • Status: offline
    • Ribbons : 0
    Re:Sleepee's Pull-Apart 460/TIM Change/VRM Heatsink Guide 2010/11/07 09:45:32 (permalink)
    Nice guide...Thanks!

    2X EVGA GTX 460 SC EE
    Asrock Z68 Extreme4 Gen3
    Intel 2500K  @4.5
    Corsair H100 w/4 Cougar fans
    CM Haf advanced
    Win 7 Pro 64bit
    8 gig Gskill Ripjaw
    Crucial M4 128gig/WD 1TB
    Afterburner
    #3
    Sleepee
    CLASSIFIED Member
    • Total Posts : 4965
    • Reward points : 0
    • Joined: 2009/07/15 20:00:39
    • Location: Philadelphia
    • Status: offline
    • Ribbons : 39
    Re:Sleepee's Pull-Apart 460/TIM Change/VRM Heatsink Guide 2010/11/07 09:47:21 (permalink)
    SirWaWa

    should of ordered/installed the high flow brackets at the sametime
    i did it on my 460 FTW's and got a 4 degree drop on load
    this time evga decided to put the screw that holds the bracket to the corner of the PCB on the underside so i had to take off the shroud
    i watched a video of guy installing it on his 470 and he didn't have do it this way as the screw was on top
    anyways the stock bracket is slightly threaded so it can hold the screw in
    the high flows are not threaded so there's nothing to keep it in place and i had no nuts so i just left it out

    Oh yeah? I may do that in two months time when I can get another 20 EVGA Bucks.

    i7-4770K @ 4.0 / Gigabyte Z87X-UD4H / 8GB DDR3-1600 G.SKILL Ripjaws X
    EVGA GTX 780 Ti SC / Silverstone Strider Plus 1000W
    Corsair H110 / CM Storm Stryker
    CM Storm Trigger / CM Sentinel Advanced
    ---
    AMD Sempron 145 / ECS A990FXM-A / 8GB DDR3-1600 G.SKILL Ripjaws X
    (3) ASUS R9-280X DirectCUII / EVGA SuperNOVA 1000P2
    Red Milk Crate
    ---
    Epiphone Sheraton R62 / Vox AC15C1
    MXR Carbon Copy / ZVEX Vextron
    #4
    inv1dious
    iCX Member
    • Total Posts : 277
    • Reward points : 0
    • Joined: 2008/02/24 17:07:13
    • Location: Cape Coral, FL
    • Status: offline
    • Ribbons : 0
    Re:Sleepee's Pull-Apart 460/TIM Change/VRM Heatsink Guide 2010/11/07 10:33:35 (permalink)
    Very cool sleepee i was wanting to do that to mine. Blue ribbon time?

    EVGA Z68 SLI Motherboard
    EVGA 970 FTW
    I7 2600k at 4.0 ghz 1.25 volt
    Corsair H80 idle 30-33c max 75c Prime 95 stable
    4x4 16gb G-SKILL Sniper 1866 Memory 1.5v
    Kingston 240gbX2 Raid 1 SSD Sata 3
    Rosewill Blackhawk case custom paint
    Windows 8 Pro 64Bit
    Logitech G710 KB Logitech G502 Mouse
    Asus 27 inch Monitor 144hz 3D
    Corsair Vengeance headphones
    Thermaltake 850 PSU 
    #5
    staypuft
    CLASSIFIED Member
    • Total Posts : 4013
    • Reward points : 0
    • Joined: 2006/03/11 14:04:03
    • Location: USA
    • Status: offline
    • Ribbons : 31
    Re:Sleepee's Pull-Apart 460/TIM Change/VRM Heatsink Guide 2010/11/07 12:01:04 (permalink)
    Nice work Sleepee, BR time for sure.
     
    I am working on a VRM heatsink comparison, just waiting on my IR thermometer.  Will be comparing the FTW sink to other home-brew types and no sinks at all.  Those little chips get pretty hot!

    Interested in a discount on EVGA products?
    Click here for details and enter this Associates code at checkout >> 2ILPLQQ8IWY8DPN
     
    2021 Build: Gigabyte Z590 Ultra | Core i7-10700K | be quiet! Dark Rock Pro 4 | 32GB G.Skill Trident Z DDR4-3200
    EVGA RTX 3080 FTW3 Ultra | Samsung 970 EVO 500GB | Seasonic Focus GX-850 | Fractal Design Meshify C | Asus TUF VG27AQL1A
    #6
    cjgentile
    FTW Member
    • Total Posts : 1009
    • Reward points : 0
    • Joined: 2009/01/25 17:04:26
    • Location: Atlanta
    • Status: offline
    • Ribbons : 5
    Re:Sleepee's Pull-Apart 460/TIM Change/VRM Heatsink Guide 2010/11/07 15:08:28 (permalink)
    SirWaWa
    evga decided to put the screw that holds the bracket to the corner of the PCB on the underside so i had to take off the shroud  

     
    I put my high flow on with out pulling it off, it only half covers the screw and its just thin plastic. Just bend it back enough to reach the screw. I get my VREG/Mosfet sink tomorrow so I will be pulling my shoud off. I havent decided if I want to just leave it off. I have the non-EE ver.
     
    I don't think the extra heat sink will help with overclocking. How high you can get on the Mhz is down to the gpu die. I just got it so I feel safer running my card at the max allowed voltage because those little mosfets get freakin' hot.
    post edited by cjgentile - 2010/11/07 15:12:54

    i7 5820k // 1080Ti FE // X99 Micro2
     
     
    #7
    diegorubeus
    CLASSIFIED Member
    • Total Posts : 2962
    • Reward points : 0
    • Joined: 2008/12/23 21:42:13
    • Location: New Jersey
    • Status: offline
    • Ribbons : 8
    Re:Sleepee's Pull-Apart 460/TIM Change/VRM Heatsink Guide 2010/11/07 15:46:37 (permalink)
    nice guide. i think i would be addign those VRM heatsinks to my gtx 460 and ofruse the high airflow bracket soon.
    i'll follow this guide for the thermal paste replacement.
    gonna use OCZ freeze.

    -INTEL CORE i7 930 D0 @ 4.00 GHZ LINX STABLE      -WD CAVIAR BLUE 320GB (MEDIA)
    -EVGA X58 SLI LE MOTHERBOARD (E757)                  -LG GH22NS40 DVD MULTI BURNER
    -CORSAIR H50 WC KIT IN PUSH-PULL CONFIG          -ACER S231HLbid 23" LED 1080P 
    -EVGA GTX 580 SUPERCLOCKED W/BACKPLATE 
    -CORSAIR HX1050 PRO SERIES PSU 
    -CORSAIR VENGEANCE 12GB DDR3 1600MHZ 
    -THERMALTAKE ELEMENT S CASE
    -CRUCIAL M4 128GB SSD (OS,GAMES)
    #8
    SirWaWa
    FTW Member
    • Total Posts : 1398
    • Reward points : 0
    • Joined: 2010/08/04 07:55:54
    • Status: offline
    • Ribbons : 0
    Re:Sleepee's Pull-Apart 460/TIM Change/VRM Heatsink Guide 2010/11/07 18:11:21 (permalink)
    cjgentile

    SirWaWa
    evga decided to put the screw that holds the bracket to the corner of the PCB on the underside so i had to take off the shroud  


    I put my high flow on with out pulling it off, it only half covers the screw and its just thin plastic. Just bend it back enough to reach the screw. I get my VREG/Mosfet sink tomorrow so I will be pulling my shoud off. I havent decided if I want to just leave it off. I have the non-EE ver.


    i tried... i really did not want to pull off the shroud
    for some reason it was stuck on there really good so gentle bending did nothing so i just took it off on both cards
    i dunno how much different the reference shroud is vs the EE one but i had no choice if i wanted the bracket off to put the new one on
    anyways i wanted to tighten/re-tighten the screws on it regardless
     

    Intel i7 960 @ 3.2GHz with Intel EE Heatsink/Fan Delta DBX-A
    Asus P6T6 WS Revolution X58 LGA 1366
    Asus BW-12B1ST CD-RW/DVD-RW/BD-R (x2)
    Corsair Obsidian 800D
    Corsair HX850W Professional Series
    Corsair Dominator GT DDR3 1600 6GB 7-7-7-20
    eVGA Nvidia GeForce GTX 780 Ti SC 3.0GB DDR5 ACX
    WD VelociRaptor 300GB 10,000 RPM SATAII
    WD Caviar Black 2TB/1TB/1TB 7,200 RPM SATAII
    Razer Megalodon 7.1 Headset
    Logitech G502 Proteus Spectrum
    Razer Onza Tournament Edition Xbox 360/PC Controller
    Logitech G810 Orion Spectrum
    Logitech X-540 5.1 Speaker System
    LG M2362D 1920 x 1080 23" 60Hz (x2)
    Windows 7 Ultimate 64-bit
    #9
    cjgentile
    FTW Member
    • Total Posts : 1009
    • Reward points : 0
    • Joined: 2009/01/25 17:04:26
    • Location: Atlanta
    • Status: offline
    • Ribbons : 5
    Re:Sleepee's Pull-Apart 460/TIM Change/VRM Heatsink Guide 2010/11/08 20:09:51 (permalink)
    Got my sink today and put it on. Decided to leave the shroud off.


    i7 5820k // 1080Ti FE // X99 Micro2
     
     
    #10
    Sleepee
    CLASSIFIED Member
    • Total Posts : 4965
    • Reward points : 0
    • Joined: 2009/07/15 20:00:39
    • Location: Philadelphia
    • Status: offline
    • Ribbons : 39
    Re:Sleepee's Pull-Apart 460/TIM Change/VRM Heatsink Guide 2010/11/08 20:15:05 (permalink)
    Are your temps any better without the shroud?

    i7-4770K @ 4.0 / Gigabyte Z87X-UD4H / 8GB DDR3-1600 G.SKILL Ripjaws X
    EVGA GTX 780 Ti SC / Silverstone Strider Plus 1000W
    Corsair H110 / CM Storm Stryker
    CM Storm Trigger / CM Sentinel Advanced
    ---
    AMD Sempron 145 / ECS A990FXM-A / 8GB DDR3-1600 G.SKILL Ripjaws X
    (3) ASUS R9-280X DirectCUII / EVGA SuperNOVA 1000P2
    Red Milk Crate
    ---
    Epiphone Sheraton R62 / Vox AC15C1
    MXR Carbon Copy / ZVEX Vextron
    #11
    cjgentile
    FTW Member
    • Total Posts : 1009
    • Reward points : 0
    • Joined: 2009/01/25 17:04:26
    • Location: Atlanta
    • Status: offline
    • Ribbons : 5
    Re:Sleepee's Pull-Apart 460/TIM Change/VRM Heatsink Guide 2010/11/08 20:21:23 (permalink)
    Hard to say because I put some IC Diamond on the gpu as well. It was all I had. I didn't take any before temps. I just think it looks cooler without it. haha. Come to think of it I could bench it without and then just hold it on to compare. Ill post back with my findings
    post edited by cjgentile - 2010/11/08 20:23:43

    i7 5820k // 1080Ti FE // X99 Micro2
     
     
    #12
    Sleepee
    CLASSIFIED Member
    • Total Posts : 4965
    • Reward points : 0
    • Joined: 2009/07/15 20:00:39
    • Location: Philadelphia
    • Status: offline
    • Ribbons : 39
    Re:Sleepee's Pull-Apart 460/TIM Change/VRM Heatsink Guide 2010/11/08 20:23:16 (permalink)
    Sounds good!

    i7-4770K @ 4.0 / Gigabyte Z87X-UD4H / 8GB DDR3-1600 G.SKILL Ripjaws X
    EVGA GTX 780 Ti SC / Silverstone Strider Plus 1000W
    Corsair H110 / CM Storm Stryker
    CM Storm Trigger / CM Sentinel Advanced
    ---
    AMD Sempron 145 / ECS A990FXM-A / 8GB DDR3-1600 G.SKILL Ripjaws X
    (3) ASUS R9-280X DirectCUII / EVGA SuperNOVA 1000P2
    Red Milk Crate
    ---
    Epiphone Sheraton R62 / Vox AC15C1
    MXR Carbon Copy / ZVEX Vextron
    #13
    cjgentile
    FTW Member
    • Total Posts : 1009
    • Reward points : 0
    • Joined: 2009/01/25 17:04:26
    • Location: Atlanta
    • Status: offline
    • Ribbons : 5
    Re:Sleepee's Pull-Apart 460/TIM Change/VRM Heatsink Guide 2010/11/08 20:37:28 (permalink)
    Alright, Ran the OC Scanner for 3 mins each @ 870mhz and 1.087v
     
    Max temp with shroud:  78c
    Max temp without shroud: 77c
     
    Under load the fan is quieter without the shroud on. Also the little Vreg sink, man dose that thing get hot. I cant even keep my finger on it.
    post edited by cjgentile - 2010/11/08 21:04:51

    i7 5820k // 1080Ti FE // X99 Micro2
     
     
    #14
    seabigbear
    The Polar Rig Master
    • Total Posts : 20424
    • Reward points : 0
    • Joined: 2009/03/11 19:53:24
    • Location: Please use My Affiliate Code: >D4DLRM5OKA<
    • Status: offline
    • Ribbons : 61
    Re:Sleepee's Pull-Apart 460/TIM Change/VRM Heatsink Guide 2010/11/08 21:39:33 (permalink)


    #15
    Thurstan
    Superclocked Member
    • Total Posts : 102
    • Reward points : 0
    • Joined: 2010/11/04 05:12:50
    • Location: Canada
    • Status: offline
    • Ribbons : 0
    Re:Sleepee's Pull-Apart 460/TIM Change/VRM Heatsink Guide 2010/11/09 04:58:54 (permalink)
    Is it possible to just remove the shroud on the EE's without having to remove the heatsink screws also?

    “First learn computer science and all the theory.  Next develop a programming style.  Then forget all that and just hack.” (George Carrette)
    #16
    Sleepee
    CLASSIFIED Member
    • Total Posts : 4965
    • Reward points : 0
    • Joined: 2009/07/15 20:00:39
    • Location: Philadelphia
    • Status: offline
    • Ribbons : 39
    Re:Sleepee's Pull-Apart 460/TIM Change/VRM Heatsink Guide 2010/11/09 05:15:25 (permalink)
    No. The heatsink is attached to the shroud itself with 4 more screws. You can only get access to those by taking off the shroud/heatsink assembly.

    i7-4770K @ 4.0 / Gigabyte Z87X-UD4H / 8GB DDR3-1600 G.SKILL Ripjaws X
    EVGA GTX 780 Ti SC / Silverstone Strider Plus 1000W
    Corsair H110 / CM Storm Stryker
    CM Storm Trigger / CM Sentinel Advanced
    ---
    AMD Sempron 145 / ECS A990FXM-A / 8GB DDR3-1600 G.SKILL Ripjaws X
    (3) ASUS R9-280X DirectCUII / EVGA SuperNOVA 1000P2
    Red Milk Crate
    ---
    Epiphone Sheraton R62 / Vox AC15C1
    MXR Carbon Copy / ZVEX Vextron
    #17
    Sleepee
    CLASSIFIED Member
    • Total Posts : 4965
    • Reward points : 0
    • Joined: 2009/07/15 20:00:39
    • Location: Philadelphia
    • Status: offline
    • Ribbons : 39
    Re:Sleepee's Pull-Apart 460/TIM Change/VRM Heatsink Guide 2011/01/22 19:07:45 (permalink)
    Updated 1/22/11!
     
    • Added a section on adding a high flow bracket
    • Added results of using a high flow bracket
    • Add pictures showing the spread of IC Diamond after three months

    i7-4770K @ 4.0 / Gigabyte Z87X-UD4H / 8GB DDR3-1600 G.SKILL Ripjaws X
    EVGA GTX 780 Ti SC / Silverstone Strider Plus 1000W
    Corsair H110 / CM Storm Stryker
    CM Storm Trigger / CM Sentinel Advanced
    ---
    AMD Sempron 145 / ECS A990FXM-A / 8GB DDR3-1600 G.SKILL Ripjaws X
    (3) ASUS R9-280X DirectCUII / EVGA SuperNOVA 1000P2
    Red Milk Crate
    ---
    Epiphone Sheraton R62 / Vox AC15C1
    MXR Carbon Copy / ZVEX Vextron
    #18
    neyus
    New Member
    • Total Posts : 19
    • Reward points : 0
    • Joined: 2011/01/08 20:22:05
    • Status: offline
    • Ribbons : 0
    Re:Sleepee's Pull-Apart 460/TIM Change/VRM Heatsink Guide 2011/01/23 11:29:46 (permalink)
    This guide is... supreme awesome. 
     
    So here's an off topic question but if I were to remove the shroud on my CPU do I do the same procedure in terms of removing it with alcohol??
    #19
    Sleepee
    CLASSIFIED Member
    • Total Posts : 4965
    • Reward points : 0
    • Joined: 2009/07/15 20:00:39
    • Location: Philadelphia
    • Status: offline
    • Ribbons : 39
    Re:Sleepee's Pull-Apart 460/TIM Change/VRM Heatsink Guide 2011/01/23 12:14:20 (permalink)
    Thanks! And yup! Use 91% or a purer concentration of Isopropyl. You can alternatively use Arcticlean 1&2.

    i7-4770K @ 4.0 / Gigabyte Z87X-UD4H / 8GB DDR3-1600 G.SKILL Ripjaws X
    EVGA GTX 780 Ti SC / Silverstone Strider Plus 1000W
    Corsair H110 / CM Storm Stryker
    CM Storm Trigger / CM Sentinel Advanced
    ---
    AMD Sempron 145 / ECS A990FXM-A / 8GB DDR3-1600 G.SKILL Ripjaws X
    (3) ASUS R9-280X DirectCUII / EVGA SuperNOVA 1000P2
    Red Milk Crate
    ---
    Epiphone Sheraton R62 / Vox AC15C1
    MXR Carbon Copy / ZVEX Vextron
    #20
    daveyd007
    FTW Member
    • Total Posts : 1269
    • Reward points : 0
    • Joined: 2010/03/02 18:27:32
    • Location: Seattle, Washington
    • Status: offline
    • Ribbons : 5
    Re:Sleepee's Pull-Apart 460/TIM Change/VRM Heatsink Guide 2011/02/04 15:15:56 (permalink)
    Outstanding job SLEEPEE. You did great on the details and pics.
     
    This is the best TIM replacement guide that I've seen thus far.

    - SYSTEM SPECS-
    ASUS Rampage Extreme III • Core I-7 980x @ 4.8Ghz w/ stock CPU cooler• 24Gb Patriot VIPER Extreme DDR3 2000Mhz • GTX 570 in 3-way SLi • TWO Intel X-25V SSD's in RAID-0 (c-drive)• Six Intel X-25M SSD's in RAID-0 (d-drive) • 10X BluRay by LG • CoolerMaster SilentPro GOLD 1200W • Antec Dark Fleet (DF-85) Full Tower Chasis • RAZER Lycosa Keyboard RZ03 • Logitech G-500 Laser mouse • BOSE Companion 5 - 5.1 Surround Sound •  UltraSlim 55" SAMSUNG L.E.D. Display 3DMARK VANTAGE SCORE - P 56,801 @ 4.76Ghz 800/2000 AIDA64 Cache & Memory Benchmark @ 4.8Ghz  Click here to see my overclocked car PC.

    #21
    lastsamurairick
    CLASSIFIED Member
    • Total Posts : 2419
    • Reward points : 0
    • Joined: 2008/11/11 17:19:53
    • Location: Orlando,FL
    • Status: offline
    • Ribbons : 6
    Re:Sleepee's Pull-Apart 460/TIM Change/VRM Heatsink Guide 2011/03/08 15:04:27 (permalink)
    Nice work ty for taking the time.

      Intel 10900k @ 3.7 Stock
      EVGA Z490 Dark 
      EVGA GEFORCE RTX 3070Ti FTW3
      G SKILL TRIDENT Z ROYAL 32GB
      EVGA 1000G5
    #22
    klewlis1
    New Member
    • Total Posts : 14
    • Reward points : 0
    • Joined: 2011/09/07 19:00:39
    • Status: offline
    • Ribbons : 0
    Re:Sleepee's Pull-Apart 460/TIM Change/VRM Heatsink Guide 2011/12/23 19:28:21 (permalink)
    Whats the diff between a hi flow bracket and a normal one and where can i buy the hi flow bracket at???

    Phenom II 960T 4.2GHz
    ASUS M5A99 V EVO
    GSKILL RipJawsX 2x4GB 1600
    Corsair Hydro H60 Water Cooler/Corsair SP120 x2 p/p
    Evga GtX 670 FTW+ 4 GB
    OCZ Vertex 4 SSD 64GB
    Seagate Barracuda 500GB HD X 2
    Thermaltake Smart m850 watt
    NZXT Phantom 410 SE White/ Blue Trim 
    3 140mm NZXT, 2 120MM nzxt , 4 Corsair SP 120 
    NZXT HUE Controler
    #23
    Sleepee
    CLASSIFIED Member
    • Total Posts : 4965
    • Reward points : 0
    • Joined: 2009/07/15 20:00:39
    • Location: Philadelphia
    • Status: offline
    • Ribbons : 39
    Re:Sleepee's Pull-Apart 460/TIM Change/VRM Heatsink Guide 2011/12/23 19:35:13 (permalink)
    The high flow bracket allows for less air resistance for your card's exhaust, so more hot air gets pushed out with less fan power. They can be purchased here, but EVGA is currently out of stock.

    i7-4770K @ 4.0 / Gigabyte Z87X-UD4H / 8GB DDR3-1600 G.SKILL Ripjaws X
    EVGA GTX 780 Ti SC / Silverstone Strider Plus 1000W
    Corsair H110 / CM Storm Stryker
    CM Storm Trigger / CM Sentinel Advanced
    ---
    AMD Sempron 145 / ECS A990FXM-A / 8GB DDR3-1600 G.SKILL Ripjaws X
    (3) ASUS R9-280X DirectCUII / EVGA SuperNOVA 1000P2
    Red Milk Crate
    ---
    Epiphone Sheraton R62 / Vox AC15C1
    MXR Carbon Copy / ZVEX Vextron
    #24
    blacksapphire08
    Omnipotent Enthusiast
    • Total Posts : 8875
    • Reward points : 0
    • Joined: 2010/08/15 18:18:38
    • Status: offline
    • Ribbons : 22
    Re:Sleepee's Pull-Apart 460/TIM Change/VRM Heatsink Guide 2011/12/23 20:00:50 (permalink)
    klewlis1

    Whats the diff between a hi flow bracket and a normal one and where can i buy the hi flow bracket at???

    EVGA store but they are currently out of stock. The openings in the bracket are wider allowing for hot air to be vented out faster. This is mainly beneficial to external exhaust cards though since the radial fan blows air through the card and out the back.

     
    #25
    klewlis1
    New Member
    • Total Posts : 14
    • Reward points : 0
    • Joined: 2011/09/07 19:00:39
    • Status: offline
    • Ribbons : 0
    Re:Sleepee's Pull-Apart 460/TIM Change/VRM Heatsink Guide 2011/12/23 20:23:25 (permalink)
    Oh ok, thanks for the info.!!!!
     

    Phenom II 960T 4.2GHz
    ASUS M5A99 V EVO
    GSKILL RipJawsX 2x4GB 1600
    Corsair Hydro H60 Water Cooler/Corsair SP120 x2 p/p
    Evga GtX 670 FTW+ 4 GB
    OCZ Vertex 4 SSD 64GB
    Seagate Barracuda 500GB HD X 2
    Thermaltake Smart m850 watt
    NZXT Phantom 410 SE White/ Blue Trim 
    3 140mm NZXT, 2 120MM nzxt , 4 Corsair SP 120 
    NZXT HUE Controler
    #26
    mamaswok
    iCX Member
    • Total Posts : 268
    • Reward points : 0
    • Joined: 2010/07/27 17:06:00
    • Location: New York, NY
    • Status: offline
    • Ribbons : 2
    Re:Sleepee's Pull-Apart 460/TIM Change/VRM Heatsink Guide 2012/06/08 17:05:50 (permalink)
    Just referred back to this guide again, timeless information.  Thanks again Sleepee!


    #27
    GDavid
    New Member
    • Total Posts : 5
    • Reward points : 0
    • Joined: 2010/08/26 02:16:11
    • Status: offline
    • Ribbons : 0
    Re:Sleepee's GTX 460 TIM Change/VRM Heatsink/High Flow Bracket Guide 2012/08/16 22:09:56 (permalink)
    Hi all, really wish there was a pic of the shroud and how that attaches to the alloy heatsink/card. I have an earlier 460 EE with centre fan and would like to remove/mod the shroud due to the cost of full heatsink replacement it's harly worth buying a whole new cooler...
    Sorry about the thread CPR... Maybe I should have the username Dr. Frankenstein
    #28
    uppityplayer09
    New Member
    • Total Posts : 40
    • Reward points : 0
    • Joined: 2010/06/15 03:19:24
    • Status: offline
    • Ribbons : 0
    Re:Sleepee's GTX 460 TIM Change/VRM Heatsink/High Flow Bracket Guide 2013/06/04 07:06:28 (permalink)
    Finally did change TIM, very easy thanks to this guide and Sleepy!


    #29
    Havalynii
    New Member
    • Total Posts : 16
    • Reward points : 0
    • Joined: 2014/07/31 01:43:24
    • Status: offline
    • Ribbons : 0
    Re:Sleepee's GTX 460 TIM Change/VRM Heatsink/High Flow Bracket Guide 2014/07/31 02:28:18 (permalink)
    Great guide and the photos were very helpful.  Thanks for putting the work into it for the rest of us to refer to!
    #30
    Jump to:
  • Back to Mobile