Boddaker
iCX Member

- Total Posts : 316
- Reward points : 0
- Joined: 2007/02/09 17:13:09
- Location: Where the beer flows like wine
- Status: offline
- Ribbons : 18


Ok folks, time to get back in the modding saddle! Having completed all my commissioned obligations for the time being, I thought it would be a good time to start my next personal project. This time I'll be taking on the gargantuan "Ultra Tower", the Cosmos II. I've always wanted to do a hotrod-themed build, and I think the Cosmos II lends itself well to this theme with its sleek, aerodynamic lines, and beefy roll-bar type handles. I'll be playing off these features, moving some things around, and generally wreaking havoc on this poor case, but in the end you'll still be able to distinguish it as a Cosmos II. :) 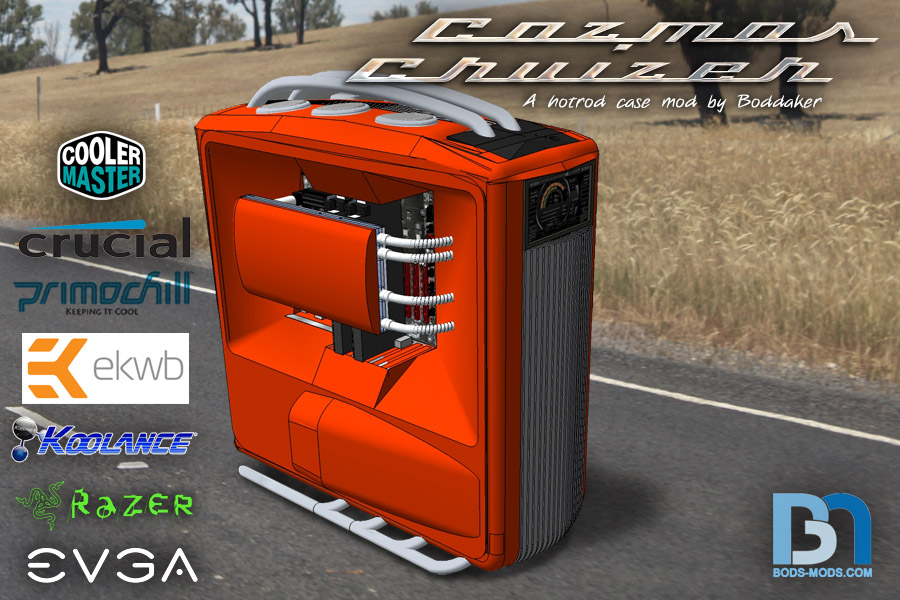 The first thing you'll notice is the open-air design. I actually hated to get rid of those cool doors, but I wanted that open engine compartment feel. And with pretty much everything watercooled, there would be no reason to worry about airflow. Next is the watercooling manifold. I spent the most of my design time on this part, as it has to be functional, as well as look like an actual automotive component for fuel delivery. It will accommodate two separate loops: One for the video cards, and one for CPU, memory, and motherboard. As far as hardware, there are still some items up in the air, but here's a short list of what I have already: EVGA X79 Dark motherboard EVGA GTX680 HC x2 Intel i7 3960X CPU Cooler Master SPH 1050w PSU Crucial 8x4Gb Ballistix Tactical Memory Crucial 2x256Gb M4 SSD drives Koolance Quick Disconnect fittings & pipe adapters Razer Deathstalker Ultimate Keyboard Razer Ouroboros Mouse EK Waterblocks: Supremacy CPU block, Dominator Ram blocks x2, X79 blocks EK Radiators: 280 dual, 420 triple rad EK 250mm Reservoir EK Dual Pump Top I'll be updating this as I get stuff in. Ok, I guess that is enough of an intro, I'll be posting my first progress update shortly. Thanks for reading, and I hope you'll be joining me on what promises to be another wild modding ride!
post edited by Boddaker - 2015/02/26 17:28:45
|
fsuwade
CLASSIFIED Member

- Total Posts : 2010
- Reward points : 0
- Joined: 2008/04/22 11:17:37
- Status: offline
- Ribbons : 6
Re:Cosmos Cruizer
2012/07/25 13:00:58
(permalink)
Boy i can not wait to see what you do with this one this year. Dang I have been waiting to see another great mod from you.
|
aka_STEVE_b
EGC Admin

- Total Posts : 17692
- Reward points : 0
- Joined: 2006/02/26 06:45:46
- Location: OH
- Status: offline
- Ribbons : 69
Re:Cosmos Cruizer
2012/07/25 13:08:56
(permalink)
Maybe CM should have you doing their case designs for them.... Looks awesome !!!
AMD RYZEN 9 5900X 12-core cpu~ ASUS ROG Crosshair VIII Dark Hero ~ EVGA RTX 3080 Ti FTW3~ G.SKILL Trident Z NEO 32GB DDR4-3600 ~ Phanteks Eclipse P400s red case ~ EVGA SuperNOVA 1000 G+ PSU ~ Intel 660p M.2 drive~ Crucial MX300 275 GB SSD ~WD 2TB SSD ~CORSAIR H115i RGB Pro XT 280mm cooler ~ CORSAIR Dark Core RGB Pro mouse ~ CORSAIR K68 Mech keyboard ~ HGST 4TB Hd.~ AOC AGON 32" monitor 1440p @ 144Hz ~ Win 10 x64
|
HeThing
CLASSIFIED ULTRA Member

- Total Posts : 6897
- Reward points : 0
- Joined: 2010/05/11 07:45:49
- Location: 6F4-72Y-6A8J <-- My Affiliate Code :D
- Status: offline
- Ribbons : 42
Re:Cosmos Cruizer
2012/07/25 14:18:17
(permalink)
|
notfordman
Omnipotent Enthusiast

- Total Posts : 10345
- Reward points : 0
- Joined: 2007/08/09 23:52:23
- Location: In a van, down by the
- Status: offline
- Ribbons : 28
Re:Cosmos Cruizer
2012/07/25 14:52:00
(permalink)
Very cool! I love the Cosmos II, I have the Original Cosmos 1000. Your design makes me think car/motorcycle. Can't wait to see what you do with this! 
|
zophar
CLASSIFIED ULTRA Member
- Total Posts : 5183
- Reward points : 0
- Joined: 2008/08/26 09:48:56
- Location: KC,MO
- Status: offline
- Ribbons : 26
Re:Cosmos Cruizer
2012/07/25 16:32:26
(permalink)
Wow. This is going to be incredible. Not that we expected anything else from the great Boddaker.
|
boballee
FTW Member
- Total Posts : 1455
- Reward points : 0
- Joined: 2011/03/16 12:19:13
- Location: Waiting for the Levee to Break at Bron-Yr-Aur
- Status: offline
- Ribbons : 8
Re:Cosmos Cruizer
2012/07/25 19:37:54
(permalink)
|
Boddaker
iCX Member
- Total Posts : 316
- Reward points : 0
- Joined: 2007/02/09 17:13:09
- Location: Where the beer flows like wine
- Status: offline
- Ribbons : 18
Re:Cosmos Cruizer
2012/07/25 22:03:43
(permalink)
Thank you guys, I will try not to disappoint! :)
|
20194700474100
iCX Member
- Total Posts : 488
- Reward points : 0
- Joined: 2009/06/22 18:55:23
- Status: offline
- Ribbons : 2
Re:Cosmos Cruizer
2012/07/26 04:40:43
(permalink)
This is going to be awesome!  Keep us updated frequently! 
|
nvidia3
Superclocked Member

- Total Posts : 152
- Reward points : 0
- Joined: 2010/07/17 02:01:04
- Status: offline
- Ribbons : 0
Re:Cosmos Cruizer
2012/07/26 06:02:06
(permalink)
i cant wait
|
Boddaker
iCX Member
- Total Posts : 316
- Reward points : 0
- Joined: 2007/02/09 17:13:09
- Location: Where the beer flows like wine
- Status: offline
- Ribbons : 18
Re:Cosmos Cruizer
2012/07/26 10:22:01
(permalink)
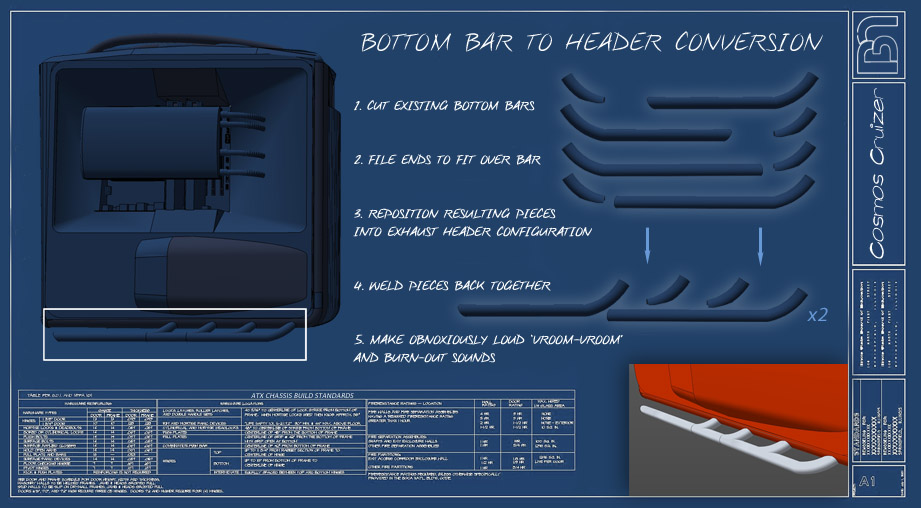 Let's take care of the bottom bars first shall we? In order to make the headers, I need four ends per side which means I need another set of bars. And Cooler Master were kind enough to send me an extra set. :) 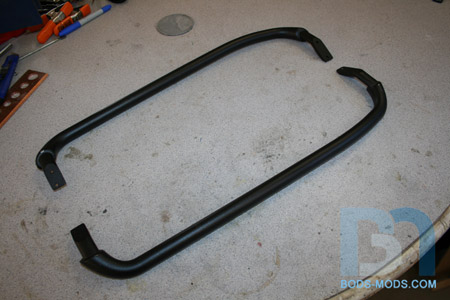 Here's a shot of all four ends lined up. 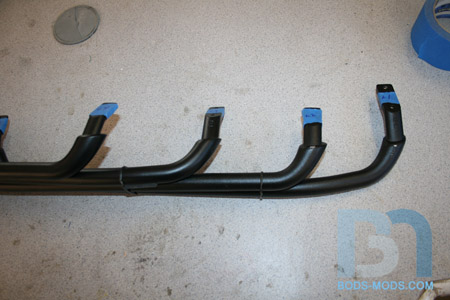 After marking where I needed to cut, I hacked off the ends. These bars are solid cast aluminum. CM does not cut corners when it comes to supporting their Ultra Tower! 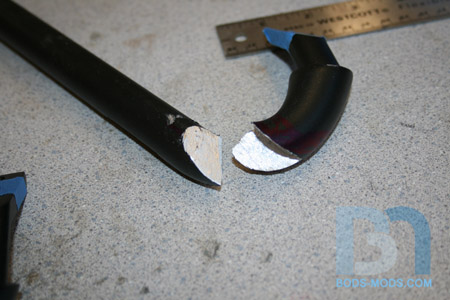 Positioning the piece and rechecking my cut angle. The rest will need to be filed away. 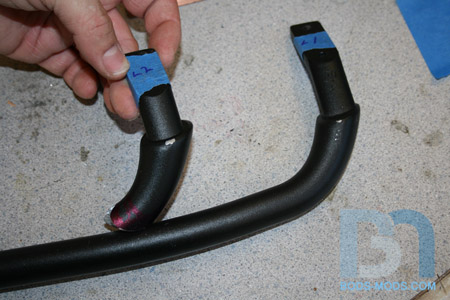 One set of header pieces cut! Now for the other side. 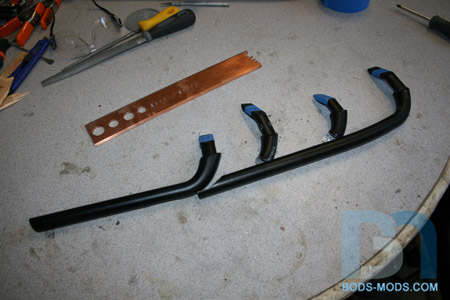 Both sides cut. I want the headers to come even with the back of the case, which is why I made the fourth piece longer. It will make for a trickier weld to the first piece tho. 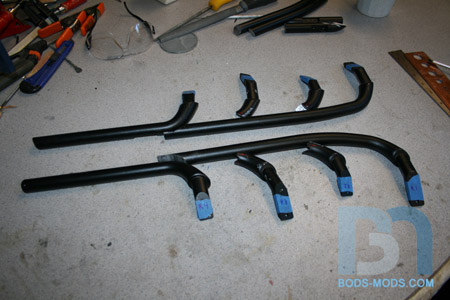 Filing one of the middle header pieces. 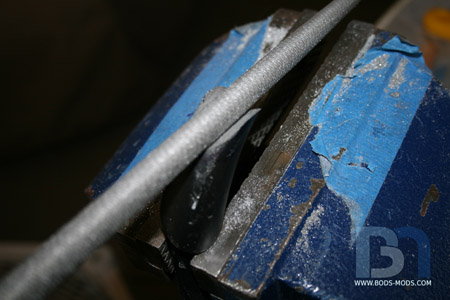 I clamped all the pieces upside down to a flat board to aid in the positioning. Once everything is filed down and fitted perfectly, this will be how it will get welded back together. 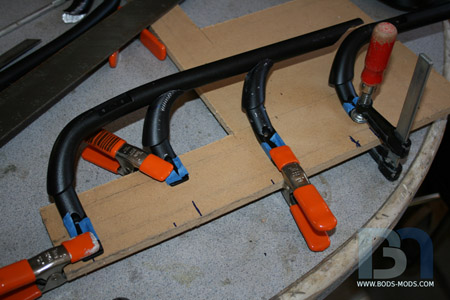 And finally a close up shot of how its fitting to the main bar. It's getting there! 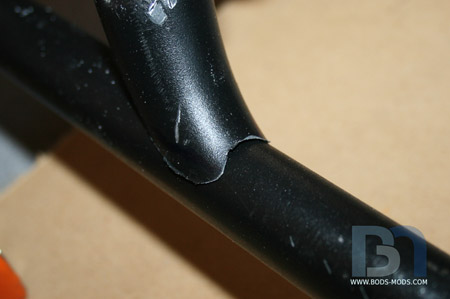 I'll be doing a lot of filing over the weekend, but the aluminum is fairly soft so it should go quickly. I can bring out my die grinder to get the bulk of it if need be. I just don't want to remove too much material. For attaching the pieces, I was eyeballing those Alumiweld brazing sticks at Harbor Freight. Anyone have any experience with them? I have seen the demo vids on Youtube, and it seems easy, but there's gotta be some kind of learning curve. I'll probably grab some and just experiment first and see how it goes. :)
|
rjohnson11
EVGA Forum Moderator

- Total Posts : 102253
- Reward points : 0
- Joined: 2004/10/05 12:44:35
- Location: Netherlands
- Status: offline
- Ribbons : 84
Re:Cosmos Cruizer
2012/07/26 11:53:30
(permalink)
This is going to be another one of your cool mods!
|
Boddaker
iCX Member
- Total Posts : 316
- Reward points : 0
- Joined: 2007/02/09 17:13:09
- Location: Where the beer flows like wine
- Status: offline
- Ribbons : 18
Re:Cosmos Cruizer
2012/07/30 12:42:43
(permalink)
Made some good progress on the bars over the weekend. Lots of filing and sanding! It actually didn't take as long as I thought. Or it didn't seem like it anyways. :) For the two center pieces, I used a combination of round and half-round files to get them to fit on the main bar. But for the end of the main piece, I had to use my die grinder with metal cutting wheel to get it to fit around the curved end piece. The wheel's diameter was pretty much spot on. 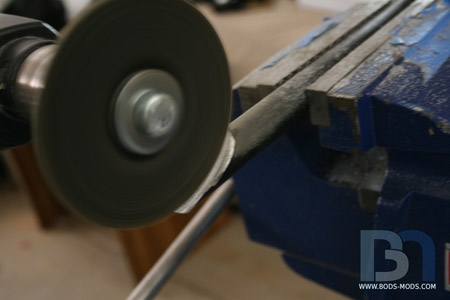 The end result. I don't really have to be too exact with the fit, since any gaps will be filled during the welding, then filed smooth. 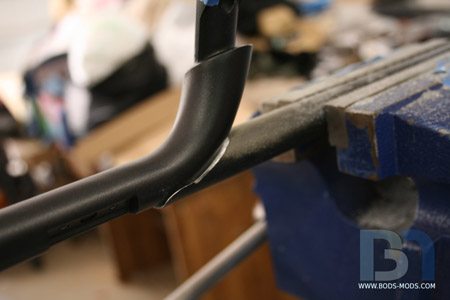 One side done. I clamped it to a flat surface again to check alignment. 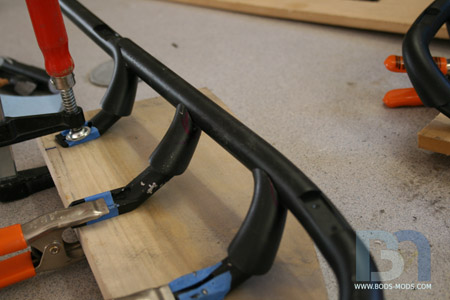 Once I got both sides filed down, I went ahead and sanded everything down to bare alu. Decided to do a quick mockup, and clamped both sides to a steel plate I had lying around. I put the rubber feet back on to confirm that it would still sit perfectly flat. This is mainly because the orientation of the feet is largely unchanged from stock. 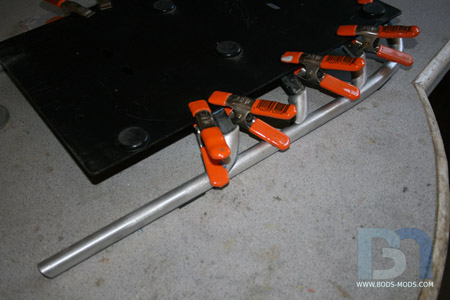 So these things are pretty much ready to be welded. I just have to bolt them down to make sure they don't move at all while they're being joined. 
|
omning
New Member

- Total Posts : 95
- Reward points : 0
- Joined: 2012/06/19 17:10:18
- Location: Orlando, Fl
- Status: offline
- Ribbons : 1
Re:Cosmos Cruizer
2012/07/30 13:12:59
(permalink)
Please tell me a massive radiator is going up front in the grill!
|
EVGA_JacobF
EVGA Alumni
- Total Posts : 16946
- Reward points : 0
- Joined: 2006/01/17 12:10:20
- Location: Brea, CA
- Status: offline
- Ribbons : 26
Re:Cosmos Cruizer
2012/08/01 17:54:55
(permalink)
Can't wait to see it 
|
1MadGrunt
SSC Member

- Total Posts : 569
- Reward points : 0
- Joined: 2010/01/22 15:10:56
- Location: Texas
- Status: offline
- Ribbons : 4
Re:Cosmos Cruizer
2012/08/01 18:42:39
(permalink)
Subscribed! Always look forward seeing what you come up with Boddaker.
|
Sleinous
EVGA Forum Moderator
- Total Posts : 7663
- Reward points : 0
- Joined: 2010/06/12 12:22:01
- Location: France
- Status: offline
- Ribbons : 32
Re:Cosmos Cruizer
2012/08/02 07:58:27
(permalink)
Am waiting to see how this turns out :D
My Affiliate Code: GL1IAAFWJF
|
dipzy_v
Superclocked Member
- Total Posts : 230
- Reward points : 0
- Joined: 2012/04/05 08:18:05
- Location: United Kingdom
- Status: offline
- Ribbons : 0
Re:Cosmos Cruizer
2012/08/03 09:19:28
(permalink)
 Heatware: dipzy_v Threadripper 1950x|Asus Zenith Extreme|32GB Gskill DDR4 C14|TITAN Xp|512GB x2 NVME SSD|Corsair AX1500i|LG 32UD99|Corsair K95 Platinum Speed|Corsair M65|
|
nvidia3
Superclocked Member
- Total Posts : 152
- Reward points : 0
- Joined: 2010/07/17 02:01:04
- Status: offline
- Ribbons : 0
Re:Cosmos Cruizer
2012/08/03 13:10:02
(permalink)
Can't wait
|
brokensoul101
New Member
- Total Posts : 8
- Reward points : 0
- Joined: 2010/11/29 17:20:10
- Location: Canada
- Status: offline
- Ribbons : 0
Re:Cosmos Cruizer
2012/08/03 13:33:30
(permalink)
Looking forward to seeing more
3960x @5ghz x3 Evga GTX 680 SC 32gigs 2133ram
|
XrayMan
Insert Custom Title Here
- Total Posts : 73000
- Reward points : 0
- Joined: 2006/12/14 22:10:06
- Location: Santa Clarita, Ca.
- Status: offline
- Ribbons : 115
Re:Cosmos Cruizer
2012/08/03 21:33:08
(permalink)
Interesting... 
My Affiliate Code: 8WEQVXMCJL Associate Code: VHKH33QN4W77V6A   
|
Boddaker
iCX Member
- Total Posts : 316
- Reward points : 0
- Joined: 2007/02/09 17:13:09
- Location: Where the beer flows like wine
- Status: offline
- Ribbons : 18
Re:Cosmos Cruizer
2012/08/04 23:29:19
(permalink)
Thanks guys! So I went ahead and grabbed me a pack of Alumiweld rods, and gave it a go today. I think it went fairly well! There was certainly a learning curve, but it wasn't too difficult to figure out, and I got the hang of it pretty quickly. 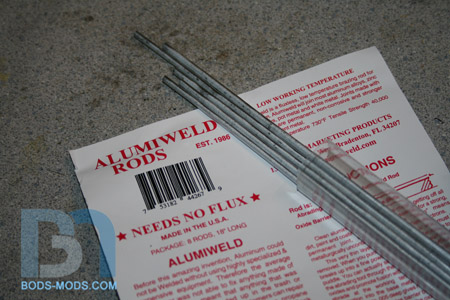 I was going to practice on some spare parts, but didn't really have anything comparable to the 3/4" thick bars, so I just dove right in and started on the first joint: Welding the two longest pieces together. 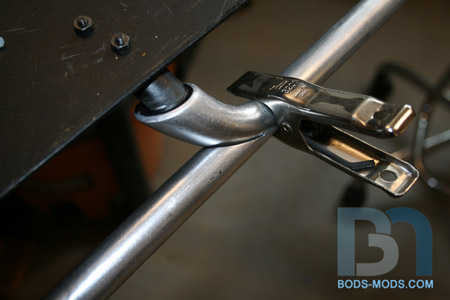 I had my hands full with one hand holding the torch and the other feeding the rods, so I couldn't get any in progress pics. But here's how it went down... 1. Cleaned parts thoroughly with soap and water, using a wire brush around the areas to be joined. 2. After drying completely, it got wiped down with acetone. 3. Bolted down parts to steel plate. Made sure the two parts could not move at all. 4. Began heating parts with torch. This took about 4 minutes to get the aluminum to the correct temperature (in this case, 750ºF) 5. Started drawing the Alumiweld rod across the joint until it melted into a pool. This was key to knowing when the alu was hot enough. Before, the rod would just break off and away, and wouldn't stick. Once it pooled up, I could work it into the gap with the rod. This took some finesse to get the pool where I wanted it. I ended up dabbing the rod as it melted along the gap. 6. Once the gap was filled, I slowly worked my way around the piece, bringing the heat with me as I went. 7. After going around the entire thing, I quickly moved on to the next part to be joined. After all three areas were welded, I let the whole thing cool for about an hour. Here's the result of the first weld:  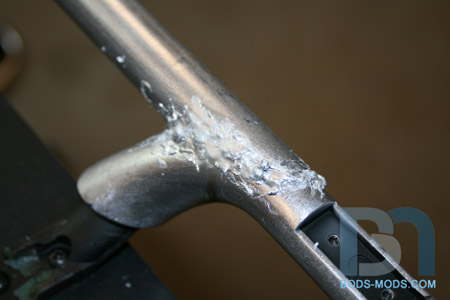 The welds are pretty messy, but I wasn't concerned about getting a perfect bead on my first try! I just wanted to make sure I had enough weld built up to close the gaps and be able to grind it down smooth with no pits or sink-holes.  Once it cooled down, i could unbolt it from the steel plate and check it out. 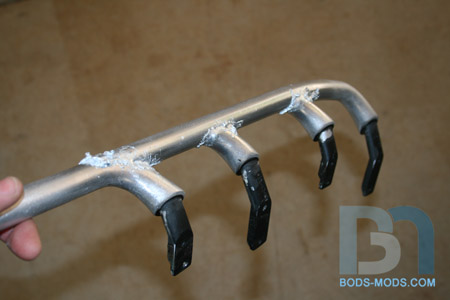 Next step was to stick it in the vice and start smoothing out the welds. I initially used my bench grinder to get the big chunks, then I moved to the dremel and files. 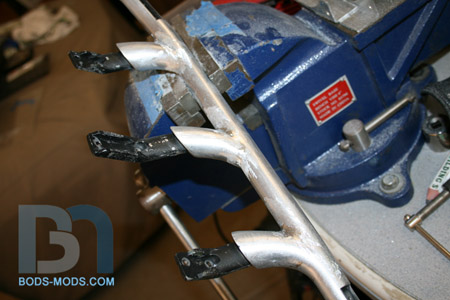 After the files, I used my orbital sander with 80grit to get all the file marks out. Next I'll move to 220. 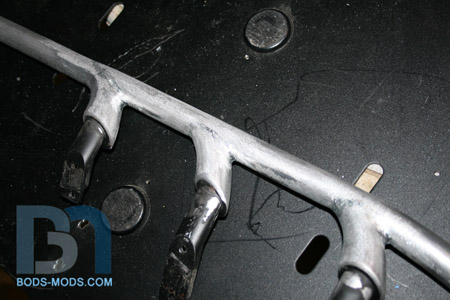 Other side: 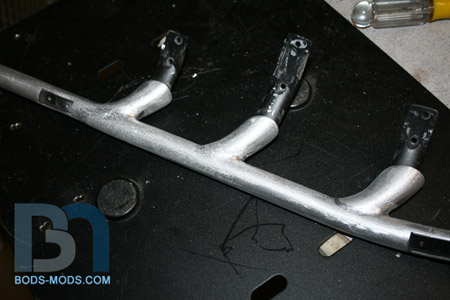 A couple close up shots of the welds: 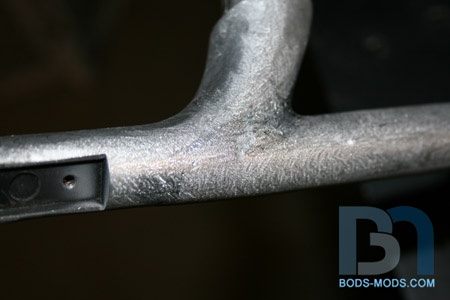 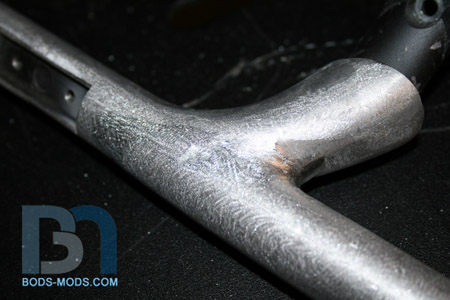 Over all, I think it came out pretty good considering it was my first try. It really pays to do your research! I heeded all the warnings about contamination, and made sure everything was as clean as possible. And it helped to watch all the vids available too. :) Tomorrow I'll do the other side, and I'll set up my video camera and see if I can capture some in progress shots for ya.
|
dipzy_v
Superclocked Member
- Total Posts : 230
- Reward points : 0
- Joined: 2012/04/05 08:18:05
- Location: United Kingdom
- Status: offline
- Ribbons : 0
Re:Cosmos Cruizer
2012/08/05 05:07:38
(permalink)
Looking good so far dude considering its your first attempt 
Heatware: dipzy_v Threadripper 1950x|Asus Zenith Extreme|32GB Gskill DDR4 C14|TITAN Xp|512GB x2 NVME SSD|Corsair AX1500i|LG 32UD99|Corsair K95 Platinum Speed|Corsair M65|
|
Boddaker
iCX Member
- Total Posts : 316
- Reward points : 0
- Joined: 2007/02/09 17:13:09
- Location: Where the beer flows like wine
- Status: offline
- Ribbons : 18
Re:Cosmos Cruizer
2012/08/13 11:34:45
(permalink)
Didn't get as much work done this weekend as I had originally planned. On Saturday, I was at my kids' school helping clean up and get ready for the new school year. Then on Sunday it was just too danged hot, and I tend to get quite lethargic when temps get into triple digits lol. Anyway, getting to what little progress I did make... I didn't feel like filing or sanding in this heat, so I decided to just mount the headers to the case. 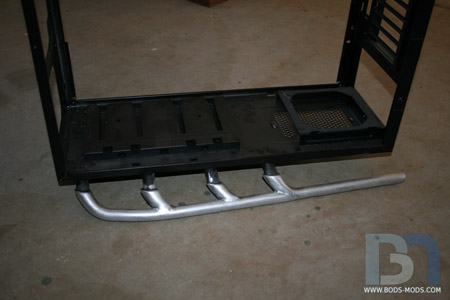 The first lug mounts in its factory location, then all the others had to be drilled.  A view from the back. I had a little bit of play to work with, and was able to get them looking symmetrical. 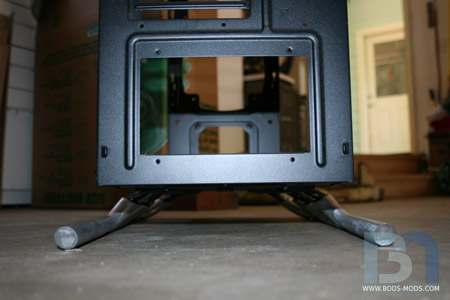 I then proceeded to mark and cut the bottom of the side trim away. I thought about cutting separate holes for each lug, but that would have made it very difficult to feed the header lugs through since they are all different orientations. So I just cut the entire area out. 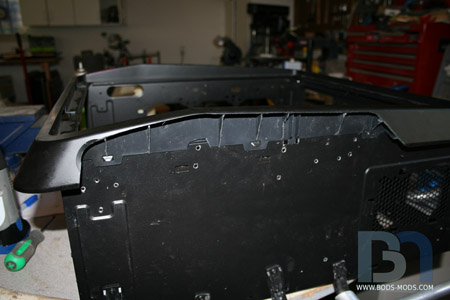 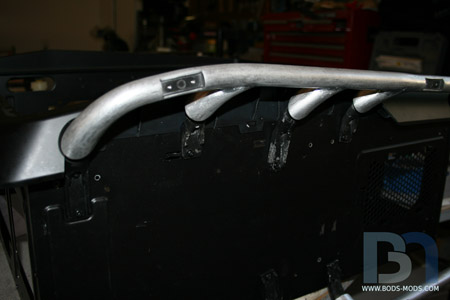 From the side you can't tell where the cut is. 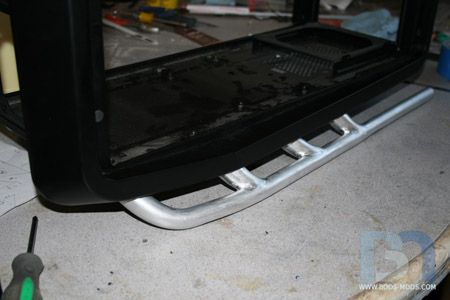 Even when you get down to the header level, it's hard to see the cut line. 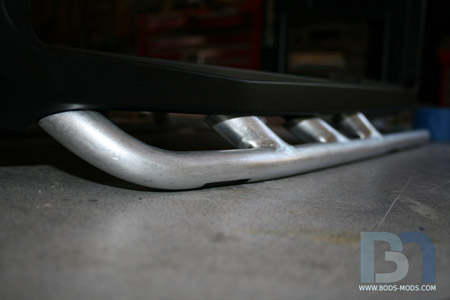 And finally a view from the back. 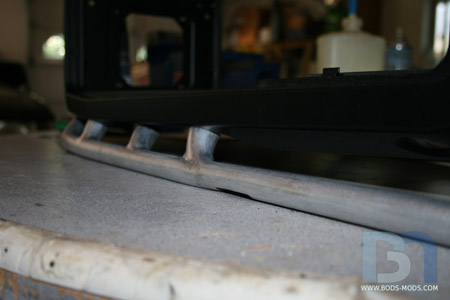 Now that I have one side cut, I can transfer the cut area over to the other side. Any adjustments I need to make should be minor if any. :)
|
Boddaker
iCX Member
- Total Posts : 316
- Reward points : 0
- Joined: 2007/02/09 17:13:09
- Location: Where the beer flows like wine
- Status: offline
- Ribbons : 18
Re:Cosmos Cruizer
2012/08/20 21:53:50
(permalink)
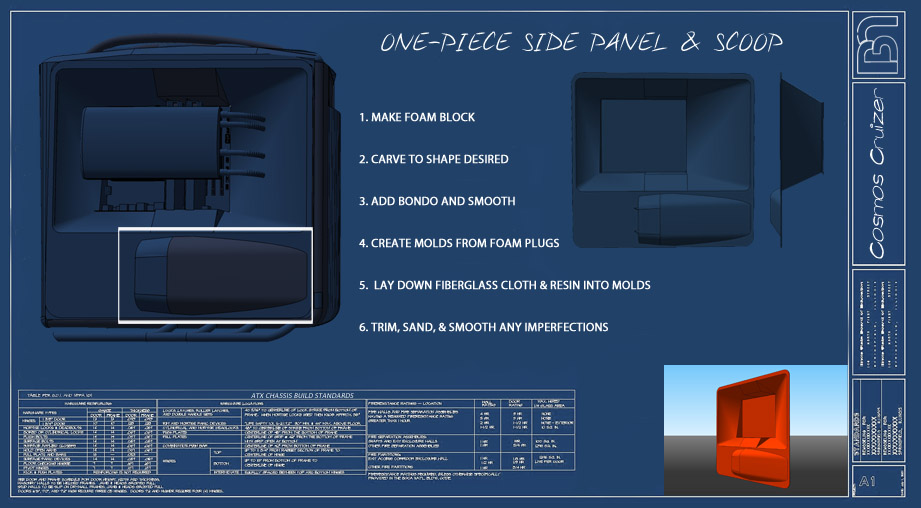 The left side panel is one of the more challenging parts of this build, if not the most challenging. It completely does away with the factory door panel, and after the modifications it becomes a major part of the support structure. Almost all hardware will be mounted to it, both front and back, and it will be seen from both sides. So not only does it have to be strong, but it also has to look good as well. And to top it all off, this will be the first time I'll be using fiberglass. So yeah, pretty tall order for this piece! After spending hours in Sketchup designing it out, checking and double checking my measurements, I finally got to a point where I could start the fabrication process. The first step is creating the form, so a block of foam was glued up. This shape represents the reverse of the concaved area of the side panel where the components will go. 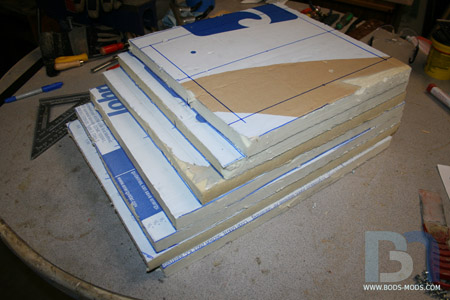 After marking it up with centerlines and borders, the carving began. 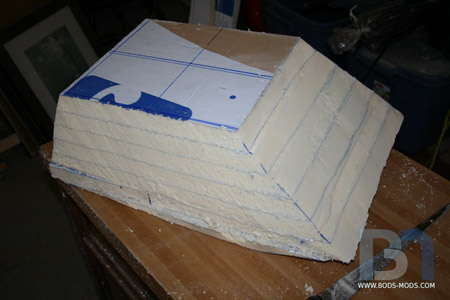 Work continued, carving and smoothing the foam to the desired shape (tools used: retractable knife, hacksaw blade, drywall sanding block). Then I added cutouts for the "shock towers" that will later become part of the IO panel on the bottom, and cable access on the top. I also added a piece of plywood on top for strength, and used zip ties running through all layers of foam to make sure it all holds together. 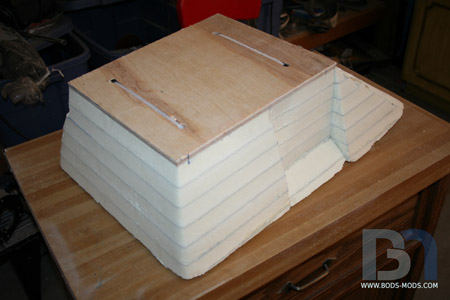 Here's a closer shot of the IO area. 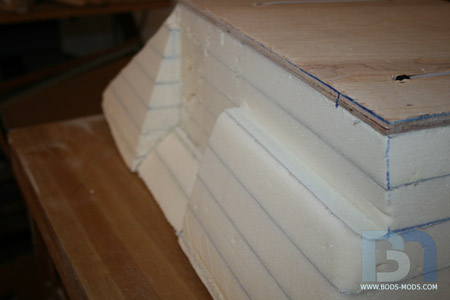 To smooth out the imperfections and fill the voids, I slopped on the bondo. 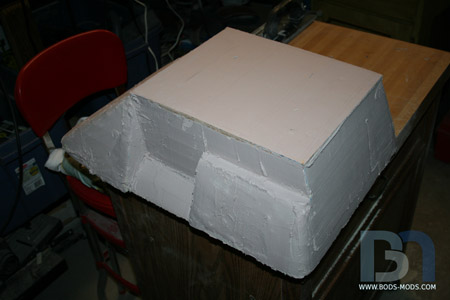 While that was setting up, I moved on to the custom side scoop that will cover the lower radiator fan intake holes. Again, I stacked up three pieces of foam and glued them together with spray adhesive. 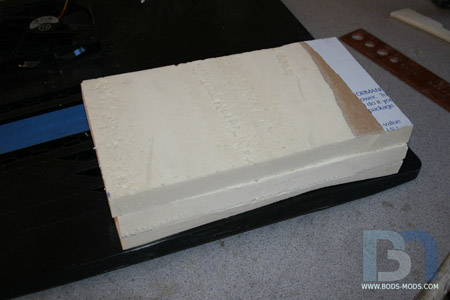 I already carved the door's contour into the bottom piece so it sits flush. 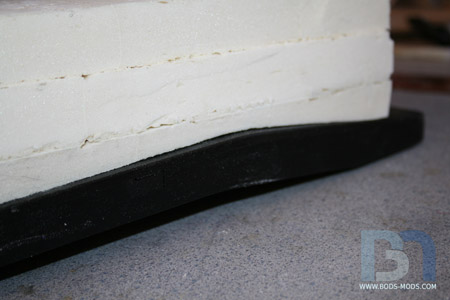 After taking a step back, I decided that 3" was too high. I removed one piece of foam, and started marking out the scoop shape. I added another small piece to the end so it tapers all the way to the edge. 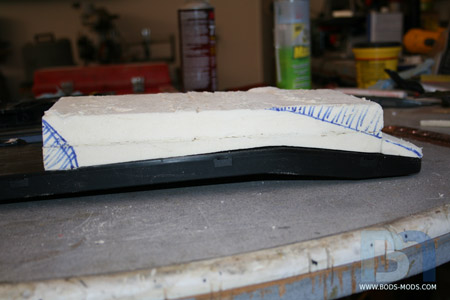 Showing the preliminary front shape. 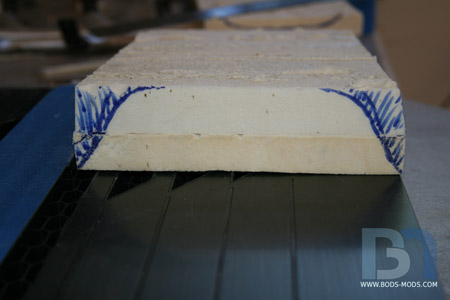 This piece was small enough to use my retractable knife. These knives are perfect for cutting foam because you can extend the blade out as long as you need it to be.  Once I got one side roughed out and matching the body lines, I needed to do the other side the same way. I'll be making two of these scoops, one for each side of the case, so it has to be symmetrical. 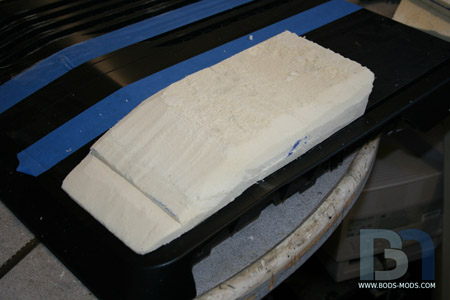 Profile shot. I like it! 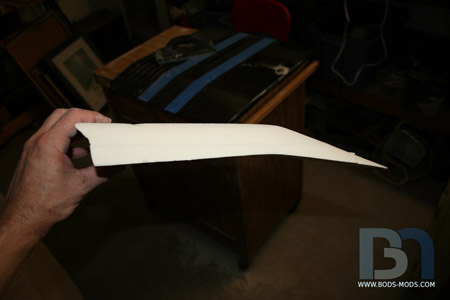 Smoothed out and ready for filler. 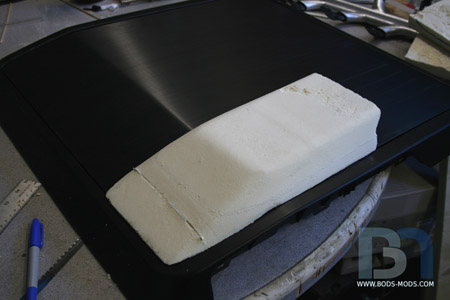 Body filler added. More sanding required! 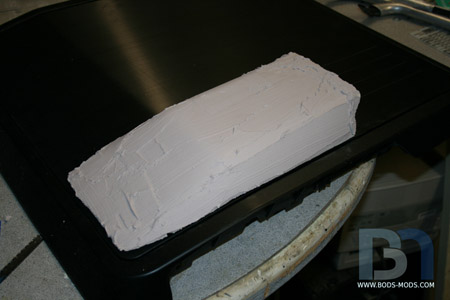 Work continues... :)
|
blood4guts
iCX Member
- Total Posts : 419
- Reward points : 0
- Joined: 2009/10/20 16:14:21
- Location: Here
- Status: offline
- Ribbons : 0
Re:Cosmos Cruizer
2012/08/20 22:43:19
(permalink)
Nice, the side panel assembly will really be something to look at once you're done.
|
Re:Cosmos Cruizer
2012/08/21 04:32:28
(permalink)
aka_STEVE_b
Maybe CM should have you doing their case designs for them.... Looks awesome !!!
+1 you should be working for Cooler Master in there R & D!
|
Boddaker
iCX Member
- Total Posts : 316
- Reward points : 0
- Joined: 2007/02/09 17:13:09
- Location: Where the beer flows like wine
- Status: offline
- Ribbons : 18
Re:Cosmos Cruizer
2012/10/08 12:19:35
(permalink)
Hey guys, I'm back on this project! Got my other obligations out of the way for now, so I can continue on with the Cruizer. :) Unfortunately, I don't really have much new progress to show. I'm still working on the form for the side panel and scoops, adding bondo and sanding. So nothing new there. I did get some patching done tho, so I can at least show that... Due to the bottom rails being transformed into hot-rod style exhaust headers, I only need one of the holes in the trim piece at the bottom. And since I'm relocating the top rails to the center, I won't need either hole up there. So I need to plug them up. I cut out six oval shaped discs and beveled the edges so they fit into the holes. 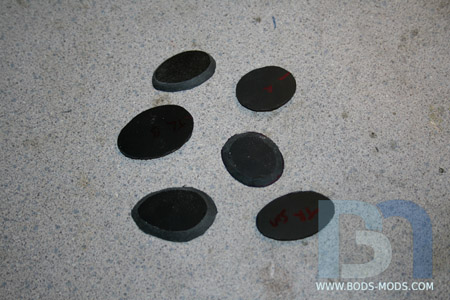 Here's one of the holes... 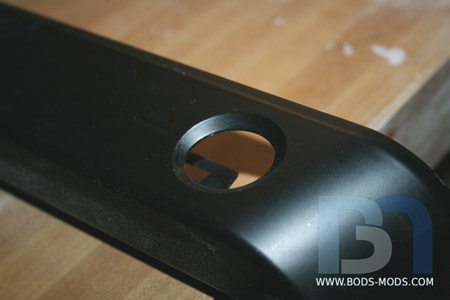 And here it is with the disc. 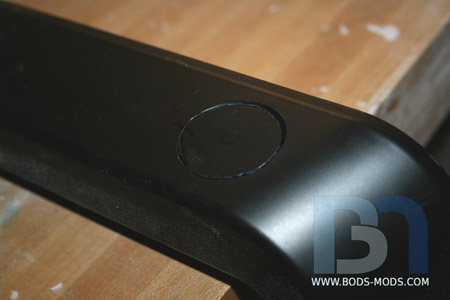 I marked each one so I knew which hole they went into, since they are all different. 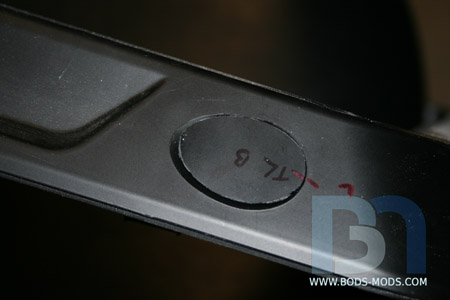 After using plastic epoxy to glue them in, I got out the body filler. 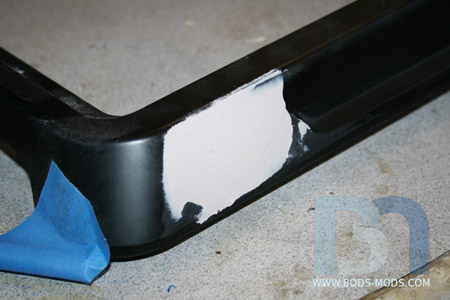 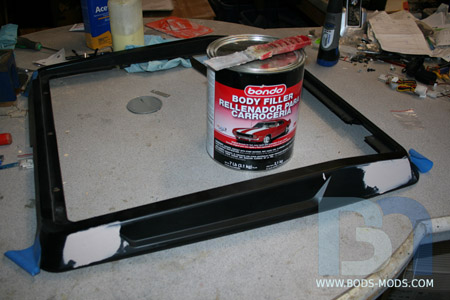 Sanded it down smooth. I started with 80 grit on my orbital sander, then went to 220 grit. I used some glazing putty to fill in any small imperfections. 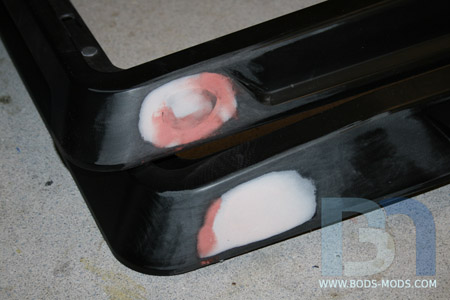 After a final light sanding, I shot it with primer. 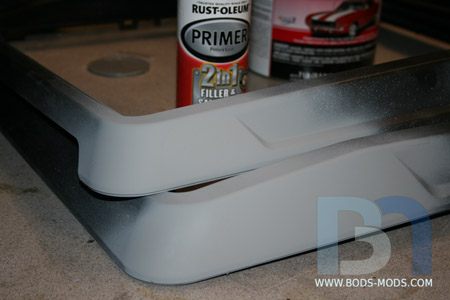 I'll sand this down with 400 grit, then scuff the entire trim piece and shoot one more coat of primer once I get all the other modifications done on it. Feels good to be back on this, and I'll be posting more regularly now as work continues. :)
|
rjohnson11
EVGA Forum Moderator
- Total Posts : 102253
- Reward points : 0
- Joined: 2004/10/05 12:44:35
- Location: Netherlands
- Status: offline
- Ribbons : 84
Re:Cosmos Cruizer
2012/10/08 12:33:38
(permalink)
Thanks for keeping us up to date on this mod!
|
Boddaker
iCX Member
- Total Posts : 316
- Reward points : 0
- Joined: 2007/02/09 17:13:09
- Location: Where the beer flows like wine
- Status: offline
- Ribbons : 18
Re:Cosmos Cruizer
2012/10/22 22:05:35
(permalink)
Ok, so I was hoping to have made more progress on this over the weekend, particularly some fiberglass work, but it just didn't happen. Still sanding and perfecting the surface because it has to be absolutely flawless. Any blemish on the plug will be transferred directly to the finished fiberglass piece. So better to try and eliminate all the issues now, than have to fix it later. :) That, and this was the last great weekend weather-wise before the rains come this week, and I spent it with the kids doing Halloween stuff. :) But I did promise pics, so here's my progress thus far... When all is said and done, the side panel trim piece will be integrated with the new fiberglass panel, so it will all be one unit. So more preparation was done to the trim piece. Holes were drilled all along the inside edge to help facilitate the adhesion of the fiberglass to the plastic. Typically, the two materials don't stick to one another, so the holes will allow the resin to flow through the plastic. I'll add the fiberglass cloth to the back side as well to sandwich it together. 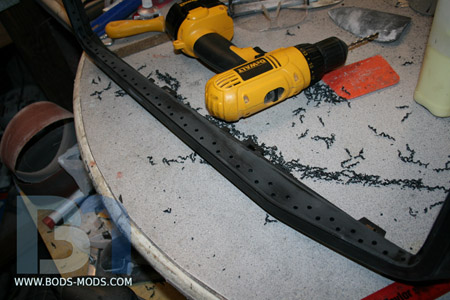 I bent a sheet of aluminum to match the curve of the side panel. The bend was very slight, all I had to do was set it over a 4" acrylic tube and apply a small amount of downward force to replicate the curve. 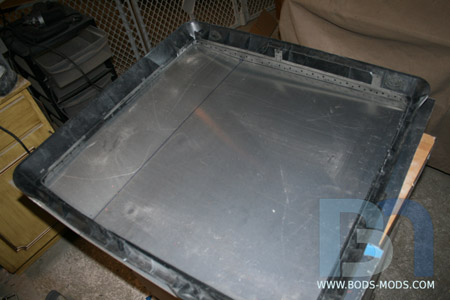 I set the trim piece face down onto the alu sheet. Here's a closeup of the curve.  Using the trim piece as a guide, I placed the plug on the sheet and marked it. 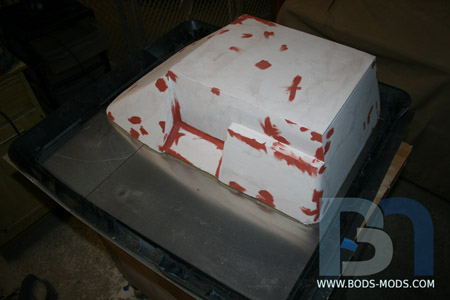 Here's a closeup again showing the curve of the alu sheet. It will serve as a backing for the fiberglass, and support for the plug. 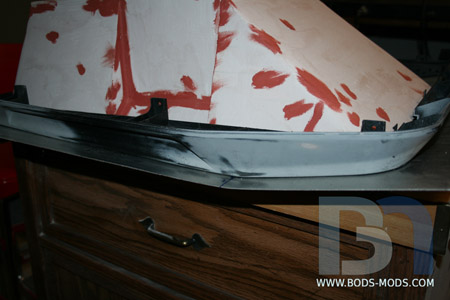 I set the trim piece aside, then removed the plug from the sheet and applied contact cement to both parts, and put them back together. This was to ensure the plug didn't move while I added epoxy putty all around it, shown here. 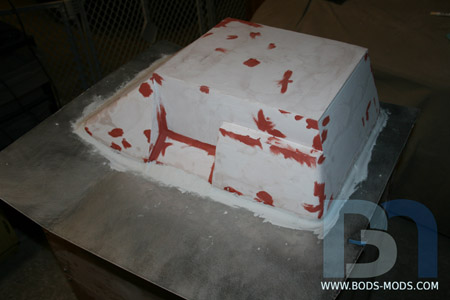 Here's the plug in its current state. The putty is all smoothed out, and creates a nice curved transition between the alu sheet and plug. It's getting real close to being done! It will start looking a whole lot better once I get some primer on it and it's all one color.  Once I get a few coats of primer on it and sanded smooth, I'll have to polish it and apply a couple coats of mold release wax, so the fiberglass won't stick to it. Only then will I be able to start the layup process!
|