cp256
Superclocked Member

- Total Posts : 197
- Reward points : 0
- Joined: 2008/01/07 18:06:51
- Status: offline
- Ribbons : 4


I finally got some time to start the H8QME-2+ build last night and I ended up staying up until 6am to finish it. I though I would share my experiences with it here in the hope that it may help some others decide to take the plunge and/or get some ideas of what buy and/or how to deal with some potential problems. This is my first "from scratch" 4p build, but I have been hardware hacking since about 1990 so I was pretty well prepared for this. I started out on fleabay by picking up a SuperMicro H8QME-2+ four processor Socket F/1207 motherboard, which was populated with four 8216 Opteron CPUs and eight 2 GB DDR2 1333 mhz 5-5-3-15 (at least that's what they are running as) DIMMS for 16 GB of RAM. I then picked up four hexacore 8439 2.8 ghz Opterons as those are as good as it gets with the Socket F platform these days. I decided to buy an already flashed BIOS chip for the motherboard in case I roached the one on the board as I wasn't going to dicker around with floppy drives to flash it and stories abound of people killing their chips while attempting a USB flash. $10 on fleabay, that's cheap insurance. Now a note about the dual 12v EPS power connectors and power supplies. I have seen a lot of questions from people as to what the best way is to get two connectors out of a standard power supply so I thought I would share my thinking on this issue. Many of you already know what I am about to explain, but I think some of this will be beneficial to a lot of 4p newbies. As the H8QM boards require two EPS eight pin 12v power connectors, I ordered a variety of cables from a few different sources to cover all bases as I also bought an H8QM3-2 so I'll need to do it all again. I picked up an eight pin EPS 12v splitter, a six pin PCI-E to eight pin adapter and a double four pin Molex to eight pin EPS adapter. Part of the reason I got three different kinds is that it provides me with flexibility as to what power supply I am able to use. Various power supplies are configured in different ways as to their output current capability on the various connectors. The better ones these days run on a single 12v rail, which means that it doesn't matter what 12v connector you use, they all can provide a lot of amperage/wattage, some to a wire frying degree. Most of the affordable ($100 or less) power supplies these days have multiple 12v rails with various current ratings. It is important that you don't overload any one 12v rail or you'll have serious stability issues and may actually destroy components or possibly worse, cause a fire. Ideally, with a multiple 12v rail PS you want to run each EPS motherboard connector on a different rail from each other and the 24 pin motherboard connector on a third separate rail. If your power supply doesn't come with two 8 pin EPS connectors, as few standard power supplies do, having various adapter options is a good thing. I ended up using the six pin PCI-E to eight pin EPS adapter on this build and I will probably pick up another one to keep in stock. Power supplies are another hot topic for people interested in building these 4p Socket F folders. I haven't put my Kill-a-Watt on this beast yet as it is on my i7 rig (at 883 watts right now), which is folding away happily, but I have seen a number of people posting what their rigs are using at the wall with the 8439's. Prevailing wisdom is that a 650 watt PS will handle it in a pinch, but you are far better off getting an 850 watt unit. There are two other factors to consider that are even more important for 24/7 folders, one of which may seem counter-intuitive for some. As a power supply nears its rated capacity its efficiency starts drop off quickly.If you are using a 650 watt power supply and it is loaded to 625 watts, it will use more power at the wall than an 850 watt power supply that has the same efficiency rating. The difference can be enough so that over the course months of folding you'll likely end paying the power company more than the difference in the price of the power supplies. That can be important to some people. Next is the efficiency rating of the power supply. The efficiency rating is effectively the measure of how much current the power supply is outputting as compared to how much power it is drawing at the wall. Generally, you want one that is has at least an 80% efficiency rating, sometimes called "Bronze." If you can afford a "Platinum" rated PS (89%), go for it. I have an 1100 watt Apevia Warlock kicking around so that's what I am using at the moment for this build. I write off the power bill as a business expense anyway so its efficiency rating doesn't matter so much to me at the moment. Once I get actual usage figures at the wall I'll probably pick up the most efficient one I can find that is a decent deal and can handle the load with a generous buffer. The Northbridge and Southbridge chips on my board didn't come with any fans, just bare heatsinks. As I will be running this build "naked" with no case, I popped on a couple of 40mm fans. These boards are meant to be run in server cases with a large amount of airflow running across the board from front to back. Anyone who has heard a SuperMicro 4p board in a rackmount case at full song knows they sound like jet engines. They are deafening! I have one with a G34 board that I wasted no time converting to Cooler Master Hyper 212+ HSFs because six 80+ CFM 80x80x38mm ultra-high speed fans are just insane. Do not neglect chipset cooling and also pay attention to moving some air across the board itself to help cool MOSFETs and other components, they do get hot on these. On to CPU cooling. There are numerous ways to deal with this ranging from the "wind tunnel" method using the stock heatsinks to replacing the heatsinks with high performance heatsink-fan (HSF) assemblies. My board came with 1U (One rack Unit or a case that is 1.75 inches high) copper heatsinks that might be sufficient for the weak dual core 8216 CPUs, but would never cut it with the six core 8439s, even with insane airflow levels. I had planned to use the four Cooler Master Hyper 212+ HSFs on it with a "musky mod" bracket setup, but I ended up using them on my G34 as it was driving me nuts. As I was planning on building two of these Socket F 4p systems I laid in a small assortment of Socket F heatsinks for experimentation. While I expect to replace them at some point in the neat future, what I am using right now is four SuperMicro p/n SNK-P0023P+ 2U heatpipe heatsinks with four 80mm Rosewill 42.5 CFM fans, one per heatsink, in suck mode to pull heat away from the board and another generic 60mm fans blowing into the front of the heatsinks. I had hoped to get away with just the 80's on top, but folding an 8103 (bigadv) drove the processor temps over 50c on a couple of cores at 80f ambient and I don't consider that to be acceptable. I plan to fabricate a set of shrouds that will place an 80mm fan between 1.5" and 3" above the top of the heatsink to provide a good sized plenum that helps straighten the airflow into the fan and allows it to draw more air through the fins. I will also enclose some of the fin area with the shroud to maximize the heat transfer. It will require some experimentation to optimize it, but that's what I think of as fun, free efficiency  Even if it doesn't turn out to be a viable option and I have to musky mod it I will have learned something. Dinner's approaching quickly so I'll leave this first post with a pic of the motherboard with the 8439s and the chipset fans installed. 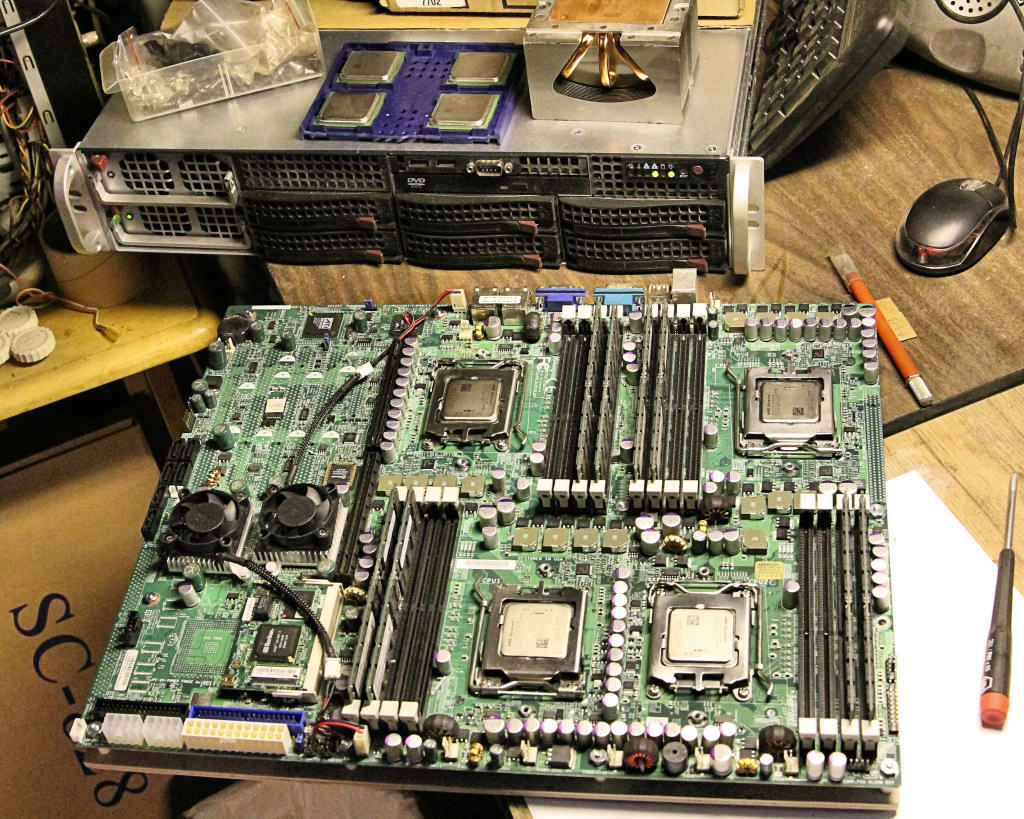
Folding Rig #1: SM H8QGi-F - 4x6172 Opterons @2520 Mhz w/CM 212+'s - 16GB Folding Rig #2 SM H8QME-2 - 4x8439 Opterons w/4x CM Hyper 101 + 8x 46 CFM 80MM Fans - 16GB Folding Rig #3 "The Ankle-Biter" - SM H8QM3-2 - 4x8425 Opterons + Nidec "Screamer" 80MM Fans - 16GB Folding Rig #4: X58 Classy3 - i7-990X @4.5 on 3x120 Juice, 12GB, 1x GTX980 K|NGP|N, 2x GTX680
|
Afterburner
EVGA Forum Moderator

- Total Posts : 25794
- Reward points : 0
- Joined: 2007/09/21 14:41:48
- Location: It's... Classified Yeeeeeeeeeeaaaaaaah........
- Status: offline
- Ribbons : 110


Re:4p SM H8QME-2+ 8439 Opteron Build
2013/04/11 15:58:21
(permalink)
Noice!!!
*AB looks at third server sitting in box next to bench (Literally) MUahahahahahahahahahahahahahahaha*
P.S... BR for you on going into some detail on the 12V 8 pins and, well all of it. Well thought out batch of info. TY...
|
TheWolf
CLASSIFIED Member

- Total Posts : 3800
- Reward points : 0
- Joined: 2007/11/14 16:05:23
- Location: Moss Point, Ms
- Status: offline
- Ribbons : 9

Re:4p SM H8QME-2+ 8439 Opteron Build
2013/04/11 16:55:51
(permalink)
Good job!
What's in the 2U server running in the background?
|
cp256
Superclocked Member

- Total Posts : 197
- Reward points : 0
- Joined: 2008/01/07 18:06:51
- Status: offline
- Ribbons : 4


Re:4p SM H8QME-2+ 8439 Opteron Build
2013/04/11 17:40:01
(permalink)
Thanks AB! Wolf, the box in the background is an SM AS-2042G with an H8QGI-f and 4x6172 Optys and CM 212+'s. It's folding an 8103. The wife made her yummy lasagne, I am recharged for the next round. As it is to be an open-air build that will eventually go into some kind of rack deal, most likely home made, I decided to mount it on a board. I had originally planned to mount it on a piece of Masonite hardboard I have in stock, but it was raining last night and I didn't want to get it wet bringing it in from the garage. I remembered that I had a 2'x8' sheet of 3/16" luan plywood left over from some floor work I did a few years ago and it was already in the house. Down to the basement wood shop with server board in hand and a few minutes later I had a mounting board cut to fit. With the motherboard laid in place on the mounting board I used a sharp pencil to outline the mounting holes and in short order had them all drilled. I had a bunch of 3/16x1" screws in stock so I measured up what the standoff distance would be with the screw threads just peeking out of the nuts and cut 14 pieces of styrene tubing to the correct 9/16" length with an X-Acto hobby miter box and razor saw. I'm a model railroader and have a pretty good stock of styrene structural shapes for scratchbuilding things and some tubing I had was the perfect diameter, but required a little drilling for the screws to fit through. Amazingly, every hole lined up and in short order the boards were married. I mounted them with the nuts on the top as I prefer to have the round head of the screws on the bottom rather than the sharp threads and it was easier to set the screws in place, let gravity hold it all together on the table, drop the tubing standoffs onto them and then drop the board onto those without having to play dexterity gymnastics doing it the other way around. I used fiber washers under the nuts on the motherboard side as just in case insulators. I had originally planned on only cutting and drilling the board last night, but as I completed each step I couldn't help but to continue onward. At this point it was 10pm and so far the motherboard with the poo-doggy 8216's still in the sockets was mounted. I decided it was time to mount some fans on the chipset heatsinks to get that out of the way. I found two good candidates in my 40mm to 60mm fan box and in addition to being new, they already had two pin to three pin fan adapter cables attached. I dug out some P3 fan screws and that job was out of the way. I considered calling it a night at that point, but the wifey was still snoozing on the couch so I decided to push forward. Many people have been firing up their ebay'ed mobos with the slow CPU's they came with to be sure they work OK before upgrading. Why didn't I do that? The motherboard came with the heatsinks dismounted and a TIM mess on both those and the CPUs. Since I had the updated BIOS chip I figured why waste good TIM to try something that doesn't have enough power to be worth folding? I popped in the new BIOS chip and prepared to swap out the CPUs. A note about removing these little square chips. It is easy to damage the little plastic BIOS chip sockets if you aren't careful removing the BIOS chip. If you don't have the right size chip extractor you can use a tiny jeweler's screwdriver to carefully pop them out. You want to get the blade as far under the chip as you can using the slots in the two corners diagonally opposed from each other. Pry carefully and slowly a little bit at a time alternating from corner to corner. Watch the socket closely for deformation that can lead to cracking the socket. These sockets can and will easily break if you get too rambunctious with your levering. Out came the 8216s and I cleaned the retainers with some Goof-Off to remove the sloppy leftover TIM from the previous owner. After a thorough inspection of the 1,207 pins of each socket (I found a tiny glob of TIM in one of them), in went the 8439s. It was ready to mount the heatsinks! Well, um, no. As a matter of habit, I got out my sheet of lapping glass and mounted up some 180 grit sandpaper to check the flatness of the interface surface. The heatsinks had a lousy surface finish so I had planned on a bit of lapping anyway. The first heatsink had a low spot right in the freaking middle of the contact patch! Lap, lap, lap, still there. Repeat, repeat, repeat. Thirty or so minutes later I had removed the low spot and could finally lap it in a figure 8 pattern to a decent finish. I mounted it on CPU #1 with some Phobya HeGrease and stated on the second heatsink hoping it would be in better shape than the first. It was worse, significantly worse. Ugh. Lap, lap, lap, lap, lap,lap, lap,lap, lap,lap, lap,lap, lap,lap, lap,lap, lap,lap, lap, repeat. Thirty some minutes later it was done. Mounted it and started on the third one. Hallelujah, this one looked pretty good! One corner was a little low, but it was wholly off of the contact patch. Two minutes of lapping and it got mounted. The fourth one was even better than the third. Phew. Squeeze out the last bead of TIM and Ut-Oh, I ran out with only about 1/4 of what I needed laid down! Note to self, remember that the TIM manufactures are greedy, stingy bastages and buy double what you think you'll need next time. Fortunately I had a greedy, stingy, tiny syringe of AC Ceramique in stock so I decided to use that rather than downgrade to the AC 5 or AC 3 left over from projects in the ancient past. Off came the insufficient HeGrease and on went the Ceramique followed by the heatsink. I paused to shoot this photo and admire my hard won handiwork. 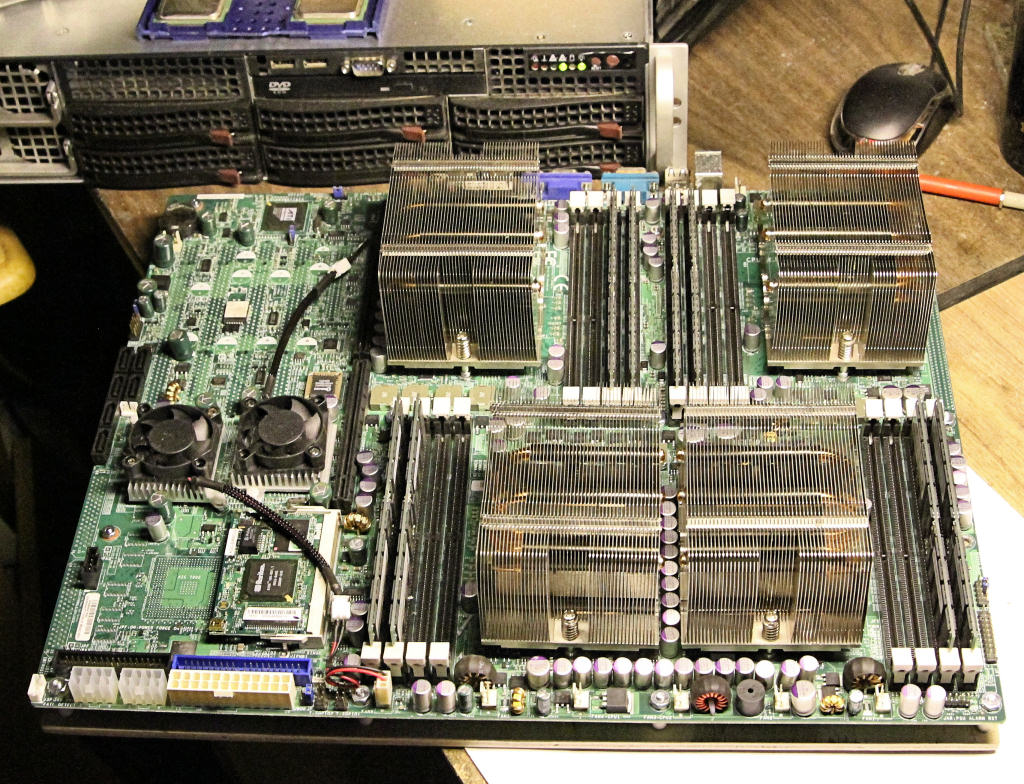 EDIT: Added BIOS chip replacement paragraph
post edited by cp256 - 2013/04/11 18:45:46
Folding Rig #1: SM H8QGi-F - 4x6172 Opterons @2520 Mhz w/CM 212+'s - 16GB Folding Rig #2 SM H8QME-2 - 4x8439 Opterons w/4x CM Hyper 101 + 8x 46 CFM 80MM Fans - 16GB Folding Rig #3 "The Ankle-Biter" - SM H8QM3-2 - 4x8425 Opterons + Nidec "Screamer" 80MM Fans - 16GB Folding Rig #4: X58 Classy3 - i7-990X @4.5 on 3x120 Juice, 12GB, 1x GTX980 K|NGP|N, 2x GTX680
|
cp256
Superclocked Member

- Total Posts : 197
- Reward points : 0
- Joined: 2008/01/07 18:06:51
- Status: offline
- Ribbons : 4


Re:4p SM H8QME-2+ 8439 Opteron Build
2013/04/11 18:01:56
(permalink)
Well hell's bells, this thing is purty close to being able to fire up, I just need a solution to mounting some fans on the heatsinks. It's about midnight and there's no way I am quitting until I see this thing fired up. I had thought I might be able to use some skinny screws to lag into the heatsink fins enough to work as a temporary solution until I can fabricate some shrouds. Nope, nothing I had on hand would work without virtually destroying the fins. I needed a plan B. Thinking about the problem got the old light bulb in my head illuminated as I noticed how similar the fins look to my Thermalright 120 eXtreme on the QX9650, which in stock form used wire retaining clips to hold the fan in place. Maybe I can bend up some wire to do the trick. Now what to use for wire? Jumbo paper clips looked top be close to the right length when unwound and I happened to have a fresh box of them in the office supplies cabinet. Sure enough, they were almost perfect once bent into a suitable shape, a wide, shallow U with small inward facing 'lightning bolt" shapes bent at the end to catch the holes on the top of the fans. Thread them through the length of the heatsink outer fins and under its fin binding strap and pop them over the top fan holes. Voila, 80mm fan mount clips! I spent about an hour bending and fitting the 8 fan clips and while not store bough perfect, I think they are a pretty slick temporary solution. 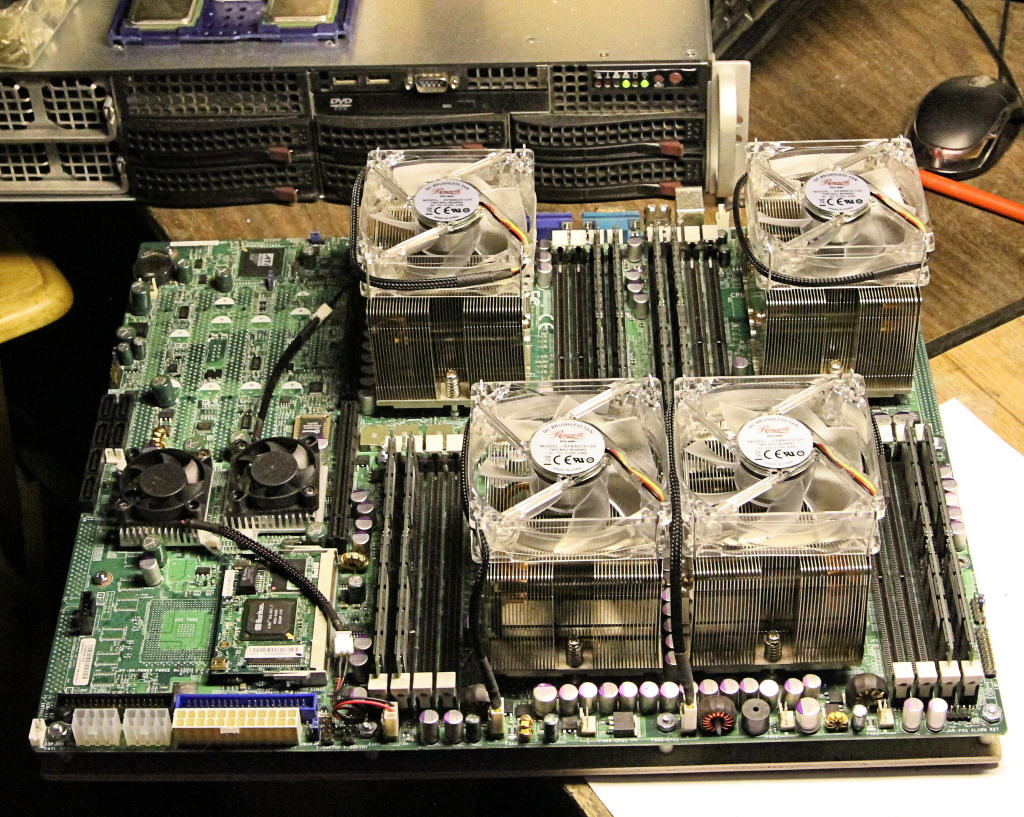 This pic is jumping the gun a bit, but it better shows the fabricated fan clips with the Z-bend at the ends. 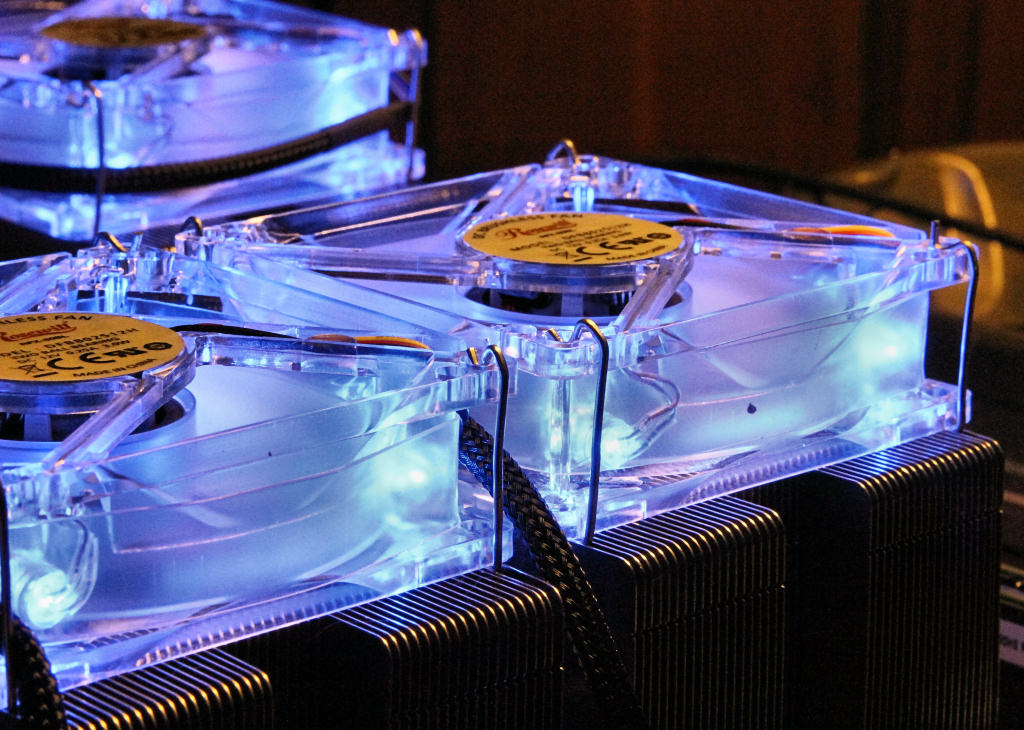 EDIT: Redid the pics
post edited by cp256 - 2013/04/11 18:31:34
Folding Rig #1: SM H8QGi-F - 4x6172 Opterons @2520 Mhz w/CM 212+'s - 16GB Folding Rig #2 SM H8QME-2 - 4x8439 Opterons w/4x CM Hyper 101 + 8x 46 CFM 80MM Fans - 16GB Folding Rig #3 "The Ankle-Biter" - SM H8QM3-2 - 4x8425 Opterons + Nidec "Screamer" 80MM Fans - 16GB Folding Rig #4: X58 Classy3 - i7-990X @4.5 on 3x120 Juice, 12GB, 1x GTX980 K|NGP|N, 2x GTX680
|
cp256
Superclocked Member

- Total Posts : 197
- Reward points : 0
- Joined: 2008/01/07 18:06:51
- Status: offline
- Ribbons : 4


Re:4p SM H8QME-2+ 8439 Opteron Build
2013/04/11 18:27:02
(permalink)
I'm ready to get this baby rockin' and rollin' like right NOW! What had been planned as a simple prep session had turned into A MISSION. I've come this far, I'm not quittin' until it is folding while I sleep. I rush around gathering the remaining bits need to fire it up. Apevia 1100w PS, PCI-E to EPS 8-pin adapter cable, Seagate 160 GB SATA drive, ATA DVD drive to load Ubuntu, SATA cable, ATA 100 cable, LAN cable, power button, LEDs, keyboard, mouse, etc. I plug it all in and it's time to Go BABY GO! 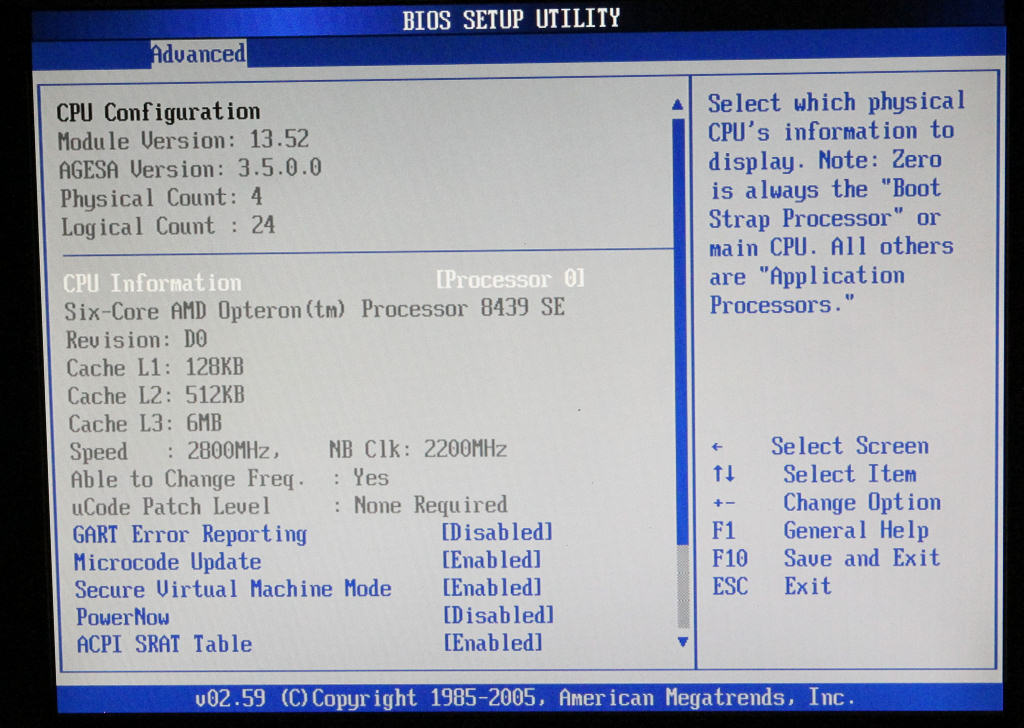 I light it off and it POSTs first time. I jump into setup to load optimized defaults and check the CPU temps, just in case. The date is at the factory default, no biggie, I set it close enough to sync when Ubuntu is online. Set the defaults and the CPUs are showing at Low temp in the hardware monitor. Fans set to full, lets save it and boot. I forget why, but I shut off the power supply form some reason and when I turned it back on the date was reset to default again. Bad battery. Fortunately it is another stock item for me so I pop one out of my card of CR2032's, slap it in and boot to setup again. With the settings redone it is time to install linux. I pop in the Ubuntu desktop 12.04 LTS CD and go through the install steps. The HD had an NT Vista partition on it so I did the manual partitioning and nuked it. Waited through the agonizing language pack load (I hate that part) and it finally tells me it is done, yay! Wait, I get a popup saying it can't install GRUB. WTH? It's not real specific about why so I hit the net and start researching the error. I find pages showing how to manually fix/reinstall GRUB after a live CD boot with grub-install and I try those to no avail. The drive ha s a boot loader on it that GRUB doesn't understand. I might have had a FreeBSD boot loader on it as part of a RAID mirror at one time, not sure. I beat on it and beat on it and still no worky worky. I finally gave up as the sun was starting to come up. No folding for me today, I must sleep. Fortunately I am self-employed so being late for work just makes me feel bad, but I don't get in trouble for it. In retrospect, after the first manual grub-install failed I should have cut bait and slapped in another drive. I would have been folding while I slept without a doubt. it was disappointing for sure, but I would whip it in the morning. EDIT: Typos
post edited by cp256 - 2013/04/11 18:32:21
Folding Rig #1: SM H8QGi-F - 4x6172 Opterons @2520 Mhz w/CM 212+'s - 16GB Folding Rig #2 SM H8QME-2 - 4x8439 Opterons w/4x CM Hyper 101 + 8x 46 CFM 80MM Fans - 16GB Folding Rig #3 "The Ankle-Biter" - SM H8QM3-2 - 4x8425 Opterons + Nidec "Screamer" 80MM Fans - 16GB Folding Rig #4: X58 Classy3 - i7-990X @4.5 on 3x120 Juice, 12GB, 1x GTX980 K|NGP|N, 2x GTX680
|
TheWolf
CLASSIFIED Member

- Total Posts : 3800
- Reward points : 0
- Joined: 2007/11/14 16:05:23
- Location: Moss Point, Ms
- Status: offline
- Ribbons : 9

Re:4p SM H8QME-2+ 8439 Opteron Build
2013/04/11 19:01:00
(permalink)
Sounds a lot like most of my build sections. I never give up until its all working, even if it takes days.
I do take a few short breaks to clear the head or grab a bite to eat, but no sleep for me until it all working right.
Good luck man, sounds like your close.
|
cp256
Superclocked Member

- Total Posts : 197
- Reward points : 0
- Joined: 2008/01/07 18:06:51
- Status: offline
- Ribbons : 4


Re:4p SM H8QME-2+ 8439 Opteron Build
2013/04/11 19:24:19
(permalink)
Four hours later I am up, bright eyed and bushy tailed. Ok, not so much, but the wife had a pot of coffee waiting for me and that's all I needed to come back to life. I had folding dreams for the first time. I'm sure it's a sign of something, good or not. After a cup of joe and a smoke I swapped the HD out for an old 60 GB Maxtor SATA-1 drive. No sense in using anything better as the fah folder will be on a memory filesystem anyway. Blew through the Ubuntu install this time with no GRUB issues. I plowed through my email and dealt with some customer issues while it installed. After rebooting off of the HD I updated the software repository, set up openssh-server and installed my public keys so I can bop in and out of there from the other boxes and copy files across. I scp'ed the fahinstall.sh script from the G34 box and when executed it couldn't find the website to get the rest of the folding bits. I popped over to [H] and sure enough there was a new fah install script, this time named "fahinstall" without the .sh on the end. That one blew all the folding goodness onto my drive. I backed up the fah folder just in case the shutdown script didn't do it. I installed lm-sensors and Turion Power Control so I can keep an eye on the CPU temps and fans. They looked fine so I rebooted. Checked ~/fah and the init script had done its job of repopulating the fah tempfs. so good so far. i cd'ed into fah and ./fah6 and off it went. I diddled in email while it downloaded the project and when I looked back it said 'FP_membrane in water', a bigadv first time out! Sure enough it was running an 8103 (still is). I told Samba to share the fah folder (described in the 4p virgin thread) and added the client to HFM. It's doing 8103 with a 22:14 TPF and 164693 PPD, not bad for the first time out on a fresh build. Checking the temps, I saw that two of the cores were topping 50c at 79f ambient. That's a few C out of my comfort range so I dug out and temporarily mounted four generic 60mm fans on the front of the heatsinks, blowing in, to help the 80's, which I have sucking on top to exhaust the hot air away from the board. Not sure if I mentioned that before. I have always believed blow is better than suck for performance, but my experiences with the G34 board taught me that it is better to get the hot air away from the board and other processors, even if it moves slightly less air. The 60's lowered temps 4c to 6c per CPU, which will be fine until I get some shrouds built. For some reason CPU #4 (left rear) seems to run hotter than the other three. The same position on the G34 runs hotter as well. You can feel the difference in heat to the other CPUs with your hand above the fan. I'd be interested to hear if others see the same thing on their 4p's. If shrouding doesn't do the trick, I'll probably pick up four more CM 212+'s or something similar and cobble together some custom mounting brackets. As an aside, I am impressed with the Rosewill RFX-80BL 42.5 CFM 80mm ball bearing fans. They move more air than most 80x25's and they are almost silent. These are the first Rosewill products I have tried and if they are reliable I'll certainly buy Rosewill again. The quality seems excellent and they come with a chrome grille, slot cover mounted speed controllers that have four pin Molex connectors and include a fan tach tail for plugging into the motherboard. They also include eight fan mounting screws. A well thought out package and very affordable at $4.99 apiece with free shipping at the Egg right now. It's well worth keeping a few of these in stock at that price, I'm going to order four more for stock. I have bought a lot of fans over the years and I don't impress easily. 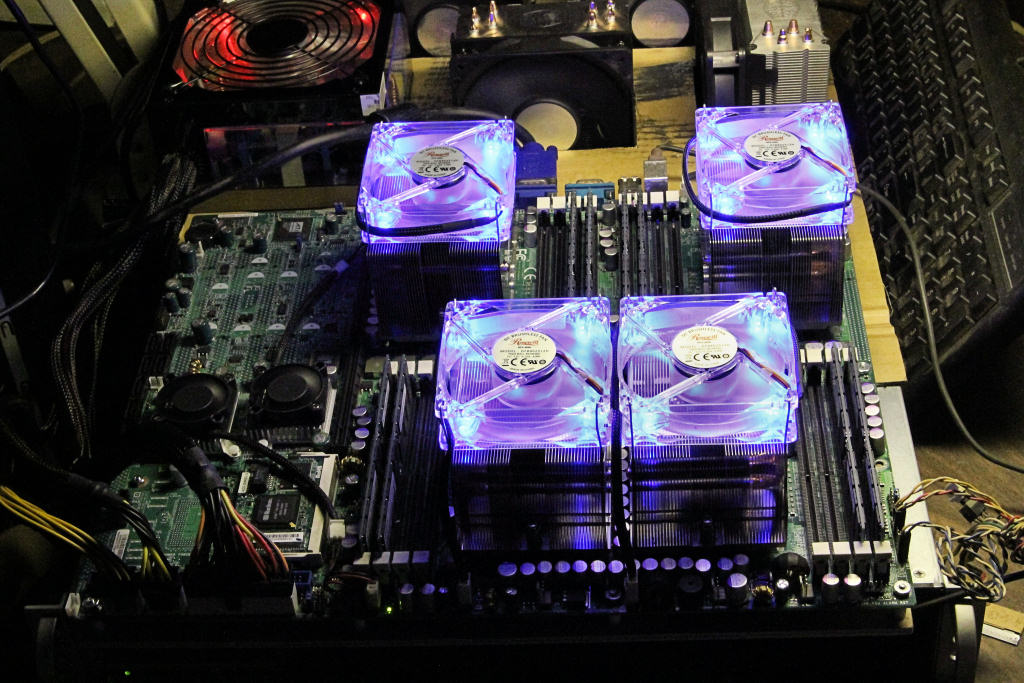 If anyone has any questions, please feel free to ask them. EDIT: Added photo
post edited by cp256 - 2013/04/11 19:35:41
Folding Rig #1: SM H8QGi-F - 4x6172 Opterons @2520 Mhz w/CM 212+'s - 16GB Folding Rig #2 SM H8QME-2 - 4x8439 Opterons w/4x CM Hyper 101 + 8x 46 CFM 80MM Fans - 16GB Folding Rig #3 "The Ankle-Biter" - SM H8QM3-2 - 4x8425 Opterons + Nidec "Screamer" 80MM Fans - 16GB Folding Rig #4: X58 Classy3 - i7-990X @4.5 on 3x120 Juice, 12GB, 1x GTX980 K|NGP|N, 2x GTX680
|
notfordman
Omnipotent Enthusiast

- Total Posts : 10345
- Reward points : 0
- Joined: 2007/08/09 23:52:23
- Location: In a van, down by the
- Status: offline
- Ribbons : 28


Re:4p SM H8QME-2+ 8439 Opteron Build
2013/04/11 20:47:09
(permalink)
Some nice engineering there with the fan clips! Looks like you had some good ideas and put them in play. Nice job! 
|
TheWolf
CLASSIFIED Member

- Total Posts : 3800
- Reward points : 0
- Joined: 2007/11/14 16:05:23
- Location: Moss Point, Ms
- Status: offline
- Ribbons : 9

Re:4p SM H8QME-2+ 8439 Opteron Build
2013/04/12 05:24:51
(permalink)
If its not to much trouble flip those fan so they blow air into the heatsinks,
I think you'll see another 3 or 4c drop in temps for the CPU's.
As is its pulling the heat up the fins instead of cooling the fins to the base.
The rest of the board should be fine as long as you have a few fans blowing across it.
|
johnerz
CLASSIFIED Member

- Total Posts : 2076
- Reward points : 0
- Joined: 2008/07/23 14:09:37
- Status: offline
- Ribbons : 7

Re:4p SM H8QME-2+ 8439 Opteron Build
2013/04/12 06:16:02
(permalink)
Very nice, you have a good brain for extemperization as well as manual dexterity I agree with Wolf on the fans, you have all the heatsinks with the fins pointing in the same direction, so a couple of fans blowing across the board down through the same direction as the fins scotty8 posted a photo of his board mounted rig using the config I mentioned and I'm using similar (will be the same when the rig gets into the workshop) Post 23 http://forums.evga.com...83&mpage=1#1910317
|
cp256
Superclocked Member

- Total Posts : 197
- Reward points : 0
- Joined: 2008/01/07 18:06:51
- Status: offline
- Ribbons : 4


Re:4p SM H8QME-2+ 8439 Opteron Build
2013/04/12 11:50:25
(permalink)
TheWolf If its not to much trouble flip those fan so they blow air into the heatsinks,
I think you'll see another 3 or 4c drop in temps for the CPU's.
As is its pulling the heat up the fins instead of cooling the fins to the base.
The rest of the board should be fine as long as you have a few fans blowing across it.
They are heatpipe sinks so the base isn't as important. I flipped them over just for kicks and three CPUs run about 2c cooler, one runs about the same, maybe 1c hotter, go figure. I have a lot more experimentation to do.
Folding Rig #1: SM H8QGi-F - 4x6172 Opterons @2520 Mhz w/CM 212+'s - 16GB Folding Rig #2 SM H8QME-2 - 4x8439 Opterons w/4x CM Hyper 101 + 8x 46 CFM 80MM Fans - 16GB Folding Rig #3 "The Ankle-Biter" - SM H8QM3-2 - 4x8425 Opterons + Nidec "Screamer" 80MM Fans - 16GB Folding Rig #4: X58 Classy3 - i7-990X @4.5 on 3x120 Juice, 12GB, 1x GTX980 K|NGP|N, 2x GTX680
|
Flybye
FTW Member

- Total Posts : 1160
- Reward points : 0
- Joined: 2006/11/17 23:55:10
- Location: Miami (Cuba v2.1)
- Status: offline
- Ribbons : 4

Re:4p SM H8QME-2+ 8439 Opteron Build
2013/04/13 06:30:50
(permalink)
Very nice monster build. I'm still  over your PPD. I wonder what that board would look like watercooled.... 
Gaming thing i9-12900KF @ 5.20GHzEVGA: Z690 Classified - RTX 3080 FTW3 Ultra - Supernova 1200w P3 - DG-75 32GBs Corsair Dominator DDR5 @ 6800 - Seagate: .5TB, 1TB M.2s, HD 4TBSony CRT 24" GDM-FW900 16:10 - DangerDen (RIP) Goodies: 2x120mm Rad & D5 + Primochill stuff
|
TheWolf
CLASSIFIED Member

- Total Posts : 3800
- Reward points : 0
- Joined: 2007/11/14 16:05:23
- Location: Moss Point, Ms
- Status: offline
- Ribbons : 9

Re:4p SM H8QME-2+ 8439 Opteron Build
2013/04/13 07:29:15
(permalink)
Wanted to thank you about posting the Rosewill RFX-80BL 42.5 CFM 80mm ball bearing fans.
I grabbed 4 yesterday and a 4 port KVM switch from the egg. This 2 port is killing me having to swap it around so much.
What I'm using now is working fine, but I could use those couple 120 fans else where. I'm always short on 120's.
|
Afterburner
EVGA Forum Moderator

- Total Posts : 25794
- Reward points : 0
- Joined: 2007/09/21 14:41:48
- Location: It's... Classified Yeeeeeeeeeeaaaaaaah........
- Status: offline
- Ribbons : 110


Re:4p SM H8QME-2+ 8439 Opteron Build
2013/04/13 07:35:05
(permalink)
TheWolf
Wanted to thank you about posting the Rosewill RFX-80BL 42.5 CFM 80mm ball bearing fans.
I grabbed 4 yesterday and a 4 port KVM switch from the egg. This 2 port is killing me having to swap it around so much.
What I'm using now is working fine, but I could use those couple 120 fans else where. I'm always short on 120's.
Sorry for the hi-jack... Which one did you get? I was looking at this one... http://www.newegg.com/Product/Product.aspx?Item=N82E16817107212 Back on topic... Looking forward to your new found production as the weeks go by... 
|
TheWolf
CLASSIFIED Member

- Total Posts : 3800
- Reward points : 0
- Joined: 2007/11/14 16:05:23
- Location: Moss Point, Ms
- Status: offline
- Ribbons : 9

Re:4p SM H8QME-2+ 8439 Opteron Build
2013/04/13 08:55:07
(permalink)
Afterburner
TheWolf
Wanted to thank you about posting the Rosewill RFX-80BL 42.5 CFM 80mm ball bearing fans.
I grabbed 4 yesterday and a 4 port KVM switch from the egg. This 2 port is killing me having to swap it around so much.
What I'm using now is working fine, but I could use those couple 120 fans else where. I'm always short on 120's.
Sorry for the hi-jack... Which one did you get? I was looking at this one... http://www.newegg.com/Product/Product.aspx?Item=N82E16817107212
Back on topic... Looking forward to your new found production as the weeks go by... 
I picked up one of these: http://www.newegg.com/Product/Product.aspx?Item=N82E16817399045 Nothing special, no audio, but don't need that anyway. Just be extra cables in the way.
|
cp256
Superclocked Member

- Total Posts : 197
- Reward points : 0
- Joined: 2008/01/07 18:06:51
- Status: offline
- Ribbons : 4


Re:4p SM H8QME-2+ 8439 Opteron Build
2013/04/13 11:16:17
(permalink)
It finished it's 8101 and picked up an 8103 with 16:51 TPF and 251137 PPD.
I also grabbed a 4-port IOGEAR KVM for the upcoming basement rack setup, thanks for the link!
I need to get these things into the basement, with them sitting next to the desk they drive the ambient temps up to 85f+ even with the inside double doors to the room open and a 20" fan in the doorway. If I keep a fan by the outside door with it open about three inches it stays about 77f by the 4p boxes, but rest of the first floor drops below 70f because the thermostat for the downstairs circuit stays above 72f. A basement rack capable of housing three 4p systems and their components will be this week's project. I'm going to set it up so the rear of it can be ducted out the window in the summer.
Folding Rig #1: SM H8QGi-F - 4x6172 Opterons @2520 Mhz w/CM 212+'s - 16GB Folding Rig #2 SM H8QME-2 - 4x8439 Opterons w/4x CM Hyper 101 + 8x 46 CFM 80MM Fans - 16GB Folding Rig #3 "The Ankle-Biter" - SM H8QM3-2 - 4x8425 Opterons + Nidec "Screamer" 80MM Fans - 16GB Folding Rig #4: X58 Classy3 - i7-990X @4.5 on 3x120 Juice, 12GB, 1x GTX980 K|NGP|N, 2x GTX680
|
TheWolf
CLASSIFIED Member

- Total Posts : 3800
- Reward points : 0
- Joined: 2007/11/14 16:05:23
- Location: Moss Point, Ms
- Status: offline
- Ribbons : 9

Re:4p SM H8QME-2+ 8439 Opteron Build
2013/04/13 16:00:30
(permalink)
I like the USB model because my keyboard and mouse work off the same receiver so I only need to connect one USB cable to the motherboard leaving one USB port open on the back of this 4p motherboard.
|
TheWolf
CLASSIFIED Member

- Total Posts : 3800
- Reward points : 0
- Joined: 2007/11/14 16:05:23
- Location: Moss Point, Ms
- Status: offline
- Ribbons : 9

Re:4p SM H8QME-2+ 8439 Opteron Build
2013/04/15 20:13:44
(permalink)
|
cp256
Superclocked Member

- Total Posts : 197
- Reward points : 0
- Joined: 2008/01/07 18:06:51
- Status: offline
- Ribbons : 4


Re:4p SM H8QME-2+ 8439 Opteron Build
2013/04/16 08:28:32
(permalink)
Yes, they are pretty bright. It's perfect for where they'll be for me as they will do a good job of lighting up that shelf in the basement rack. I did the design work for the basement rack yesterday and hope to start construction today. I just happen to have all the materials required, including the 3" locking swivel casters, in stock 
Folding Rig #1: SM H8QGi-F - 4x6172 Opterons @2520 Mhz w/CM 212+'s - 16GB Folding Rig #2 SM H8QME-2 - 4x8439 Opterons w/4x CM Hyper 101 + 8x 46 CFM 80MM Fans - 16GB Folding Rig #3 "The Ankle-Biter" - SM H8QM3-2 - 4x8425 Opterons + Nidec "Screamer" 80MM Fans - 16GB Folding Rig #4: X58 Classy3 - i7-990X @4.5 on 3x120 Juice, 12GB, 1x GTX980 K|NGP|N, 2x GTX680
|
cp256
Superclocked Member

- Total Posts : 197
- Reward points : 0
- Joined: 2008/01/07 18:06:51
- Status: offline
- Ribbons : 4


Re:4p SM H8QME-2+ 8439 Opteron Build
2013/04/20 09:59:31
(permalink)
Just a quick update. I'm still experimenting with cooling on this build and have been gathering the rest of the bits for the basement folding station build. A couple of days ago when it hit 80F outside I decided to see what would happen to the ambient temp with only some fans cooling this room. With three 20" fans, one of which is an industrial quality wind blaster, and one 18" fan moving air in and out of the room, temps quickly hit 90F and I had to shut down the i7 folding rig for the first time in over a month. The hottest 6172 and 8439 CPUs peaked at about 52C, which is not too bad, but a bit higher than I care for. I had doubled up the fans on the 8439's, without that two of them hit 55C. Just for kicks I put an 84 CFM Vantec 80mm Tornado on the hottest 8439 and it dropped the temp by 4C at full blast, but the noise it makes at 5400 RPM isn't acceptable. Dialed back to about half that it is still noisy, but somewhat liveable. Even with it going to the basement in the near future I'd still like a quieter solution than four of those. Just for kicks I picked up a cute little CM Hyper 101 HSF that looks like a little 80mm version of the Hyper 212+. It's only rated for 95 watts, but I figured it at only $15 was worth trying out. I lapped the base up to 1,000 grit wet/dry paper (it really needed it), fabricated Socket F adapter brackets and swapped out the single 30CFM 80mm CM fan for two 46 CFM Rosewill 80's in a push-pull configuration. To my surprise the experiment worked! To make the Socket F mounts I scrounged a cad plated sheet metal bracket from my scrap box in the garage and hacked a couple of 20mm wide pieces out if it and shaped them as seen in the photos below. The four threaded holes on the 101's base are on 10mm centers so I drilled holes to mate to the center two holes on the H101 and mounted the tabs to the underside of the base. I then measured out the 3.5" center to center distance of the Socket F mounting holes and drilled those. I used 3/16" spring tension screws from the SM heatsinks with a couple of #8 washers for sufficient clamping power and voila, I had a clean Socket F Hyper 101. I waited for a checkpoint on the current project and shut down the system. Dismounted the SM sink on the hottest running 8439, cleaned off the TIM, applied some fresh Antec Formula 6 diamond paste (using the "tinting" method), mounted the H101 and Rosewill fans and fired up the rig. Resumed the project (I think it was an 8101) and after it had heat soaked up to a stable folding temp i was pleasantly surprised to find that it was now running 3C cooler than it had been. I let it run for a couple of more hours and being satisfied with its performance I hit the Egg again and ordered three more H101's. They should be here Monday morning. I'll fabricate three more sets of tab brackets this weekend and hopefully be able to get them lapped and installed by Monday evening. Here's my reasoning behind the CM Hyper 101 experiment. I want the airflow to move from front to back on these boards. With the stock SM heatsinks and 80mm fans blowing down onto them the airflow is all messed up, going out both the front and back of each heatsink. When the rig is installed into the basement folding rack the airflow on the front side of each heatsink will be fighting the rear exhaust of the rack. I wanted a solution that would both fit the tight CPU1 and CPU2 center spacing and exhaust rearward. Aside from a couple of Chinese imports with a long availability time, the CM Hyper 101 was the only potential unit that fit the bill. I wasn't impressed with the 95 watt design capacity, but I figured I might be able to raise that with some good lapping and doubling up 80mm fans rated at 50% more airflow than CM's. It would appear that I have managed to achieve that so we'll see what three more of them will do. I expect to see even better results with the air all moving one way, although I may have to add a pair of styrene air walls to duct the output of the front 101's in between the intake of the rear 101's. Besides, they're cute as hell, I think four of these baby 212's with dual fans on the board will look pretty cool! 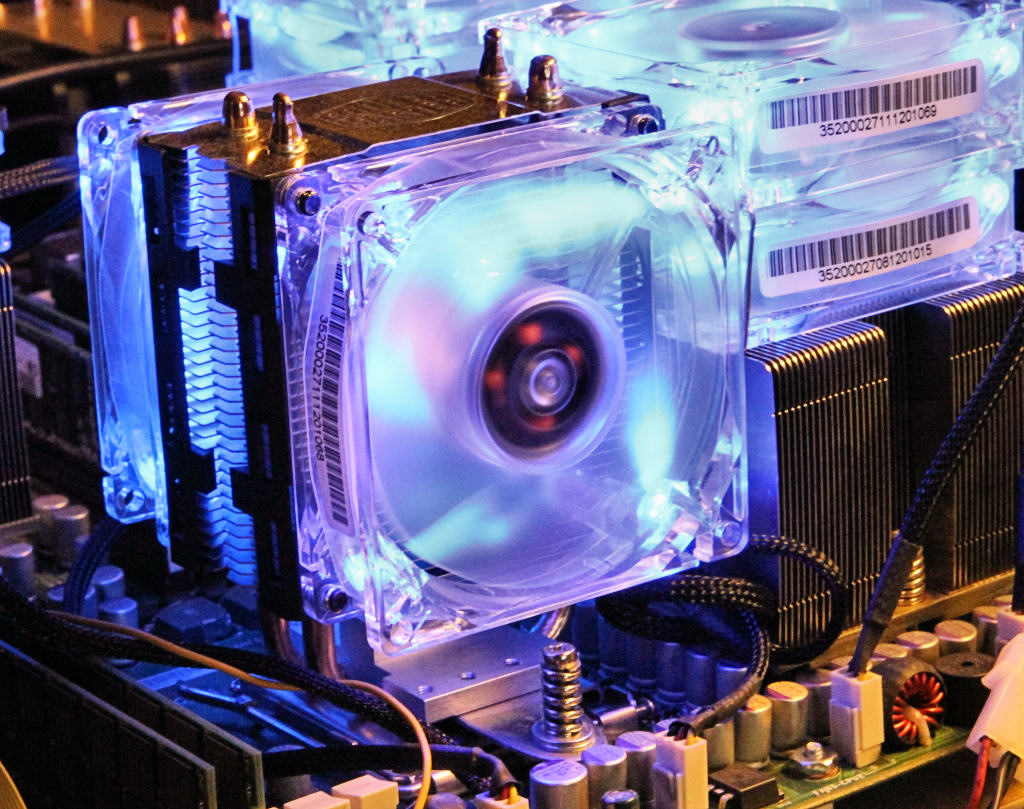 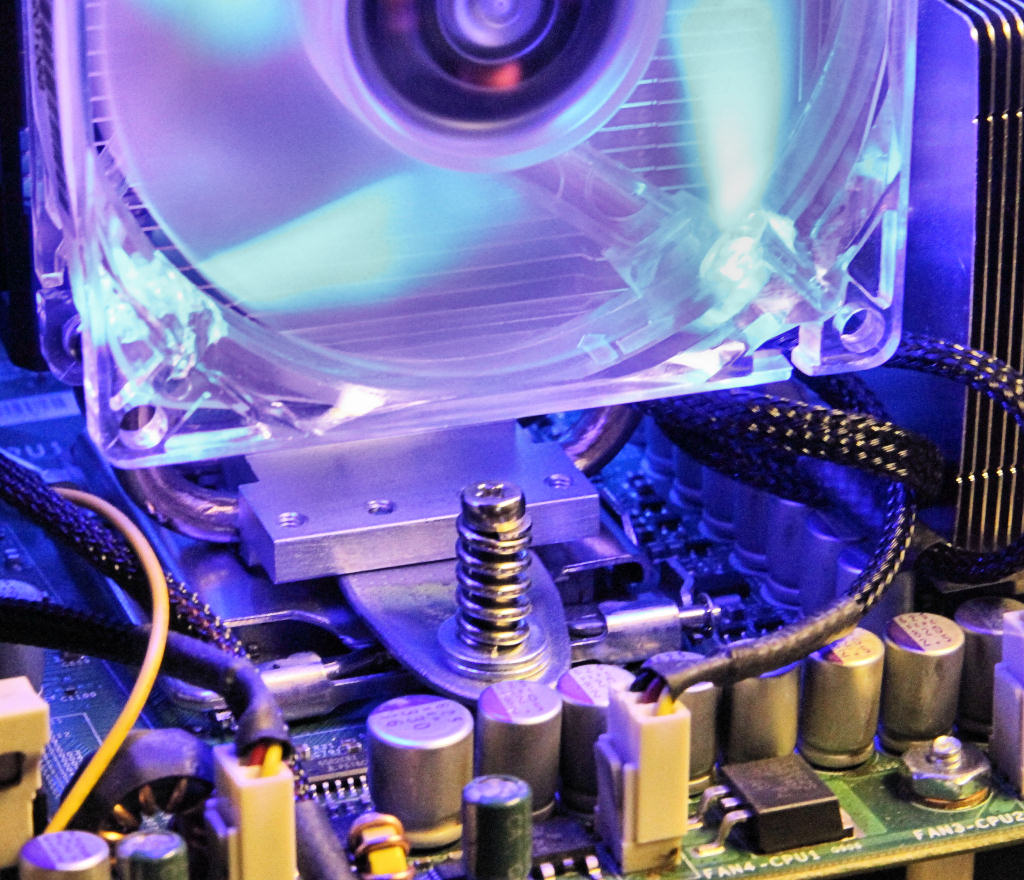 Edit: Typos.
post edited by cp256 - 2013/04/20 12:06:32
Folding Rig #1: SM H8QGi-F - 4x6172 Opterons @2520 Mhz w/CM 212+'s - 16GB Folding Rig #2 SM H8QME-2 - 4x8439 Opterons w/4x CM Hyper 101 + 8x 46 CFM 80MM Fans - 16GB Folding Rig #3 "The Ankle-Biter" - SM H8QM3-2 - 4x8425 Opterons + Nidec "Screamer" 80MM Fans - 16GB Folding Rig #4: X58 Classy3 - i7-990X @4.5 on 3x120 Juice, 12GB, 1x GTX980 K|NGP|N, 2x GTX680
|
cp256
Superclocked Member

- Total Posts : 197
- Reward points : 0
- Joined: 2008/01/07 18:06:51
- Status: offline
- Ribbons : 4


Re:4p SM H8QME-2+ 8439 Opteron Build
2013/04/28 09:53:41
(permalink)
It turns out that two Hyper 101's won't quite fit side by side without a little tweaking, they are about 2mm too wide because of the fan brackets. I clamped the one on the right to a table and slightly bent the whole thing to the right. I also sanded the center bracket edges a bit. If I were going to do this again from scratch I would offset the mounting screw holes for each by 2mm and sand the center fan mounting brackets .5mm each. After lapping up to 1000 grit paper they perform pretty well and I love the Baby 212+ look. 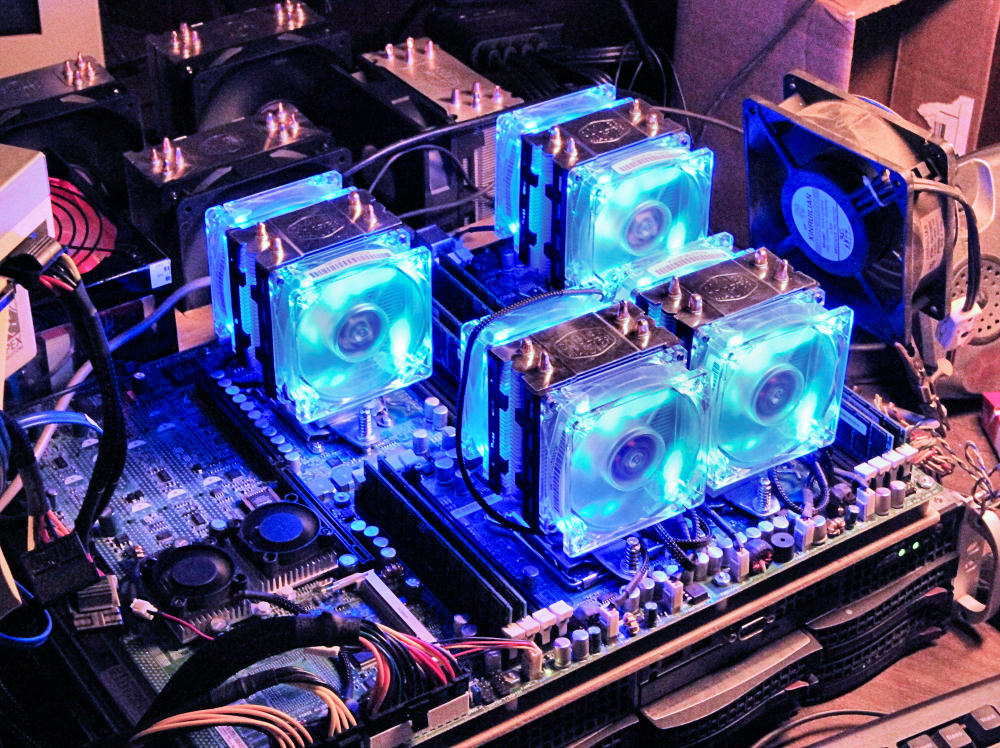 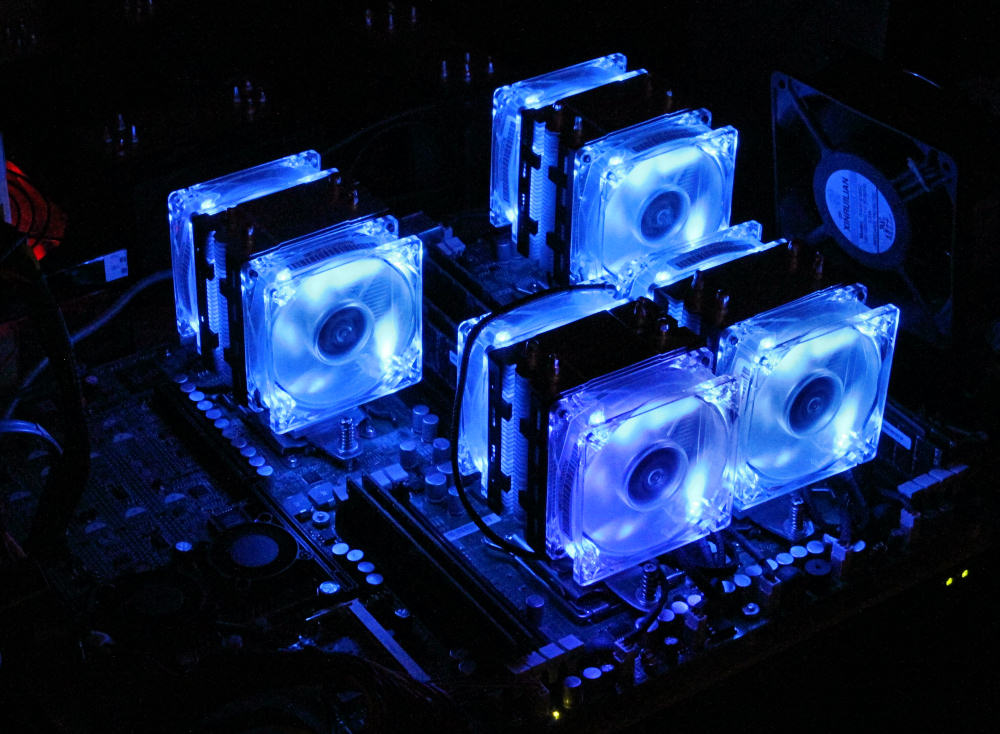
Folding Rig #1: SM H8QGi-F - 4x6172 Opterons @2520 Mhz w/CM 212+'s - 16GB Folding Rig #2 SM H8QME-2 - 4x8439 Opterons w/4x CM Hyper 101 + 8x 46 CFM 80MM Fans - 16GB Folding Rig #3 "The Ankle-Biter" - SM H8QM3-2 - 4x8425 Opterons + Nidec "Screamer" 80MM Fans - 16GB Folding Rig #4: X58 Classy3 - i7-990X @4.5 on 3x120 Juice, 12GB, 1x GTX980 K|NGP|N, 2x GTX680
|
Viper97
CLASSIFIED ULTRA Member

- Total Posts : 5208
- Reward points : 0
- Joined: 2007/09/07 13:06:18
- Location: Chillin'
- Status: offline
- Ribbons : 11

Re:4p SM H8QME-2+ 8439 Opteron Build
2013/04/28 11:32:15
(permalink)
My gawd man... you could plant that on the moon and still see it from my house! 
|
TheWolf
CLASSIFIED Member

- Total Posts : 3800
- Reward points : 0
- Joined: 2007/11/14 16:05:23
- Location: Moss Point, Ms
- Status: offline
- Ribbons : 9

Re:4p SM H8QME-2+ 8439 Opteron Build
2013/04/28 12:52:15
(permalink)
Wow looks great, nice work!
I had looked at those 101's at one point thinking they would work well.
|
cp256
Superclocked Member

- Total Posts : 197
- Reward points : 0
- Joined: 2008/01/07 18:06:51
- Status: offline
- Ribbons : 4


Re:4p SM H8QME-2+ 8439 Opteron Build
2013/04/29 05:50:47
(permalink)
Yeah, 32 LEDs do light things up a bit...
Folding Rig #1: SM H8QGi-F - 4x6172 Opterons @2520 Mhz w/CM 212+'s - 16GB Folding Rig #2 SM H8QME-2 - 4x8439 Opterons w/4x CM Hyper 101 + 8x 46 CFM 80MM Fans - 16GB Folding Rig #3 "The Ankle-Biter" - SM H8QM3-2 - 4x8425 Opterons + Nidec "Screamer" 80MM Fans - 16GB Folding Rig #4: X58 Classy3 - i7-990X @4.5 on 3x120 Juice, 12GB, 1x GTX980 K|NGP|N, 2x GTX680
|
johnerz
CLASSIFIED Member

- Total Posts : 2076
- Reward points : 0
- Joined: 2008/07/23 14:09:37
- Status: offline
- Ribbons : 7

Re:4p SM H8QME-2+ 8439 Opteron Build
2013/04/29 10:22:03
(permalink)
I expect it's designed to lure the moths in to the fan blades at night, they are a pain to clean up lol
|
TheWolf
CLASSIFIED Member

- Total Posts : 3800
- Reward points : 0
- Joined: 2007/11/14 16:05:23
- Location: Moss Point, Ms
- Status: offline
- Ribbons : 9
|
cp256
Superclocked Member

- Total Posts : 197
- Reward points : 0
- Joined: 2008/01/07 18:06:51
- Status: offline
- Ribbons : 4


Re:4p SM H8QME-2+ 8439 Opteron Build
2013/04/29 11:16:29
(permalink)
No moths in here!
The alligator clip is one of two on a weighted "third hand" that is holding a 96 CFM Xinruilian AC fan to spotcool the board.
Folding Rig #1: SM H8QGi-F - 4x6172 Opterons @2520 Mhz w/CM 212+'s - 16GB Folding Rig #2 SM H8QME-2 - 4x8439 Opterons w/4x CM Hyper 101 + 8x 46 CFM 80MM Fans - 16GB Folding Rig #3 "The Ankle-Biter" - SM H8QM3-2 - 4x8425 Opterons + Nidec "Screamer" 80MM Fans - 16GB Folding Rig #4: X58 Classy3 - i7-990X @4.5 on 3x120 Juice, 12GB, 1x GTX980 K|NGP|N, 2x GTX680
|
cp256
Superclocked Member

- Total Posts : 197
- Reward points : 0
- Joined: 2008/01/07 18:06:51
- Status: offline
- Ribbons : 4


Re:4p SM H8QME-2+ 8439 Opteron Build
2013/05/09 14:32:32
(permalink)
I have slowly been getting the basement folding rack built. I can't recall how many other things have gotten in the way over the past couple of weeks, but it's a lot! I got work out of the way early today so I would have a good sized solid block of time for construction. I need to get the rack finished so I can move the two 4p folders into the basement so I have room to build and set up the ankle biter 8425 4p without the wife flipping out. I managed to finish the framework so all that is left is slicing up some masonite and luan plywood for the two sides and the shelves, building a screen door for the front and cobbling up some sort of rear exhaust blower setup that ducts out the basement window for the summer. Since it will live in my basement shop area the screen door on the front will keep out the lions share of the detritus that occasionally floats around and more importantly, it will keep the nosey cats out of there. I finally shot a few pics of it to satisfy the "pics or it didn't happen" crew since I have mentioned it so many times and still haven't gotten it done yet. I'm no carpenter or cabinetmaker, but I can cut, glue and screw. It ain't a work of art, but it should do the job I need it to do adequately. 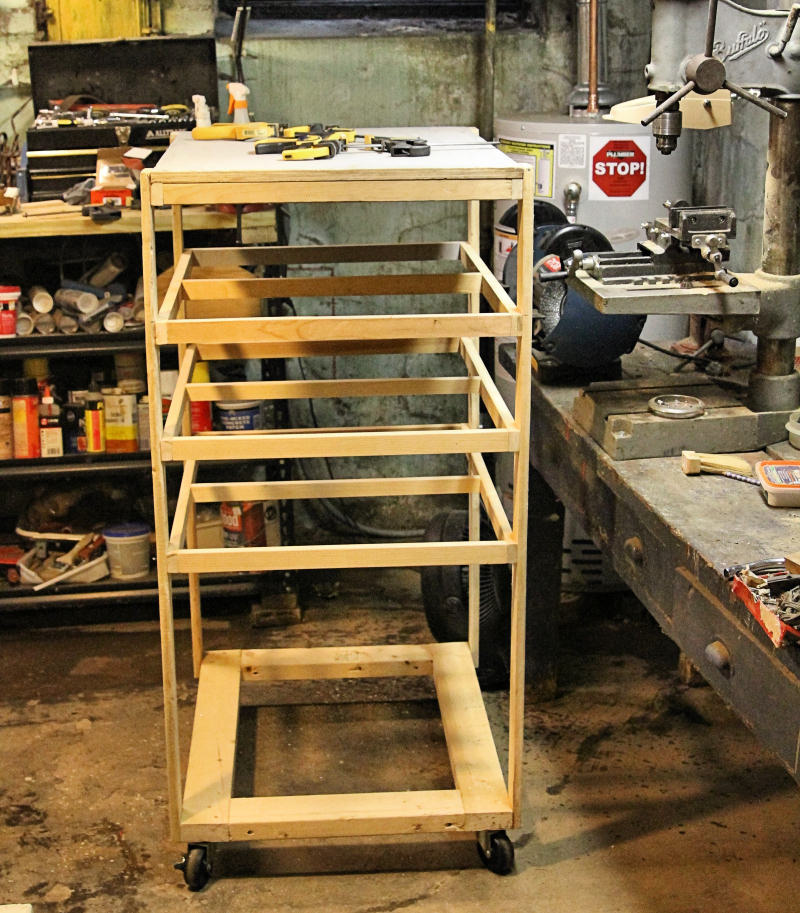 I started out with a sturdy base of 2x4's and added some heavy duty 3" casters as it is likely this thing will weigh a couple of hundred pounds when populated with servers and power equipment. I was going to use 1x4's for the uprights, but I already had a couple of 1x3 8 footers kicking around so I decided to see if those would be sturdy enough to do the job and to my surprise they are! The rack is 4 feet tall from the base to the top. without the casters. It is 30" deep and 24" wide on the inside. 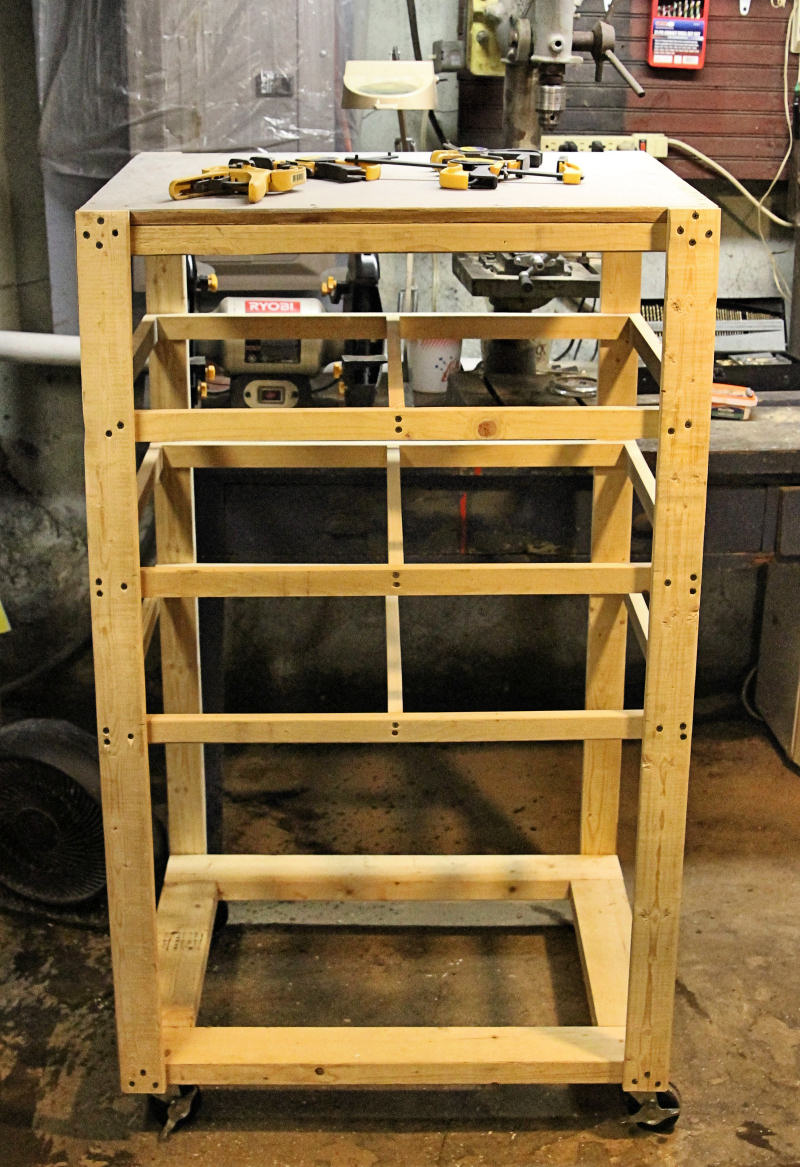 I topped it with a piece of 3/4" plywood I had kicking around, I would have preferred 1/2", but I didn't have any handy. It was already the right width and I only had to slice off about 2 inches on one end. My original idea was to screw and glue 1x2 shelf supports and that's what the 3/4" ply is sitting on at the top, but for the other three I just used drywall screws. The second from the top shelf frame was assembled outside of the unit and then screwed in place. That's why it only only has two screws through the uprights at each corner as the shelf frame itself was already screwed together. I simplified things on the last two frames by driving two screws at each corner straight through the 1x3's and shelf frame side 1x2's and into the front and rear 1x2's. Not only does it use one less screw at each corner, I think it is a lot stronger. 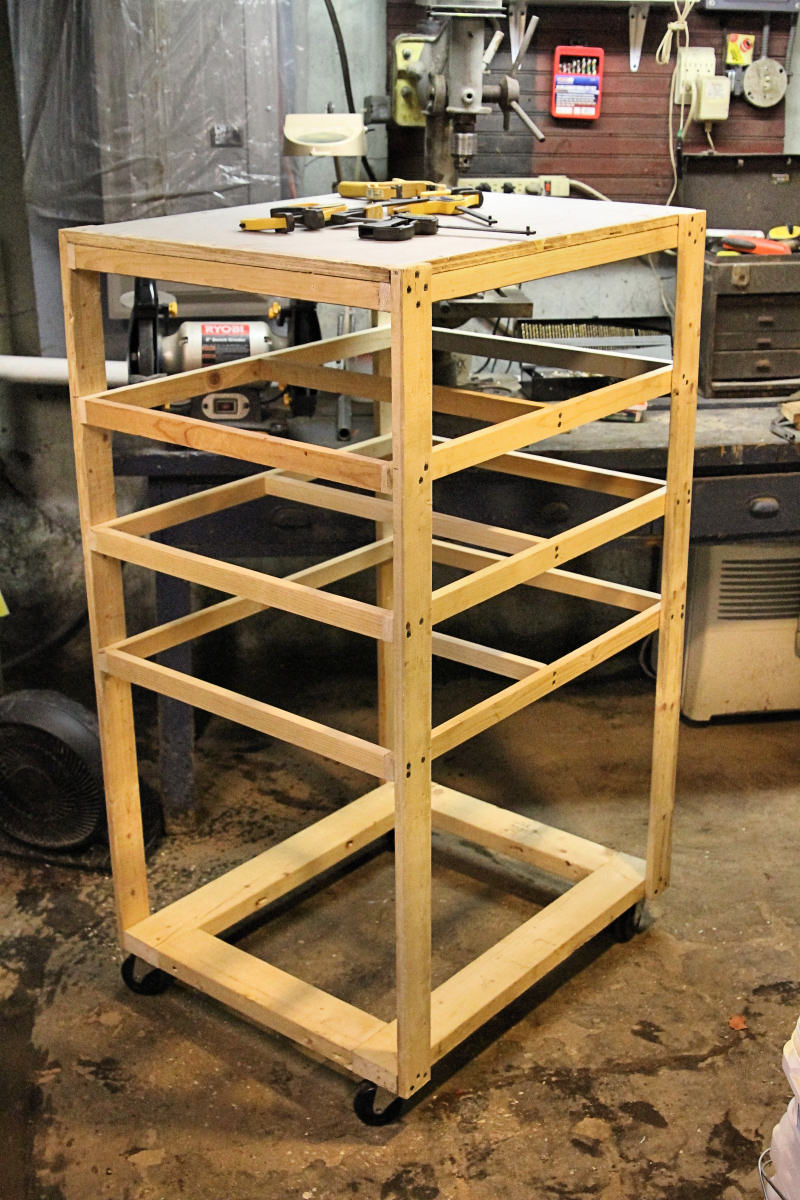 There are metal corner braces at the four rear corners to keep it from being a flexible flyer. I figured I would need to add more corner braces tied into the shelf frames, but after testing it with a heavy toolbox (~50 lbs) on top I don't think I'll need to. I had also planned on adding another pair of uprights centered on the sides, but I really don't think it will be necessary, especially when the the masonite is screwed to the sides. I added center supports to the shelf frames to minimize drooping with thin luan plywood or masonite shelves and to provide support when the shelves are slid partially out for maintenance work. There's room to add another shelf for a fourth nekkid server later on or the extra height can be used for tall UPSes like the Back-Ups XS units I have. Each shelf would actually hold two nekkid 4p server boards so I suppose it could eventually hold eight folders if my insanity worsens... 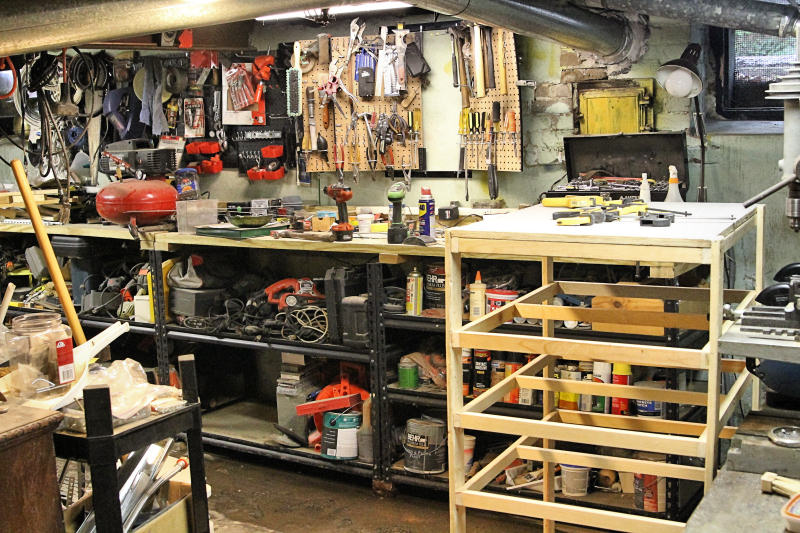 Here's a wider angle of my Mad Scientist basement shop area. I also have a garage shop for welding and working on bigger stuff like cars  The folding rack will live off camera to the left. I already ran a new 20 amp circuit and ethernet cable for it. I plan on priming it tomorrow and maybe cutting the shelves and sides. I haven't decided what the final color will be yet, maybe black. Oh yeah, the best part? I haven't yet had to buy anything yet for this rack. I had all the wood, hardware, screws and even the casters in stock! I even have masonite and screen to finish it. I might have to buy some paint depending on what I color I decide on. I know I have a can of black kicking around somewhere... Edit: Forgot to put in the dimensions
post edited by cp256 - 2013/05/09 15:07:40
Folding Rig #1: SM H8QGi-F - 4x6172 Opterons @2520 Mhz w/CM 212+'s - 16GB Folding Rig #2 SM H8QME-2 - 4x8439 Opterons w/4x CM Hyper 101 + 8x 46 CFM 80MM Fans - 16GB Folding Rig #3 "The Ankle-Biter" - SM H8QM3-2 - 4x8425 Opterons + Nidec "Screamer" 80MM Fans - 16GB Folding Rig #4: X58 Classy3 - i7-990X @4.5 on 3x120 Juice, 12GB, 1x GTX980 K|NGP|N, 2x GTX680
|
TheWolf
CLASSIFIED Member

- Total Posts : 3800
- Reward points : 0
- Joined: 2007/11/14 16:05:23
- Location: Moss Point, Ms
- Status: offline
- Ribbons : 9

Re:4p SM H8QME-2+ 8439 Opteron Build
2013/05/09 15:14:04
(permalink)
Nice work! Can't wait to see the finished product.
|